background image

Appendix A: Using the KVM Client 


106


c.


The card is not detected. You can emulate the card reinsertion to re-detect 

it. See 

Emulating the Card Reinsertion

 (on page 105). 


Disconnecting a Virtual Device 

When the KVM Client is closed, the virtual media connection to the target 

server is closed. Devices are also disconnected when switching the KVM Client 

to a different port or KX. 
You can also use the Disconnect or Unmount button without closing the 

current KVM Client. 


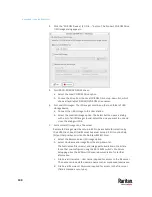
To disconnect the virtual peripheral device(s): 

1.


It is highly recommended to first "safely remove" or "eject" the virtual 

media drive that you want to disconnect from the target server. If you 

have enabled the read/write mode, it may result in data loss when you do 

not perform this operation.   


Refer to the user documentation of the target server's operating 

system for how to "safely remove" or "eject" a drive. 

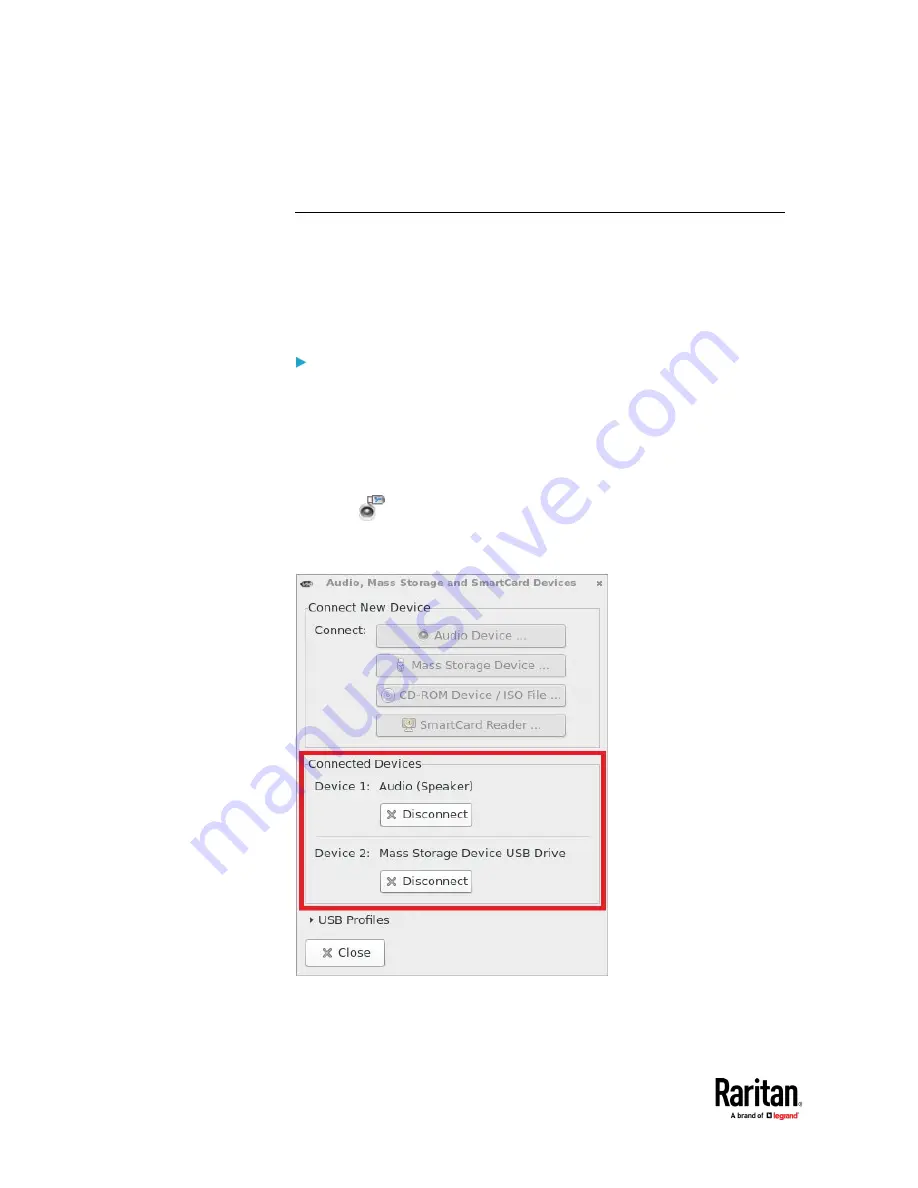
2.


Click 

  to open the "Audio, Mass Storage and SmartCard Devices" 

dialog. 

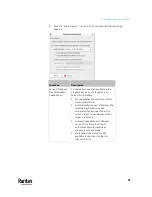
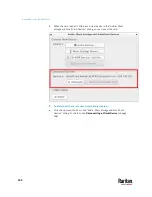
Existing virtual devices are listed in the Connected Devices section. 


The devices that you can no longer mount onto the target server are 

disabled. Hover your mouse for a tooltip showing reasons. 

Содержание Raritan Dominion User Station

Страница 1: ...Dominion User Station User Guide Release 4 4 0 Copyright 2021 Raritan Inc KXUST 1K v4 4 0 E July 2021 255 62 0011 00...

Страница 2: ...ns may cause harmful interference to radio communications However there is no guarantee that interference will not occur in a particular installation If this equipment does cause harmful interference...

Страница 3: ...ment now supports serial console windows Window Management on page 113 AutoLogin supported for CC SG mode This existing feature available now in CC SG mode Autologin on page 144 CC SG Auditing feature...

Страница 4: ...ect the Equipment 12 Step 2 Initial Log in to the Dominion User Station 14 Step 3 Add KX Devices without CC SG integration 14 Step 4 Access KVM Switches and Ports without CC SG integration 17 Step 5 U...

Страница 5: ...fying States of KVM Switches and Ports 63 Identifying External Media 64 Dual Video Port Status 64 Using Search 65 Using Filters 65 Port Scanner 68 Operating the Port Scanner 69 Scanner Options 71 Port...

Страница 6: ...gle Mouse Mode for Dual Monitor Targets 122 Managing Keyboard Macros 123 Executing Macros 124 Editing or Deleting Macros 125 Keyboard Macro Example 125 Audio Settings 126 Hotkeys and Gestures 127 Move...

Страница 7: ...S Mode and Certificate Settings 173 Strong Password Settings 175 User Blocking 177 Restricted Service Agreement 178 Display Settings 179 Customization 181 Customization Examples 184 Remote Control 185...

Страница 8: ...tcut Icons in the Main Toolbar 241 Keyboard Layout Icon 241 Volume Icon 241 Network Icon 241 Clock Icon 243 Location and Clock Time Format 244 Additional Features 247 Screen Unlocking 247 Factory Rese...

Страница 9: ...and Ports 257 Get Targets and Access Points 260 Handling of Access Client Sessions 262 Create Access Client Sessions 262 Close Access Client 262 Named Scenes aka Window Layouts 263 Restore a Named Sce...

Страница 10: ......

Страница 11: ...from customer LAN WAN networks Access to servers and devices on the network via RDP SSH and VNC is also supported Additional access to web applications can be added using WEB and ESXi access points No...

Страница 12: ...over IP connections to target servers Note The User Station CANNOT access a KVM port that is connected to a tiered KVM switch or a blade chassis server Support a HDMI or DisplayPort interfaced monito...

Страница 13: ...User Station Front View DKX4 UST 1 Microphone input 2 Audio output 3 Power LED 4 Hard disk LED 5 Power button 6 SD card reader not available 7 USB 2 0 and 3 1 ports KX4 UST and KX3 UST Version 2 mode...

Страница 14: ...Gigabit LAN port 1 5 Gigabit LAN port 2 6 7 USB Ports KX3 UST and KX3 UST Version 2 USB 2 0 3 0 KX4 UST only USB 3 1 8 DisplayPort DP video 1 9 DisplayPort DP video 2 10 HDMI video 11 Connector for ex...

Страница 15: ...pendix A Introduction 5 Introduction to the Software After powering on the User Station the Login Screen is shown After successfully logging in to the User Station the Main Screen displays Login Scree...

Страница 16: ...and Restart or Shut Down Login The login icon indicates the authentication type being used Local LDAP or CC SG A local authentication checkbox is available whenever the username admin is entered and w...

Страница 17: ...of this screen This toolbar shows the Main Menu shortcut icons and lists any open User Station and KVM Client windows The Port Navigator opens by default and can be closed then re opened from the Mai...

Страница 18: ...e 222 Default icons Description The Keyboard Layout icon indicates the current keyboard layout The default is en American English See Keyboard Layout Icon on page 241 This icon controls the volume See...

Страница 19: ...ding the possibility to disable them The key combinations listed below are the factory defaults for these hotkeys This guide dos not mention operations whose hotkeys are disabled by default Dominion U...

Страница 20: ...ied Ctrl Windows Left Right Up Down Grows the active window until it touches the nearest edge in the direction specified Edges are the outer edges of the other windows monitor edges in multi nonitor s...

Страница 21: ...ick Edit Preferences Select the hotkey you want to use for this port and click OK Options include Ctrl Shift F key Ctrl Shift letter Ctrl Alt number Ctrl Alt letter Shift Alt F key Shift Alt letter Ct...

Страница 22: ...tion see Overview on page 1 To make a basic connection 1 Disconnect all devices from power 2 Connect a USB keyboard and mouse to the front or rear USB ports 3 Optional Connect a microphone and speaker...

Страница 23: ...Appendix A Getting Started 13 DKX4 UST DKX3 UST Version 2 DKX3 UST Version 1 1 Power ON all devices...

Страница 24: ...SG integration If you are not integrating your User Station with CC SG proceed with this step If you want to integrate CC SG see CommandCenter Secure Gateway Integration on page 159 If the User Statio...

Страница 25: ...ing Started 15 Choose Main Menu User Station Configuration For the Main Menu s location see Main Menu Port Navigator Toolbar on page 7 2 Click New 3 Enter the data for the KX Device a KX III or KX IV...

Страница 26: ...r the User Station See Authentication of User Stations and KVM Switches on page 251 Note If you enter incorrect user credentials for a KVM switch you may be blocked if User Blocking has been enabled o...

Страница 27: ...and VNC targets This window is displayed by default If not launch it by pressing Ctrl Alt N or choosing Main Menu Port Navigator Note The User Station CANNOT access a KVM port that is connected to a t...

Страница 28: ...ow double click opens it in a new KVM Client window right click shows the KVM Client options Note The behaviors of the left mouse single and double clicks and middle button clicks can be customized Se...

Страница 29: ...ilable hot key macros and sends the selected macro to the target server Mouse Switches between single mouse and various dual mouse modes or synchronizes two mouse pointers onscreen Video Settings Adju...

Страница 30: ...s Auto sense Video Forces the video re sensing to adjust the video display Send Ctrl Alt Del Sends the hot key Ctrl Alt Del to the target server to ensure it is interpreted by that server Full Screen...

Страница 31: ...orization failed User has been actively disconnected by an administrator KX device version not supported by the client Note In FIPS mode the User Station CANNOT connect to any targets on a KX3 or CC S...

Страница 32: ...ly assigns the IP address only DNS comes from manual input Manual This option configures static addressing Click Add to specify at least one IPv4 address netmask and gateway Disabled IPv4 networking i...

Страница 33: ...een Unlocking on page 247 Restart Restarts the User Station Shut Down Powers off the User Station You should always use the software command as the only method to power off your User Station Warning D...

Страница 34: ...h the VESA mount securely to the back of your monitor using four appropriate screws 3 Align two screw holes on each side of the Dominion User Station with those on the VESA mount 4 Tighten two sides s...

Страница 35: ...in a 19 inch data center rack you must purchase the L type rackmount kit from Raritan One rackmount kit contains two L type brackets the cable support bar and a number of screws The following diagram...

Страница 36: ...port bar to the back end of the L type brackets using two of the included screws Letter Item A Cable support bar B Front arms of the L type brackets 3 Attach the L type brackets to the rack through th...

Страница 37: ...dCenter Secure Gateway Integration on page 159 In This Chapter User Station Configuration 27 Adding KVM Switches 29 Editing KVM Switches 31 Deleting KVM Switches 32 Importing KVM Switches 33 Configuri...

Страница 38: ...d or Import KX devices and manage them Targets Add and manage Targets See Managing Targets and Access Methods on page 42 4 Import button and New button By default the KX Devices option is selected and...

Страница 39: ...nt you can add your KVM switches with single sign on capability Note To add a KX device that is under CC SG management make sure Allow direct access is checked for the device in CC SG then add the KX...

Страница 40: ...nter the required information See Step 3 Add KX Devices without CC SG integration on page 14 Click Save and the new KVM switch s content is shown Important If Allow LDAP Single Sign on is enabled LDAP...

Страница 41: ...e For the difference between a KVM switch s and the User Station s user credentials see Authentication of User Stations and KVM Switches on page 251 To view the KVM switch s ports Click the desired KV...

Страница 42: ...nabled on that KVM switch and too many incorrect attempts are made When this occurs contact the KVM switch s system administrator for help Deleting KVM Switches The final button in the Actions column...

Страница 43: ...already exists in the system the import updates the credentials as given in the CSV You can also optionally specify customized Discovery port and HTTPS port for each device CSV file format The CSV fi...

Страница 44: ...le you want to import The Bulk Import page opens to display the file details File name and size Errors if any with line number if appropriate Total number of KX Devices to be added Number of KX Device...

Страница 45: ...ts 35 Note If errors are listed the import button is disabled Correct the file and try again 4 Click Start the Import Update in the details dialog Import progress shows in the dialog When complete a s...

Страница 46: ...ile Check the resulting CSV file if you are not sure Commenting out Use the hashtag character in the first position of a line to comment out the line Hostnames are not allowed to contain 192 168 2 104...

Страница 47: ...nfigure the General Settings Checkbox Function Hotkey Assign a hotkey combination for quickly accessing this KVM port Available options include Ctrl Shift character Ctrl Alt character Shift Alt charac...

Страница 48: ...fault target window settings click the Access Client Settings button See Access Client Settings on page 118 for details on each If you want to override any of those settings for the port you are confi...

Страница 49: ...ation hotkeys See Hotkeys for Controlling the User Station Besides you must NOT use the hotkeys specified in the Desktop Settings for port access See Desktop Settings Port Data Retrieval Status An ico...

Страница 50: ...er credentials are entered for the KVM switch The presented certificate of the device cannot be verified when certificate checking is enabled Network connectivity issues For example the selected KVM s...

Страница 51: ...n the Dominion User Station DSAM ports appear on the User Station when the KX device is added similar to KVM ports Your serial ports are labeled Ser to show the port type The number label of a DSAM po...

Страница 52: ...pendent ports are treated as if they were part of a dual monitor port group When a KVM switch is added Dominion User Station automatically detects ports and creates a Target with a KVM access method f...

Страница 53: ...argets and access methods 1 In Main Menu open the User Station Configuration window then click Targets 2 The Targets list appears Click New 3 In the Add Access page you will name the Target and add th...

Страница 54: ...ti KVM Access with Dominion KX4 101 devices on page 48 SSH VNC and RDP Access 1 Add a target then add the access method Adding Targets and Access Methods on page 43 2 When Type is selected as SSH VNC...

Страница 55: ...web user interface of another KVM device See Remote Control via Web Browser on page 185 The web client offers simple navigation only and does not support Java plugins file upload download audio video...

Страница 56: ...Embedded Host Client and must be version 6 0 or higher Upon launching the Remote Console of the virtual machine is shown Single sign on is not supported so you must enter credentials each time you lau...

Страница 57: ...n be found in the address bar of a browser where the URL to the virtual machine is displayed The ID is the last component in the URL See example images in host view and remote console view 5 Select Us...

Страница 58: ...d in Dominion User Station To configure the Multi KVM access method select the KVM ports that you want to group virtually and set one of the supported orientations Once Multi KVM access is created the...

Страница 59: ...e access method Adding Targets and Access Methods on page 43 2 Select Multi KVM as the Access Type 3 Select the orientation for the port group 4 In the Primary Port and Secondary Port fields you must...

Страница 60: ...d Access Methods Targets and Access methods are listed in the User Station Configuration window You cannot delete KVM access but all other access methods can be deleted A Target must have at least one...

Страница 61: ...t or access point See Configuring KVM Ports on page 36 for details on KVM port settings See Configuring Access Settings on page 52 for all other types Edit user credentials for any access method Delet...

Страница 62: ...settings in each category Unique settings for each access type are outlined in the examples below By default Dominion User Station uses Target Window Settings that are valid for all ports and access p...

Страница 63: ...Appendix A Managing Targets and Access Methods 53 VNC Access Settings...

Страница 64: ...Appendix A Managing Targets and Access Methods 54 SSH Access Settings...

Страница 65: ...Appendix A Managing Targets and Access Methods 55 WEB Access Settings...

Страница 66: ...sessions When opening a session Open in new Open in current is available for KVM and VNC RDP and SSH only support Open in new VNC Only RFB protocol versions 3 3 to 3 8 are supported Proprietary exten...

Страница 67: ...ontrol Panel or use the Windows Search dialog Windows Key R then type in gpedit msc Browse to Local Computer Policy Computer Configuration Administrative Templates Windows Components Remote Desktop Se...

Страница 68: ...in the Devices panel 1 Open the Devices panel Once opened the panel color turns gray 2 Click a KVM switch 3 Click a KVM or Serial port Note The User Station CANNOT access a KVM port that is connected...

Страница 69: ...uration In This Chapter Port Navigator 59 Identifying States of KVM Switches and Ports 63 Identifying External Media 64 Dual Video Port Status 64 Using Search 65 Using Filters 65 Port Navigator The Po...

Страница 70: ...M switch and port states See Identifying States of KVM Switches and Ports on page 63 2 Favorite Access Devices and Targets Favorite Access panel Shows a list of the favorite KVM ports you have configu...

Страница 71: ...Access to use KVM RDP VNC SSH WEB ESXi Next to the Target name all configured access methods are listed Click the access method directly to open the appropriate client If there are multiple Access Po...

Страница 72: ...lt is to show items whose status is Up See Using Filters on page 65 For dual port video the name of the dual port video group is displayed instead of the port names Dual port video groups whose primar...

Страница 73: ...ying States of KVM Switches and Ports In the Port Navigator window different icons and colors are applied to indicate current states of the added KVM switches and ports Icon and color information is a...

Страница 74: ...o make a connection to both ports The secondary port cannot be connected to directly so its status is not reflected in the Navigator If the secondary port has Status Down there is still a dual monitor...

Страница 75: ...s KVM ports displayed prior to using the Search function Note The User Station will NOT search the KVM ports of those unselected KVM switches in the Devices panel To search for a KVM port only click t...

Страница 76: ...e is normal Error The KVM switch cannot communicate with the User Station Unknown The KVM switch can communicate with the User Station but cannot determine its device state Checkbox KVM ports or targe...

Страница 77: ...Appendix A Navigation and Access 67 2 For Target Access Type select the access types you want to include 3 When completed click Filters again to hide the options...

Страница 78: ...o an external USB device when enabled This is useful for forensic or surveillance purposes See Port Scanner Settings on page 72 for details on configuration and user privilege Launch the Port Scanner...

Страница 79: ...is created at the start and end of the scan session The Port Scanner functions in both CC SG mode and non CC SG mode Window Management functions do not apply to the Port Scanner window In This Chapter...

Страница 80: ...Appendix A Port Scanner 70 2 The thumbnail preview shows all included ports Choose vertical or horizontal placement in the scanner options...

Страница 81: ...is included the next time the scanner is started Scanner Options The port scanner can be configured to set intervals and delays thumbnail orientation and pause behavior See Port Scanner Settings on pa...

Страница 82: ...saved is the thumbnail image from the scanner Sub directories are created on the USB drive per KX device named after the device port by number and name Images are named by timestamp Duplicate KX devi...

Страница 83: ...rt Scanner 73 indicates the setting is disabled 3 Click Edit to make changes 4 To set Intervals and Delays Port Display Interval 1 300 sec Select the number of seconds to display each port before swit...

Страница 84: ...box to turn the feature on Make sure a USB drive is accessible Make sure you have the Record Scanner Snapshots privilege 6 To configure remaining preferences Thumbnails Orientation Select Vertical or...

Страница 85: ...e grid view works for both CC SG and non CC SG The port scanner grid view can show ports from more than one KX Thumbnails can be arranged in a view as a grid without scroll bars The thumbnails are aut...

Страница 86: ...Appendix A Port Scanner 76 The thumbnails section fills the entire space if preferred the live preview section can be hidden...

Страница 87: ...116 The server or PC connected to a KVM port is called the target server The Dominion User Station s KVM Client settings are configured through the toolbar only No menu bar is available In This Chapt...

Страница 88: ...ection settings are the optimal settings for video performance most of the time Do NOT make changes unless required See Default Connection Properties on page 80 Setting Description Optimize for Determ...

Страница 89: ...tored persistently for the accessed port To view connection information Click the Info tab in the same dialog Item Description Device Name The KVM switch s name Host Port The KVM switch s IP address a...

Страница 90: ...ned to maximize text readability This setting is ideal for general IT and computer applications such as performing server administration Video Mode defaults to Full Color 2 Video frames transmit in hi...

Страница 91: ...can result in higher frame rates When Text Readability is selected as the Optimized setting the four rightmost modes provide reduced color resolution or no color at all These modes are appropriate for...

Страница 92: ...nce to the target server you are accessing Click Send Ctrl Alt Del OR click Send LeftAlt Tab This hotkey macro switches between open windows on the target server you are accessing Warning If you physi...

Страница 93: ...icks are directly transmitted to the target server Click to select one mouse command or mode Single Mouse Cursor is for single mouse mode Absolute Automatic and Standard are the dual mouse modes Impor...

Страница 94: ...sue still cannot be resolved enter the Absolute or single mouse mode See Single Mouse Cursor on page 84 and Absolute Mouse Mode on page 85 Single Mouse Cursor In single mouse mode you only use the tar...

Страница 95: ...get server s mouse is set to a different acceleration or speed This mode is supported on target servers with USB ports and is the default mode for virtual media CIMs Use of virtual media CIMs on targe...

Страница 96: ...mouse cursor shape should be normal and not animated The target server s mouse speeds should not be set to very slow or very high values Advanced mouse properties such as Enhanced pointer precision o...

Страница 97: ...you have an issue with mouse synchronization 1 Verify that the selected video resolution and refresh rate are among those supported by your User Station The KVM Client s Connection Properties dialog d...

Страница 98: ...detects the target server s video settings resolution refresh rate and redraws the video screen Clicking in the toolbar results in the same video re sensing function Best Possible Video Mode The User...

Страница 99: ...and applies to the current connection only Automatically Calibrate Color on Connection Causes the User Station to automatically update the color calibration once connected to a target server Advanced...

Страница 100: ...a new numeric value in the text box to adjust corresponding settings Setting Description Clock Controls how quickly video pixels are displayed across the video screen Changes made to clock settings ca...

Страница 101: ...eo image for the active target server Horizontal Offset Controls the horizontal positioning of the target server display on your monitor Vertical Offset Controls the vertical positioning of the target...

Страница 102: ...nal Contrast Red Controls the red signal contrast Contrast Green Controls the green signal contrast Contrast Blue Controls the blue signal contrast Peripheral Devices and USB Settings Click to open th...

Страница 103: ...ee Virtual Media on page 96 SmartCard Reader This button connects a smart card reader to the target server See SmartCard Reader on page 102 Connected Devices This section lists all devices which have...

Страница 104: ...cting Audio Devices If an audio device is physically connected to the User Station you can virtually connect it to one or multiple target servers simultaneously Note Prior to connecting the audio devi...

Страница 105: ...t server select this checkbox Set the playback audio format in the Audio Format field Automatically Connect at Startup The selected playback device will automatically be connected to the current targe...

Страница 106: ...virtual media VM Virtual media extends KVM capabilities by enabling target servers to remotely access media from the User Station and network file servers With this feature media mounted onto the Use...

Страница 107: ...s on page 31 A USB connection through the virtual media CIM must exist between the KVM switch and the target server Target server requirements You must choose the correct USB profile for the target se...

Страница 108: ...Click to open the Audio Mass Storage and SmartCard Devices dialog 2 Click the Mass Storage Device button The Connect Mass Storage Device Image File dialog appears 3 Choose the drive from the Local US...

Страница 109: ...ad Write is not available in the following situations The drive is write protected The user credentials you entered for the KVM switch does not allow Read Write permission on the KVM port you are acce...

Страница 110: ...dialog with OK 5 For remote ISO images on a file server Remote ISO images must be setup in KX3 to be available for selection by the KVM Client See Virtual Media File Server Setup in KX III s online h...

Страница 111: ...pplied to the target server These drives are accessible for the duration of the KVM session For example you can mount a specific CD ROM use it and then physically disconnect it when you are done The C...

Страница 112: ...readers Refer to the topic titled Supported and Unsupported Smart Card Readers in the KX III KVM switch s user documentation which is accessible from its application or the Dominion KX III section of...

Страница 113: ...er Restriction Caused by KX III KVM Switch Settings 4 Select the desired card reader from the list shown in the dialog To automatically connect the selected card reader to the current target server wh...

Страница 114: ...l device in the Audio Mass Storage and SmartCard Devices dialog you can insert the card To disconnect the card reader from the target server Click the Unmount button in the Audio Mass Storage and Smar...

Страница 115: ...d or emulate the card reinsertion to solve the issue The scenario where you must physically remove and reinsert the card a The smart card reader with a card inserted is physically connected to the Use...

Страница 116: ...o disconnect the virtual peripheral device s 1 It is highly recommended to first safely remove or eject the virtual media drive that you want to disconnect from the target server If you have enabled t...

Страница 117: ...ks fine for most target servers In case any of your target servers requires a special USB profile to have the remote audio devices virtual media and card reader work properly select a different USB pr...

Страница 118: ...get server configurations Additional profiles are made available to meet the specific needs of other commonly deployed server configurations for example Linux and Mac OS X There are also a number of p...

Страница 119: ...III KVM switch a PDU s outlet s must be associated with the selected KVM port The user credentials you entered for the KVM switch grant you the power control permission See the KVM switch s user docu...

Страница 120: ...ice state is listed 3 Enabled devices can be controlled using the Actions options Turn External Device On Off Click On or Off to control terminal output relay Pulse External Device Sends a pulse to th...

Страница 121: ...ick Retain Window Size The Retain Window Size setting prevents changes made to the resolution of the target from affecting the KVM client s window size The KVM client will display scroll bars or black...

Страница 122: ...bars are invisible and its toolbar displays for several seconds only before disappearing from the screen To enter full screen mode 1 Click Full Screen Mode or click 2 A message indicating that the too...

Страница 123: ...ator and the Port Scanner are not included in window management If two monitors are connected to the User Station the feature works separately on each monitor Windows are not moved from one monitor to...

Страница 124: ...endix A Using the KVM Client 114 To use Window Management 1 Choose Main Menu Window Management then select an option OR 2 Open the Port Navigator then open the Window Management panel to select an opt...

Страница 125: ...nminimized Revert Tiling Undo last tiling operation and restore previous window sizes Previously minimized windows will be minimized again Minimize Client Windows Minimizes all client windows from des...

Страница 126: ...her Window title group_name port_name When one window is closed the other one is closed automatically Switching to and from Dual Video ports is not possible When switching from a single port to a Dual...

Страница 127: ...erences to customize the following user settings In This Chapter Access Client Settings 118 Managing Keyboard Macros 123 Audio Settings 126 Hotkeys and Gestures 127 Window Layouts 130 Port Scanner Set...

Страница 128: ...1 If not displayed launch the User Station Configuration window See User Station Configuration on page 27 2 Click Preferences Access Client Settings The Access Client Settings page opens showing the...

Страница 129: ...ns on page 112 Show Tool Bar Show or hide the client tool bar Start in Full Screen Mode Enable or disable full screen mode for KVM sessions To exit full screen mode press Ctrl Alt F in the KVM Client...

Страница 130: ...ferences for RDP sessions Disabled Use 2 monitors Use 3 monitors Use all monitors Desktop Scaling Select a desktop scaling percentage for RDP sessions Console Target Window Settings These options appl...

Страница 131: ...full screen mode for web sessions For web sessions the full screen hot key is F11 To exit full screen mode press Ctrl Alt F in the KVM Client Launch Settings These options configure the mouse button...

Страница 132: ...ng the Warn if a Virtual Media Connection is about to be disconnected checkbox will cause a warning message to display if this event occurs 1 Click Save Note additional options when settings have been...

Страница 133: ...he user who created them can see and use these macros To create a keyboard hotkey macro 1 If not displayed launch the User Station Configuration window See User Station Configuration on page 27 2 Clic...

Страница 134: ...age 125 4 If needed make changes to the keys shown in the right box To resort the key commands select a key command and click or to move it up or down To remove a key command select it and click 5 Cli...

Страница 135: ...disabled macro shows To edit a keyboard macro 1 Click the desired macro s button 2 Make necessary changes to the information shown See Managing Keyboard Macros on page 123 To delete a keyboard macro 1...

Страница 136: ...audio appliances used by the User Station 1 If not displayed launch the User Station Configuration window See User Station Configuration on page 27 2 Click Preferences Audio Settings The Audio Settin...

Страница 137: ...function it is assigned to Window Management Hotkeys and Gestures Configure hotkeys to close windows switch between windows or move them around on your desktop When Switch Keys is enabled you can use...

Страница 138: ...tures The Hotkeys and Gestures page opens showing the current settings for all categories 3 Scroll down and click Edit to make changes To enable select a key combination for the function from its drop...

Страница 139: ...e screen corner in the specified direction on the monitor Ctrl Alt 3 on the keypad Ctrl Alt 7 on the keypad Ctrl Alt 9 on the keypad Ctrl Shift Move the window in the specified direction to the neares...

Страница 140: ...ch keys see Hotkeys and Gestures on page 127 Window Layouts The window layouts feature allows you to save layouts of running access client windows so that the specific layout can be restored upon sele...

Страница 141: ...an error message that their target cannot be connected To manage layouts The tools for window layout management allow you to set a layout to be restored upon login rename or delete layouts and assign...

Страница 142: ...he User Preferences Port Scanner Settings page When enabled snapshots are stored on an accessible USB device The image saved is the thumbnail image from the scanner Sub directories are created on the...

Страница 143: ...ser Preferences 133 indicates the setting is disabled 3 Click Edit to make changes 4 To set Intervals and Delays Port Display Interval 1 300 sec Select the number of seconds to display each port befor...

Страница 144: ...e checkbox to turn the feature on Make sure a USB drive is accessible Make sure you have the Record Scanner Snapshots privilege 6 To configure remaining preferences Thumbnails Orientation Select Verti...

Страница 145: ...pen a port into a full KVM session 7 Click Save Change Password You can change your own password To change your password 1 If not displayed launch the User Station Configuration window See User Statio...

Страница 146: ...tasks In This Chapter Users 137 User Groups 140 Autologin 144 LDAP 145 CommandCenter Secure Gateway Integration 159 Trusted Certificates 166 Server Certificate 169 Security Settings 173 Display Setti...

Страница 147: ...rivileges for other users to operate and administer the User Station Note that the Dominion User Station s user profiles determine the permissions users are granted to have on the User Station instead...

Страница 148: ...ion Login User name for logging in to the User Station 2 to 255 characters Restricted character colon Authenticate via LDAP Select this checkbox if this user will be authenticated via LDAP See LDAP on...

Страница 149: ...Deleting Users To view existing user profiles in the User Station Configuration window click Administration Users Select an option in the Type field to show the desired user types Note that this fiel...

Страница 150: ...r select the checkboxes for users you want to delete and click Delete Selected 2 Click OK on the confirmation message User Groups A user group determines the privileges its members can have There are...

Страница 151: ...ield Description Name Type a name for the new user group Privileges Assign one or multiple privileges to the new user group See Privileges on page 141 4 Click Save and the new user group s data is sho...

Страница 152: ...tings Device Administration Log in to the User Station Change Preferences permission Device Access permission ESXi Access WEB Access VNC Access RDP Access and SSH Access permissions KX device addition...

Страница 153: ...he user profile the user s login name is shown See Users on page 137 Each user group shows a maximum of five users in this view Click each user group s name to view its details You can delete any user...

Страница 154: ...gin is supported in both CC SG integration mode and non CC SG integration mode Note To configure Autologin for keyboard mouse sharing setups see Configuring Keyboard Mouse Sharing on page 192 To confi...

Страница 155: ...r groups from the LDAP server into the User Station after performing an LDAP search for user group objects See Searching for LDAP Users and Groups on page 155 User names for this LDAP authentication m...

Страница 156: ...he LDAP authentication mode Adding LDAP Servers To apply external LDAP authentication at least one LDAP server must be added to the User Station If you are not familiar with the LDAP settings consult...

Страница 157: ...entication priority when there are multiple LDAP servers If adding more than one LDAP server you can change the priority by selecting the sequential number of any existing LDAP server That existing LD...

Страница 158: ...host name or IP address Use TLS SSL Select this checkbox if the security connection is required for the LDAP server Port TCP port for the LDAP authentication whose default is either of the following...

Страница 159: ...Appendix A Administration Features 149 5 Enter the bind credentials in the Bind section...

Страница 160: ...h starts at the directory level denoted by the Base DN One Searches one level below the base DN with the base excluded Subtree Searches all levels below the base DN including the base Search Credentia...

Страница 161: ...o no search Select this checkbox if the LDAP bind operation shall be performed with a DN derived from a search operation for the user who s trying to log in Usually this checkbox is Deselected for the...

Страница 162: ...is used to match local group names Group Member Attribute The attribute of the LDAP group class which denotes the users who belong to a group Its value must be either one below A user s DN Value of t...

Страница 163: ...ve column indicates that LDAP server is enabled indicates that LDAP server is disabled To modify an LDAP server setting 1 Click the desired LDAP server s button The Edit LDAP Server page opens 2 Make...

Страница 164: ...rs can log in See Users on page 137 When that page shows the LDAP authentication is currently enabled While enabled all users are authenticated via the LDAP servers so only LDAP users can log in The o...

Страница 165: ...ers or user groups as needed To search for LDAP user or group objects 1 Click Administration LDAP The Search for LDAP Users page opens If the Search button is disabled enable the LDAP authentication f...

Страница 166: ...which is the starting point of the LDAP search Search Filter Search criteria for finding LDAP user objects within the directory tree Search Scope The depth to search for LDAP user or group objects whi...

Страница 167: ...these options are disabled Max Search Results The default limitation is 1000 If the found result entries are more than the upper limit you set those result entries exceeding the maximum are not displa...

Страница 168: ...e 157 for help with this setting LDAP Login Failure Message Certificate hostname verification added in release 1 3 may cause an error upon upgrade if LDAP servers were added using IP address instead o...

Страница 169: ...with your CC SG username and password Dominion User Station uses your CC SG authorization information to automatically show the nodes you have access to in the Dominion User Station Navigator Your per...

Страница 170: ...CC SG devices To enable CC SG integration 1 If not displayed launch the User Station Configuration window See User Station Configuration on page 27 2 Click Administration CC SG 3 In the Edit CC SG Se...

Страница 171: ...ndix A Administration Features 161 4 For the setting to take effect you must log out of Dominion User Station then login again with your CC SG credentials See Logging in with CC SG Integration on page...

Страница 172: ...an extra checkbox for local users Authenticate locally checkbox This checkbox appears when the username admin is entered so you can login with the standard Dominion User Station admin user Users who n...

Страница 173: ...KVM switches that are configured locally on the Dominion User Station do not appear when you are logged in with a CC SG user account Your nodes and interfaces are detected automatically Each supporte...

Страница 174: ...Filters and Help Search Searches for ports switches or interfaces containing the search word s See Using Search on page 65 Additional Filters Determines which items are displayed in this window based...

Страница 175: ...method directly to open the appropriate client If there are multiple Access Points of the same type defined then the most recently added added Access Point is opened Right click on the Target or clic...

Страница 176: ...stall this CA certificate onto the User Station When FIPS mode is enabled all encrypted connections to KX III KVM switches are processed using the FIPS accredited cryptographic code and the authentici...

Страница 177: ...alled certificates click Back to all Certificates To remove this certificate click Remove and then OK 5 If multiple certificates are needed repeat the same steps to install more Removing an Installed...

Страница 178: ...te Failure Messages In the FIPS mode and when Check KX Device Certificates is enabled if the KVM connection failure is resulted from the absence of a valid KVM switch certificate on the User Station a...

Страница 179: ...e on page 170 Create a private key and a self signed certificate in the Dominion User Station interface See Create Self Signed on page 171 Note It is strongly recommended to update the preinstalled de...

Страница 180: ...valid does not match the rules or cannot be parsed otherwise an error message displays To import private key and certificate 1 Plug a USB drive containing the appropriate certificate file in the root...

Страница 181: ...you will install it To create a self signed certificate 1 Click Administration Server Certificate 2 Click the Create Self Signed button 3 Enter certificate details and key parameters Country Code Must...

Страница 182: ...Appendix A Administration Features 172 4 Click Create 5 The certificate and key details display If you approve click Install to use this certificate Installing the certificate requires a reboot...

Страница 183: ...mode is enabled all encrypted connections to KX III KVM switches are processed using the FIPS accredited cryptographic code and the authenticity of those KVM switches is checked via their certificate...

Страница 184: ...s on page 166 2 Click Edit and then select or deselect the checkboxes for FIPS or Certificate Settings Note If certificates have not been installed yet you will see a message Click Manage Certificates...

Страница 185: ...ords can be enabled to specify length and characters required and limit reuse of old passwords To configure password settings 1 Click Administration Security Settings The Security Settings page opens...

Страница 186: ...al criteria specified Minimum Password Length The minimum number of characters required in a password Enforce characters Users must include at least one of the specified characters Lower Case Upper Ca...

Страница 187: ...a user is blocked Unblocking Users are automatically unblocked after the specified amount of time or a System Administrator user can unblock the user early in the Users configuration The blocking sta...

Страница 188: ...ck Save Restricted Service Agreement After the Restricted Service Agreement feature is enabled the agreement s content is displayed on the login screen Users must select a checkbox to agree to the sta...

Страница 189: ...ded 5 Click Save Display Settings The User Station display can be configured to lock the screen or turn off the monitor in certain conditions Display settings include screen locking and scaling The se...

Страница 190: ...itor turn off after the specified idle time period 4 To lock the screen when idle check the Lock Screen when idle checkbox Lock Screen can only be enabled with Turn off Monitor after idle timeout The...

Страница 191: ...ely the image file is broken Replace with a different image file Image requirements Desktop background image JPG PNG or SVG images up to 128 MB Solid background color that is not transparent Applicati...

Страница 192: ...is currently in use the file name is listed while non customized sections will show Default Image files found on the USB device are listed as options Click the Apply button for the image file you wan...

Страница 193: ...and there are 2 image files found on the connected USB device Both listed images meet the requirements for a background image as JPG files under 128MB 4 For Login Screen customization you can also en...

Страница 194: ...Station Configuration In this example the customized application logo was just saved Customized login screen In this example a customized login screen was configured The login screen contains the cust...

Страница 195: ...S JSON to control Dominion User Station programmatically from customer applications There are two main use cases to launch sessions or window layouts and or to perform administrative tasks Remote Cont...

Страница 196: ...nable Unrestricted Navigator to allow additional features The Unrestricted Navigator can launch sessions in non full screen mode and show multiple sessions at the same time Windows Layout and Window M...

Страница 197: ...rt 8443 The API is not available on regular remote control ports 80 and 443 The API uses JSON documents for both POST request data method parameters and responses One checkbox on the Remote Control pa...

Страница 198: ...If the API user is already logged in on the local console the API will take over the session If no user is logged in on the local console the API user will be automatically logged in If another user...

Страница 199: ...ring Keyboard and Mouse Sharing allows you to control several Dominion User Stations by one keyboard and mouse that is connected to one of the Dominion User Stations This can be useful in a control ro...

Страница 200: ...Appendix A Administration Features 190 KX3 User Station 4 Monitor Vertical Configuration Example...

Страница 201: ...her horizontally or vertically from screen to screen Each Dominion User Station can have its own extended desktop with multiple monitors so the Mouse will move from the ends of each extended desktop E...

Страница 202: ...a client Dominion User Station 2 Click Administration Keyboard Mouse Sharing 3 Click Edit then select Enabled 4 Select Client in the Mode field 5 Select the Share Window Layouts option to allow saved...

Страница 203: ...in out Users option to automatically login logout to all user stations connected by keyboard mouse sharing while using the configuration 7 In the Controller Settings enter a Screen Name to identify th...

Страница 204: ...Appendix A Administration Features 194 9 Click Save...

Страница 205: ...w language you must reboot to fully update the language in every area Note that some text is not available in all languages Language setting is part of backup and restore but upon factory reset the la...

Страница 206: ...Appendix A Administration Features 196 3 Click Save You will see an immediate change in the GUI but you must reboot the Dominion User Station to ensure a full language update...

Страница 207: ...ation window click Maintenance to perform the following User Station maintenance tasks In This Chapter Event Log 198 Backup and Restore 204 Factory Reset 208 Software Update 209 Support 210 About this...

Страница 208: ...onveniently read or filtered To search and view the Event Log 1 If not displayed launch the User Station Configuration window See User Station Configuration on page 27 2 Click Maintenance Event Log Th...

Страница 209: ...is logged in description when applicable Event Log Archives Event Log records can be archived to clear the database Event Log archives are always created and stored inside the User Station The file cr...

Страница 210: ...Choose how records will be included in the archive Age or Date In the Age field select a file age to include 1 week 1 month 2 months 6 months 1 year default 2 years 5 years 10 years Or select older t...

Страница 211: ...Appendix A Maintenance Features 201 6 Click OK in the confirmation dialog...

Страница 212: ...in event log Please archive event log entries or auto archiving will be started once event log grows above 3 Million entries Critical threshold The critical threshold is 3 million records An automacti...

Страница 213: ...t displayed launch the User Station Configuration window See User Station Configuration on page 27 2 Click Maintenance Event Log The Event Log page opens 3 Click Archives The Event Log Archives page o...

Страница 214: ...ce to write the new archive Deletion of each archive is logged into the Event Log Backup and Restore The User Station allows you to back up the latest settings and data with one click By default the b...

Страница 215: ...the backup file with the filename software version and file size shown on the screen To restore to the previous settings and data 1 If there are any existing backup files the Backup Archives page lis...

Страница 216: ...estore page opens When the User Station detects the connected USB drive the export button appears in the Actions column 3 Click the button of the desired backup file The selected file is exported to t...

Страница 217: ...8 digits Examples Backup filename with version number and date time stamp KXUST_backup_4 1 0 5 284_20191014090046 dat The software version is 4 1 0 5 284 The date is 20191014 October 14 2019 Backup fi...

Страница 218: ...ult settings User groups other than the built in user groups Built in user groups reset to factory default settings All user preferences settings System settings Trusted certificates Server certificat...

Страница 219: ...her than the software version currently running on your User Station See About this Device on page 213 Important It is strongly recommended to back up all data and settings and export to a USB drive p...

Страница 220: ...ge 10 When the upgrade completes the User Station reboots and then the login screen is shown Note If the software upgrade fails and the User Station is unable to operate contact Raritan Technical Supp...

Страница 221: ...he setting is enabled indicates the setting is disabled 3 Click Edit 4 Select the Support Login checkbox 5 Click Save 6 Provide your User Station s IP address to Raritan Technical Support To retrieve...

Страница 222: ...nected USB flash drive and send the file to the Raritan Technical Support for troubleshooting You must have the System Administration permission to perform this operation Note The Diagnostic Log File...

Страница 223: ...log 5 Send the file to Raritan Technical Support About this Device The About this Device page shows the firmware version information and the product serial number You can access this page from the Ma...

Страница 224: ...e Main Menu In This Chapter Date Time 214 Keyboard 218 Monitor 222 Mouse 223 Network 224 Default Shortcut Icons in the Main Toolbar 241 Date Time 1 Choose Main Menu System Settings Date Time The date...

Страница 225: ...Appendix A System Settings 215 2 See Time Zone on page 217 for details on how time zone is used by manual and NTP date time configurations...

Страница 226: ...ect Time Zone if needed then use the Time and Date sections to configure the current date and time Note that the Time section uses a 24 Hour clock Click Apply or OK when complete To use NTP Turn on Sy...

Страница 227: ...e zone changes affect the time displayed onscreen daylight savings time and internal UTC based clock of the User Station For the manual date and time time zone changes do NOT affect the time displayed...

Страница 228: ...og appears 2 Click any tab to configure different keyboard settings Configure the keyboard layout in the tab labeled Keyboard Layouts on page 219 To use the keypad to move the mouse pointer configure...

Страница 229: ...o change the keyboard layout list available in the Main Toolbar See Main Menu Port Navigator Toolbar on page 7 A maximum of four layouts are supported If you have four layouts you must remove one befo...

Страница 230: ...k the button in the Keyboard model field Then select the vendor and model of your keyboard Reset to Defaults Click this button to reset all keyboard settings to the defaults Mouse Keys When you want t...

Страница 231: ...ion is to press Left Alt Left Shift Num Lock Select primary button Select modifier button Select alternate button Double click the selected button Enter Enter Acceleration Use the slider bar to adjust...

Страница 232: ...button to specify this monitor as the primary monitor when there are two monitors connected This button is disabled when Only one monitor is connected OR this monitor has been set as the primary one R...

Страница 233: ...og Apply to keep the dialog open or Cancel to cancel If clicking OK or Apply a confirmation message appears Click Restore Previous Configuration to restore to the original settings or click Keep This...

Страница 234: ...one of the network connections as the default one However if you change the network settings of either or both connections the final one that is changed will automatically become the default connecti...

Страница 235: ...1 and Ethernet 2 is for the other 2 Select the desired connection and click Edit A dialog appears 3 Enter a new name in the Connection name field if desired 4 Click the IPv4 Settings or IPv6 Settings...

Страница 236: ...abled See IPv4 Settings on page 226 IPv6 Settings Setting Description Method Select one of the following as the connection method Ignore Automatic Automatic addresses only Automatic DHCP only Manual S...

Страница 237: ...rs Additional search domains Optional You may specify IP addresses of one or multiple additional domains for resolving host names Use commas to separate multiple domains DHCP client ID Optional You ca...

Страница 238: ...efault network connection Note You can retrieve current IP addresses from the Connection Information dialog See Network Icon on page 241 Automatic DHCP addresses only The DHCP server in the network au...

Страница 239: ...r Station s IPv4 address netmask and gateway in this section At least one IPv4 address netmask and gateway must be specified The following settings are configurable for this method See the above table...

Страница 240: ...r multiple additional domains for resolving host names Use commas to separate multiple domains IPv6 privacy extensions Determine whether and how privacy extensions apply to the IPv6 addressing Disable...

Страница 241: ...default network connection Note You can retrieve current IP addresses from the Connection Information dialog See Network Icon on page 241 Automatic addresses only IPv6 autoconfiguration automatically...

Страница 242: ...ete Routes Manual Select this method when intending to manually assign a static IP address to the User Station In the Addresses section click Add and then type the User Station s IPv6 address prefix a...

Страница 243: ...Appendix A System Settings 233 Ethernet Settings MTU Select Automatic or click plus minus to specify the maximum number of bytes per packet...

Страница 244: ...c Requires Wake on LAN password Link Negotiation Ignore Automatic Manual Set Speed and Duplex Miscellaneous Settings The Miscellaneous settings tab is used when you have a VPN configuration Select the...

Страница 245: ...replace the standard Ethernet configuration This setup doubles the maximum network speed if both ports are used and provides redundancy The Dominion User Station network will continue to work if eith...

Страница 246: ...Appendix A System Settings 236 3 In the Choose a Connection Type dialog select Bond then click Create 4 The Bond Connection dialog opens 5 In the Bond tab click Add...

Страница 247: ...ries and keep the newly created Bond Connection entries OpenVPN Connections An OpenVPN configuration can be uploaded to the Dominion User Station to use a VPN client for all connections You must provi...

Страница 248: ...Appendix A System Settings 238 2 Click the Add Icon plus sign In the Choose a Connection Type dialog select Import a saved VPN configuration then click Create...

Страница 249: ...Appendix A System Settings 239 1 An upload dialog appears Select the ovpn config file then click Open 2 The VPN client is added Select it and click the Edit icon...

Страница 250: ...cted status bar will show that it is active The Lock icon displays in the status bar when a user logs in with active VPN 5 To automatically connect to VPN edit the network connection go to the Miscell...

Страница 251: ...ches among available languages By default the following languages are available en English US fr French de German Right clicking the icon A shortcut menu with these commands displays Layouts Changes t...

Страница 252: ...ctive connection select Disconnect The formatting of that connection s name turns from bold to normal indicating that it becomes inactive To activate any disabled network connection shown in the list...

Страница 253: ...location and time zone of the User Station Change the time format of the clock shown in the Main Toolbar For details see Location and Clock Time Format on page 244 To close the calendar click the cloc...

Страница 254: ...ppendix A System Settings 244 Location and Clock Time Format After expanding the Locations section click Edit The Clock Preferences dialog appears Click the desired tab or button to configure settings...

Страница 255: ...te any existing location in the Locations tab select it and click Edit or Remove General Clock Format Select the desired clock format to be shown in the Main Toolbar 12 or 24 hour format Panel Display...

Страница 256: ...em s time zone setting is different from the selected location s and you have the System Administration privilege a Set button appears to the right of the location name when hovering the mouse pointer...

Страница 257: ...een locking When you attempt to unlock the screen a password prompt appears Only the user who locked the screen can unlock the User Station Other users must log out and then log in to the User Station...

Страница 258: ...n User Station to Factory Defaults To abandon the factory reset select the other option 5 When the system prompts you to enter user credentials type the admin credentials admin user and the current ad...

Страница 259: ...croll down to Screenshot of Desktop and Screenshot of Active Window If the functions are enabled use the hotkey displayed If the functions are disabled click Edit then select a hotkey for the function...

Страница 260: ...mount 75 x 75 mm 100 x 100 mm Video 1 x HDMI 2 x DisplayPort Support video resolutions up to 3840 x 2560 I O ports 1 x SD card reader not available 2 x Audio Line out mic 2 x USB 3 0 rear 6 x USB 2 0...

Страница 261: ...rget servers For example user credentials for the KVM switch determine whether you can access all KVM ports on this KVM switch or whether you can perform the virtual media or power control function on...

Страница 262: ...on such as adding KVM switches Device access such as access to the data of all KVM switches and KVM ports user A Limited privileges are granted Port access permitted No virtual media access permitted...

Страница 263: ...eyboard Mouse sharing is enabled Outgoing TCP Ports 5000 and 443 for the communication to the KX4 5900 for VNC targets configurable some VNC clients may use other ports 3389 for RDP targets configurab...

Страница 264: ...Required password The user s password Required user_type The type of the user Optional May be one of local users existing in the User Station only ldap LDAP authenticated users or ccsg CC SG users If...

Страница 265: ...d in_progress and result it is required to wait until the login process in finished before making any further API calls It is required to request the status of the login process until it is signalled...

Страница 266: ...session progress progress started Now wait some seconds curl c cookies txt b cookies txt H Content Type application json d auth_id 4dc950f2 2f8b 424b ba31 d6fb33f943b7 https 192 168 3 175 8443 api v1...

Страница 267: ...unsupported port type status The port status of the port associated with this access point KVM access points only availability The availability status s of the port associated with this access point...

Страница 268: ...ype serial access_id 1256 id 8 name thre KX3UST status up availability idle port_type k vm access_id 7 id 7 name thre KX4UST status up availability idle port_type k vm access_id 6 id 3 name Windows Bo...

Страница 269: ...Appendix D API 259...

Страница 270: ...lowing members access_id The ID of this access point Use the ID to create an access session to this access point of this target access_type The type of this access point KVM Serial RDP VNC etc The mul...

Страница 271: ...6 name thre KX4UST access access_id 6 access_type kvm st atus up availability idle id 7 name thre KX3UST access access_id 7 access_type kvm st atus up availability idle id 8 name Windows Box Dual acce...

Страница 272: ...https 192 168 3 175 8443 api v1 access open_client result true curl c cookies txt b cookies txt H Content Type application json d access_id 2 options key current value true https 192 168 3 175 8443 ap...

Страница 273: ...the scenes may be the active one the is_active member is true for this scene Example curl c cookies txt b cookies txt H Content Type application json https 192 168 3 175 8443 api v1 access scenes nam...

Страница 274: ...2 168 3 175 8443 api v1 access window_management result true Maintenance The User Station supports some basic maintenance functions via the API It currently has functions for identity firmware informa...

Страница 275: ...ult whether the update was initiated successfully or not In case of an error an error string is also returned Note Importing the firmware upgrade is done synchronously Especially the download but also...

Страница 276: ...tem metadata only If you are interested in one backup only e g if you are waiting for the backup process to finish you don t have to query the whole list of backups When you know the ID of a backup yo...

Страница 277: ...xists will fail Restore a backup To restore a backup use a GET request to the maintenance backups id_of_the_backup restore URL This returns the result success or fail and an error message in case of f...

Страница 278: ...20210325104912 dat status working The backup is not finished yet status is working wait some time and try again curl c cookies txt b cookies txt H Content Type application json https 192 168 3 175 844...

Страница 279: ...he backup using an URL curl c cookies txt b cookies txt H Content Type application json d uri http 192 168 2 101 backup bin https 192 168 3 175 8443 api v1 maintenance backups import result true backu...

Страница 280: ......
Страница 281: ...2 Configuring Keyboard Mouse Sharing 144 191 192 Configuring KVM Ports 17 31 36 51 60 68 165 Configuring the Maximum Search Results and Local Authentication Settings 146 154 157 158 Connecting Audio D...

Страница 282: ...troduction to the Software 5 Introduction to the User Station 3 IPv4 Settings 22 226 IPv6 Settings 22 226 229 K Keyboard 218 241 Keyboard Layout Icon 8 241 Keyboard Layouts 218 219 Keyboard Macro Exam...

Страница 283: ...Restricted Service Agreement 178 Retain Window Size 111 S Scale Video 111 118 Scanner Options 69 71 72 132 Scenarios When Read Write is Unavailable 98 99 Screen Unlocking 23 247 Searching for LDAP Us...

Страница 284: ...s 137 140 143 145 154 Using Filters 18 60 62 64 65 164 165 Using Search 60 65 164 Using the API 188 Using the KVM Client 20 77 124 159 V VESA Mount Optional 23 Video Mode 78 81 Video Settings 88 View...

Отзывы: