background image

9: Line, Tunnel, Terminal, and Host Settings 

EDS User Guide 


59


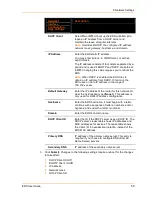
2.  Enter or modify the following settings: 

Tunnel -  
Accept Mode 
Page Settings 

Description 

Mode 

Select the method used to start a tunnel in Accept mode. 
Choices are: 

Disabled = do not accept an incoming connection. 

Enabled = accept an incoming connection. (default

Any Character = start waiting for an incoming connection 
when any character is read on the serial line. 

Start Character = start waiting for an incoming connection 
when the start character for the selected tunnel is read on the 
serial line. 

Modem Control Asserted = start waiting for an incoming 
connection as long as the Modem Control pin (DSR) is 
asserted on the serial line until a connection is made.  

Modem Emulation = start waiting for an incoming connection 
when triggered by modem emulation AT commands. Connect 
mode must also be set to Modem Emulation. 

Local Port 

Enter the port number for use as the local port. The defaults 
are port 10001 for Tunnel n and port 10002 for Tunnel 2. 

Protocol 

Select the protocol type for use with Accept Mode. The default 
protocol is TCP. 

Flush Serial 
Data 

Select Enabled to flush the serial data buffer on a new 
connection. 

Block Serial 
Data 

Select On to block, or not tunnel, serial data transmitted to the 
EDS.  

Block Network 
Data 

Select On to block, or not tunnel, network data transmitted to 
the EDS. 

TCP Keep 
Alive 

Enter the time, in seconds, the EDS waits during a silent 
connection before checking if the currently connected network 
device is still on the network. If the unit then gets no response 
after 8 attempts, it drops that connection. 

Email on 
Connect 

Select whether the EDS sends an email when a connection is 
made. Select None if you do not want to send an email. 
Otherwise, select the Email profile to use for sending. 

Email on 
Disconnect 

Select whether the EDS sends an email when a connection is 
closed. Select None if you do not want to send an email. 
Otherwise, select the Email profile to use for sending. 

Password 

Enter a password that clients must send to the EDS within 30 
seconds from opening a network connection to enable data 
transmission.  

The password can have up to 31 characters and must contain 

Содержание EDS32PR

Страница 1: ...EDS Device Servers and Terminal Servers User Guide EDS4100 EDS8PR EDS16PR EDS32PR EDS8PS EDS16PS Part Number 900 433 Revision H May 2009...

Страница 2: ...mply with the limits for a Class B digital device pursuant to Part 15 of FCC and EN55022 1998 Rules when properly enclosed and grounded These limits are designed to provide reasonable protection again...

Страница 3: ...ed 17 Evolution OS 17 Additional Features 17 Modem Emulation _______________________________________________ 17 Web Based Configuration and Troubleshooting ________________________ 17 Command Line Int...

Страница 4: ...__________________________ 25 4 Installation of EDS4100 27 Package Contents 27 User Supplied Items 27 Identifying Hardware Components 28 Serial Ports___________________________________________________...

Страница 5: ..._____________ 51 9 Line Tunnel Terminal and Host Settings 52 Line Settings 52 Line Statistics ___________________________________________________ 52 Line Configuration ________________________________...

Страница 6: ...horized Users ______________________________________ 95 SSH Client Known Hosts __________________________________________ 96 SSH Client User Configuration______________________________________ 97 SSL...

Страница 7: ..._____________________________________________ 123 Command Line Interface Settings 124 Command Line Interface Statistics _________________________________ 124 CLI Configuration ________________________...

Страница 8: ..._______________________________________________ 152 Scientific Calculator _____________________________________________ 153 C Lantronix Cables and Adapters 154 D Compliance 156 Lithium Battery Notice...

Страница 9: ...erface Status 48 Figure 8 2 Network 1 eth0 Interface Configuration 49 Figure 8 3 Network 1 Ethernet Link 51 Figure 9 1 Line n Statistics 52 Figure 9 2 Line n Configuration 53 Figure 9 3 Line n Command...

Страница 10: ...2 12 Diagnostics Ping 113 Figure 12 13 Diagnostics Traceroute 113 Figure 12 14 Diagnostics DNS Lookup 114 Figure 12 15 Diagnostics Memory 115 Figure 12 16 Diagnostics Buffer Pools 116 Figure 12 17 Dia...

Страница 11: ...S8PR EDS16PR or EDS32PR Installing the EDS8PR EDS16PR and EDS32PR device servers 6 Using DeviceInstaller Locating an EDS unit and viewing its properties and device details 7 Configuration Using Web Ma...

Страница 12: ...d application D Compliance Compliances according to ISO IEC Guide 22 and EN 45014 E Warranty Lantronix Warranty Policy link Index Additional Documentation The following documents are available on the...

Страница 13: ...P IP protocol stack a variety of remote management capabilities and an innovative design based on the leading edge Lantronix Evolution OS Delivering a data center grade programmable device computing a...

Страница 14: ...nt RS 232 422 point to point connections and RS 485 multi drop connections without requiring modifications to existing software or hardware in your application Ports 1 through 4 support RS 232 devices...

Страница 15: ...rts with hardware handshaking signals RS 232 and RS 422 485 One RJ45 Ethernet port IEEE 802 3af standard for Power over Ethernet PoE 8 MB Flash memory 32 MB Random Access Memory RAM Lantronix Evolutio...

Страница 16: ...n your application Figure 2 3 EDS16PR Device Server Features The key features of the EDS8PR EDS16PR and EDS32PR include Dual purpose Ethernet terminal server and device server design 8 EDS8PR 16 EDS16...

Страница 17: ...ting tools Additional Features Modem Emulation In modem emulation mode the EDS can replace dial up modems The unit accepts modem AT commands on the serial port and establishes a network connection to...

Страница 18: ...taxing already overloaded email systems Enterprise Grade Security Evolution OS provides the EDS with the highest level of networking security possible This data center grade protection ensures that ea...

Страница 19: ...LI and XML interfaces the diagnostic tools let you View critical hardware memory MIB II buffer pool and IP socket information Perform ping and trace route operations Conduct forward or backup DNS look...

Страница 20: ...ic unit Port Numbers Every TCP connection and every UDP datagram is defined by a destination and source IP address and a destination and source port number For example a Telnet server commonly uses po...

Страница 21: ...S User Guide 21 Product Information Label The product information label on the bottom of the device contains the following information Bar code Product ID name Product Revision Part number Hardware Ad...

Страница 22: ...2PR serial port supports a directly connected RS 232 serial device A serial cable for each serial device to be connected to the EDS8 16 32PR All devices attached to the device ports support the RS 232...

Страница 23: ...gure 3 2 shows the back of the EDS8PS Figure 3 1 Front View of the EDS8PS Figure 3 2 Back View of the EDS8PS The product information label on the bottom contains the following information Bar code Ser...

Страница 24: ...16PS shows the connection of the attached Ethernet network The EDS8 16PS can be configured to operate at a fixed Ethernet speed and duplex mode half or full duplex or to auto negotiate the connection...

Страница 25: ...s from a fast blink to a solid ON Restore factory defaults 1 Press and hold the reset button for about 11 seconds The LED blinks quickly for about 3 seconds then comes on for about 5 seconds then blin...

Страница 26: ...n of EDS8PS and EDS16PS EDS User Guide 26 4 Insert the power cord into the back of the EDS8 16PS Plug the other end into an AC wall outlet 5 Power up the serial devices Figure 3 4 Example of EDS8 16PS...

Страница 27: ...y also include a power supply User Supplied Items To complete your EDS4100 installation you need the following items RS 232 and or RS 422 485 serial devices that require network connectivity A serial...

Страница 28: ...he EDS4100 The bottom of the EDS4100 not shown has a product information label This label contains the following information Bar code Serial number Product ID name Product description Hardware address...

Страница 29: ...upport up to 921600 Ports 2 4 support up to 230400 Figure 4 3 RS 232 Serial Port Pins Serial Ports 1 2 3 4 Figure 4 4 RS 422 RS 485 Serial Port Pins Note Multi drop connections are supported in 2 wire...

Страница 30: ...3 81 Figure 4 5 Terminal Block Connector Pin Assignments Pin Signal Top V Middle V Bottom Ground LEDs Light emitting diodes LEDs on the front and back panels show status information Back panel Each s...

Страница 31: ...following guidelines when attaching serial devices All four EDS4100 serial ports support RS 232 devices Alternatively ports 1 and 3 support RS 422 485 devices To connect an EDS4100 serial port to anot...

Страница 32: ...ack of the EDS4100 Plug the other end into an AC wall outlet Terminal block connector The terminal block connector supports a power range of 42 VDC to 56 VDC Attach the power source to the terminal bl...

Страница 33: ...rial devices that require network connectivity Each EDS8 16 32PR serial port supports a directly connected RS 232 serial device A serial cable for each serial device All devices attached to the EDS de...

Страница 34: ...f the EDS16PR Figure 5 2 Back View of the EDS16PR Product Label A product information label on the bottom contains the following information Bar code Serial number Product ID name Product description...

Страница 35: ...rk You can configure the EDS to operate at a fixed Ethernet speed and duplex mode half or full duplex or auto negotiate the connection to the Ethernet network LEDs Light emitting diodes LEDs on the fr...

Страница 36: ...curring on the serial and Ethernet ports Installing the EDS8 16 32PR Finding a Suitable Location You can install the EDS8 16 32PR either in an EIA standard 19 inch rack 1U tall or as a desktop unit If...

Страница 37: ...5 Installation of EDS8PR EDS16PR or EDS32PR EDS User Guide 37 Figure 5 4 Example of EDS16PR Connections...

Страница 38: ...the instructions on the product CD to install and run DeviceInstaller 1 Click Start All Programs Lantronix DeviceInstaller DeviceInstaller 2 When DeviceInstaller starts it will perform a network devi...

Страница 39: ...as EDS ID Shows the EDS ID embedded within the unit Hardware Address Shows the EDS hardware MAC address Firmware Version Shows the firmware currently installed on the EDS Extended Firmware Version Pro...

Страница 40: ...he EDS Supports Email Triggers Shows True indicating email triggers are available on the EDS Telnet Enabled Indicates whether Telnet is enabled on this EDS Telnet Port Shows the EDS port for Telnet se...

Страница 41: ...otherwise noted Accessing Web Manager through a Web Browser Access the Web Manager Select the Web Configuration tab on the DeviceInstaller window Or 1 Open a standard web browser such as Netscape Navi...

Страница 42: ...7 Configuration Using Web Manager EDS User Guide 42 Figure 7 1 The EDS Web Manager Status Home Page...

Страница 43: ...ove enable you to link to sub pages On some pages you must also select the item you are configuring such as a line or a tunnel In the middle section you can select or enter new configuration settings...

Страница 44: ...email 121 Filesystem Shows file system statistics and lets you browse the file system to view a file create a file or directory upload files using HTTP copy a file move a file or perform TFTP actions...

Страница 45: ...igned certificate 99 Syslog Lets you specify the severity of events to log and the server and ports to which the syslog should be sent 82 System Lets you reboot the EDS restore factory defaults upload...

Страница 46: ...Device Status page is the first page that appears when you log into the Web Manager It also appears when you click the Status link in the menu bar This read only page shows EDS product information net...

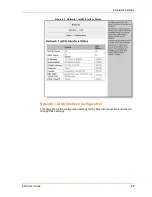
Страница 47: ...tatus of the Ethernet link and let you configure it on the EDS device Network Settings Network 1 eth0 Interface Status This page shows the status of the Ethernet network interface View the network int...

Страница 48: ...ttings EDS User Guide 48 Figure 8 1 Network 1 eth0 Interface Status Network 1 eth0 Interface Configuration This page shows the configuration settings for the Ethernet connection and lets you change th...

Страница 49: ...h0 Interface Configuration 2 Enter or modify the following settings Network 1 Interface Configuration Page Settings Description BOOTP Client Select On or Off At boot up the EDS will attempt to obtain...

Страница 50: ...xxx Default Gateway Enter the IP address of the router for this network Or clear the field appears as None This address is only used for static IP address configuration Hostname Enter the EDS hostname...

Страница 51: ...ork on the menu bar 2 Then click Network 1 and Link at the top of the page as shown below The Network 1 eth0 Ethernet Link page appears Figure 8 3 Network 1 Ethernet Link Status shows the current nego...

Страница 52: ...The following section describes the steps to view and configure Line settings Line Statistics This read only page shows the status and statistics for the serial line selected at the top of this page...

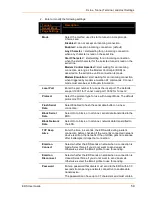
Страница 53: ...the current line is enabled To change the state select Enabled or Disabled from the drop down menu Protocol Select the protocol from the drop down menu The default is Tunnel Baud Rate Select the baud...

Страница 54: ...set to Software Prefix a decimal character with or a hexadecimal character with 0x or provide a single printable character The default Xon char is 0x11 Xoff Char Specify the character to use to stop t...

Страница 55: ...thod of enabling Command Mode or choose to disable Command Mode Always immediately enables Command Mode for the serial line Use Serial String enables Command Mode when the serial string is read on the...

Страница 56: ...choing of the serial string at boot up Sign on Message Enter the boot up sign on message Select a string type Text string of bytes sent on the serial line during boot time Binary one or more byte valu...

Страница 57: ...ent statistics and configure serial settings Connect Mode Accept Mode Disconnect Mode Packing Mode start and stop characters modem emulation and AES keys View Tunnel Statistics Click Tunnel on the men...

Страница 58: ...EDS User Guide 58 Accept Mode In Accept Mode the EDS listens waits for incoming connections Configure Accept Mode 1 Click Tunnel n and Accept Mode at the top of the page The Tunnel n Accept Mode page...

Страница 59: ...for Tunnel 2 Protocol Select the protocol type for use with Accept Mode The default protocol is TCP Flush Serial Data Select Enabled to flush the serial data buffer on a new connection Block Serial D...

Страница 60: ...or the password upon connection On prompt for a password upon connection Off do not prompt for a password upon connection 3 Click Submit Packing Mode When in Packing Mode data is not transferred one b...

Страница 61: ...9 Line Tunnel Terminal and Host Settings EDS User Guide 61 Figure 9 6a Tunnel n Packing Mode Mode Disable Figure 9 7b Tunnel n Packing Mode Mode Timeout...

Страница 62: ...nd Character Modes Send the queued data when the number of queued bytes reaches the threshold Timeout Appears for Timeout Mode Enter a time in milliseconds for the EDS to send the queued data after th...

Страница 63: ...llowing settings Tunnel Serial Settings Page Settings Description Line Settings Current serial settings for the line Protocol display only The protocol being used on the line In this case Tunnel Buffe...

Страница 64: ...User Guide 64 Connect Mode Connect mode defines how the unit makes an outgoing connection Configure Connect Mode 1 Select Tunnel n and Connect Mode at the top of the page The Tunnel n Connect Mode pa...

Страница 65: ...ss Enter the remote address to which the EDS will connect Enter an IP address or DNS name Remote Port Enter the remote port number Local Port Enter the port for use as the local port A random port is...

Страница 66: ...ter the time in seconds the unit waits during a silent connection before checking whether the currently connected network device is still on the network If the unit then gets no response after 8 attem...

Страница 67: ...the Serial Line The modem emulation page enables you to configure the modem emulation settings when you select Modem Emulation as the Tunnel n or Tunnel 2 Connect Mode type Configure modem emulation 1...

Страница 68: ...known Commands Select whether an ERROR or OK response is sent in reply to unrecognized AT commands With Enabled selected same as modem command ATU0 ERROR is returned for unrecognized AT commands With...

Страница 69: ...nel n and Start Stop Chars at the top of the page The Tunnel n Start Stop Chars page appears Figure 9 12 Tunnel n Start Stop Chars 2 Enter or modify the following settings Tunnel Start Stop Chars Page...

Страница 70: ...isconnect Mode 2 Enter or modify the following settings Tunnel Disconnect Mode Page Settings Description Character Stop Select Enabled to disconnect upon receiving the stop character See Start and Sto...

Страница 71: ...ES Keys The Tunnel n AES Keys page appears Figure 9 14 Tunnel n AES Keys 2 Enter or modify the following settings Note Empty trailing byes that are not specified are set to 0 Tunnel AES Keys Page Sett...

Страница 72: ...the value for each byte of the decrypt key Select the format for the byte as either Text or Binary 3 Click Submit Terminal Settings This page shows configuration settings for attaching a terminal on...

Страница 73: ...ct whether to display a choice for the user to exit the Login Connect Menu and reach the CLI Choices are Enabled a choice allows the user to exit to the CLI Disabled there is no exit to the CLI Send B...

Страница 74: ...ine Configuration Page Description Terminal Type Enter text to describe the type of terminal The text will be sent to a host via IAC Note IAC means interpret as command It is a way to send commands ov...

Страница 75: ...of the page Configuration is automatically selected Host 1 is the default The Host Configuration page appears Figure 9 17 Host Configuration 2 Enter or modify the following settings Host Page Settings...

Страница 76: ...ed You will see a menu like this 1 Add a destination serial line M to the menu by filling in Line M Name For this purpose set Line M Protocol None Line M Command Mode Disabled 2 Add a network destinat...

Страница 77: ...Guide 77 From the Web Manager go to the Terminal page If Login Connect Menu is enabled you will see a preview layout in the lower part of the page From the Command Line Interface go to the config ter...

Страница 78: ...y The EDS consults this cache when performing forward lookups Each item in the cache eventually times out and is removed automatically after a certain period or you can delete it manually View the EDS...

Страница 79: ...ty Enter the SNMP read only community string Write Community Enter the SNMP read write community string System Contact Enter the name of the system contact System Name Enter the system name System Des...

Страница 80: ...host 3 Click Submit 4 In the Current Configuration table delete and clear currently stored settings as necessary FTP Configuration This page shows the current File Transfer Protocol FTP configuration...

Страница 81: ...when logging in via FTP Password Enter the password to use when logging in via FTP 3 Click Submit Click Reset to reset the FTP Password TFTP Configuration This page shows the status and various stati...

Страница 82: ...Syslog page shows the current configuration status and statistics of the syslog Here you can configure the syslog destination and the severity of the events to log Note The system log is not retained...

Страница 83: ...s in descending order of severity e g Emergency is more severe than Alert Message logging will include all severities up to the selected level Selecting the Debug severity will log all system message...

Страница 84: ...10 Services Settings EDS User Guide 84 View HTTP statistics Click HTTP on the menu bar and then Statistics at the top of the page The HTTP Statistics page appears Figure 10 6 HTTP Statistics...

Страница 85: ...configuration settings Configure HTTP 1 Click HTTP on the menu bar and then Configuration at the top of the page The HTTP Configuration page opens Figure 10 7 HTTP Configuration 2 Enter or modify the...

Страница 86: ...ait when receiving a request This prevents Denial of Service DoS attacks The default is 10 seconds Max Bytes Enter the maximum number of bytes the HTTP server accepts when receiving a request The defa...

Страница 87: ...than one Username per URI is permitted Click Submit and enter the next Username as necessary The URI realm username and password are user specified free form fields The URI must match the directory c...

Страница 88: ...no authentication is necessary Basic encodes passwords using Base64 Digest encodes passwords using MD5 SSL the page can only be accessed over SSL no password is required SSL Basic the page is accessib...

Страница 89: ...IP address of the device You will be prompted whether you want to subscribe to the device RSS feed Once you subscribe you can view the RSS feed Configure RSS settings 1 Click RSS on the menu bar The...

Страница 90: ...the top for viewing print queue statistics changing print queue configuration and printing a test page Because the LPD lines operate independently you can specify different configuration settings for...

Страница 91: ...91 LPD Configuration Page Here you can change LPD configuration settings Configure LPD settings 1 Click LPD on the menu bar select the LPD line and click Configuration The LPD Configuration page appe...

Страница 92: ...ta End of Job Select Enabled to send an end of job string Formfeed Select Enabled to force the printer to advance to the next page at the end of each print job Convert Newlines Select Enabled to conve...

Страница 93: ...Internet It provides encryption authentication and message integrity services This page has four links at the top for viewing and changing SSH server host keys SSH server authorized keys SSH client kn...

Страница 94: ...ate New Keys Key Type Select a key type to use for the new key RSA use this key with the SSH1 and SSH2 protocols DSA use this key with the SSH2 protocol Bit Size Select a bit length for the new key 51...

Страница 95: ...lete User link and Public RSA Key and Public DSA Key have View Key and Delete Key links Configure the SSH server for authorized users 1 Click SSH on the menu bar and then Server Authorized Users at th...

Страница 96: ...the SSH client for known hosts 1 Click SSH on the menu bar and then Client Known Hosts at the top of the page The SSH Client Known Hosts page appears Figure 11 3 SSH Client Known Hosts 2 Enter or mod...

Страница 97: ...ry least a password or key pair must be configured for a user The keys for public key authentication can be created elsewhere and uploaded to the device or automatically generated on the device If upl...

Страница 98: ...use the Browse button to select the key Key Type Select the key type to be used Choices are RSA use this key with the SSH1 and SSH2 protocols DSA use this key with the SSH2 protocol Create New Keys Us...

Страница 99: ...tion to a web server Certificate Private key combinations can be obtained from an external Certificate Authority CA and downloaded into the unit Self signed certificates with associated private key ca...

Страница 100: ...file must be PEM The file must start with BEGIN RSA PRIVATE KEY and end with END RSA PRIVATE KEY Read DSA instead of RSA in case of a DSA key Some Certificate Authorities add comments before and or a...

Страница 101: ...ter the same name that the user will enter when requesting your web site Example If a user enters http www widgets abccompany com to access your web site the Common Name would be www widgets abccompan...

Страница 102: ...ttings EDS User Guide 102 SSL Page Settings Description DSA Digital Signature Algorithm also based on large prime numbers but can only be used for signing Developed by the US government to avoid the p...

Страница 103: ...S Configure automatic discovery of the device by the DeviceInstaller utility View or change the current date or time Configure the EDS system settings And how you can use several other tools for diagn...

Страница 104: ...CAUTION In the next step all files and configuration settings on the file system are destroyed upon formatting Back up all files as necessary Upon formatting the current configuration is retained 4 To...

Страница 105: ...opy File Source Enter the location where the file you want to copy resides Destination Enter the location where you want the file copied After you specify a source and destination click Copy to copy t...

Страница 106: ...CMP and ARP protocols 2 Click on one of the protocol names to see the details of the settings for that protocol TCP Settings Figure 12 3 TCP Protocol Page On the TCP page you may modify the following...

Страница 107: ...Data The Send Data selection governs when data may be sent into the network The Standard implementation waits for an ACK before sending a packet less than the maximum length Select Expedited to send...

Страница 108: ...cache Both addresses are required Figure 12 6 ARP Protocol Page 1 Enter the time in hours minutes and seconds for the timeout 2 Enter the IP address to add to the ARP cache 3 Enter the MAC address to...

Страница 109: ...filter 1 Click IP Address Filter on the menu bar The IP Address Filter page opens to display the current configuration Figure 12 7 IP Address Filter Configuration 2 Enter or modify the following setti...

Страница 110: ...isplay the current configuration Figure 12 8 Query Port Configuration 2 Select On to enable the Query Port server 3 Click Submit Diagnostics The EDS has several tools for diagnostics and statistics Th...

Страница 111: ...Bases MIBs available on the EDS View EDS MIB II statistics 1 Click Diagnostics on the menu bar and then MIB II at the top of the page menu The MIB II Network Statistics page opens Figure 12 10 MIB II...

Страница 112: ...ns for IP forwarding IP Sockets The IP Sockets page opens and shows all of the open network sockets on the EDS Display open network sockets on the EDS Click Diagnostics on the menu bar and then IP Soc...

Страница 113: ...the host before timing out The default is 5 seconds 3 Click Submit The results of the ping appear in the page Traceroute You can trace a packet from the EDS to an Internet host showing how many hops...

Страница 114: ...ed for DNS Lookup to work Use forward or reverse DNS lookup 1 Click Diagnostics on the menu bar then DNS Lookup at the top of the page The Diagnostics DNS Lookup page appears Figure 12 14 Diagnostics...

Страница 115: ...ry statistics for the EDS Click Diagnostics on the menu bar then Memory at the top of the page The Diagnostics Memory page appears Figure 12 15 Diagnostics Memory Buffer Pools Several parts of the EDS...

Страница 116: ...12 Maintenance and Diagnostics Settings EDS User Guide 116 Figure 12 16 Diagnostics Buffer Pools...


Страница 117: ...cess ID PID the percentage of total CPU cycles a process used within the last three seconds the total stack space available the maximum amount of stack space used by the process since it started and t...

Страница 118: ...12 Maintenance and Diagnostics Settings EDS User Guide 118 Note The Adobe SVG plug in is required to view the CPU Load Graph...

Страница 119: ...o set change the current date and time Real Time Clock Page Settings Description Time Zone From the drop down list select the time zone corresponding to the location of the EDS Date From the drop down...

Страница 120: ...boot the EDS The system refreshes and redirects the browser to the EDS home page Restore Factory Defaults Click Factory Defaults to restore the EDS to the original factory settings All configurations...

Страница 121: ...ion mode Serial Line Settings Tunneling Statistics Email Configuration You can view and configure email alerts from the EDS This section tells you how to configure alerts See Configure Accept Mode on...

Страница 122: ...s EDS User Guide 122 View email statistics Click Email from the main menu then choose an email profile from the drop down list e g Email 1 then click Statistics Figure 13 1 Email Statistics To clear t...

Страница 123: ...s groups separated by semicolons Configure EDS email settings 1 Click Email on the menu bar and then Email n and Configuration at the top of the page The Email 1 Configuration page appears Figure 13 2...

Страница 124: ...SSH ports and to configure CLI settings Command Line Interface Statistics This shows the current connection status of the CLI servers listening on the Telnet and SSH ports When a connection is active...

Страница 125: ...and Line Interface Configuration page appears Figure 13 4 Command Line Interface Configuration 2 Enter or modify the following settings Command Line Interface Configuration Settings Description Telnet...

Страница 126: ...An example of such a string is control L 3 Click Submit XML Configuration The EDS allows for the configuration of units using an XML configuration file Export a current configuration for use on other...

Страница 127: ...ort Configuration 2 Enter or modify the following settings XML Export Configuration Page Settings Description Export to browser Select this option to export the XCR data in the selected fields to a we...

Страница 128: ...se only with a secure link and save only in secure locations Lines to Export Select the instances you want to export in the line LPD PPP tunnel and terminal groups Groups to Export Check the configura...

Страница 129: ...XML Status Record Export Status 2 Enter or modify the following settings XML Status Record Export System Status Page Settings Description Export to browser Select this option to export the XML status...

Страница 130: ...g HTTP The groups to import can be specified by toggling the respective group item or entering a filter string When toggling a group item all instances of that group will be imported The filter string...

Страница 131: ...g the path and file name of the entire external XCR file to import You can also browse to select the XCR file Figure 13 8 XML Import Configuration from External File Import Configuration from the File...

Страница 132: ...on Filename Enter the name of the file on the EDS local to its file system that contains XCR data Lines to Import Select the lines whose settings you want to import Click the Select All link to select...

Страница 133: ...not break your network connectivity You may check or uncheck any group to include or omit that group from import To import all of the groups click the Select All but Networking link to import all gro...

Страница 134: ...ay only contain records from a single line instance this is done by selecting a single Line to Export when exporting the file Figure 13 10 XML Import Line s from Single Line Settings on the File syste...

Страница 135: ...ces are selected Whole Groups to Import Select the configuration groups to import from the XML configuration record Note By default all groups are checked except those pertaining to the network config...

Страница 136: ...tes the connection Accept Mode is enabled by default Disconnect Mode This mode defines how an open connection stops the forwarding of data The specific parameters to stop the connection are configurab...

Страница 137: ...makes a connection Active if it sees any character from the serial port Active if it sees a specific configurable character from the serial port Modem control signal Modem emulation For the any charac...

Страница 138: ...e for the time frame The EDS observes the modem control inactive setting Note To clear data from serial buffers on disconnect enable Flush Serial Data Packing Mode Packing Mode takes data from the ser...

Страница 139: ...ation Command Mode supports the standard AT command set For a list of available commands from the serial or Telnet login enter AT Use ATDT ATD and ATDP to establish a connection All of these commands...

Страница 140: ...S0 is 2 or greater A Repeat last valid command For ATDT and ATDP commands from 1 to 255 the EDS uses the configured Connect Mode remote station address and replaces the last segment with the number pr...

Страница 141: ...nually asserted or asserted only while either an Accept Mode tunnel or a Connect Mode tunnel is connected Statistics The EDS logs statistics for tunneling The Dropped statistic shows connections ended...

Страница 142: ...key pairs private and public keys These keys are used for the Diffie Hellman key exchange the underlying encryption protocol The EDS represents its keys in the Open SSH format Authorized Users users p...

Страница 143: ...s more secure 7 Click Submit Use RFC4716 format Keys 1 Use any program that can produce keys in the RFC4716 format 2 Use ssh keygen to convert the format to OpenSSH ssh keygen i f RFC4716_file output_...

Страница 144: ...figuring the SSH client known hosts is optional It prevents Man In The Middle MITM attacks Secure Sockets Layer SSL SSL uses digital certificates for authentication and cryptography against eavesdropp...

Страница 145: ...hing public key that allows another to verify the signature but not recreate it The authority s certificate can be signed by itself resulting in a self signed or trusted root certificate or by another...

Страница 146: ...leting a certificate request and sending it to a certificate authority that will create a certificate key combo usually for a fee Or generate your own A few utilities exist to generate self signed cer...

Страница 147: ...m file contains both certificate and key If loading the SBR certificate into EDS as an authority you will need to edit it 1 Open the file in any plain text editor 2 Delete all info before BEGIN CERTIF...

Страница 148: ...the firmware image but may be overridden by placing the appropriate file in the appropriate directory on the EDS file system Web Manager files can be retrieved and overridden with the following proce...

Страница 149: ...wing format Product Type long name short name For example enable show EDS Product Information Product Type Lantronix EDS EDS Change the EDS short and long names with the Web Manager 1 Click System in...

Страница 150: ...Unzip the files and save them to a directory on your PC 2 From the EDS main web page click System in the menu bar The System page appears 3 In the Upload New Firmware section click Browse A pop up pag...

Страница 151: ...downloads frequently asked questions FAQs and the most up to date documentation are available at http www lantronix com support When you report a problem please provide the following information Your...

Страница 152: ...Command Mode serial string sign on message AES Keys Converting Binary to Hexadecimal Following are two simple ways to convert binary numbers to hexadecimal notation Conversion Table Hexadecimal digits...

Страница 153: ...se a scientific calculator such as the one available on the Windows operating systems For example 1 On the Windows Start menu click Programs Accessories Calculator 2 On the View menu select Scientific...

Страница 154: ...5 RJ45 5 m 16 4 ft Connects the EDS8 16 32PR Ethernet ports to an Ethernet switch hub or is used for cascading from one EDS8 16 32PR to another Connects the EDS8 16 32PR serial RJ45 RS232 ports to a d...

Страница 155: ...r RJ45 to DB9F Allows a standard straight pinned CAT5 cable to connect the EDS8 16 32PR to the DB9M DTE interface of a PC or serial device 200 2073 Adapter RJ45 to DB25M Allows a standard straight pin...

Страница 156: ...DS16PR 16 Port Device Server and EDS32PR 32 Port Device Server EDS8PS 8 Port Device Server and EDS16PS 16 Port Device Server Conform To The Following Standards Or Other Normative Documents Radiated an...

Страница 157: ...0 0 0 0 0 0 SecureBox 1101 2101 0 0 0 0 0 0 WiBox 0 0 0 0 0 0 UBox 0 0 0 0 0 0 MatchPort 0 0 0 0 0 0 SLC 0 0 0 0 0 0 XPort 0 0 0 0 0 0 WiPort 0 0 0 0 0 0 SLB 0 0 0 0 0 0 SLP 0 0 0 0 0 0 SCS 0 0 0 0 0...

Страница 158: ...stung an der Einspeisung erfolgt die den berstromschutz und die Versorgungsleitungen beeintr chtigt Erdung Eine zuverl ssige Schutzerdung dieser Ausr stung muss gew hrleistet sein Dies gilt besonders...

Страница 159: ...ide 159 Grounding Reliable earthing of this equipment must be maintained Particular attention should be given to supply connections when connecting to power strips rather than direct connections to th...

Страница 160: ...EDS User Guide 160 E E W Wa ar rr ra an nt ty y For details on the Lantronix warranty replacement policy go to our web site at http www lantronix com support warranty index html...

Страница 161: ...Hardware 110 IP Sockets 112 Memory 115 MIB II Statistics 111 Ping 112 Processes 117 Traceroute 113 Diagnostics Settings 103 DNS Configuration 78 DSA 146 E EDS16 32PR Features 16 Hardware components 2...

Страница 162: ...rt number 21 Port Numbers 20 Port Numbers 20 Ports Serial and Telnet 19 Product ID 21 Product Information Label 21 protection levels 18 Protocol Stack Configuration 106 Protocols Supported 17 Q Query...

Страница 163: ...Tunneling Accept Mode 137 Connect Mode 136 Disconnect Mode 138 Modem Emulation 139 Packing Mode 138 Serial Line Settings 140 Statistics 141 U Updating Firmware 150 Upload Authority Certificate 100 Upl...

Отзывы: