background image

Section 5  OTHER CONVENIENT FUNCTIONS

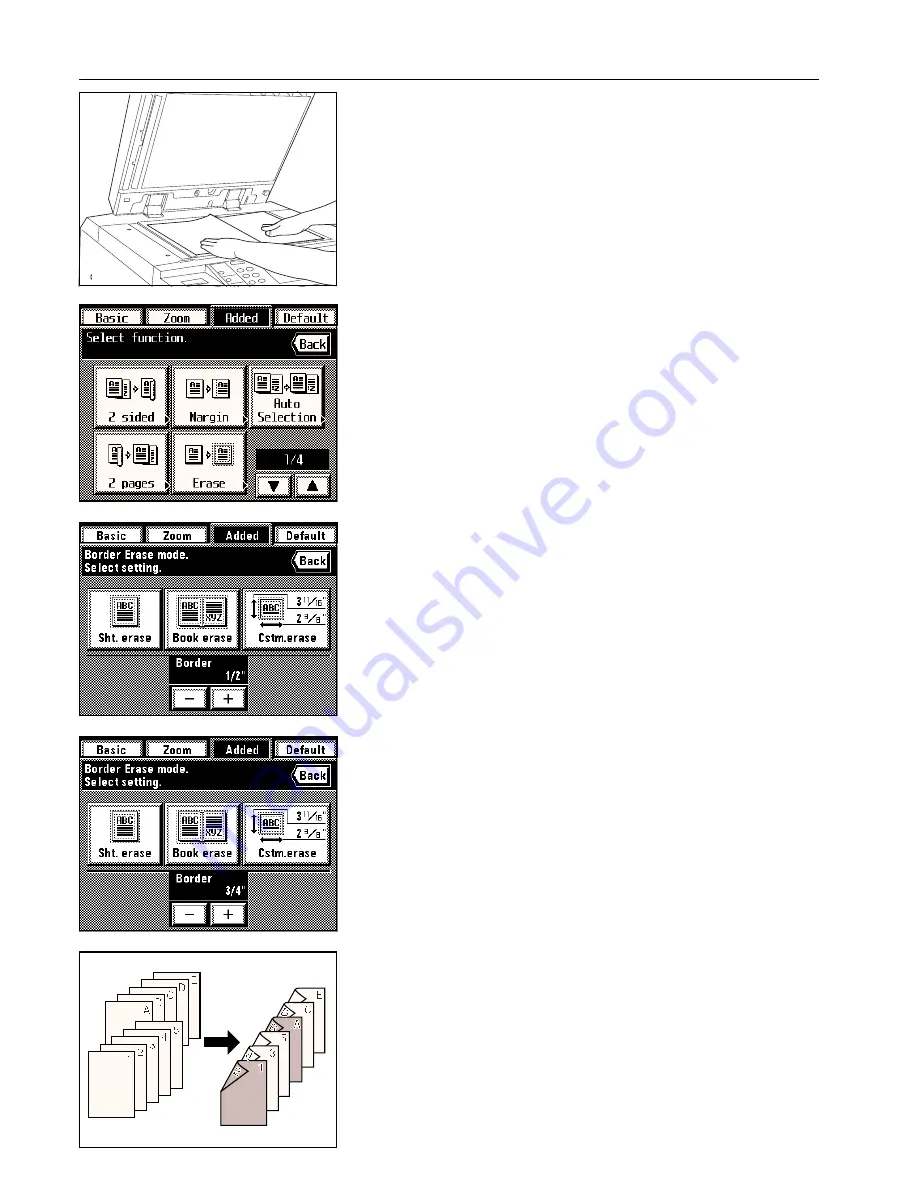
1. Set the originals.

* When using a book as the original, set it on the platen as shown in the illustration.

2. Touch the “Added” key.

The function select screen will appear.

3. Touch the “Erase” key. (If that key is not displayed, touch the “

” key or the “

” key until it

is displayed.)
The border erase set-up screen will appear.

4. If you want to change the width of the border that will be erased under “Sht. erase” or

“Book erase”, touch the “+” key or the “-” key. The border width can be set to 1/4", 1/2" or
3/4".
* In order to use the “Cstm. erase” key with non-standard paper sizes, the size of the

originals that you will use must be registered in advance. (See “

#

 Custom border erase

size” on page 8-16.)

5. Specify the type of the originals that are being used by touching either the “Sht. erase”,

“Book erase” or “Cstm. erase” key.
The touch panel will return to the basic screen.

(5) Adding covers for or insert sheets between copies [Sheet copy mode]
The sheet copy mode has three submodes: cover, insert and chapter.

5-7

Содержание KM-6230

Страница 1: ...Please read the instruction handbook before using the copier Keep it in the designated location for inside front cover INSTRUCTION HANDBOOK ...

Страница 2: ...or transmitted in any form or by any means electronic or mechanical including photocopying recording or by any information storage and retrieval system without permission in writing from the Publisher Legal Restriction On Copying It may be prohibited to copy copyrighted material without permission of the copy right owner It is prohibited under any circumstances to copy domestic or foreign currenci...

Страница 3: ...ient attention to or incorrect compliance with the related points Symbols The m symbol indicates that the related section includes safety warnings Specific points of attention are indicated inside the symbol General warning Warning of danger of electrical shock Warning of high temperature The symbol indicates that the related section includes information on prohibited actions Specifics of the proh...

Страница 4: ...Cover mode 5 8 Insert mode 5 8 Chapter mode 5 9 2 Combining modes 5 10 3 Making copies with the sheet copy mode 5 10 6 Making handout materials together with Transparencies Presentation mode 5 13 Presentation mode copying onto the backing sheet 5 13 Presentation mode leaving the backing sheet blank 5 14 7 Feeding paper as a backing sheet for transparencies Transparency backing sheet modes 5 16 Cop...

Страница 5: ...code change 8 11 0 Auto shut off ON OFF 8 11 Date time 8 11 Accessing the machine default setting mode 8 12 Changing the default settings 8 12 2 Copy related defaults 8 15 Types of copy defaults 8 15 1 Exposure mode 8 15 2 Exposure step 8 15 3 Toner economy mode 8 15 4 Auto exposure adjustment 8 15 5 Manual exposure adjustment 8 16 6 Copy quality mode 8 16 7 Sort mode ON OFF 8 16 8 Paper selection...

Страница 6: ...ce in the copies for binding etc Margin mode page 5 1 Copying onto both the front and back of the copy paper from various originals Two sided copy mode page 4 5 Printing page numbers on the copies Print page numbers function page 5 3 Erasing the edges around copies from books etc Border erase mode page 5 6 Copying each side of two page open face originals onto separate sheets Page separation mode ...

Страница 7: ...e for easy sorting Rotate Sort copy mode page 5 27 Making mirror image copies Mirror image mode page 5 26 Inverting black and white Invert copy mode page 5 26 Memorizing frequency used settings Program mode page 5 27 Setting different size originals at the same time Auto selection page 3 5 Copying various originals in one batch Job build function page 6 3 Using department codes to manage the numbe...

Страница 8: ...ment is avail able Finisher page 9 1 Booklet Stitcher page 9 10 Mailbox Unit page 9 12 Side Deck page 9 11 Key Counter page 9 11 Print Scan System page 9 12 Tandem Board page 9 12 31 MAKING FULL USE OF THE MACHINE S ADVANCED FUNCTIONS ...

Страница 9: ...TION LABELS NOTE DO NOT remove these labels Label 2 High temperature inside Do not touch parts in this area because there is a dan ger of getting burned Label 1 High voltage inside NEVER touch parts in this area because there is a danger of electric shock Label 3 High temperature inside Do not touch parts in this area because there is a dan ger of getting burned Section 1 IMPORTANT PLEASE READ FIR...

Страница 10: ... RH and avoid the following locations when selecting a site for the copier Avoid locations near a window or with exposure to direct sunlight Avoid locations with vibrations Avoid locations with drastic temperature fluctuations Avoid locations with direct exposure to hot or cold air Avoid poorly ventilated locations Power supply Grounding the copier WARNING DO NOT use a power supply with a voltage ...

Страница 11: ... remove the power plug from the outlet when performing cleaning operations If dust accumulates within the copier there is a danger of fire or other trouble It is therefore recommended that you consult with your service representative in regard to cleaning of internal parts This is particularly effective if accomplished prior to seasons of high humidity Consult with your service representative in r...

Страница 12: ...Section 2 NAMES OF PARTS Section 2 NAMES OF PARTS 2 1 ...

Страница 13: ...that have been scanned for copying The bottom line indicates the number of copies made Instruction handbook box Keep the instruction handbook here Transport handles Use these handles when moving this machine There are a total of four transport handles in all fi Paper ejection cover Open this cover if paper misfeeds in the fixing unit or ejection sec tion fl Main switch Turn this switch ON before c...

Страница 14: ...e number of copies to be made or to enter a desired value Reset key See Initial mode at right Stop Clear key Press this key when you want to stop copying or want to change the number of copies to be made Start key and indicator Press this key when the indicator is lit green in order to start copying Proof Copy key and indicator Press this key to light the indicator when you want to make a test cop...

Страница 15: ...he total number of exposure steps can be set to either 7 or 13 See 2 Exposure steps on page 8 15 0 Copy exposure adjustment keys Touch the appropriate key when you want to manually adjust the copy exposure Touch the Lighter key to lighten the exposure and the Darker key to darken it Auto Auto manual exposure mode selection key Touch this key when you want to switch between the auto exposure mode a...

Страница 16: ...e the Finisher or when replenishing staples in the stapler holders 5 Front cover handle Use this handle to open the front cover 6 Upper cover Open this cover if paper misfeeds during ejection onto the Non sort tray 7 Scrap hole punch tank The scraps left over from the hole puncher are collected here 8 Scrap hole punch tank knobs Use these knobs to remove the scrap hole punch tank 9 Internal tray 0...

Страница 17: ... press this switch Paper plate up down switch for upper cover Press or hold down this switch when you want to raise or lower the paper plate inside the Side Deck Press it once to lower the paper plate to a level where 1 000 sheets of paper can be loaded Hold the switch down to lower the plate to a level where 4 000 sheets of paper can be loaded If the right cover is open the paper plate will not m...

Страница 18: ...e the guides until both of them are aligned with the width of the paper that will be loaded in that drawer 4 Set the paper against the right hand side of the drawer first and then let go of the paper so that it rests on the bottom plate of the drawer IMPORTANT The sticker 1 inside the drawer indicates how high paper can be loaded Do not ex ceed the limit indicated on that sticker When you load pap...

Страница 19: ... 75 g m2 or 80 g m2 paper The paper can be of any size between 5 1 2 x 8 1 2 and 11 x 17 A6R and A3 When copying onto special paper always use this tray to feed the paper If you want to copy onto non standard size paper register the size of paper that you want to use in advance See How to register a custom size on page 8 12 Types of paper and the number of sheets that can be set in the stack bypas...

Страница 20: ...n To register the size of envelopes that you want to use see How to register a custom size on page 8 12 4 Loading paper into the Side Deck option The optional Side Deck will hold up to 4 000 sheets of 11 x 8 1 2 A4 size standard 75 g m2 or 80 g m2 paper 1 Hold down the paper plate up down switch to lower the paper plate inside the Side Deck to its lowermost position If either the upper cover or th...

Страница 21: ...r folds before using them Clippings or originals with very slippery surfaces Originals with wet correction fluid Originals with folds If you must use such originals smooth out the folded portions before setting them in the DF 4 Setting originals in the DF 1 Adjust the original insert guides to fit the size of the originals Before setting any new originals remove any originals that are remaining on...

Страница 22: ...pen as there is a danger of personal injury 3 Adding toner Add toner when Add toner to resume copying appears in the message display DO NOT add toner unless this message is displayed Touch the Toner key on the touch panel to display the procedure for adding toner CAUTION Do not incinerate toner and toner containers Dangerous sparks may cause burns 5 Auto selection mode The copier will automaticall...

Страница 23: ...e toner bottle located below the over the metal pin 1 that is protruding out of the toner supply slot 6 Turn the bottle clockwise 90 degrees and the toner in the bottle will be emptied into the copier Be sure to turn the bottle all the way until it stops so that the on the bottle is aligned with the on the main body of the copier 7 Wait about 60 seconds and then tap the sides of the bottle in orde...

Страница 24: ...paper of the same size as the original no special settings are required 5 Copy exposure adjustment In the initial mode manual exposure mode is selected the exposure scale will be displayed and the copy exposure can be adjusted as desired When you want to darken the exposure touch the Darker key to move the scroll box within the exposure scale to the right When you want to lighten the exposure touc...

Страница 25: ...on the Copy Tray Finisher or Booklet Stitcher Depending upon the copy mode the copies may be ejected face up or face down If the copier is equipped with the optional Copy Tray a maximum of 250 copies can be stored at one time 3 Selecting the desired functions Select from among the copier s various functions Touch the key or the key to access all of the available functions It is possible to select ...

Страница 26: ...ize key if you want to change the currently selected paper size 2 Zoom copy mode The zoom ratio can be set to any 1 increment between 25 and 400 If you set the originals in the DF the zoom ratio can be set to any value between 25 and 200 2 Select the size of paper that you want to copy onto by touching the appropriate paper size key The corresponding zoom ratio will be displayed Copying will begin...

Страница 27: ...elected the corresponding copy zoom ratio will be displayed 5 Touch the End key The touch panel will return to the basic screen and selected the zoom ratio will be displayed Touch the desired paper size key if you want to change the currently selected paper size 4 Fixed size zoom mode Enlargement reduction is automatically performed to one of the following pre set ratios 25 50 64 78 121 129 200 or...

Страница 28: ... touch one of these keys and thereby highlight the width field the desired zoom ratio can also be entered directly using the numeric keys Touch the 100 key if you want to return the zoom ratio to 100 6 Touch the End key The touch panel will return to the basic screen and the selected zoom ratios for both the length and width will be displayed Touch the desired paper size key if you want to change ...

Страница 29: ... back of the copy paper When there is an odd number of originals the back side of the last copy will be blank It is also possible to have the image on the back side of the copy rotated 180 degrees 1 Normal The image will be copied in its current direction 2 Rotate The image will be rotated 180 degrees and copied Thus if the finished copies are then bound at the top edge of the copy set all of the ...

Страница 30: ...iginals that were registered using the job reservation function you can use the copy modes etc that were already selected for that job Once the interrupt copying job is finished the operation that was interrupted will resume at the same settings it was using before the interruption 1 Press the Interrupt key The Interrupt indicator will blink If there are any originals that were registered using th...

Страница 31: ...originals Once copying of the selected originals is finished the interrupted copy job will be resumed automatically 5 Rotate copy When the orientation of the originals is different than that of the paper loaded in the drawers the image will be turned 90 degrees counterclockwise for copying No special setting is required to use this function POINT OF INFORMATION The size of paper that can be used i...

Страница 32: ... Check key and the touch panel will return to the basic screen If you want to change any of the settings touch the corresponding function key on the touch panel and then touch the Change key after that The function select screen will appear Change the desired settings by following the appropriate procedure for that function 8 Change settings function The Pause key will be displayed on the basic sc...

Страница 33: ... to set the auto preheat function to engage automatically if the copier is not used for a certain period of time See 7 Auto preheat time on page 8 11 10 Auto shut off function This function automatically turns the main switch OFF O if the copier is not used for a designated period of time between 15 and back 240 minutes To make copies again turn the main switch ON More about the auto shut off func...

Страница 34: ...e a margin for binding on the top side of the copy paper The margin width can be set to 1 4 3 8 1 2 5 8 or 3 4 The margin position that is available for the back side will differ depending upon the margin position that is selected for the front side The circle indicates the possible settings Front back margin When you are making two sided copies the margin positions and margin width can be se lect...

Страница 35: ...gin go to step 6 4 If you want to change the width of the margin touch the key or the key until the desired width is displayed The margin width can be set to 1 4 3 8 1 2 5 8 or 3 4 The previously selected value is set as the default for the margin width Change this setting as desired If you do not want to change the current margin width go to the next step 5 Select the margin position that you wan...

Страница 36: ... margin on the back side touch the No key The margin position that is available for the back side will differ depending upon the margin position that is selected for the front side Once the settings are finished the touch panel will return to the basic screen and copying will be possible 2 Printing page numbers on the copies Print page numbers This function can be used to assign page numbers in se...

Страница 37: ...want the copies for the third original to be designated as page one enter 2 under the 1st page field In order to have the first original designated as a page number other than one enter the number a positive number that you want to use For example when you want the copies for the first original to be designated as page three enter 3 under the 1st page field 5 Select the numbering style that you wa...

Страница 38: ...at specific size In this operation it is necessary to specify the binding orientation of the originals 1 Left The left page of the originals is copied first followed by the right page 2 Right The right page of the originals is copied first followed by the left page Page separation from two sided originals Each side of two sided originals is copied onto separate sheets of paper 1 Set the originals ...

Страница 39: ...icates the width of the border that will be erased Erasing blemishes from the edges and middle of copies Book Use for making neat copies from thick books etc The a in the illustration indicates the width of the border that will be erased Selecting the area to be erased Custom For making neat blemish free copies from originals of non standard sizes i e sizes other than 11 x 8 1 2 etc The a in the i...

Страница 40: ...will be erased under Sht erase or Book erase touch the key or the key The border width can be set to 1 4 1 2 or 3 4 In order to use the Cstm erase key with non standard paper sizes the size of the originals that you will use must be registered in advance See Custom border erase size on page 8 16 5 Specify the type of the originals that are being used by touching either the Sht erase Book erase or ...

Страница 41: ...rted at specified locations among copies made from multiple originals You can also select whether or not you want the insert sheets themselves to be copied onto The drawer in which the insert sheets will be loaded must be selected in advance See Drawer for insert sheets on page 8 16 The available settings will differ depending upon the type of originals being used and type of copies that you want ...

Страница 42: ...pying When leaving both the front and back side of the insert sheets blank The illustration shows an example of two sided copying Chapter mode Special paper can be specified as pages that will designate chapters when you make two sided copies from either one sided or two sided originals and only the front side of these sheets will be copied onto Only the front side of these specified sheets will b...

Страница 43: ... It is not possible to specify locations for insert sheets and chapter pages separately 3 Select the type of finished copies that you want to make by touching either the 2 sided 2 pages or 1 sided key If you selected 2 sided go to the next step If you selected 2 pages go to step 6 If you selected 1 sided go to step 8 3 Making copies with the sheet copy mode 1 Touch the Added key The function selec...

Страница 44: ...me direction when the pages are opened just as they are on a wall calendar 6 Specify the type of the originals that are being used by touching either the 2 sided or Book key If you selected 2 sided go to step 8 If you selected Book go to the next step 7 Specify the binding orientation of the originals Then go to the next step Left The left page of the originals is copied first followed by the righ...

Страница 45: ...ront side Blank or No no back cover at all key If you do not want to use any other modes go to step 19 Insert mode settings 12 Touch the Insertion key if you want to use the insert mode If not go to step 14 13 Select how you want the inserts sheet to be finished by touching either the Fr Rear Copy Front Copy or Fr Rear Blank key If you do not want to use any other modes go to step 15 Chapter mode ...

Страница 46: ...t In other words calculate each two sided original as 2 individual pages when entering the page number 18 Once you are finished entering page numbers touch the Enter key If you want to perform the procedure to register the page numbers over again touch the Page reenter key and follow the procedure in steps 16 and 17 19 Check all of your settings and then touch the Enter key The touch panel will re...

Страница 47: ...ation indicate the transparencies 1 Set the transparencies in the stack bypass tray POINT OF INFORMATION Fan out the transparencies at least once before setting them Up to 25 transparencies can be loaded into the stack bypass tray at one time Make sure that paper of the same size as the transparencies is loaded in one of the drawers or decks 2 Set the originals 3 Touch the Added key The function s...

Страница 48: ... the 2 sided Book or 1 sided key If you selected 2 sided the touch panel will return to the basic screen In this case go to step 12 If you selected Book go to the next step If you selected 1 sided go to step 9 8 Specify the binding orientation of the originals Left The left page of the originals is copied first followed by the right page Right The right page of the originals is copied first follow...

Страница 49: ...cted onto tray 1 7 Feeding paper as a backing sheet for transparencies Transparency backing sheet modes When 2 or 3 transparencies are stacked on top of one another static electricity can cause problems This mode automatically places a backing sheet between the transparencies during copying It is possible to copy onto the backing sheet from the same original as well as to make multiple copies POIN...

Страница 50: ... paper of the same size as the transparencies is loaded in one of the drawers or decks 2 Set the originals 3 Touch the Added key The function select screen will appear 4 Touch the OHP back key If that key is not displayed touch the key or the key until it is displayed The transparency backing mode set up screen will appear 5 Touch the Copy key if you want to copy onto the backing sheet and the Bla...

Страница 51: ... to register images 1 Touch the Added key The function select screen will appear 2 Touch the Overlay key If that key is not displayed touch the key or the key until it is displayed The form overlay mode set up screen will appear 3 Touch the key that corresponds to the level of shading that you want to use for the overlay image The shading level can be set to any 10 increment between 10 and 100 4 I...

Страница 52: ...OINT OF INFORMATION Both the originals and the copy paper must be of standard paper sizes 1 Combination styles 2 in 1 Use this mode to copy two originals onto one sheet This mode can also be used together with the two sided copy mode to copy four originals onto one two sided copy When setting originals on the platen set them in the normal first second order The actual 2 in 1 mode that you should u...

Страница 53: ...or the 4 in 1 key POINT OF INFORMATION The mode that you should use depends on the orientation in which the originals are set Depending upon the key that was touched during selection of the combination style in the panel at left the originals must be set as shown to the illustrations below If you selected 1 or 4 If you selected 2 or 3 4 Select the type of borderline that you want by touching eithe...

Страница 54: ...the paper that you want to copy onto 9 Press the Start key 10 Making a booklet sheet originals Booklet copy This mode can be used to copy one sided or two sided originals onto two page open face two sided copies in such a way that the finished copies can be stacked and folded into a booklet format POINT OF INFORMATION The size of originals that can be used in this mode is limited to 11 x 8 1 2 and...

Страница 55: ...ey If the copier is equipped with the optional Booklet Stitcher and more than one set of copies is to be stapled select the finishing settings that you want to use as well 5 Set the originals When setting the originals on the platen start with the first page 6 Press the Start key 11 Making a booklet two page open face originals Booklet cover copy mode This mode can be used to have covers either bl...

Страница 56: ...e front and back covers will be blank 1 Touch the Added key The function select screen will appear 2 Touch the Book Book key If that key is not displayed touch the key or the key until it is displayed The Book Book mode set up screen will appear 3 Select the binding orientation that you want for the finished copies by touching either the Left or Right key 4 Select whether or not you want to copy o...

Страница 57: ...d then staple the arranged copies into a booklet format such as with a weekly magazine or a pamphlet POINT OF INFORMATION To use this mode it is necessary to select the drawer or deck from which the cover sheet will be fed See Drawer for cover sheets on page 8 16 The size of originals that can be used in this mode is limited to 11 x 8 1 2 and the paper size is limited to 11 x 17 or 8 1 2 x 11 To u...

Страница 58: ...the finished copies will read from right to left 2 Left side binding orientation The order of copying will be performed so that the stacked and folded pages of the finished copies will read from left to right 1 Touch the Added key The function select screen will appear 2 Touch the Stitching key If that key is not displayed touch the key or the key until it is displayed The binding mode set up scre...

Страница 59: ...Set the originals When setting the originals on the platen start with the first page 10 Press the Start key 13 Inverting black and white Invert copy mode The black and white areas of the image are inverted reversed on the copy When multiple inverted copies are made Please wait Image cycle may appear in the message display 1 Set the originals 2 Touch the Added key The function select screen will ap...

Страница 60: ...ntally in the drawers and or decks 1 Set the originals 2 Press the Sort Group key to light the Sort indicator 3 Press the Start key If you set the originals in the DF scanning will start and copying carried out automatically If you set the first original on the platen Continue scanning originals will be displayed 4 Set the next original and touch the Continue key Repeat this operation for all of t...

Страница 61: ...tings that are registered under that program number 2 Copying with a registered program 1 Press the Program key The program select screen will appear If Off platen is selected under 9 Job programming on page 8 16 and there are set tings registered under program 1 those copy functions will be automatically displayed In this case go to step 4 If Regular is selected under 9 Job programming on page 8 ...

Страница 62: ...performed in order starting the topmost job in the display downward 3 No of copies Indicates the number of originals in the copy job 4 No of originals Indicates the number of copies that will be made 2 Touch the Add key 1 Adding a job 1 Press the Add Job key A list of the currently reserved jobs will appear If Addition of job is possible appears in the message display additional jobs can be schedu...

Страница 63: ...key to select the desired mode If the copier is equipped with the optional Finisher it is also possible to change the Staple Sort mode and the Hole Punch mode settings as well If the copier is equipped with the optional Booklet Stitcher it is the Staple Sort mode settings that can also be changed 5 Once you have finished all the desired settings touch the End key The touch panel will return to the...

Страница 64: ...arge number of originals or originals of different types can be copied at one time by scanning all of the originals of the same size or type as an individual job and then storing each of those jobs Depending on the type of originals or the way that copies are to be finished you can select from among 9 different modes The instructions for the job build function can be displayed on the touch panel T...

Страница 65: ...ecify the type of the originals that are being used by touching either the 2 sided org or 1 sided org key 5 Select how you want the copies to be finished by touching either the 2 sided copy or 1 sided copy key 6 The start scanning screen will appear Select the size of paper that you want to copy onto The auto magnification selection mode is the default setting in the initial mode When copying onto...

Страница 66: ...p 3 on page 5 20 Print page numbers function Touch the Page key and follow the procedure from step 4 on page 5 4 7 Set the originals 8 Press the Start key 9 If you want to scan in more originals touch the Continue key and repeat the procedure from step 6 Once all of the originals have been completely scanned go to step 10 To delete the last set of the originals that you scanned touch the Clear Las...

Страница 67: ...ed copies from all types of originals Duplex All Originals By specifying whether each set of originals is either one sided or two sided each set will be scanned and all of the originals will be made into two sided copies without any blank pages Copying onto the front side of specified pages Chapterize By scanning in each chapter separately the front side of the first page of each chapter will alwa...

Страница 68: ...change the setting for the border erase mode touch the key or the key at the right of the border width display to select the desired width The border width can be set to 1 4 1 2 or 3 4 In this setting only sheet originals can be selected for use in the border erase mode The settings for the border erase mode can be changed for each job If you touch the Added key the following copy functions can be...

Страница 69: ...ke by touching the key or the key This number can also be entered directly with the numeric keys 12 Touch the End key Copying will begin 3 Batch copy from the platen Sheet originals only Sheet originals or the like which cannot be set in the DF will be scanned into memory first and then the copies will be made at one time This mode is convenient for Sort copying of a large number of just such orig...

Страница 70: ...o to next step 6 Specify the binding orientation of the originals 7 The start scanning screen will appear The auto magnification selection mode is the default setting in the initial mode When copying onto custom paper sizes or with a custom zoom ratio press the Manual key until 1 1 appears on the copy magnification ratio display If you want to change the magnification ratio touch the key or the ke...

Страница 71: ...ntinue scanning by repeating the procedure from step 5 If you selected Book originals continue scanning by repeating the procedure from step 6 If you selected Sheet originals continue scanning by repeating the procedure from step 7 Once all of the originals have been completely scanned go to step 11 To delete the last set of the originals that you scanned touch the Clear Last Job key If you want t...

Страница 72: ... See 1 Reset box delete all on page 8 23 It is also possible to print out a list of all of the registered images See 4 Document list on page 8 23 1 Registering an image 1 Press the Doc Mgmt key The document management screen will appear 3 Touch the Register key 4 Enter the name that you want to register for that image See page 8 29 for the procedure on entering the name 2 Touch the Form Gallery Ov...

Страница 73: ... regarding a specific image or to print it out select the desired image and touch the Recall key If the image that you want to check is not displayed touch the key or the key until it is displayed 4 Information about that image will be displayed Once you are finished checking that infor mation touch the End key If you want to print out the image touch the Form Print key Printing will begin and onc...

Страница 74: ...ange the order in which the image names are displayed 1 Press the Doc Mgmt key The document management screen will appear 2 Touch the Form Gallery Overlay key A list of registered images will appear 3 Touch the Modify key 4 Select the image that corresponds to the information that you want to modify If the image that you want to modify the information for is not displayed touch the key or the key ...

Страница 75: ...Change any copy settings that you want such as the number of copies to be made etc 3 Touch the Start key Copying will begin Once copying is finished the touch panel will return to the basic screen 3 Quick copying If the copier is equipped with the optional Print Scan System that allows you to send data from your computer that data is stored in the quick print memory of the copier Thus it is possib...

Страница 76: ...e touch panel will return to the basic screen 2 Checking data for a print job Follow the procedure below when you want to check certain information that corresponds to a specific print job 1 Press the Doc Mgmt key The document management screen will appear 2 Touch the Quick Print key If the Quick Print key is not displayed there is no longer data for print jobs in memory 3 Select the print job tha...

Страница 77: ...ou want to delete If the print job that you want to delete is not displayed touch the key or the key until it is displayed 4 Touch the Delete key 5 If you are certain that you want to delete that data touch the Delete key once again The touch panel will return to the screen for step 3 If you do not want to delete that data touch the Cancel key 6 If you want to delete other print jobs repeat steps ...

Страница 78: ...ayed under Original If you want to change the size of the copy paper touch the Paper key and select the size of paper that you want 7 Press the Start key Scanning of the originals will begin 8 Once scanning of the original is finished a message that asks you whether or not you want to continue registering other data will appear Once you are finished registering data touch the End key The touch pan...

Страница 79: ...gin If you touch the Added key you can select from among the two sided copy mode the margin mode the print page numbers function the form overlay mode the sheet copy mode and the booklet cover copy mode Refer to the corresponding procedure in Section 4 or 5 for the mode and function that you want to use 8 Change how the copies will be finished such as the number of copies to be made etc then touch...

Страница 80: ...o print out the first page of the originals touch the Print from 1st key Once printing is finished the touch panel will return to the screen that was displayed before printing began Once you are finished checking information press the Reset key The touch panel will return to the basic screen 6 If you want to check the information for other shared data touch the End key and then in the next screen ...

Страница 81: ... which the name for the shared data is displayed touch the q Up key or the Q Down key until that name is in the position that you want If you want to change the name of the data touch the Rename key See page 8 29 for the procedure on entering the name Once you are finished changing the name the touch panel will return to the basic screen 7 Once you are finished modifying information touch the End ...

Страница 82: ...tself Follow the procedure below when you want to use the copier to store the original in a synergy print box 1 Press the Doc Mgmt key The document management screen will appear 2 Touch the Synergy Print Box key 3 Touch the Store key The available synergy print boxes will be displayed in blocks of 10 4 Select the box that you want to register the originals in The example in the illustration shows ...

Страница 83: ...Press the Doc Mgmt key The document management screen will appear 2 Touch the Synergy Print Box key 3 Touch the Recall Box key The available synergy print boxes will be displayed in blocks of 10 4 Select the box that contains the corresponding originals The example in the illustration shows that 40 synergy print boxes from no 61 to no 100 are available If you want to select a box number other than...

Страница 84: ...e copies will be finished touch the Change entire Job Setting key and go to step 11 10 Select the copy mode and function that you want to use and press the Start key Copying will begin If you touch the Added key you can select from among the two sided copy mode the margin mode the print page numbers function the form overlay mode the sheet copy mode and the booklet cover copy mode Refer to the cor...

Страница 85: ... finished The touch panel will return to the screen for step 2 In this case go to step 5 If you selected more than one set of originals touch the key or the key to display the information about the other originals 4 Touch the Back key The touch panel will return to the screen for step 2 5 If you want to check the information for other originals repeat steps 2 4 Once you are finished checking infor...

Страница 86: ... 10 sets of originals at one time If any original that you want to print out is not displayed touch the key or the key until it is displayed 3 Touch the Change Box Row key A list of the originals you selected will appear 4 Select the original for which you want to change the order of printing and touch the q Up key or the Q Down key until that original is in the position that you want 5 Touch the ...

Страница 87: ...f you do not want to change the name go to step 8 If the name that you want to change is not displayed touch the key or the key until it is displayed 7 Enter the new name that you want to register for those originals See page 8 9 for the procedure on entering the name Once you are finished changing the name the touch panel will return to the basic screen 8 If you want to change the order in which ...

Страница 88: ...tual mailboxes See 1 Reset box delete all on page 8 23 It is also possible to print out a list of all of the registered information for each virtual mail box See 4 Document list on page 8 23 IMPORTANT You can additionally select the length of time that you want to elapse before each job file in a virtual mailbox is automatically deleted It is possible to set this time to any number of days between...

Страница 89: ...u want to continue printing from the next set of originals touch the Continue from next job key 2 Changing the password 1 Follow steps 1 6 on page 7 17 2 Touch the Password key 3 Use the numeric keys to enter the new password Max 8 digits 4 Touch the End key The touch panel will return to the basic screen 3 Deleting data from a virtual mailbox Any data stored in a virtual mailbox will be automatic...

Страница 90: ...cedure to change the limit for the number of copies that can be made by one or more departments without need to delete and re register the department codes Follow this procedure to check copy totals It is possible to view the total number of copies made on the machine the number of copies made for each paper size and the number of copies made by each department Follow this procedure to print out t...

Страница 91: ...digit management pin code as desired See 9 Management pin code change on page 8 11 3 How to register the various management settings Registering new department codes 1 Enter the copy management select mode See page 8 1 2 Touch the Set code key 3 Touch the Register key 4 Use the numeric keys to enter the department code 7 digit that you want to register 5 Touch the Register key If that department c...

Страница 92: ... 7 8 Touch the End key The touch panel will return to the screen for step 3 9 Touch the End key The touch panel will return to the copy management mode set up screen 10 Touch the End key The touch panel will return to the basic screen Deleting department codes 1 Enter the copy management select mode See page 8 1 2 Touch the Set code key 3 Touch the Delete key 4 Touch the department code that you w...

Страница 93: ... or the key until it is displayed 5 Use the numeric keys to change the limit for the number of copies that can be made under that department code The limit can be set in units of 1 000 sheets up to a maximum of 999 000 Enter 0 to enable unlimited copying 6 Touch the Register key The touch panel will return to the screen for step 4 To change the copy limit for another department repeat steps 4 6 7 ...

Страница 94: ...king copy counts 1 Enter the copy management select mode See page 8 1 2 Touch the Reference key The numbers of copies made by each individual department will be displayed 3 Touch the All dept total key in order to view the total number of copies made on the machine and the number of copies made for each paper size If the information you want is not displayed touch the key or the key until it is di...

Страница 95: ...copy management ON when you use this machine as a printer under the optional Print Scan System touch Printer in order to put a checkmark in the check box A corre sponding setting is also required in your computer See the On line Manual for the printer for the procedure to set the management mode in your computer 3 Touch the End key The touch panel will return to the basic screen 4 Making copies wh...

Страница 96: ...weekly timer Canceling the timer function Turning the weekly timer ON OFF Follow this procedure to set the present time If the time is not set correctly here weekly timer operation will not be triggered at the expected time Follow this procedure to register the times at which the copier is to be turned ON and OFF during each day of the week Leave the main switch ON and the copier will be turned ON...

Страница 97: ...y The touch panel will return to the basic screen Programming the weekly timer 1 Enter the weekly timer select mode See page 8 7 2 Touch the Week timer key 3 Touch the day of the week that you want to set the ON and OFF times for 3 Use the numeric keys to enter the management pin code 6200 If the pin code you entered matches the registered one the screen will change to the weekly timer set up scre...

Страница 98: ...e you are finished setting the ON OFF times touch the Enter key The touch panel will return to the weekly timer set up screen 9 Touch the End key The touch panel will return to the basic screen Canceling the timer function 1 Enter the weekly timer select mode See page 8 7 2 Touch the Cancel key 3 Touch the desired day of the week for which you want to temporarily cancel the weekly timer Cancel wil...

Страница 99: ...aver indicator will blink Warm up has begun Wait a while Another way to start warm up is to turn the main switch OFF O and then back ON again 2 Once warm up is finished you can make copies using the normal procedure 3 Once copying is finished press the Energy Saver key again The Energy Saver indicator will light continuously and the copier will once again enter the energy saving mode 3 Default set...

Страница 100: ...d before the auto shut off function see page 4 10 automatically turns the power to the copier OFF It is possible to set this time to any 15 minute increment between 15 and 240 minutes It is also possible to deactivate the auto shut off function See 0 Auto shut off ON OFF The factory default setting is 60 minutes It is recommended that you extend the time before the auto shut off function engages i...

Страница 101: ...ment pin code 6200 If the pin code you entered matches the registered one the screen will change to the default select screen You can change the 4 digit pin code as desired See 9 Management pin code change on page 8 11 4 Touch the Machine default key If the copier is equipped with the optional MMD Host Monitoring System Device you will also have to touch the Machine default key which is displayed ...

Страница 102: ...that corre sponds to that setting Once you are finished touch the End key and then the Basic key The touch panel will return to the basic screen 3 Drawer paper size No setting is necessary because the factory default setting is already set to APS 4 Special paper designation 1 If you want to change the drawer that is designated for special paper touch the Change key 2 Touch the key that corresponds...

Страница 103: ...eat function engages by touching the key or the key as appropriate If you want to continue changing other default settings follow the procedure that corre sponds to that setting Once you are finished touch the End key and then the Basic key The touch panel will return to the basic screen 8 Auto shut off time 1 Select the length of time that will elapse before the auto shut off function engages by ...

Страница 104: ...are certain that you want to change the time touch the OK key If you want to continue changing other default settings follow the procedure that corre sponds to that setting Once you are finished touch the End key and then the Basic key The touch panel will return to the basic screen 2 Copy related defaults Types of copy defaults The 20 different default settings defined as copy defaults are descri...

Страница 105: ... a limit on the number of copies that can be made at one time 1 999 Custom border erase size Select the size of the area to be designated for the Cstm erase setting of the border erase mode see page 5 6 It is the area outside that defined size that will be erased Front back margin key ON OFF Select whether you want the key that allows you to set the front and back page margin sepa rately to be dis...

Страница 106: ... the pin code you entered matches the registered one the screen will change to the default select screen You can change the 4 digit pin code as desired See 9 Management pin code change on page 8 11 4 Touch the Copy default key 5 Touch the key and the key as necessary to display the copy default setting that you want to access and touch that item Follow the procedure below that corresponds to the s...

Страница 107: ...or not by touching the ON key or the OFF key as appropriate under Toner Eco mode 3 Select the default setting for the toner economy mode by touching the ON key or the OFF key as appropriate under Economy Default 4 Touch the End key The touch panel will return to the copy default select screen If you want to continue changing other default settings follow the procedure that corre sponds to that set...

Страница 108: ...1 Select the default copy quality mode by touching the Mixed key the Text key or the Photo key as appropriate If you want to continue changing other default settings follow the procedure that corre sponds to that setting Once you are finished touch the End key and then the Basic key The touch panel will return to the basic screen 7 Sort mode ON OFF 1 Select the default setting for the Sort mode by...

Страница 109: ...then the Basic key The touch panel will return to the basic screen Zoom mode 1 Select the default zoom mode by touching the Size zoom key or the Standard zoom key as appropriate If you want to continue changing other default settings follow the procedure that corre sponds to that setting Once you are finished touch the End key and then the Basic key The touch panel will return to the basic screen ...

Страница 110: ...up screen or not by touching the ON key or the OFF key as appropriate If you want to continue changing other default settings follow the procedure that corre sponds to that setting Once you are finished touch the End key and then the Basic key The touch panel will return to the basic screen Drawer for insert sheets 1 If you want to change the drawer from which insert sheets are fed touch the Chang...

Страница 111: ...then the Basic key The touch panel will return to the basic screen Repeat copying 1 Select whether to allow repeat copying or not by touching the ON key or the OFF key as appropriate If you want to continue changing other default settings follow the procedure that corre sponds to that setting Once you are finished touch the End key and then the Basic key The touch panel will return to the basic sc...

Страница 112: ... for each synergy print box and virtual mailbox This procedure will delete at one time all of the data registered in any one box However since each synergy print box and virtual mailbox can have its own name and password if you regis ter a password for any of these boxes you will need to enter the registered password in order to access the data within that box This procedure will allow you to sele...

Страница 113: ...the pin code you entered matches the registered one the screen will change to the default select screen You can change the 4 digit pin code as desired See 9 Management pin code change on page 8 11 4 Touch the Box Management key The box management select screen will appear Follow the procedure below that corre sponds to the procedure that you want to perform Procedures 1 Reset box delete all 1 Touc...

Страница 114: ...en touch the Basis key The touch panel will return to the basic screen 2 Box name password Clear data in box 1 Touch the Box Name Box Password Clear Data in Box key 2 Select the number of the box 001 100 that you want to access by touching the key or the key as appropriate 3 Touch the End key 4 If you want to register a name for that box touch the Box Name key 5 Enter the name that you want to reg...

Страница 115: ... making settings for other boxes repeat steps 2 11 Once you are finished touch the End key and then in the next screen touch the Basis key The touch panel will return to the basic screen 3 Box default 1 Touch the Box default key 2 Select the number of days that you want each job file to be saved by touching the key or the key as appropriate under Auto delete document 3 Set the number of virtual ma...

Страница 116: ...The process to delete all of the data can take between 20 to 30 minutes Normally is not necessary to delete stored data 1 Touch the Default key The management mode select screen will appear 2 Touch the Default setting key 3 Use the numeric keys to enter the management pin code 6200 If the pin code you entered matches the registered one the screen will change to the default select screen You can ch...

Страница 117: ...ic keys to enter the management pin code 6200 If the pin code you entered matches the registered one the screen will change to the default select screen You can change the 4 digit pin code as desired See 9 Management pin code change on page 8 11 4 Touch the Toner coverage inf key An assessment report will be printed out Once printing is finished the touch panel will return to the basic screen 4 To...

Страница 118: ...Touch the Mode key Use the numeric keys to enter numbers The function of each key a key Touch to switch between the screens for inputting upper and lowercase letters Mode key Touch to switch between the screens for inputting symbols and either upper or lowercase letters Erase key Touch to delete all of characters to the right of the cursor O key P key Touch to move the cursor to the right or left ...

Страница 119: ...ch the Mode key to switch back to the screen for inputting lowercase letters 8 Touch the a key to switch to the screen for inputting uppercase letters 9 Touch the D key 8 30 10 Touch the a key to switch back to the screen for inputting lowercase letters 11 Touch the e and f keys in that order 12 Touch the End key The name you have entered will be registered and the touch panel will return to the p...

Страница 120: ... page 8 16 Sort ON The Sort mode will be selected and copies will be ejected into the Non sort tray Sort OFF The Non sort mode will be selected and copies will be ejected into the Non sort tray Staple mode Press the Staple Sort key to select the desired stapling style from among the three styles available Hole Punch mode Press the Punch key to select the desired number of holes from among the two ...

Страница 121: ... all copies from the Sort tray The maximum number of copies that can be stored on the Sort tray will differ depend ing on the size of copy paper that is being used See page 9 5 5 Remove all of the finished copies from the Sort tray 3 3 3 3 3 Copying in the Group mode This mode automatically groups copies made from multiple originals with all the copies produced from an individual original stacked ...

Страница 122: ...e copied in the DF When setting an original on the platen a message will appear after each original is scanned to confirm whether you want to scan another original or not POINT OF INFORMATION A maximum of fifty 11 x 8 1 2 or 8 1 2 x 11 size copies can be stapled at one time Up to thirty 11 x 17 or 8 1 2 x 14 size copies can be stapled at one time 3 Set the desired number of copy sets to be made 4 ...

Страница 123: ...ole punching will be accomplished as shown in the illustration at left as viewed from the front of the copies IMPORTANT The position of the holes on each page may differ very slightly due to the fact that holes are punched in one sheet at a time 2 Set the originals to be copied 3 Set the desired paper size and number of copy sets to be made etc POINT OF INFORMATION Acceptable copy paper sizes for ...

Страница 124: ... engage and the number of finished copies in the Non sort tray reaches the acceptable limit Paper capacity exceeded Remove paper from Finisher will appear in the message display and copying will stop Remove all of the finished copies from the Non sort tray and then resume copying When the Hole Punch mode is used in combination with either the Sort Sort Staple or Group mode the finished copies will...

Страница 125: ...ntact the service representative for your copier 0 0 0 0 0 Refilling the Stapling Unit If a message appears on the copier indicating that staples have run out the staple holder s need to be replenished with staples When Front appears in the message display the front stapler is empty and when Rear appears in the message display the rear stapler is empty The procedure to refill either stapler is the...

Страница 126: ...n is correct The arrow on the staple cartridge indicates the correct direction of insertion 8 Make sure the new staple cartridge is completely inserted all the way into the staple holder and then remove the paper tape covering the staple cartridge 9 Replace the staple holder back in its original position in the Stapling Unit Once it has been fully inserted it will click into place 10 Lift up the S...

Страница 127: ...cover towards you 2 Grasp the internal tray handle and carefully pull the internal tray out towards you 3 Grasp the Stapling Unit handle and lift up the Stapling Unit The two staplers will become visible 4 Pinch the staple holder release lever as shown in the illustration and lower it to release the lock 5 Pull out the staple holder 6 Push up on the tab A on the protective faceplate in order to ra...

Страница 128: ...into place 10 Lift up the Stapling Unit slightly and then lower it into its original position 11 Replace the internal tray in its original position all the way into the Finisher 12 Close the front cover securely Disposing of hole punch scraps The scrap hole punch tank is located inside the coupling section of the copier Leave the main switch on your copier turned ON while performing the procedure ...

Страница 129: ... well 6 Push in on both knobs one on each side of the scrap hole punch tank to lock the tank back in place 7 Reattach the Finisher to your copier 2 Booklet Stitcher This unit lets you store a large volume of copies and shifts the position of each copy set for ease of sorting It can staple finished copy sets and bind them For more detailed information refer to the instruction handbook for your Book...

Страница 130: ...le 3 Side Deck This unit is an auxiliary paper feed unit that holds up to 4 000 sheets of standard 75 g m2 11 x 8 1 2 size copy paper 4 Key Counter The Key Counter enables you to verify the number of copies that have been made It is useful for centralized management of the total number of copies made by different departments or by the company as a whole etc Setting the Key Counter Insert the Key C...

Страница 131: ...Unit 6 Print Scan System If the copier is equipped with the Print Scan System the copier can be used as a printer For more detailed information refer to the printer edition of your instruction handbook 7 Tandem Board The Tandem Board is required when two copy machines are connected together Con necting two copy machines will increase copy management speed two fold In addition for example if copyin...

Страница 132: ...or decks Load paper of size indicated 3 1 Add paper in bypass There is no paper in the stack bypass tray Set paper in the stack bypass tray 3 2 Reposition original or change drawer The orientation of the originals and the paper that you selected is different Change the orientation of the originals If you press the Start key without changing the orientation of the originals copying will be accompli...

Страница 133: ...al was not fed correctly into the DF Remove all originals and then set them in the DF once again 10 2 Memory overflow Delete some stored data The corresponding box has reached its acceptable limit of data under the copy management function In order to register new data into one of the boxes it is first necessary to delete some of the currently registered data 8 23 System error Main switch off on N...

Страница 134: ...the main body of the copier 2 Open the waste toner tank cover 3 Remove the waste toner tank 4 Close the opening of the waste toner tank with the attached seal IMPORTANT Waste toner is NOT reusable Give the old waste toner tank to the service representative for your copier CAUTION Do not incinerate toner and toner containers Dangerous sparks may cause burns 5 Set the new waste toner tank 6 Close th...

Страница 135: ...0 16 The procedure to remove misfed paper can be displayed on the touch panel by touching the key 2 Cautions WARNING High voltage is present in the charger section Take sufficient care when working in this area as there is a danger of electrical shock CAUTION The copier s fixing unit is extremely hot Take sufficient care when working in this area as there is a danger of getting burned Do not reuse...

Страница 136: ...indicator 2 Remove the misfed paper without tearing it If the paper does happen to tear remove any loose scraps from inside the copier 3 Push the drawer firmly back into the copier Misfeed in the Front Deck If Misfeed in paper drawer Remove paper and the misfeed location indicator shown in the illustration appear on the touch panel paper has misfed in the Front Deck 1 Pull out the Front Deck 2 Rem...

Страница 137: ...t If the paper does happen to tear remove any loose scraps from inside the copier 3 Close the right upper cover Misfeed inside the right lower cover If Paper misfeed Open right lower cover and the misfeed location indicator shown in the illustration appear on the touch panel a misfeed has occurred inside the right lower cover If the copier is equipped with the optional Side Deck first pull the Sid...

Страница 138: ...e misfeed message has disappeared from the touch panel Then re set the paper into the stack bypass tray 2 2 2 2 2 Misfeed in the paper conveyor section If Paper misfeed Open front cover and the misfeed location indicator shown in the illustration appear on the touch panel paper has misfed in the paper conveyor section 1 Open the front cover 2 Lower the paper conveyor section release lever to the l...

Страница 139: ...ting burned 7 Push the conveyor section all the way back into its original position in the copier and return the release lever to its original position as well 8 Close the front cover 3 3 3 3 3 Misfeed in the fixing unit or ejection section If Paper misfeed Remove paper from fixing unit and the misfeed location indicators shown in the illustration appear on the touch panel paper has misfed in the ...

Страница 140: ...le remove it without tearing it If the misfed paper is not visible perform steps 5 10 If you simply cannot remove the misfed paper easily turn the fixing unit knob in the direction of the arrow to eject the misfed paper 5 Lower the paper conveyor section release lever to the left and pull out the paper conveyor section WARNING High voltage is present in the charger section Take sufficient care whe...

Страница 141: ...it If Paper jam in duplex unit Open duplex unit drawer and the misfeed location indicators shown in the illustration appear on the touch panel paper has misfed in the duplex unit 1 Open the paper ejection cover and if the misfed paper is visible remove it If the copier is equipped with the optional Finisher or optional Copy Tray first detach or remove it from the copier as appropriate and then rea...

Страница 142: ...o reversing cover screws a located on the left side of the duplex unit The paper reversing cover b will open downwards 8 Remove the misfed paper without tearing it Close the paper reversing cover and fasten it with the same 2 screws If the paper does happen to tear remove any loose scraps from inside the copier 9 Push the duplex unit all the way back into its original position in the copier 10 Clo...

Страница 143: ...isfed originals without tearing them 5 If you cannot remove the originals easily open the reversing unit and remove them from there 6 If you still cannot remove the originals easily turn the original misfed release dial to convey them to the position where they can be easily removed 7 Once you have removed the misfed originals close the reversing unit securely 8 Close the original reversing cover ...

Страница 144: ...e removed from the coupling section open the upper cover 4 Remove the misfed paper from the conveyor section 5 Close the upper cover and reattach the Finisher to the copier Misfeed in the Sort tray If Misfeed in Finisher Remove paper and the misfeed location indicator shown in the illustration appear on the touch panel paper has misfed in the conveyor section to the Sort tray 1 Lift up the Non sor...

Страница 145: ...ob in a clockwise direction The misfed paper will be returned to the internal tray and the internal tray can now be pulled out 5 Grasp the internal tray handle and carefully pull the internal tray out towards you IMPORTANT Once the internal tray is pulled out DO NOT attempt to move the internal tray guides c If these guides are moved there is a danger of damage to the Finisher 6 Remove the misfed ...

Страница 146: ...feed location indicator shown in the illustration appear on the touch panel paper has misfed in the paper conveyor section to the internal tray 1 Grasp the front cover handle and open the front cover towards you 2 Grasp the conveyor guide handle A and open the conveyor guide to the right 3 If the misfed paper is visible remove it without tearing it 4 Grasp the conveyor guide handle B and open the ...

Страница 147: ...visible in the internal tray remove it without tearing it 9 Replace the internal tray in its original position all the way into the Finisher 10 Close the front cover securely 7 7 7 7 7 Misfeed in the optional Side Deck If Misfeed in side deck Remove paper and the misfeed location indicator shown in the illustration appear on the touch panel paper has misfed in the Side Deck 1 Hold down the Side De...

Страница 148: ...Side Deck and the copier remove the paper without tearing it If you cannot remove the misfed paper easily go to the next step 3 Open the right cover to the Side Deck 4 Remove the misfed paper without tearing it 5 Close the right cover to the Side Deck and reattach the Side Deck to the copier 10 17 ...

Страница 149: ...ting an original on the platen set it face down 3 5 The finished copies are too light Is the copier in the auto exposure mode To adjust the overall exposure level perform the Auto exposure adjustment procedure 8 15 adjust the exposure as appropriate To adjust the overall exposure level perform 4 1 the Manual exposure adjustment proce dure 8 16 Add toner 3 5 Is the copier in the manual exposure mod...

Страница 150: ...ll exposure level perform the Manual exposure adjustment procedure 8 16 Clean the platen the slit glass and the original protector under the DF 10 20 Paper is continually misfed Were the originals set correctly When setting an original on the platen align it properly with the appropriate original size indicator lines 3 5 When setting originals in the DF align them securely with the original insert...

Страница 151: ...it glass section c with a soft cloth dampen with alcohol or mild detergent DO NOT use thinner or other solvents If the slit glass section of the DF becomes dirty black lines may appear on finished copies as shown in the illustration at left If such black lines do appear on your cop ies perform the cleaning procedure on the slit glass section as described above CAUTION DO NOT leave the document fee...

Страница 152: ...2 160 g m2 paper In stack bypass tray Standard 60 g m2 200 g m2 or special paper letterheads colored paper or Transparencies etc envelopes DL C5 COM 10 Monarch only when using the printer functions of this machine Continuous copying 1 999 sheets Light source Inert gas lamp Developing system Dual component dry process Toner replenishment system From toner bottle to waste toner tank Fixing system He...

Страница 153: ...ealth CDRH of the U S Food and Drug Administration FDA This act prohibits the sale of laser products in the U S without certification and applies to laser products manufactured after Aug 1 1976 The label shown below indicates compliance with the CDRH regulations and must be attached to laser products marketed in the United States On this copier the label is on the rear SAFETY OF LASER BEAM 3 Optic...

Страница 154: ...12 4 ...

Страница 155: ...nal switches and are not suitable for isolating the equipment from the power source ATTENTION Le débranchement de la fiche secteur est le seul moyen de mettre l appareil hors tension Les interrupteurs sur l appareil ne sont que des interrupteurs de fonctionnement ils ne mettent pas l appareil hors tension ...

Страница 156: ... frequency energy and if not installed and used in accordance with the instruction manual may cause harmful interference to radio communications Op eration of this equipment in a residential area is likely to cause harmful interference in which case the user will be required to correct the interference at his own ex pense CAUTION The changes or modifications not expressly approved by the party res...

Страница 157: ...r was purchased of the defects If the KYOCERA MITA dealer is not able to provide warranty service write to KYOCERA MITA at the below address for the name and address of an Authorized KYOCERA MITA Dealer in your area This warranty does not cover copiers a which have become damaged due to operator negligence misuse or accidents b which do not work properly because of the use of supplies not meeting ...

Страница 158: ...12 8 A ...

Страница 159: ...12 9 For best copy results and machine performance we recommend that you use only KYOCERA MITA original supplies for your KYOCERA MITA copier ...

Страница 160: ...ay P O Box 57006 Irvine California 92618 7006 TEL 949 457 9000 FAX 949 457 9119 Southeastern Region 1500 Oakbrook Drive Norcross Georgia 30093 TEL 770 729 9786 FAX 770 729 9873 Southwestern Region 2825 West Story Road Irving Texas 75038 5299 TEL 972 550 8987 FAX 972 570 4704 Dallas Parts Distribution Center National Training Center 2825 West Story Road Irving Texas 75038 5299 TEL 972 659 0055 FAX ...

Отзывы: