6
E
9
13
12 C
13
9.
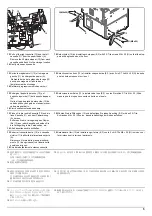
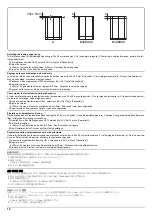
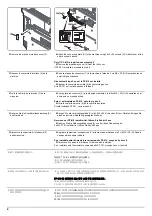
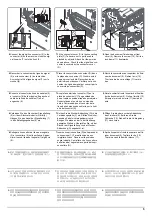
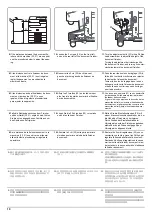
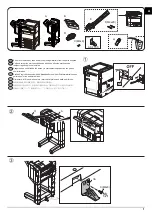
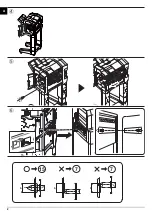
Insert the pin (12) on the connecting plate
(C) into the hole (13) on the document fin-
isher. Connect the document finisher to the
machine.
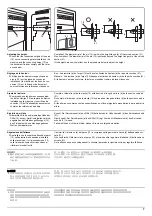
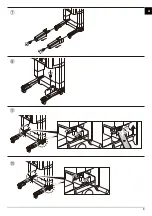
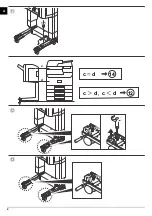
* If the document finisher doesn't comply
with the reference of the height as described
on page 7, adjust the height.
10.
Slowly push the lock frame (11) fully into the
machine so that the connectors at the far
end are connected.
11.
Secure the lock frame (11) using the screw
(10) removed in step 8.
12.
Install the staple cartridge (E).
13.
Close the upper front cover (9).
Proceed to adjusting the stapling position on
page 12.
9.
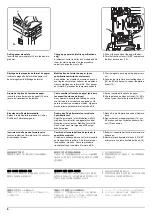
Introduire l'ergot (12) sur la plaque de con-
nexion (C) dans le trou (13) sur le finisseur
de document. Connecter le finisseur de doc-
ument sur la machine.
* Si le finisseur de document n'est pas con-
forme à la référence de hauteur comme
décrit à la page 7, ajustez la hauteur.
10.
Pousser doucement le cadre de verrouillage
(11) à fond dans la machine de sorte que les
connecteurs à l'extrémité soient raccordés.
11.
Fixez le bâti de verrouillage (11) à l'aide de
la vis (10) déposée à l'étape 8.
12.
Installer la cartouche d'agrafes (E).
13.
Refermer le couvercle avant supérieur (9).
Passez à l'ajustement de la position d'agraf-
age page 12.
9.
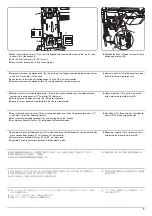
Inserte la clavija (12) de la placa de conex-
ión (C) en el orificio (13) del finalizador de
documentos. Conecte el finalizador de docu-
mentos a la máquina.
* Si el finalizador de documentos no cumple
con la referencia de altura como se describe
en la página 7, ajuste la altura.
10.
Empuje lentamente y hasta el fondo el
marco del cierre (11) hacia la máquina de
modo que se conecten los conectores en el
extremo más lejano.
11.
Asegure la carcasa de bloqueo (11) por
medio del tornillo (10) quitado en el paso 8.
12.
Instale el cartucho de grapas (E).
13.
Cierre la cubierta frontal superior (9).
Proceda al ajuste de la posición de grapado
en la página 12.
9.
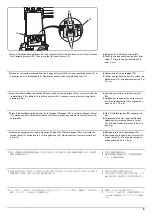
Setzen Sie den Stift (12) der Verbindung-
splatte (C) in die Öffnung (13) des Finishers.
Verbinden Sie den Finisher mit dem Gerät.
* Falls die Höhe des Finishers nicht mit der
auf Seite 7 in der Referenz beschriebenen
Höhe übereinstimmt, justieren Sie die Höhe.
10.
Schieben Sie die Verriegelung (11) wieder
langsam ins Gerät, so dass die Verbindun-
gen am anderen Ende des Geräts geschlos-
sen werden.
11.
Befestigen Sie den Fixierrahmen (11) mit der
in Schritt 8 entfernten Schraube (10).
12.
Installieren Sie das Heftklammer-Magazin
(E).
13.
Schließen Sie die obere vordere Abdeckung
(9).
Fahren Sie mit der Justage der Heftposition
auf Seite 12 fort.
9.
Inserire il perno (12) della piastra di connes-
sione (C) nel foro (13) del finisher docu-
menti. Collegare il finisher documenti alla
macchina.
* Se il finisher documenti non è conforme
con il riferimento altezza come descritto a
pagina 7, regolare l'altezza.
10.
Spingere lentamente la frame di blocco (11)
nella macchina in modo che i connettori
all'estremità risultino collegati.
11.
Fissare il telaio di bloccaggio (11) utilizzando
la vite (10) rimossa nel passo 8.
12.
Installare il contenitore punti (E).
13.
Chiudere il coperchio superiore anteriore (9).
Proseguire con la regolazione della
posizione di pinzatura a pagina 12.
9.
連結板 (C) のピン (12) をドキュメントフィ
ニッシャーの穴 (13) に挿入する。
ドキュメ
ントフィニッシャーを機械本体に接続する。
※P7 の高さ調整の基準に適合しない場合
は、
高さ調整を行う。
10.
機械奥側のコネクタが接続されるように、
ロックフレーム (11) をゆっくり奧に押す。
11.
手順 8 で外したビス
(10)
で、
ロックフレーム
(11)
を固定する。
12.
ステープルカートリッジ (E) を取り付ける。
13.
前上カバー(9) を閉じる。
P12
「ステープル位置の調整」
に進む。
9.
将连接板 (C) 的销钉 (12) 插入装订器的孔
(13) 中。 把装订器连接到机器本体。
※ 若不符合 P7 的高度调整的基准时,执行高
度调整。
10.
慢慢的把固定架 (11) 完全推入机器,这样机
器里侧的接插件就可以顺利连接。
11.
使用在步骤 8 中取下的 1 颗螺丝 (10) 来固定
锁框 (11)。
12.
安装装订针盒 (E)。
13.
关闭前部上盖板 (9)。
跳至 P12「调节装订位置」。
9.
연결판 (C) 의 핀 (12) 을 두큐먼트 피니셔의
구멍 (13) 에 삽입합니다 . 도큐먼트 피니셔
를 본체에 연결합니다 .
※ 연결할 도큐먼트 피니셔가 7 페이지에 설
명된 높이 기준에 부합하지 않으면 높이를
조정하십시오 .
10.
본체 뒷쪽의 커넥터가 연결되도록 잠금 프레
임 (11) 을 본체 안으로 천천히 밀어 넣습니
다 .
11.
스텝 8 에서 뺀 나사 (10)1 개로 잠금 프레임
(11) 을 고정합니다 .
12.
스테이플 카트리지 (E) 를 설치합니다 .
13.
상단 프론트 커버 (9) 를 닫습니다 .
12 페이지의 스테이플 위치 조정을 진행합니
다 .
11
10
Содержание Copystar CS 3011i
Страница 1: ...SERVICE MANUAL Published in September 2016 2RHSM 1 Rev 1 6 3011i 6 3511i ...
Страница 4: ...This page is intentionally left blank ...
Страница 10: ...This page is intentionally left blank ...
Страница 78: ...2RG 2RH 1 2 51 B B A A B B A A B B A A Tray lower cover Pin Pin ...
Страница 79: ...2RG 2RH 1 2 52 11 Attach the tray lower cover 12 Fix the tray lower cover by using two pins Figure 1 2 77 ...
Страница 83: ...2RG 2RH 1 2 56 This page is intentionally left blank ...
Страница 496: ...2RG 2RH 2 1 18 Figure 2 1 23 Duplex conveying section block diagram EPWB DU_SENS DU_CL_REM YC13 A5 YC15 1 DUCL DUS ...
Страница 504: ...2RG 2RH 2 2 8 This page is intentionally left blank ...
Страница 568: ...Installation Guide DP 7100 Document processor Installation Guide ...
Страница 572: ...2 1mm 0mm ն ո պ ջ չ շ A D C B B A ...
Страница 573: ...3 ռ ս վ ր ւ ց տ E A ...
Страница 574: ...4 ք द I M3x8 փ F G M4x10 K J H A ...
Страница 575: ...5 ON ध A ...
Страница 577: ...7 շ յ ն ո D E B ...
Страница 578: ...8 չ պ F G M4x10 H I M3x8 K J ջ B ...
Страница 579: ...9 ռ B ...
Страница 589: ...19 ո ն շ պ ջ չ 8 6 7 10 11 9 A B ...
Страница 599: ...DP 7110 Document processor Installation Guide ...
Страница 603: ...2 շ շ 2 շ 2 շ C M4x14 E ߑ ߒ ߓ ߔ ո շ 2 ߑ ն A ...
Страница 604: ...3 ߘ ո ߕ ߗ ո չ պ ջ ߖ F G H M3x8 BLACK A ...
Страница 605: ...4 ռ վ ր ւ ց ࠉտ ս I A ...
Страница 606: ...5 J L փ ք द K M3x8 K M3x8 K M3x8 ध A ...
Страница 607: ...6 ऩ प भ फ ब न म O N A ...
Страница 608: ...7 ON य A ...
Страница 610: ...9 շ ո շ 2 շ 2 շ 2 ߑ ն շ ߑ ߒ ߓ ߔ C M4x14 E B ...
Страница 611: ...10 ߖ ߕ ߘ ߎ չ պ ջ ߗ F G ո H M3x8 BLACK B ...
Страница 612: ...11 ռ ս տ ր ց վ I B ...
Страница 613: ...12 ւ ք द ध न փ J L P K M3x8 K M3x8 B ...
Страница 614: ...13 ऩ प फ O N B ...
Страница 634: ...DP 7120 Document processor Installation Guide ...
Страница 638: ...2 1mm 0mm ն շ ո չ ջ պ B B A D C A ...
Страница 639: ...3 ռ ս վ տ ց ր E A ...
Страница 640: ...4 G ւ F F ք փ H ON 10 mm 10 mm A ...
Страница 642: ...6 շ ո յ ն D B ...
Страница 643: ...7 չ E B ...
Страница 644: ...8 F ON G պ F ջ ռ H 10 mm 10 mm B ...
Страница 653: ...17 ղ ն շ ճ մ յ 2 6 7 3 4 5 A B ...
Страница 655: ...19 չ ջ պ ս վ ռ 9 11 10 13 14 12 10 mm A B ...
Страница 665: ...PF 791 500 x 2 Paper feeder Installation Guide ...
Страница 673: ...PF 810 3000 sheet deck Installation Guide ...
Страница 686: ...DF 791 3000 sheet finisher Installation Guide ...
Страница 701: ...DF 7120 1000 sheet finisher Installation Guide ...
Страница 705: ...2 մ յ ն 7 7 15 a b a a b b b a A ...
Страница 706: ...3 ո շ չ պ A ...
Страница 707: ...4 ջ ռ ս c d 14 c d c d 12 c d ջ ռ ս c d 14 c d c d 12 c d A ...
Страница 708: ...5 վ ր D ց ON տ A ...
Страница 710: ...7 L յ մ ն շ B ...
Страница 712: ...9 ս ռ վ տ G B ...
Страница 713: ...10 ր ց ւ b a 17 17 25 a b a a b b B ...
Страница 714: ...11 ք փ द c d 24 c d c d 22 c d B ...
Страница 715: ...12 न ध ऩ प B ...
Страница 716: ...13 ब फ ON D B ...
Страница 719: ...AK 740 Bridge unit Installation Guide ...
Страница 721: ...MT 730 Mailbox Installation Guide ...
Страница 736: ...PH 7A C D Punch unit Installation Guide ...
Страница 757: ...DT 730 B Document tray Installation Guide ...
Страница 759: ...5 2013 5 302LC56750 01 H F G D D 6 4 3 7 E C D D M4 8 M4 8 M4 8 M4 8 ...
Страница 760: ...FAX System 12 Installation Guide ...

