5
11
10
9
11
D
C
D
D
C
C
6
5
7 8
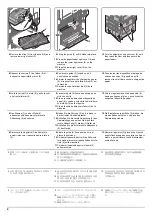
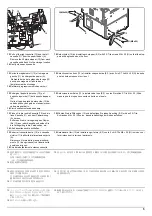
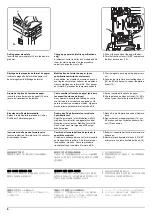
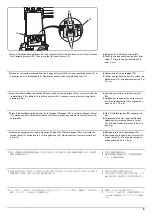
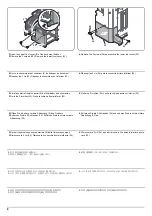
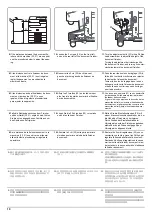
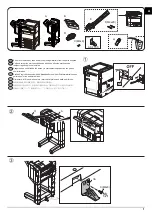
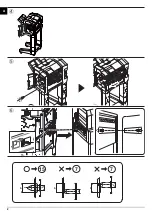
6.
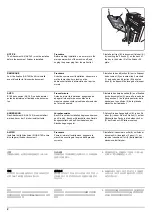
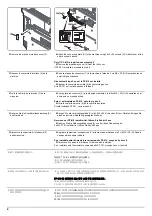
Connect the signal line connector (5) to the
connector (6) on the machine. Hook the sig-
nal line wire (7) onto the hook (8).
7.
Fit the connector cover (D) in the connecting
plate (C). Take care not to get the cable
pinched by objects. Attach it at the point as
shown above. Check that the signal line con-
nector is covered by the connector cover
(D).
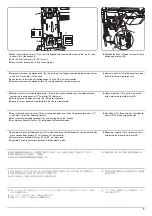
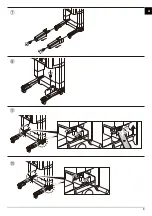
8.
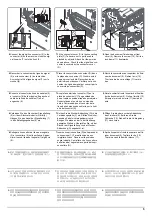
Open the document finisher upper front
cover (9). Remove the screw (10). Pull the
lock frame (11) frontwards.
6.
Raccorder le connecteur de ligne de signal
(5) sur le connecteur (6) de la machine.
Accrocher le fil de ligne de signal (7) sur le
crochet (8).
7.
Placer le couvercle de connecteur (D) dans
la plaque de connexion (C). Prendre soin à
ne pas pincer le câble. Raccordez-les au
point indiqué ci-dessus. Vérifier que le con-
necteur de ligne de signal est couvert par le
couvercle de connecteur (D).
8.
Ouvrir le couvercle avant supérieur du finis-
seur de document (9). Retirez la vis (10).
Tirer le cadre de verrouillage (11) vers le
bas.
6.
Conecte el conector de línea de señales (5)
al conector (6) de la máquina. Enganche el
cable de la línea de señales (7) en el
enganche (8).
7.
Acople la cubierta del conector (D) en la
placa de conexión (C). Tenga cuidado de
que el cable no quede atrapado por objetos.
Conéctelas en el punto que se muestra
arriba. Compruebe que el conector de la
línea de señales quede cubierto por la cubi-
erta del conector (D).
8.
Abra la cubierta frontal superior del finaliza-
dor de documentos (9). Quite el tornillo (10).
Empuje el marco de cierre (11) hacia del-
ante.
6.
Verbinden Sie den Stecker der Signalleitung
(5) mit dem Steckverbinder im Gerät (6).
Hängen Sie das Kabel der Signalleitung (7)
in den Befestigungshaken (8) ein.
7.
Setzen Sie die Stecker-Abdeckung (D) in die
Verbindungsplatte (C) ein. Stellen Sie sicher,
dass das Kabel nicht eingeklemmt wird.
Bringen Sie diese an der in der Abbildung
gezeigten Stelle an. Überprüfen Sie, ob der
Stecker der Signalleitung von der Stecker-
Abdeckung (D) abgedeckt ist.
8.
Öffnen Sie die obere vordere Abdeckung
des Finishers (9). Entfernen Sie die
Schraube (10). Ziehen Sie die Verriegelung
(11) nach vorne.
6.
Collegare il connettore di linea del segnale
(5) al connettore (6) sulla periferica. Aggan-
ciare il cavo di linea del segnale (7) al gancio
(8).
7.
Inserire il copri connettore (D) nella piastra di
connessione (C). Fare attenzione a non
impigliare il cavo. Fissare nella posizione
sopra indicata. Controllare che il connettore
della linea del segnale sia coperto dal copri
connettore (D).
8.
Aprire il coperchio frontale superiore del fin-
isher documenti (9). Togliere la vite (10).
Tirare in avanti la frame di blocco (11).
6.
信号線のコネクター(5) を機械本体のコネ
クター(6) に接続する。
信号線 (7) は、
フッ
ク (8) に掛けること。
7.
コネクターカバー(D) を連結板 (C) にはめ
込む。
電線を挟み込まない様注意すること。
図の位置で取り付けること。
信号線のコネク
ターがコネクターカバー(D) で隠れている
ことを確認する。
8.
ドキュメントフィニッシャーの前上カバー
(9) を開く。
ビス (10) を外す。
ロックフレー
ム (11) を手前に引く。
6.
把信号线的接插件 (5) 和机器本体的接插件
(6) 相连接。 把信号线 (7) 挂到挂钩 (8) 上。
7.
将接插件盖板 (D) 嵌入到连接板 (C)。 请注
意不要夹住电线。 按图示位置来安装。请确
认信号线的接插件是否完全隐藏在接插件盖
板中 (D)。
8.
打开装订器的前上盖板 (9)。取下螺丝 (10)。
向身体前侧拉出固定架(11)。
6.
시그널 라인 연결 커넥터 (5) 를 본체의 커넥
터 (6) 에 연결합니다 . 시그널 라인 와이어
(7) 를 후크 (8) 에 겁니다 .
7.
커넥터 커버 (D) 를 연결판 (C) 에 맞추어 끼
웁니다 . 케이블이 커넥터 커버 (D) 에 끼이
지 않도록 주의합니다 . 위에 표시된 위치에
부착합니다 . 시그널라인 커넥터가 커넥터
커버 (D) 에 덮여있는지 확인합니다 .
8.
도큐먼트 피니셔의 상단 프론트 커버 (9) 를
엽니다 . 나사 (10) 를 제거합니다 . 잠금 프
레임 (11) 을 앞으로 뺍니다 .
Содержание Copystar CS 3011i
Страница 1: ...SERVICE MANUAL Published in September 2016 2RHSM 1 Rev 1 6 3011i 6 3511i ...
Страница 4: ...This page is intentionally left blank ...
Страница 10: ...This page is intentionally left blank ...
Страница 78: ...2RG 2RH 1 2 51 B B A A B B A A B B A A Tray lower cover Pin Pin ...
Страница 79: ...2RG 2RH 1 2 52 11 Attach the tray lower cover 12 Fix the tray lower cover by using two pins Figure 1 2 77 ...
Страница 83: ...2RG 2RH 1 2 56 This page is intentionally left blank ...
Страница 496: ...2RG 2RH 2 1 18 Figure 2 1 23 Duplex conveying section block diagram EPWB DU_SENS DU_CL_REM YC13 A5 YC15 1 DUCL DUS ...
Страница 504: ...2RG 2RH 2 2 8 This page is intentionally left blank ...
Страница 568: ...Installation Guide DP 7100 Document processor Installation Guide ...
Страница 572: ...2 1mm 0mm ն ո պ ջ չ շ A D C B B A ...
Страница 573: ...3 ռ ս վ ր ւ ց տ E A ...
Страница 574: ...4 ք द I M3x8 փ F G M4x10 K J H A ...
Страница 575: ...5 ON ध A ...
Страница 577: ...7 շ յ ն ո D E B ...
Страница 578: ...8 չ պ F G M4x10 H I M3x8 K J ջ B ...
Страница 579: ...9 ռ B ...
Страница 589: ...19 ո ն շ պ ջ չ 8 6 7 10 11 9 A B ...
Страница 599: ...DP 7110 Document processor Installation Guide ...
Страница 603: ...2 շ շ 2 շ 2 շ C M4x14 E ߑ ߒ ߓ ߔ ո շ 2 ߑ ն A ...
Страница 604: ...3 ߘ ո ߕ ߗ ո չ պ ջ ߖ F G H M3x8 BLACK A ...
Страница 605: ...4 ռ վ ր ւ ց ࠉտ ս I A ...
Страница 606: ...5 J L փ ք द K M3x8 K M3x8 K M3x8 ध A ...
Страница 607: ...6 ऩ प भ फ ब न म O N A ...
Страница 608: ...7 ON य A ...
Страница 610: ...9 շ ո շ 2 շ 2 շ 2 ߑ ն շ ߑ ߒ ߓ ߔ C M4x14 E B ...
Страница 611: ...10 ߖ ߕ ߘ ߎ չ պ ջ ߗ F G ո H M3x8 BLACK B ...
Страница 612: ...11 ռ ս տ ր ց վ I B ...
Страница 613: ...12 ւ ք द ध न փ J L P K M3x8 K M3x8 B ...
Страница 614: ...13 ऩ प फ O N B ...
Страница 634: ...DP 7120 Document processor Installation Guide ...
Страница 638: ...2 1mm 0mm ն շ ո չ ջ պ B B A D C A ...
Страница 639: ...3 ռ ս վ տ ց ր E A ...
Страница 640: ...4 G ւ F F ք փ H ON 10 mm 10 mm A ...
Страница 642: ...6 շ ո յ ն D B ...
Страница 643: ...7 չ E B ...
Страница 644: ...8 F ON G պ F ջ ռ H 10 mm 10 mm B ...
Страница 653: ...17 ղ ն շ ճ մ յ 2 6 7 3 4 5 A B ...
Страница 655: ...19 չ ջ պ ս վ ռ 9 11 10 13 14 12 10 mm A B ...
Страница 665: ...PF 791 500 x 2 Paper feeder Installation Guide ...
Страница 673: ...PF 810 3000 sheet deck Installation Guide ...
Страница 686: ...DF 791 3000 sheet finisher Installation Guide ...
Страница 701: ...DF 7120 1000 sheet finisher Installation Guide ...
Страница 705: ...2 մ յ ն 7 7 15 a b a a b b b a A ...
Страница 706: ...3 ո շ չ պ A ...
Страница 707: ...4 ջ ռ ս c d 14 c d c d 12 c d ջ ռ ս c d 14 c d c d 12 c d A ...
Страница 708: ...5 վ ր D ց ON տ A ...
Страница 710: ...7 L յ մ ն շ B ...
Страница 712: ...9 ս ռ վ տ G B ...
Страница 713: ...10 ր ց ւ b a 17 17 25 a b a a b b B ...
Страница 714: ...11 ք փ द c d 24 c d c d 22 c d B ...
Страница 715: ...12 न ध ऩ प B ...
Страница 716: ...13 ब फ ON D B ...
Страница 719: ...AK 740 Bridge unit Installation Guide ...
Страница 721: ...MT 730 Mailbox Installation Guide ...
Страница 736: ...PH 7A C D Punch unit Installation Guide ...
Страница 757: ...DT 730 B Document tray Installation Guide ...
Страница 759: ...5 2013 5 302LC56750 01 H F G D D 6 4 3 7 E C D D M4 8 M4 8 M4 8 M4 8 ...
Страница 760: ...FAX System 12 Installation Guide ...

