3
4
4
C
D
(M3x12)
B
2
B
A
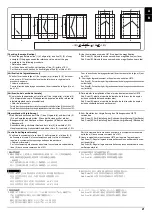
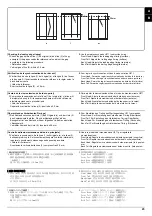
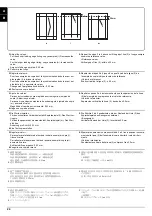
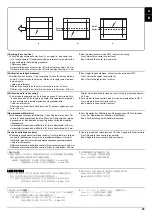
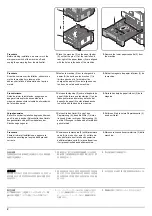
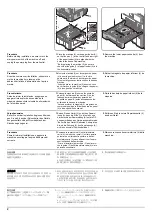
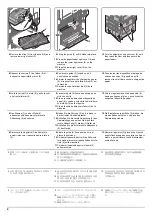
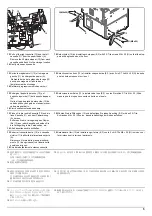
3.
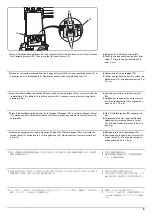
Secure the machine (2) to the paper feeder
(A) with the 2 pins (B).
4.
Insert the lower paper cassette (3) into the
machine.
5.
Install the retainer (C) in the location as
shown in the figure using 2 S Tite screws M3
× 12 (D).
6.
Turn the adjusters on each corner (4) until
they reach the floor and then secure the
paper feeder.
3.
Fixer la machine (2) au chargeur de papier
(A) avec les 2 broches (B).
4.
Insérez le magasin de papier inférieur (3)
dans la machine.
5.
Installer l'élément de retenue (C) à l'endroit
indiqué sur la figure avec 2 vis S Tite M3 ×
12 (D).
6.
Faire tourner les dispositifs de réglage de
chacun des coins (4) jusqu'à ce qu'ils
touchent le sol et fixer ensuite le chargeur de
papier.
3.
Fije la máquina (2) al depósito de papel (A)
con las dos clavijas (B).
4.
Inserte el depósito de papel inferior (3) en la
máquina.
5.
Instale el retén (C) en el lugar que muestra
la ilustración, mediante los 2 tornillos S Tite
M3 × 12 (D).
6.
Gire los reguladores en cada esquina (4)
hasta que lleguen al piso y, a continuación,
asegure el depósito de papel.
3.
Sichern Sie das Gerät (2) mit den 2 Stiften
(B) am Papiereinzug (A).
4.
Setzen Sie die untere Papierkassette (3) ins
Gerät ein.
5.
Die Halterung (C) an der dargestellten Stelle
mit den 2 S-Tite-Schrauben M3 × 12 (D) bef-
estigen.
6.
Die Einsteller an jeder Ecke (4) drehen, bis
sie den Boden berühren, und dann den
Papiereinzug sichern.
3.
Fissare la macchina (2) sull'alimentatore
carta (A) con i 2 perni (B).
4.
Inserire il cassetto carta inferiore (3) nella
macchina.
5.
Installare il fermo (C) nella posizione
mostrata in figura, utilizzando le 2 viti S Tite
M3 × 12 (D).
6.
Ruotare i regolatori (4) presenti su ciascun
angolo finché vengano a contatto con il pavi-
mento, e quindi fissare l’unità di alimentazi-
one della carta.
3.
ピン (B)2 本で機械本体 (2) をペーパー
フィーダー(A) に固定する。
4.
下段カセット (3) を機械本体に挿入する。
5.
イラストの位置に取付板(C)をビス M3×12 S
タイト
(D)2 本で取り付ける。
6.
四隅のアジャスター(4) を床に接触する位
置まで回し、
ペーパーフィーダーを固定す
る。
3.
用 2 个固定插销 (B) 将机器主机 (2) 固定在
供纸盒 (A) 上。
4.
把下部纸盒 (3) 插到机器主机中。
5.
使用 2 颗紧固型 S 螺丝 M3 × 12(D)将安
装板(C)安装在图示位置。
6.
转动四角上的调节器 (4) 直至与地面接触,
然后再固定供纸盒。
3.
핀 (B) 2 개로 본체 (2) 를 급지대 (A) 에 고정
합니다 .
4.
하단 용지 카세트 (3) 를 본체에 장착합니다 .
5.
나사 M3 × 12 S 타이트 (D) 2 개를 사용하
여 리테이너 (C) 를 그림에 표시된 위치에 설
치 합니다 .
6.
각 모서리에 위치하는 어져스터 (4) 를 맨 안
쪽에 닿을 때까지 돌려 급지대를
고정합니다 .
Содержание Copystar CS 3011i
Страница 1: ...SERVICE MANUAL Published in September 2016 2RHSM 1 Rev 1 6 3011i 6 3511i ...
Страница 4: ...This page is intentionally left blank ...
Страница 10: ...This page is intentionally left blank ...
Страница 78: ...2RG 2RH 1 2 51 B B A A B B A A B B A A Tray lower cover Pin Pin ...
Страница 79: ...2RG 2RH 1 2 52 11 Attach the tray lower cover 12 Fix the tray lower cover by using two pins Figure 1 2 77 ...
Страница 83: ...2RG 2RH 1 2 56 This page is intentionally left blank ...
Страница 496: ...2RG 2RH 2 1 18 Figure 2 1 23 Duplex conveying section block diagram EPWB DU_SENS DU_CL_REM YC13 A5 YC15 1 DUCL DUS ...
Страница 504: ...2RG 2RH 2 2 8 This page is intentionally left blank ...
Страница 568: ...Installation Guide DP 7100 Document processor Installation Guide ...
Страница 572: ...2 1mm 0mm ն ո պ ջ չ շ A D C B B A ...
Страница 573: ...3 ռ ս վ ր ւ ց տ E A ...
Страница 574: ...4 ք द I M3x8 փ F G M4x10 K J H A ...
Страница 575: ...5 ON ध A ...
Страница 577: ...7 շ յ ն ո D E B ...
Страница 578: ...8 չ պ F G M4x10 H I M3x8 K J ջ B ...
Страница 579: ...9 ռ B ...
Страница 589: ...19 ո ն շ պ ջ չ 8 6 7 10 11 9 A B ...
Страница 599: ...DP 7110 Document processor Installation Guide ...
Страница 603: ...2 շ շ 2 շ 2 շ C M4x14 E ߑ ߒ ߓ ߔ ո շ 2 ߑ ն A ...
Страница 604: ...3 ߘ ո ߕ ߗ ո չ պ ջ ߖ F G H M3x8 BLACK A ...
Страница 605: ...4 ռ վ ր ւ ց ࠉտ ս I A ...
Страница 606: ...5 J L փ ք द K M3x8 K M3x8 K M3x8 ध A ...
Страница 607: ...6 ऩ प भ फ ब न म O N A ...
Страница 608: ...7 ON य A ...
Страница 610: ...9 շ ո շ 2 շ 2 շ 2 ߑ ն շ ߑ ߒ ߓ ߔ C M4x14 E B ...
Страница 611: ...10 ߖ ߕ ߘ ߎ չ պ ջ ߗ F G ո H M3x8 BLACK B ...
Страница 612: ...11 ռ ս տ ր ց վ I B ...
Страница 613: ...12 ւ ք द ध न փ J L P K M3x8 K M3x8 B ...
Страница 614: ...13 ऩ प फ O N B ...
Страница 634: ...DP 7120 Document processor Installation Guide ...
Страница 638: ...2 1mm 0mm ն շ ո չ ջ պ B B A D C A ...
Страница 639: ...3 ռ ս վ տ ց ր E A ...
Страница 640: ...4 G ւ F F ք փ H ON 10 mm 10 mm A ...
Страница 642: ...6 շ ո յ ն D B ...
Страница 643: ...7 չ E B ...
Страница 644: ...8 F ON G պ F ջ ռ H 10 mm 10 mm B ...
Страница 653: ...17 ղ ն շ ճ մ յ 2 6 7 3 4 5 A B ...
Страница 655: ...19 չ ջ պ ս վ ռ 9 11 10 13 14 12 10 mm A B ...
Страница 665: ...PF 791 500 x 2 Paper feeder Installation Guide ...
Страница 673: ...PF 810 3000 sheet deck Installation Guide ...
Страница 686: ...DF 791 3000 sheet finisher Installation Guide ...
Страница 701: ...DF 7120 1000 sheet finisher Installation Guide ...
Страница 705: ...2 մ յ ն 7 7 15 a b a a b b b a A ...
Страница 706: ...3 ո շ չ պ A ...
Страница 707: ...4 ջ ռ ս c d 14 c d c d 12 c d ջ ռ ս c d 14 c d c d 12 c d A ...
Страница 708: ...5 վ ր D ց ON տ A ...
Страница 710: ...7 L յ մ ն շ B ...
Страница 712: ...9 ս ռ վ տ G B ...
Страница 713: ...10 ր ց ւ b a 17 17 25 a b a a b b B ...
Страница 714: ...11 ք փ द c d 24 c d c d 22 c d B ...
Страница 715: ...12 न ध ऩ प B ...
Страница 716: ...13 ब फ ON D B ...
Страница 719: ...AK 740 Bridge unit Installation Guide ...
Страница 721: ...MT 730 Mailbox Installation Guide ...
Страница 736: ...PH 7A C D Punch unit Installation Guide ...
Страница 757: ...DT 730 B Document tray Installation Guide ...
Страница 759: ...5 2013 5 302LC56750 01 H F G D D 6 4 3 7 E C D D M4 8 M4 8 M4 8 M4 8 ...
Страница 760: ...FAX System 12 Installation Guide ...


