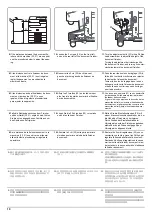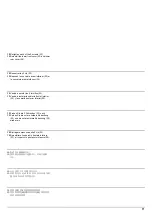
9
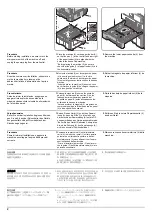
15
25
26
15
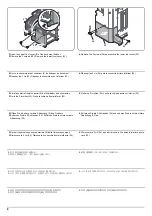
3.
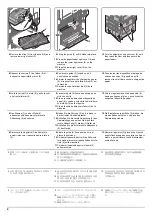
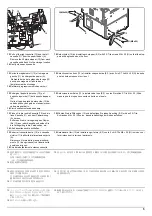
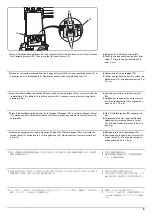
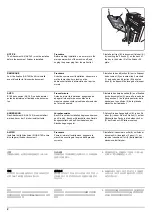
Insert a Philips-head screwdriver into the 2 long slots (25) in the front deck cursor (15) and loosen
the 2 adjusting screws (26). Then move the front deck cursor (15).
4.
Retighten the 2 adjusting screws (26).
5.
Check that the gap between the front deck
cursor (15) and the paper is between 0.5
and 1.5 mm.
3.
Insérer un tournevis cruciforme dans les 2 longues fentes (25) du curseur de platine avant (15) et
desserrer les 2 vis de réglage (26). Déplacer ensuite le curseur de platine avant (15).
4.
Resserrer les 2 vis de réglage (26).
5.
Vérifier que l'écartement entre le curseur de
platine avant (15) et le papier est entre 0,5 et
1,5 mm.
3.
Inserte un destornillador de cabeza Philips en las dos ranuras largas (25) en el cursor frontal de
la plataforma (15) y afloje los 2 tornillos de ajuste (26). Después, mueva el cursor frontal de la
plataforma (15).
4.
Vuelva a apretar los 2 tornillos de ajuste
(26).
5.
Verifique que la separación entre el cursor
frontal de la plataforma (15) y el papel sea
de entre 0,5 y 1,5 mm.
3.
Einen Kreuzschlitzschraubendreher in die 2 langen Öffnungen (25) im vorderen Konsole-Cursor
(15) stecken und die 2 Einstellschrauben (26) lösen. Danach den vorderen Konsole-Cursor (15)
verschieben.
4.
Die 2 Einstellschrauben (26) wieder anzie-
hen.
5.
Vergewissern Sie sich, dass der Abstand
zwischen dem vorderen Konsole-Cursor
(15) und dem Papier im Bereich 0,5 bis 1,5
mm liegt.
3.
Inserire un cacciavite con testa a croce tipo Philips nelle 2 fessure lunghe (25) nel cursore fron-
tale del deck (15) e allentare le 2 viti di regolazione (26). Quindi spostare il cursore frontale del
deck (15).
4.
Ristringere le 2 viti di regolazione (26).
5.
Controllare che lo spazio tra il cursore fron-
tale del deck (15) e la carta sia compreso
nella gamma tra 0,5 e 1,5 mm.
3.
デッキカーソル前 (15) の 2 箇所の長穴 (25) からプラスドライバー挿入し、調整ビス (26)2 本を
緩め、
デッキカーソル前 (15) を移動させる。
4.
調整ビス (26)2 本を締め付ける。
5.
デッキカーソル前 (15) と用紙の隙間が 0.5
~ 1.5mm の範囲内になっていることを確認
する
3.
将十字螺丝刀从堆纸板前部游标 (15) 的 2 处长孔 (25) 处插入,拧松 2 颗调节螺丝 (26),移动堆
纸板前部游标 (15)。
4.
拧紧 2 颗调节螺丝 (26)。
5.
确认堆纸板前部游标 (15) 与纸张的间隙在
0.5 ~ 1.5mm 的范围内。
3.
프론트 데크커서 (15) 의 두 군데의 긴 구멍 (25) 에서 십자 드라이버 삽입하고 조정 나사 (26) 2
개를 풀어 프론트 데크 커서 (15) 를 이동시킵니다 .
4.
조정나사 (26) 2 개를 조입니다 .
5.
데크커서 앞 (15) 과 용지의 틈이 0.5 ~ 1.5
mm 범위내가 되어 있는 것을 확인합니다 .
Содержание Copystar CS 3011i
Страница 1: ...SERVICE MANUAL Published in September 2016 2RHSM 1 Rev 1 6 3011i 6 3511i ...
Страница 4: ...This page is intentionally left blank ...
Страница 10: ...This page is intentionally left blank ...
Страница 78: ...2RG 2RH 1 2 51 B B A A B B A A B B A A Tray lower cover Pin Pin ...
Страница 79: ...2RG 2RH 1 2 52 11 Attach the tray lower cover 12 Fix the tray lower cover by using two pins Figure 1 2 77 ...
Страница 83: ...2RG 2RH 1 2 56 This page is intentionally left blank ...
Страница 496: ...2RG 2RH 2 1 18 Figure 2 1 23 Duplex conveying section block diagram EPWB DU_SENS DU_CL_REM YC13 A5 YC15 1 DUCL DUS ...
Страница 504: ...2RG 2RH 2 2 8 This page is intentionally left blank ...
Страница 568: ...Installation Guide DP 7100 Document processor Installation Guide ...
Страница 572: ...2 1mm 0mm ն ո պ ջ չ շ A D C B B A ...
Страница 573: ...3 ռ ս վ ր ւ ց տ E A ...
Страница 574: ...4 ք द I M3x8 փ F G M4x10 K J H A ...
Страница 575: ...5 ON ध A ...
Страница 577: ...7 շ յ ն ո D E B ...
Страница 578: ...8 չ պ F G M4x10 H I M3x8 K J ջ B ...
Страница 579: ...9 ռ B ...
Страница 589: ...19 ո ն շ պ ջ չ 8 6 7 10 11 9 A B ...
Страница 599: ...DP 7110 Document processor Installation Guide ...
Страница 603: ...2 շ շ 2 շ 2 շ C M4x14 E ߑ ߒ ߓ ߔ ո շ 2 ߑ ն A ...
Страница 604: ...3 ߘ ո ߕ ߗ ո չ պ ջ ߖ F G H M3x8 BLACK A ...
Страница 605: ...4 ռ վ ր ւ ց ࠉտ ս I A ...
Страница 606: ...5 J L փ ք द K M3x8 K M3x8 K M3x8 ध A ...
Страница 607: ...6 ऩ प भ फ ब न म O N A ...
Страница 608: ...7 ON य A ...
Страница 610: ...9 շ ո շ 2 շ 2 շ 2 ߑ ն շ ߑ ߒ ߓ ߔ C M4x14 E B ...
Страница 611: ...10 ߖ ߕ ߘ ߎ չ պ ջ ߗ F G ո H M3x8 BLACK B ...
Страница 612: ...11 ռ ս տ ր ց վ I B ...
Страница 613: ...12 ւ ք द ध न փ J L P K M3x8 K M3x8 B ...
Страница 614: ...13 ऩ प फ O N B ...
Страница 634: ...DP 7120 Document processor Installation Guide ...
Страница 638: ...2 1mm 0mm ն շ ո չ ջ պ B B A D C A ...
Страница 639: ...3 ռ ս վ տ ց ր E A ...
Страница 640: ...4 G ւ F F ք փ H ON 10 mm 10 mm A ...
Страница 642: ...6 շ ո յ ն D B ...
Страница 643: ...7 չ E B ...
Страница 644: ...8 F ON G պ F ջ ռ H 10 mm 10 mm B ...
Страница 653: ...17 ղ ն շ ճ մ յ 2 6 7 3 4 5 A B ...
Страница 655: ...19 չ ջ պ ս վ ռ 9 11 10 13 14 12 10 mm A B ...
Страница 665: ...PF 791 500 x 2 Paper feeder Installation Guide ...
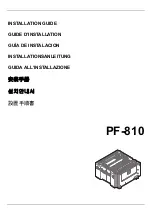
Страница 673: ...PF 810 3000 sheet deck Installation Guide ...
Страница 686: ...DF 791 3000 sheet finisher Installation Guide ...
Страница 701: ...DF 7120 1000 sheet finisher Installation Guide ...
Страница 705: ...2 մ յ ն 7 7 15 a b a a b b b a A ...
Страница 706: ...3 ո շ չ պ A ...
Страница 707: ...4 ջ ռ ս c d 14 c d c d 12 c d ջ ռ ս c d 14 c d c d 12 c d A ...
Страница 708: ...5 վ ր D ց ON տ A ...
Страница 710: ...7 L յ մ ն շ B ...
Страница 712: ...9 ս ռ վ տ G B ...
Страница 713: ...10 ր ց ւ b a 17 17 25 a b a a b b B ...
Страница 714: ...11 ք փ द c d 24 c d c d 22 c d B ...
Страница 715: ...12 न ध ऩ प B ...
Страница 716: ...13 ब फ ON D B ...
Страница 719: ...AK 740 Bridge unit Installation Guide ...
Страница 721: ...MT 730 Mailbox Installation Guide ...
Страница 736: ...PH 7A C D Punch unit Installation Guide ...
Страница 757: ...DT 730 B Document tray Installation Guide ...
Страница 759: ...5 2013 5 302LC56750 01 H F G D D 6 4 3 7 E C D D M4 8 M4 8 M4 8 M4 8 ...
Страница 760: ...FAX System 12 Installation Guide ...


