25
A
B
a
1
h
2
X
X'
i
k
X'
X
X'
X
100
+1.5%
-1.5%
X
X
X'
j
3
3
3
3
2
X'
X
3.
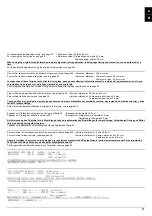
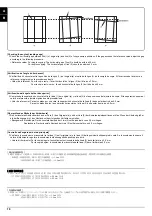
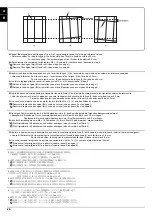
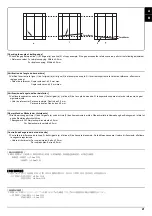
Adjust the values.
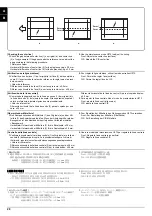
For the shorter length copy example (h)(j): Increases the value.
For the longer length copy example (i)(k): Decreases the value.
Amount of change per step: 0.02 %
4.
Perform a test copy.
5.
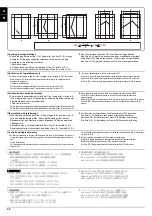
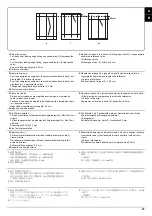
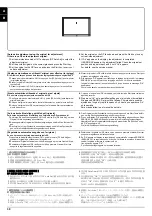
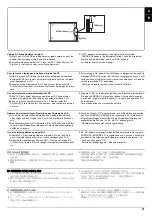
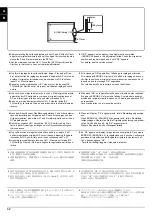
Repeat the steps 2 to 4 above until the gap of line (2) (3) of copy
example shows the reference value.
<Reference value>
For the sub-scan direction, vertical gap of line (2): within ±1.5%
For the main-scan direction, horizontal gap of line (3): within ±1.5%
3.
Régler les valeurs.
Pour l’exemple de copie dont la longueur est plus courte (h)(j) :
augmenter la valeur.
Pour l’exemple de copie dont la longueur est plus longue (i)(k) :
diminuer la valeur.
Changement par graduation d’échelle : 0,02 %
4.
Effectuer une copie de test.
5.
Répéter les étapes 2 à 4 jusqu’à ce que l’écart de la ligne (2) (3) de
l’exemple de copie indique la valeur de référence.
<Valeur de référence>
Pour la direction du balayage secondaire, l’écart vertical de la ligne (2)
est de ±1,5%
Pour la direction du balayage principal, l’écart horizontal de la ligne (3)
est de ±1,5%
3.
Ajuste los valores.
Para el ejemplo de copia más corto (h)(j): aumenta el valor.
Para el ejemplo de copia más largo (i)(k): disminuye el valor.
Magnitud del cambio por incremento: 0,02 %
4.
Haga una copia de prueba.
5.
Repita los pasos 2 a 4 anteriores hasta que la separación de la línea
(2) (3) del ejemplo de copia presente el valor de referencia.
<Valor de referencia>
Para la dirección de exploración secundaria, separación vertical de la
línea (2): dentro de ±1,5%
Para la dirección de exploración principal, separación horizontal de la
línea (3): dentro de ±1,5%
3.
Die Werte einstellen.
Für die kürzere Länge des Kopierbeispiels (h)(j): Den Wert erhöhen.
Für die längere Länge des Kopierbeispiels (i)(k): Den Wert verringern.
Änderung pro Schritt: 0,02 %
4.
Eine Testkopie erstellen.
5.
Die Schritte 2 bis 4 wiederholen, bis der Abstand der Linie (2) (3) des
Kopierbeispiels den Bezugswert aufweist.
<Bezugswert>
Subscanrichtung: Vertikaler Abstand der Linie (2): Innerhalb ±1,5%
Hauptscanrichtung: Horizontaler Abstand der Linie (3): Innerhalb
±1,5%
3.
Regolare i valori.
Per l’esempio di copia di lunghezza inferiore (h)(j): aumenta il valore.
Per l’esempio di copia di lunghezza superiore (i)(k): riduce il valore.
Entità modifica per passo: 0,02 %
4.
Eseguire una copia di prova
5.
Ripetere le operazioni sopra descritte da 2 a 4 fino a quando lo scostamento
della linea (2) (3) dell’esempio di copia riporterà i valori di riferimento.
<Valore di riferimento>
Per l’orientamento della scansione ausiliare, lo scostamento verticale
della linea (2) deve essere compreso fra ±1,5%
Per l’orientamento della scansione principale, lo scostamento orizzon-
tale della linea (3) deve essere compreso fra ±1,5%
3.
設定値を調整する。
長さが短い場合コピーサンプル (h)(j):設定値を上げる
長さが長い場合コピーサンプル (i)(k):設定値を下げる
1 ステップ当たりの変化量:0.02%
4.
テストコピーを行う。
5.
コピーサンプルの線 (2)(3) のずれが基準値内になるまで手順 2 ~ 4
を繰り返す。
<基準値>
副走査方向の場合、線 (2) の上下ずれ:±1.5% 以内
主走査方向の場合、線 (3) の左右ずれ:±1.5% 以内
3.
调整设定值。
在长度偏短时 复印样本(h)(j) :调高设定值
在长度偏长时 复印样本(i)(k) :调低设定值
设定值的一个调整单位变化量 :0.02%
4.
进行测试复印。
5.
重复上述步骤 2 到 4,直至复印样本上的线(2)、(3)之间的偏移值达
到标准值范围内。
< 标准值 >
对于副扫描方向,线(2)的上下偏移值 :±1.5% 以内
对于主扫描方向,线(3)的左右偏移值 :±1.5% 以内
3.
설정치를 조정합니다 .
길이가 짧은 경우 샘플 카피 (h)(j):설정치를 높입니다 .
길이가 긴 경우 샘플 카피 (i)(k):설정치를 내립니다 .
1 스텝당 변화량:0.02%
4.
테스트 카피를 합니다 .
5.
샘플 카피 선 (2)(3) 의 차이가 기준치내가 될 때까지 2 ~ 4 를 반복합
니다 .
<기준치>
부주사 방향의 경우 선 (2) 의 상하차이:±1.5% 이내
주주사 방향의 경우 선 (3) 의 좌우차이:±1.5% 이내
A
B
Содержание Copystar CS 3011i
Страница 1: ...SERVICE MANUAL Published in September 2016 2RHSM 1 Rev 1 6 3011i 6 3511i ...
Страница 4: ...This page is intentionally left blank ...
Страница 10: ...This page is intentionally left blank ...
Страница 78: ...2RG 2RH 1 2 51 B B A A B B A A B B A A Tray lower cover Pin Pin ...
Страница 79: ...2RG 2RH 1 2 52 11 Attach the tray lower cover 12 Fix the tray lower cover by using two pins Figure 1 2 77 ...
Страница 83: ...2RG 2RH 1 2 56 This page is intentionally left blank ...
Страница 496: ...2RG 2RH 2 1 18 Figure 2 1 23 Duplex conveying section block diagram EPWB DU_SENS DU_CL_REM YC13 A5 YC15 1 DUCL DUS ...
Страница 504: ...2RG 2RH 2 2 8 This page is intentionally left blank ...
Страница 568: ...Installation Guide DP 7100 Document processor Installation Guide ...
Страница 572: ...2 1mm 0mm ն ո պ ջ չ շ A D C B B A ...
Страница 573: ...3 ռ ս վ ր ւ ց տ E A ...
Страница 574: ...4 ք द I M3x8 փ F G M4x10 K J H A ...
Страница 575: ...5 ON ध A ...
Страница 577: ...7 շ յ ն ո D E B ...
Страница 578: ...8 չ պ F G M4x10 H I M3x8 K J ջ B ...
Страница 579: ...9 ռ B ...
Страница 589: ...19 ո ն շ պ ջ չ 8 6 7 10 11 9 A B ...
Страница 599: ...DP 7110 Document processor Installation Guide ...
Страница 603: ...2 շ շ 2 շ 2 շ C M4x14 E ߑ ߒ ߓ ߔ ո շ 2 ߑ ն A ...
Страница 604: ...3 ߘ ո ߕ ߗ ո չ պ ջ ߖ F G H M3x8 BLACK A ...
Страница 605: ...4 ռ վ ր ւ ց ࠉտ ս I A ...
Страница 606: ...5 J L փ ք द K M3x8 K M3x8 K M3x8 ध A ...
Страница 607: ...6 ऩ प भ फ ब न म O N A ...
Страница 608: ...7 ON य A ...
Страница 610: ...9 շ ո շ 2 շ 2 շ 2 ߑ ն շ ߑ ߒ ߓ ߔ C M4x14 E B ...
Страница 611: ...10 ߖ ߕ ߘ ߎ չ պ ջ ߗ F G ո H M3x8 BLACK B ...
Страница 612: ...11 ռ ս տ ր ց վ I B ...
Страница 613: ...12 ւ ք द ध न փ J L P K M3x8 K M3x8 B ...
Страница 614: ...13 ऩ प फ O N B ...
Страница 634: ...DP 7120 Document processor Installation Guide ...
Страница 638: ...2 1mm 0mm ն շ ո չ ջ պ B B A D C A ...
Страница 639: ...3 ռ ս վ տ ց ր E A ...
Страница 640: ...4 G ւ F F ք փ H ON 10 mm 10 mm A ...
Страница 642: ...6 շ ո յ ն D B ...
Страница 643: ...7 չ E B ...
Страница 644: ...8 F ON G պ F ջ ռ H 10 mm 10 mm B ...
Страница 653: ...17 ղ ն շ ճ մ յ 2 6 7 3 4 5 A B ...
Страница 655: ...19 չ ջ պ ս վ ռ 9 11 10 13 14 12 10 mm A B ...
Страница 665: ...PF 791 500 x 2 Paper feeder Installation Guide ...
Страница 673: ...PF 810 3000 sheet deck Installation Guide ...
Страница 686: ...DF 791 3000 sheet finisher Installation Guide ...
Страница 701: ...DF 7120 1000 sheet finisher Installation Guide ...
Страница 705: ...2 մ յ ն 7 7 15 a b a a b b b a A ...
Страница 706: ...3 ո շ չ պ A ...
Страница 707: ...4 ջ ռ ս c d 14 c d c d 12 c d ջ ռ ս c d 14 c d c d 12 c d A ...
Страница 708: ...5 վ ր D ց ON տ A ...
Страница 710: ...7 L յ մ ն շ B ...
Страница 712: ...9 ս ռ վ տ G B ...
Страница 713: ...10 ր ց ւ b a 17 17 25 a b a a b b B ...
Страница 714: ...11 ք փ द c d 24 c d c d 22 c d B ...
Страница 715: ...12 न ध ऩ प B ...
Страница 716: ...13 ब फ ON D B ...
Страница 719: ...AK 740 Bridge unit Installation Guide ...
Страница 721: ...MT 730 Mailbox Installation Guide ...
Страница 736: ...PH 7A C D Punch unit Installation Guide ...
Страница 757: ...DT 730 B Document tray Installation Guide ...
Страница 759: ...5 2013 5 302LC56750 01 H F G D D 6 4 3 7 E C D D M4 8 M4 8 M4 8 M4 8 ...
Страница 760: ...FAX System 12 Installation Guide ...


