


C200
1-5
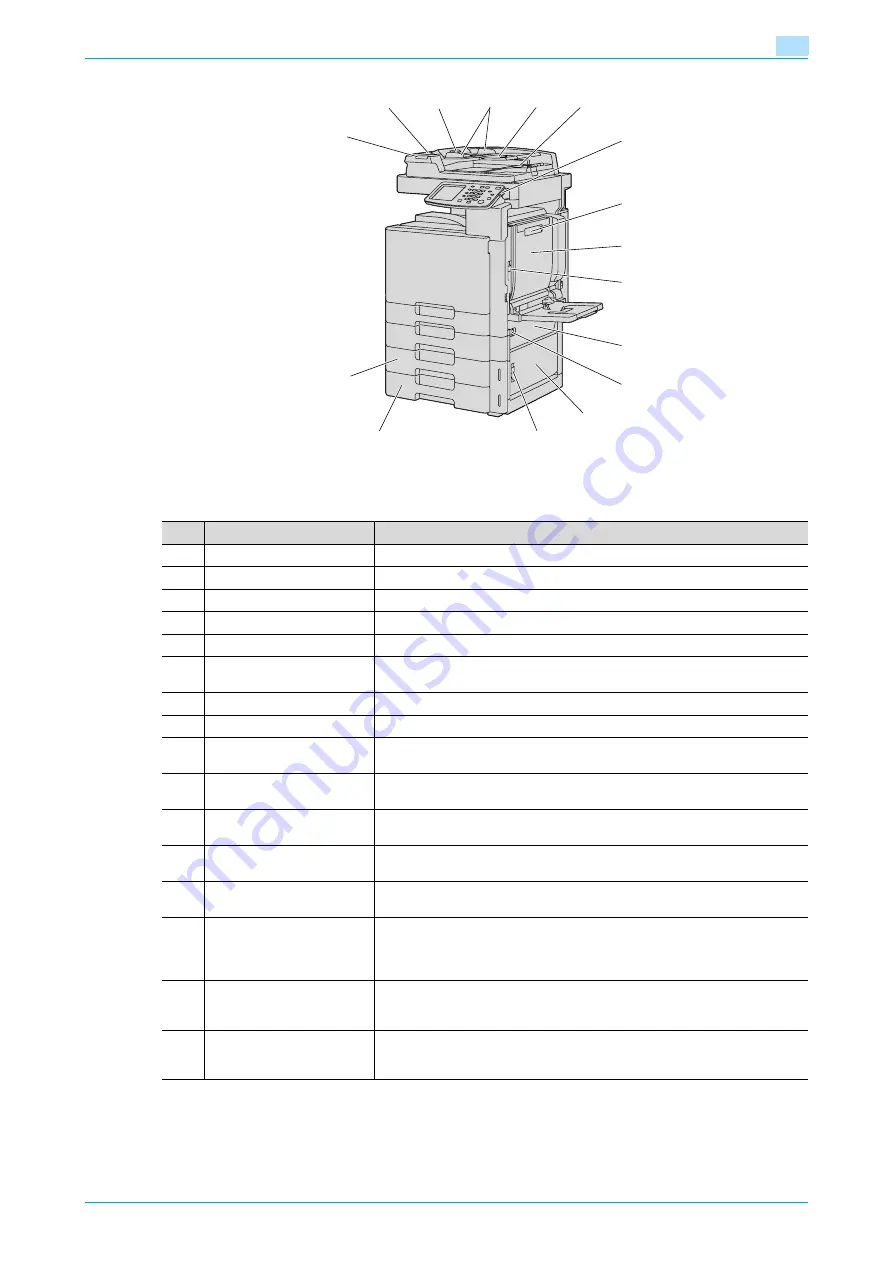
Before making copies
1
*The illustration above shows the main unit with the optional ADF, duplex unit, bypass tray, additional paper
feed cabinet and double paper feed cabinet installed.
13
11
12
14
15
16
17
18
19
20
21
22
23
24
25
26
No.
Part name
Description
11
Left-side cover
Opened when clearing paper misfeeds.
12
Left-side cover release lever
Used to open the left-side cover.
13
Lateral guide
Adjusted to the width of the original.
14
Original feed tray
Loaded with originals facing up.
15
Original output tray
Collects originals that have been scanned.
16
Sub power switch
Pressed to turn on/off machine operations.
When turned off, the machine enters a state where it conserves energy.
17
Duplex unit release lever
Used to open the duplex unit door when clearing paper misfeeds.
18
Duplex unit door
Opened when clearing paper misfeeds in the duplex unit.
19
Upper right-side door re-
lease lever
Used to open the upper right-side door.
20
Center right-side door
Opened when clearing paper misfeeds from the paper transport section of tray
2.
21
Center right-side door re-
lease lever
Used to open the centerright-side door.
22
Lower right-side door
Opened when clearing paper misfeeds from the paper transport section of tray
2, 3 or 4.
23
Lower right-side door re-
lease lever
Used to open the Lower right-side door.
24
Tray 4/storage box
Used as the storage box when the single paper feed cabinet is installed.
Can be loaded with up to 500 sheets of plain paper when the double paper
feed cabinet is installed. Can be loaded with up to 150 sheets of thick paper
1, thick paper 2 or thick paper 3.
25
Tray 3
Can be loaded with up to 500 sheets of plain paper.
Can be loaded with up to 150 sheets of thick paper 1, thick paper 2 or thick
paper 3.
26
Printing indicator
This indicator lights up or flashes to indicate the status of the machine.
Flashing in green: Printing
Lit in orange: Warning
Содержание bizhub C200
Страница 1: ...User s Guide Copy Operations...
Страница 11: ...C200 x 10 Introduction Explanation of manual conventions...
Страница 12: ...C200 x 11 Introduction...
Страница 15: ...1 Before making copies...
Страница 48: ...2 Basic copy operations...
Страница 92: ...C200 2 45 Basic copy operations 2 3 Touch OK The Basic screen appears again...
Страница 94: ...3 Additional copy operations...
Страница 109: ...4 Troubleshooting...
Страница 137: ...C200 4 29 Troubleshooting 4 4 Close the misfeed clearing door...
Страница 146: ...5 Specifications...
Страница 151: ...6 Copy paper originals...
Страница 167: ...C200 6 17 Copy paper originals 6 Touch or until the button for the desired paper size is displayed...
Страница 170: ...7 Application functions...
Страница 192: ...8 Replacing toner cartridges waste toner box imaging unit...
Страница 206: ...9 Care of the machine...
Страница 214: ...10 Managing jobs...
Страница 219: ...C200 10 6 Managing jobs 10 3 Check the printing status and then touch OK To view other jobs touch or...
Страница 220: ...11 Utility mode...
Страница 244: ...C200 11 25 Utility mode 11 11 Touch OK To cancel the setting and select the default press the Reset key...
Страница 256: ...C200 11 37 Utility mode 11 8 Touch OK...
Страница 259: ...12 Appendix...
Страница 261: ...C200 12 3 Appendix 12 12 1 2 List of Available Characters Input screen Alphanumeric characters symbols...
Страница 265: ...13 Index...
Страница 268: ...http konicaminolta com Copyright 2008 2008 11 A02F 9587 11...


