


PFX2512_CE
29
2
Installa
tion and P
repar
a
tion
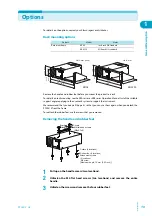
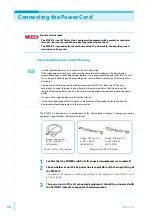
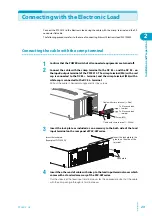
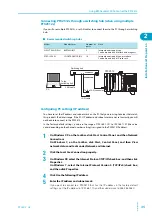
Connecting with the Electronic Load
Connect the PFX2512 to the Electronic load using the cable with the crimp terminal and the 20-
conductor flat cable.
The following procedure refers to the case of connecting Kikusui's Electronic load PLZ1004W.
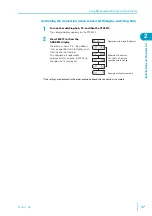
Connecting the cable with the crimp terminal
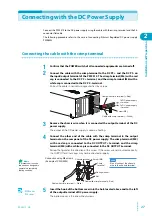
1
Confirm that the POWER switch of all connected equipments are turned off.
2
Connect the cable with the crimp terminal to the DC EL + and the DC EL - on
the input/output terminal of the PFX2512. The crimp terminal (M6) with a red
cap is connected to the DC EL + terminal, and the crimp terminal (M6) with a
white cap is connected to the DC EL - terminal.
Pull out the cable in horizontal angle and fix it by screws.
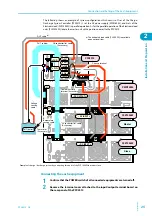
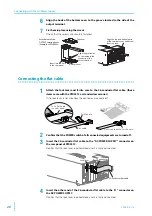
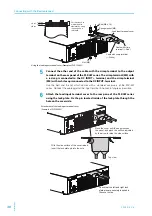
3
Insert the lock plate as included as an accessory to the both side of the load
input terminal on the rear panel of PLZ-4W series.
4
Insert the other end of cable with crimp to the load input terminal cover which
comes with a standard accessory of the PLZ-4W series.
Cut the sleeve of the load input terminal cover for the appropriate size that the cable
with the crimp can go through its terminal cover.
Cable with crimp terminal (+: Red)
Cable with crimp terminal (–: White)
Screw (M6)
To Electronic load
– terminal
To Electronic load
+ terminal
Lock plate
Insert the lock plate to the
groove on the side of the
terminal.
Insert the lock plate
(Example of PLZ1004W)
Содержание PFX2515
Страница 10: ...10 PFX2512_CE This page is intentionally blank ...
Страница 11: ...General Description This chapter describes the outline of product the connectable equipments and the options ...
Страница 58: ...58 PFX2512_CE This page is intentionally blank ...
Страница 59: ...Specification This chapter contains the PFX2512 specifications and outline drawings ...
Страница 86: ...86 PFX2512_CE This page is intentionally blank ...
Страница 100: ...100 PFX2512_CE This page is intentionally blank ...
Страница 103: ......