


PFX2512_CE
19
1
Ge
ne
ra
l D
e
sc
ri
p
ti
o
n
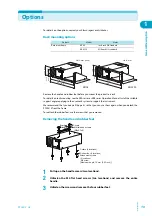
Options
For details on the options, contact your Kikusui agent or distributor.
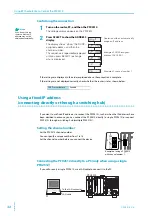
Rack mounting options
Remove the handle and rubber feet before you mount the product to a rack.
For details on rack mounting, see the KRA series or KRB series Operation Manual. Install the suitable
support angles applying to the used rack system to support the instrument.
We recommend that you keep all the parts so that you can use them again when you detach the
PFX2512 from the frame.
To reattach the rubber feet, use the screws that you removed.
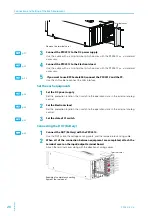
Removing the handle and rubber feet
1
Pull up on the handle covers (two locations).
2
Unfasten the M4 flat head screws (two locations) and remove the entire
handle.
3
Unfasten the screws and remove the four rubber feet.
Product
Model
Notes
Rack mout frame
KRA3
Inch rack EIA Standard
KRA150
Milli rack JIS standard
KRA150
( 460
)
480
(460 (18.11) )
482 (18.98)
149
24.5
100
132.5 (5.22)
57 (2.24)
260 (10.24)
260
37.75
(1.49)
KRA3
Unit : mm
Unit : mm (inch)
Brackets
Handle
Covers
M4 flat head screws
(M4x0.7x8)
Rubber feet (4 locations)
Collars (4 locations)
Attachment screws
(4 locations)
M4 screw
Maximum depth: 16 mm (0.63 inch)
( )
Содержание PFX2515
Страница 10: ...10 PFX2512_CE This page is intentionally blank ...
Страница 11: ...General Description This chapter describes the outline of product the connectable equipments and the options ...
Страница 58: ...58 PFX2512_CE This page is intentionally blank ...
Страница 59: ...Specification This chapter contains the PFX2512 specifications and outline drawings ...
Страница 86: ...86 PFX2512_CE This page is intentionally blank ...
Страница 100: ...100 PFX2512_CE This page is intentionally blank ...
Страница 103: ......