


DCS 300 User’s Manual
7-24
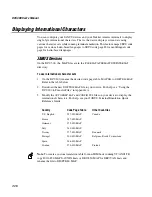
Changes to the Native Async Syntax
For your host application to work with the DCS 300, you must make these syntax
changes to the terminal commands:
Carriage Return delimiter (CR)
You must use a line feed (LF) as the delimiter.
Write Display command (WtD...)
You must remove the “Wt” portion of the
command. Format the command as D
options
/
data
and write it to the socket. The socket
number, not the terminal number, uniquely identifies each terminal to the application.
The DCS 300 maintains the mapping between socket number and terminal number.
Set Terminal Parameters command (StD…)
You must replace the “St” portion of the
command with a lowercase “e.” Format the command as eD
options
/
parameters
.
Reset command (G)
You must format the command by sending a lowercase “g” as a
null-terminated string.
Terminal Firmware Version command (DtV)
You must format the command by
sending a lowercase “v” as a null-terminated string.
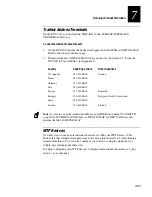
Using Native Sockets
Terminals that are running Native client applications establish terminal sessions on the
DCS 300 through the Native sockets interface. To use this interface, you must
understand stream/sockets programming fundamentals. An excellent reference book for
sockets programming is
UNIX Network Programming
by W. Richard Stevens (ISBN 0-
13-949876-1).
Note:
Intermec does not provide application programming support for streams/sockets
programming.
The DCS 300 initiates communications with the host application through the
configured port. Individual terminal sessions are mapped to unique sockets. Each
terminal power up results in the DCS 300 opening another socket on the port to initiate
the session with the host. The DCS 300 keeps an internal table that maps terminal
numbers to socket numbers. These sockets (sessions) remain open until either the host
application closes the session using the Reset command or a terminal cycles power
resulting in the DCS 300 closing the old session and a new session being initiated.
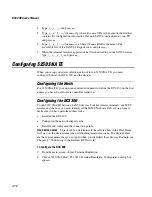
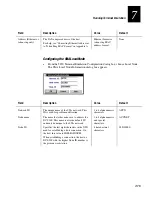
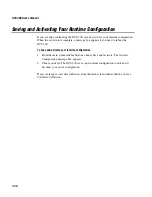
Configuring the DCS 300
To run Native applications between Trakker Antares UDP Plus terminals, and WTP
devices and the host, you must identify all the IP hosts and their ports. For each host,
you must also use DNS or manually enter their IP addresses. Before you proceed, make
sure you have performed these tasks:
•
Installed the DCS 300.
•
Configured the network adapter cards.
•
Installed and configured the downline connection points and data collection
devices.
Содержание DCS 300
Страница 1: ...P N 067296 005 User s Manual DCS300 ...
Страница 4: ...DCS 300 User s Manual blank ...
Страница 16: ...DCS 300 User s Manual ...
Страница 22: ...DCS 300 User s Manual ...
Страница 23: ...Getting Started 1 ...
Страница 24: ...DCS 300 System Manual blank ...
Страница 42: ...blank ...
Страница 43: ...Learning About the DCS 300 2 ...
Страница 44: ...DCS 300 User s Manual blank ...
Страница 68: ...blank ...
Страница 69: ...Connecting to the Upline Network 3 ...
Страница 70: ...DCS 300 System Manual 3 2 blank ...
Страница 94: ...blank ...
Страница 95: ...Connecting to the Intermec RF Network 4 ...
Страница 96: ...DCS 300 System Manual blank ...
Страница 134: ...blank ...
Страница 135: ...Connecting to the 9180 and the Intermec CrossBar Network 5 ...
Страница 136: ...DCS 300 System Manual blank blank ...
Страница 158: ...DCS 300 System Manual blank ...
Страница 159: ...Running Data Collection Browser 6 ...
Страница 160: ...DCS 300 System Manual blank ...
Страница 171: ...Running Terminal Emulation 7 ...
Страница 172: ...DCS 300 System Manual blank ...
Страница 209: ...Running Peer to Peer Applications 8 ...
Страница 210: ...DCS 300 System Manual blank ...
Страница 232: ...blank ...
Страница 233: ...Running Terminal Sessions 9 ...
Страница 234: ...DCS 300 System Manual blank ...
Страница 258: ...DCS 300 System Manual 9 26 blank ...
Страница 259: ...Running Screen Mapping 10 ...
Страница 260: ...DCS 300 System Manual 10 2 blank ...
Страница 269: ...Running Screen Mapping 10 11 10 Screen 3 Screen 4 Main Host Screen Screen 5 ...
Страница 271: ...Running Screen Mapping 10 13 10 Screen 4 Menu Option 915 Screen 5 Screen 6 Menu Option 910 Screen 7 ...
Страница 333: ...Troubleshooting 11 ...
Страница 334: ...DCS 300 System Manual blank ...
Страница 372: ...blank ...
Страница 373: ...Specifications and Other Helpful Information A ...
Страница 374: ...DCS 300 System Manual B 2 blank ...
Страница 391: ...Upgrading the DCS 300 and Devices B ...
Страница 392: ...DCS 300 System Manual blank ...
Страница 411: ...How the DCS 300 Routes Transactions C ...
Страница 412: ...DCS 300 System Manual blank ...
Страница 430: ...blank ...
Страница 431: ...Index I ...
Страница 432: ...DCS 300 System Manual I 2 blank ...