background image

77

Cooling Fans

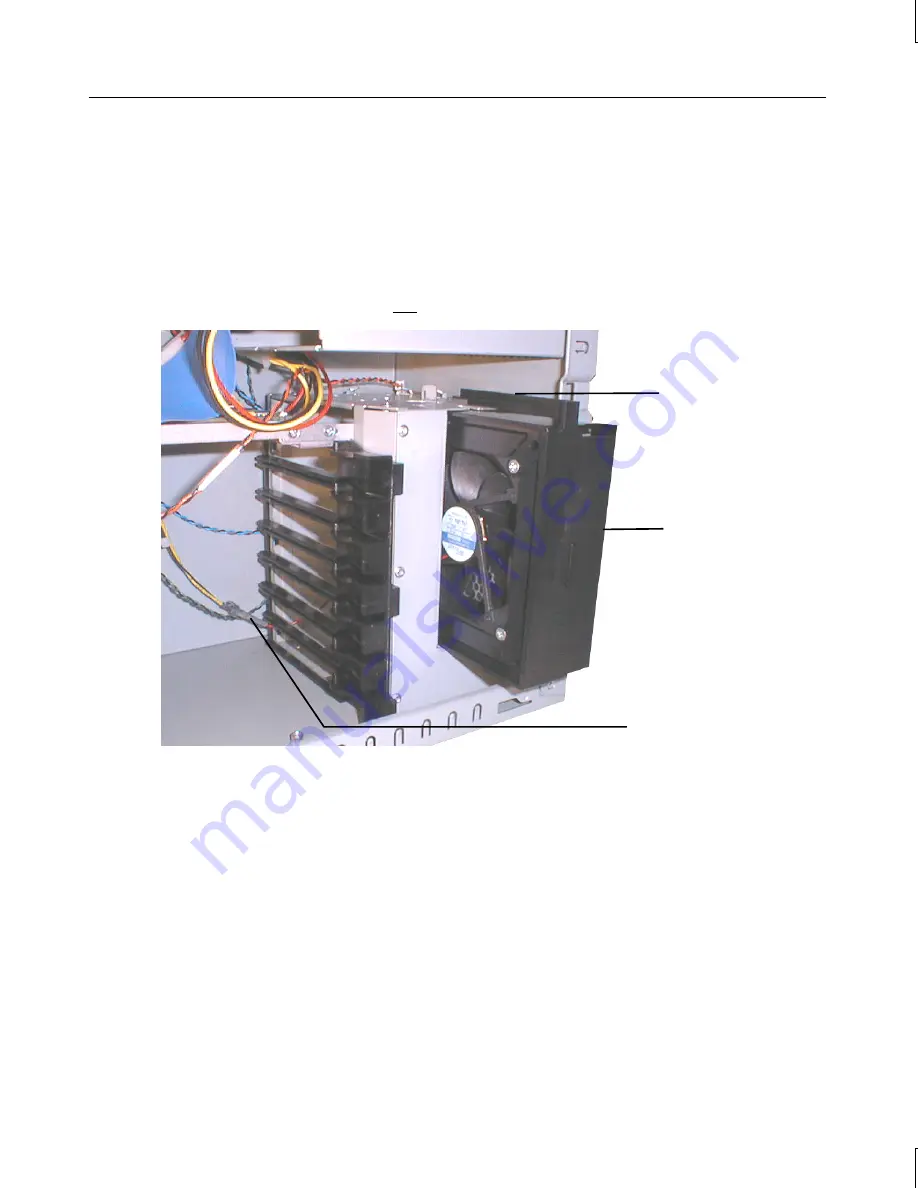
Two internal fans ensure proper airflow to cool system components in the base unit.  One fan is
installed in a housing at the front of the base unit chassis.  Another fan is secured to the rear of the
base unit chassis, and has a cooling duct to direct the airflow over the system’s processors.

CAUTION

Arrows on each fan indicate airflow direction and rotation.  Install each fan with the
airflow arrow pointing into the chassis to ensure proper cooling of system
components.

To replace the front fan:

WARNING

The system is always on when connected to AC power.  Before performing this
task, disconnect the system’s power cord from its AC power outlet.

1.


Disconnect the fan’s power cable from its power supply connector.

2.


Disengage the release on top of the fan assembly in the expansion card guide, and gently pull
the fan assembly out of its housing.

3.


Feed the power cable for the new fan into the front fan housing and through the lowest
opening in the card guide assembly.

4.


Align the new fan assembly with the opening in its housing, and gently push the fan assembly
into its housing until the release on top of the fan assembly engages.

5.


Connect the new fan’s power cable to its power supply connector.

Fan Release

Fan Assembly

Fan Cable Connector

Содержание Zx1 ViZual Workstation

Страница 1: ...Zx1 ViZual Workstation System Guide August 1999 D1AA00300...

Страница 2: ...Computer Systems and the Intergraph Computer Systems logo are registered trademarks of Intergraph Computer Systems Zx is a trademark of Intergraph Computer Systems Other brands and product names are t...

Страница 3: ...ced Replace the battery only with the same or equivalent type as recommended by the manufacturer Dispose of used batteries according to the manufacturer s instructions Internal components may be at hi...

Страница 4: ......

Страница 5: ...ower 7 Starting the System 8 What s Next 8 2 Setting Up the Software 9 Preparing for Setup 9 Going Through Setup 11 Finishing Setup 12 Creating an Emergency Repair Disk 13 Creating System Software Bac...

Страница 6: ...leaning System Components 31 5 Troubleshooting Operational Problems 33 Getting Started 33 System Power 33 System Boot 34 Video 36 Audio 37 Network 37 Peripheral Drive Errors 37 Miscellaneous Hardware...

Страница 7: ...ternal SCSI Peripheral Devices 62 SCSI Cable Lengths and Device Speeds 63 SCSI Cable Quality 63 SCSI IDs 64 Connecting External SCSI Devices 64 Changing SCSI Controller or Device Settings 65 Upgrading...

Страница 8: ...ower Management 89 System Resources 89 ISA Bus Interrupt IRQ Assignments 89 Direct Memory Access DMA Channels 90 Input Output I O Addresses 90 Memory Addresses 91 Using System Resources 92 System Conf...

Страница 9: ...oblems describes how to resolve basic problems you may encounter when using the system Chapter 6 Reinstalling the Operating System describes how to reinstall the operating system and associated system...

Страница 10: ...ee the System Board Manual delivered with the workstation See the Late Breaking News document if provided for important hardware and documentation details not covered in this document Ergonomic Inform...

Страница 11: ...es and fixes and more To connect to the IBBS 1 Set your system s communications protocol for eight 8 data bits no parity one 1 stop bit and any baud rate up to 14 400 2 Using a modem call 1 256 730 87...

Страница 12: ...s serial number Software product serial numbers are included in the product packaging Hardware product serial numbers are on a sticker affixed to the product Your name and telephone number A brief de...

Страница 13: ...Late Breaking News if provided and Start Here document for a special purpose system if provided Operating system software CD ROM and diskettes drivers and other system software CD ROM and diskettes an...

Страница 14: ...o 80 percent non condensing the optimum humidity is 50 percent non condensing Connecting System Components CAUTION If you do not use the cables delivered with the system use shielded cables to prevent...

Страница 15: ...Power Receptacle AC Voltage Selection Switch USB Serial COM Parallel LPT Serial COM Video Out typical SCSI Microphone Ethernet Network Audio Line In Audio Line Out MIDI Game Mouse Keyboard Expansion S...

Страница 16: ...ltiple monitors connect one monitor to each installed graphics controller card See the graphics controller documentation for more information 2 Connect the cables from the keyboard and the mouse to th...

Страница 17: ...ion slots and typical installed expansion cards Slot Type Typical Expansion Cards Installed 1 Top AGP Graphics controller 2 PCI Graphics controller for multi card configurations 3 PCI Graphics control...

Страница 18: ...CSI peripheral device 4 Connect a SCSI cable between SCSI ports on any additional SCSI peripheral devices 5 Set the SCSI ID of each peripheral device to a unique SCSI ID number Do not use any SCSI ID...

Страница 19: ...ied to the system Auxiliary power ensures that system components power up quickly when needed See Chapter 4 Operating the System for more information on controlling system power To connect the system...

Страница 20: ...e base unit and press the Power button shown in the following figure What s Next You can do the following to prepare your system for use If you want to get going with the default setup go to Chapter 2...

Страница 21: ...the SCSI controller graphics controller audio controller network controller and mouse Driver software for internal peripheral devices and for additional expansion cards installed at the factory Core...

Страница 22: ...the system is connected to a network that uses the Transmission Control Protocol Internet Protocol TCP IP get and record the appropriate TCP IP information for your system from your network administra...

Страница 23: ...Power button shown in the following figure The first time you start the system it boots to a Microsoft End User License Agreement EULA After reading and accepting the terms of the agreement follow th...

Страница 24: ...he operating system s Setup files After you complete Setup and restart the system you can set up a user account and join a workgroup or domain if needed See the operating system documentation and oper...

Страница 25: ...stem before shipment and which are not available on the operating system CD ROM You may need these backup diskettes later for example if you have to reinstall a device driver or the operating system Y...

Страница 26: ...14 What s Next See Chapter 3 Configuring the System to configure the system for use See Chapter 4 Operating the System for related information on operating the system...

Страница 27: ...s video display You can also determine which type of graphics controller is installed on your system See the graphics controller documentation delivered with the system and any README files delivered...

Страница 28: ...restart the system 2 Press the space bar when prompted to display the Last Known Good menu If using the Last Known Good option fails to correct the video display problems you can obtain a functional...

Страница 29: ...Com 3C905B TX 10 Mbit 100 Mbit Ethernet network controller card This Peripheral Component Interconnect PCI card features Wake On LAN technology The required driver software was installed before shipme...

Страница 30: ...sk drive or CD ROM drive you may need to reassign system drive letters See the operating system Help for more information To change drive letters 1 Exit all applications currently running on your syst...

Страница 31: ...lick OK 7 When prompted click Yes to restart the system with the new settings or click No to continue with other tasks and use the new settings the next time you restart the system Configuring the SCS...

Страница 32: ...and keep a backup copy of the Emergency Repair Disk See the operating system documentation and Help for information on creating and using an Emergency Repair Disk Configuring the BIOS The system s ba...

Страница 33: ...nd Closing the Door A door on the front of the system controls access to the Power button LED indicators the floppy disk drive the CD ROM drive and other front access peripheral devices To open the do...

Страница 34: ...e system Auxiliary power ensures that system components power up quickly when needed The Power button is a momentary contact switch changing system states based upon the length of time the button is p...

Страница 35: ...Shutdown for more information on controlling system power Reading System LEDs The LEDs on the faceplate describe the current operational state of the system If the Power LED is Then Unlit Auxiliary po...

Страница 36: ...e finished configuring the utility click Start Shutdown After you start the system again the utility will use the settings you selected The Automatic System Shutdown dialog contains the following opti...

Страница 37: ...m 1 Turn on power to the system 2 At the boot menu select the appropriate operating system option and then press ENTER To log on to the operating system 1 If the logon dialog does not display press CT...

Страница 38: ...tabilize and the disk drives to stop spinning Using the Keyboard The system s PS 2 compatible keyboard includes the following features 104 standard keys including special application function keys F1...

Страница 39: ...application specific functions DELETE Deletes characters You can use either of the Windows keys in combination with other keys to perform certain operating system functions as follows Key Combination...

Страница 40: ...the left mouse button twice Drag Press and hold the left mouse button then move the mouse Release the button when you finish dragging your selection to a new location Right click Press and release th...

Страница 41: ...g overwritten or erased slide the write protect tab on the diskette toward the diskette edge until it snaps into place To write data to a diskette ensure the write protect opening is covered Using the...

Страница 42: ...m shipped with some or all of the following InterSite programs installed InterSite Welcome provides tools to ensure that your system is fully ready for use See InterSite Welcome for more information I...

Страница 43: ...der in the BIOS You can set the system to boot first from a diskette then from a SCSI disk drive and then from the ATAPI CD ROM drive See Chapter 7 Configuring the BIOS for information on using the BI...

Страница 44: ...32...

Страница 45: ...evices for troubleshooting help if there are problems these devices The following chapters in this document contain information and instructions that may be helpful when carrying out troubleshooting p...

Страница 46: ...e order in the BIOS to boot from a SCSI disk drive first See Chapter 7 Series of beeps and error messages display Message Explanation and Solution Refresh Failure Bad memory refresh circuitry on the s...

Страница 47: ...C Change the boot sequence See Chapter 7 for information on running BIOS Setup and changing the boot sequence BIOS is corrupted Load a new BIOS to the system s flash memory See Chapter 7 and the Syst...

Страница 48: ...sockets I O Card parity error message displays Reason Solution Faulty card is installed in the ISA slot Remove the ISA card and then restart the system Video System is powered on but screen remains b...

Страница 49: ...properly connected notify your network administrator Networking software is configured incorrectly Review the network settings in the operating system and or notify your network administrator Cannot p...

Страница 50: ...ard System loses BIOS configuration information Reason Solution Lithium battery voltage on the system board is low The system also displays a battery voltage low message during the system boot Replace...

Страница 51: ...dows NT 4 0 Windows 98 or Windows 95 and run Version Manager Create backup diskettes for the system software listed for your system in Version Manager Backup diskettes or software CD ROMs and document...

Страница 52: ...e select Custom Setup On a system with internal SCSI disk drives and a SCSI controller press the S key to install the SCSI controller driver from backup diskette Select Other Requires disk provided by...

Страница 53: ...onal changes required for your system as described in Chapter 4 Operating the System If your system was running 4 0 Service Pack software install this software after installing drivers and other syste...

Страница 54: ...lled 2 Insert the Windows NT 4 0 Service Pack CD ROM into your system s CD ROM drive 3 In Explorer or File Manager go to the SUPPORT UTILS I386 directory 4 Double click DMACHECK EXE The ATAPI DMA supp...

Страница 55: ...erating parameters Each time you power on the system the BIOS uses stored parameters to configure system operation The BIOS Setup program which is also stored in the flash EPROM on the system board al...

Страница 56: ...restore Fail Safe default values to all parameters Fail Safe defaults are the safest set of parameters They should always work but do not provide optimal system performance Use them if the system is b...

Страница 57: ...splay of BIOS information during boot The Optimal default is Silent Floppy Access Control Sets diskette access when booting from diskette The Optimal default is Read Write Hard Disk Access Control Set...

Страница 58: ...the parameter The Optimal default is Disabled Advanced Chipset Setup Parameter Description USB Function Set support for the Universal Serial Bus USB The Optimal default is Disabled USB KB Mouse Legacy...

Страница 59: ...or the Advanced Configuration and Power Interface ACPI control register The Optimal default is Disabled Gated Clock Sets support for the gated clock The Optimal default is Disabled Graphics Aperture S...

Страница 60: ...r chipset power management and Advanced Power Management APM features The Optimal default is Enabled Power Button Function Sets the operation of the system s power button The Optimal default is On Off...

Страница 61: ...t LAN Wake Up Sets support for Wake on LAN The Optimal default is Disabled PC98 Power LED Sets support for PC98 power LED use The Optimal default is Disabled FAN OFF at Suspend Sets support to turn of...

Страница 62: ...P The IRQs are 3 4 5 7 9 10 11 12 14 and 15 Reserved Memory Size Sets the size of the memory area reserved for legacy ISA adapter cards The Optimal default is Disabled Reserved Memory Address Sets the...

Страница 63: ...d by the parallel port This parameter only appears if the Onboard Parallel Port parameter is set to 278 or 378 The Optimal default is 7 Parallel Port DMA Channel Sets the DMA channel for the parallel...

Страница 64: ...52...

Страница 65: ...e bare metal of the system s chassis to protect against electrostatic discharge NOTE Right side and left side are as seen from the front of the system Avoiding Electrostatic Discharge Sensitive compon...

Страница 66: ...g the left side panel To remove a side panel 1 Slide both lock clips on the side panel away from each other UNLOCK 2 Grasp the handhold on the panel and pull the panel back and away from the chassis T...

Страница 67: ...interference EMI emissions To remove the faceplate 1 Open the door and stow it in the base unit You cannot remove the faceplate if the door is closed See Chapter 4 Operating the System 2 Remove both s...

Страница 68: ...e faceplate onto the chassis until all tabs engage CAUTION Engage the tabs with care Do not apply more pressure than necessary System Components The following figure shows the system s major component...

Страница 69: ...Right side and left side are as seen from the front of the system See Chapter 8 Gaining Access to System Components for details on opening the system and protecting against electrostatic discharge Th...

Страница 70: ...ard PnP cards are ISA cards that contain configuration registers like PCI cards During startup the system s BIOS automatically detects the installed card and assigns the necessary system resources Sin...

Страница 71: ...ing System Components for instructions CAUTION Spare blanking plates are included with the system Ensure that you cover an open slot with a blanking plate to ensure proper airflow for cooling and to r...

Страница 72: ...ch The system supports up to 1 GB 1 024 MB of error correction code ECC synchronous dynamic random access memory SDRAM Install DIMMs in order from the lowest bank to the highest bank beginning with ba...

Страница 73: ...ne of the front access device bays A second cable delivered with the workstation is available to connect two front access EIDE devices to the secondary EIDE channel SCSI peripheral devices are control...

Страница 74: ...he SCSI ID enabling or disabling termination installing device drivers when required and configuring other drive attributes If you are installing a internal peripheral device that connects to an expan...

Страница 75: ...4 ft 12 m Bus used in the system The total cable length on the system s Wide Ultra2 SCSI bus is the sum of the following Internal SCSI cable 40 inches 1 0 meter SCSI cable between the system and the f...

Страница 76: ...SCSI ID of each peripheral device to a unique SCSI ID number Do not use any SCSI ID numbers already used by the system 6 For each SCSI peripheral device connected to the port if the device is The las...

Страница 77: ...r non Ultra2 SCSI external devices to the system For more information on the SCSI Configuration Utility see Chapter 3 Configuring the System Upgrading Processors You can upgrade a single processor sys...

Страница 78: ...66...

Страница 79: ...t the system s power cord from its AC power outlet WARNING Internal components may be at high temperatures Allow time for them to cool before handling them WARNING Internal components can be damaged b...

Страница 80: ...utlet 1 Disconnect the power and data cables from the drive 1 Remove and retain the screws securing the floppy disk drive to its bay 2 Slide the drive out the front of the base unit chassis 3 Connect...

Страница 81: ...e system s power cord from its AC power outlet WARNING The CD ROM drive contains a laser and is classified as a Class 1 Laser Product To prevent direct exposure to the laser beam and to avoid hazardou...

Страница 82: ...emoved disk drive can cause the heads to crash Subsequent failures may not be noticeable for three to six months Handle disk drives carefully to avoid damage Three 3 5 inch x 1 0 inch peripheral devic...

Страница 83: ...sis 4 If replacing an internal access device remove and retain the screws securing the device to the cage and remove it from the cage 5 Place the new device in the cage and secure it with the screws r...

Страница 84: ...andle the expansion card carelessly Do not expose the expansion card to moisture or extreme temperatures Do not remove the expansion card from its antistatic package until you are ready to install it...

Страница 85: ...are certified for use with Intergraph computers at extremes of temperatures and system load to ensure reliable performance System memory modules available from other vendors may not function properly...

Страница 86: ...g the System and the System Board Manual for more information on processor modules and their sockets Processor Heat sink mounting bracket Retention module Heat sink lock To replace a processor module...

Страница 87: ...onto the heat sink lock mounting posts Power Supply WARNING There are no user serviceable parts in the power supply Return the power supply to the manufacturer for repair The power supply is located i...

Страница 88: ...nit chassis 5 Place the new power supply on its shelf in the base unit chassis and secure it with the four screws removed previously 6 Make sure the AC voltage selection switch on the power supply on...

Страница 89: ...m is always on when connected to AC power Before performing this task disconnect the system s power cord from its AC power outlet 1 Disconnect the fan s power cable from its power supply connector 2 D...

Страница 90: ...connector 3 Remove and retain the screws securing the fan to the back of the base unit chassis CAUTION Support the fan as you remove the screws Do not let the fan fall onto any installed expansion ca...

Страница 91: ...tic rivets on the processor retention modules and remove the retention modules from the chassis 7 Remove the 13 screws from the system board 8 Lift the system board out of the chassis and place it on...

Страница 92: ...connected to AC power Before performing this task disconnect the system s power cord from its AC power outlet 1 Remove any expansion cards that restrict access to the battery 2 Note the positive orie...

Страница 93: ...e in this chapter 3 Disconnect the power switch cable from its connector on the system board 4 Remove and retain the screw that secures the power switch to the base unit chassis 5 Turn the power switc...

Страница 94: ...e chassis gently push the new LED into the tabs that hold it to the chassis until it clicks into place 17 Connect the LED cable to its connector on the system board or on the SCSI controller card as a...

Страница 95: ...vered with your workstation for detailed information on the system board and its components memory slots and sockets jumpers and connectors and external ports Functional Diagram The following diagram...

Страница 96: ...rfaces or become excessively bent or twisted In particular SCSI cables should not have any creased bends EIDE Cabling The installed EIDE cable connects the primary EIDE channel to the CD ROM drive and...

Страница 97: ...ct to the controller s external SCSI port on the back of the base unit An additional SCSI controller card is required to control any SCSI peripheral devices installed in front access device bays Cable...

Страница 98: ...r Connects To 1 EIDE connector on system board 2 EIDE device 3 EIDE CD ROM drive installed cable or EIDE device optional cable Internal Access Device SCSI Cable 1 3 2 4 Connector Connects To 1 SCSI in...

Страница 99: ...ge is always on 2 Maximum 5 0 V and 3 3 V combined power is 180W The power supply has two power cables P1 and P2 that connect to ATX power connectors on the system board The power supply has six perip...

Страница 100: ...unit chassis Another fan is mounted to the upper back of the base unit chassis under the system s power supply Both fans pressurize the chassis and force warm air out of the base unit s vents The chas...

Страница 101: ...e Power LED on the front of the base unit indicates the following power states of the system If the Power LED is Then Unlit Auxiliary power is off there is no power consumption the system is disconnec...

Страница 102: ...and speaker 0064 1 byte Keyboard controller 0070 bit7 1 bit Enable NMI 0070 bit0 6 7 bits RTC address max 128 bytes 0071 1 byte RTC data byte 0080 008F 16 bytes DMA page registers 00A0 00A1 2 bytes I...

Страница 103: ...1 disk change status 03F7 bit0 6 read 7 bits Primary IDE channel status 03F8 03FF 8 bytes COM 1 0CF8 0CFB 4 bytes PCI configuration address registers DW access 0CFC 0CFF 4 bytes PCI configuration dat...

Страница 104: ...stalled in your system The system has a limited number of open IRQs To install more ISA devices than you have open IRQs you must disable one unused system port for each excess ISA device unless the de...

Страница 105: ...drive 40X EIDE ATAPI compatible CD ROM drive Keyboard Windows 95 98 compatible PS 2 keyboard Mouse Logitech wheel mouse Expansion Slots One full length AGP six full length PCI one shared with ISA two...

Страница 106: ...erator PIIX4E Video Display Controller Intel 82443BX PCI AGP System Specifications Item Specifications Dimensions 21 x 7 6 x 20 5 in 53 3 x 19 3 x 52 1 cm Weight 55 lb 25 kg maximum configuration AC l...

Страница 107: ...nter From Customer Name Customer Contact Phone Mail Address Reason for Return NOTE All returned equipment MUST be shipped in original Intergraph packaging to obtain warranty service WARNING Back up di...

Страница 108: ...stem you will be assigned a RGA log number 3 Complete the RGA Form on the previous page entering the RGA log number obtained from the Customer Response Center Ensure that the address in the From secti...

Страница 109: ...oration 9805 Kellner Road Huntsville AL 35894 TO Repair Depot RGA No ________________________ Intergraph Corporation 9805 Kellner Road Huntsville AL 35894 TO Repair Depot RGA No ______________________...

Страница 110: ......

Отзывы: