Intel
®
Server System R2000WT Product Family System Integration and Service Guide
53
3.5
Intel
®
I/O Expansion Module – Installation / Removal
3.5.1
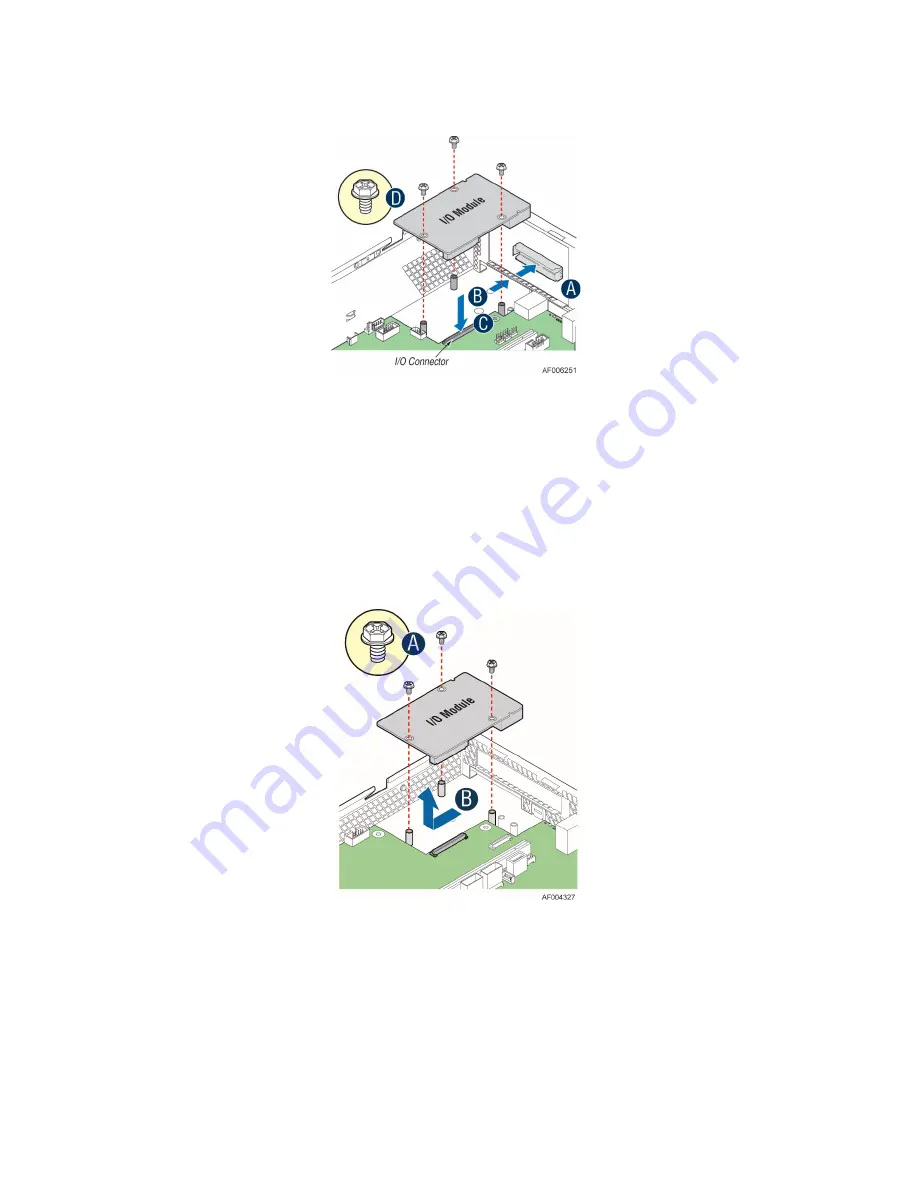
Intel® I/O Expansion Module Installation
Figure 67. Installing Intel
®
I/O Expansion Module
•
To remove the filler panel, squeeze the side panels and push it out of the chassis (see letter ‘A’)
•
Attach the I/O module port stickers to the outside of the chassis back panel
•
Carefully angle and insert the rear I/O connectors of the I/O module into the cut-out on the chassis back
panel and position the module over the server board connector (see letter ‘B’). Care should be taken NOT
to damage the I/O shield material when placing the I/O module into the back panel cut-out.
•
Carefully press down on the module to engage the connectors (see letter ‘C’)
•
Secure the module with three screws as shown (see letter ‘D’)
3.5.2
Intel® I/O Expansion Module Removal
Figure 68. Removing an I/O Expansion Module
•
Power off the server and detach the power cable(s)
•
Detach all cables from the I/O Module
•
Remove the system cover – See Page 50
•
Remove the three screws as shown (see letter ‘A’).
•
Carefully pull up on the I/O Module until it disengages from the server board (see letter ‘B’).
•
If no replacement module is to be installed, re-install the I/O expansion module bay filler panel into the
system back panel (Note: the filler panel snaps into the back panel from the outside of the chassis)
Содержание R2000WT
Страница 16: ...Intel Server System R2000WT Product Family System Integration and Service Guide xvi Blank Page...
Страница 100: ...Intel Server System R2000WT Product Family System Integration and Service Guide 84 Figure 98 DIMM Fault LEDs...
Страница 117: ...Intel Server System R2000WT Product Family System Integration and Service Guide 101 Blank Page...


