background image

Intec Printing Solutions - ColorCut Pro User Guide for Intec ColorCut SC5000 ................................................................................................... Page No: 30

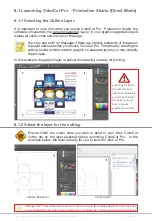
6.4.2 Automatically Adding PageMARKs 

From the File menu in Illustrator or CorelDraw, select the menu item ‘

ColorCut Pro 

Add PageMARKs

’. 

B

PageMARKs will be automatically added to your job 

C

 and you will see a NEW 

LAYER ‘

ColorCutPro Auto Placement Only

’ added in your Layers palette. 

D

B

C

C

C

C

D

Содержание ColorCut SC5000 Series

Страница 1: ...ColorCut SC5000 Series ColorCut Pro Production Studio 2021 User Guide Revision 0 1...

Страница 2: ......

Страница 3: ...Registration PageMARKs 26 6 3 1 Configuring Automatic PageMARKs 27 6 3 2 Additional Configuration for Mac users 28 6 4 Using ColorCut Pro Add PageMARKs 29 6 4 1 Selecting the Layer to Add PageMARKs 2...

Страница 4: ...10 8 The Cut Settings Window 65 10 9 Selecting Order of the Cut Creasing to be performed 66 10 10 The Material Type Actions Window 66 10 11 Assigning a Material Type Action to a Color or clearing one...

Страница 5: ...olutions ColorCut Pro User Guide for Intec ColorCut SC5000 Page No 5 11 8 Media Positioning 83 11 9 SC5000 Cutting without Targets Origin fine tuning 84 11 13 Production Log 85 11 11 ADVANCED Producti...

Страница 6: ...orCut Pro plug in or using the ColorCut Pro Production Studio version of software which can be launched separately either on the same or a different computer ColorCut Pro Production Studio is a simple...

Страница 7: ...600x900 1600x1080 1600x1280 1920x1080 or higher 2x available USB Ports Note KB Mouse often use a port each so factor this in FB750 FB1150 FB8000 SC5000 and LC600 users PC directly connected to ColorCu...

Страница 8: ...eved from the ColorCut Job library by entering the job number OR scanning the QRcode on the printed sheets and then cut the file The advantage of using ColorCut Pro Production Studion version in job s...

Страница 9: ...irect mode and then cut directly from the PC version of Illustrator or the recommended solution is 2 Connect a PC to your Intec cutter and install ColorCut Pro Production Studio on the PC on the same...

Страница 10: ...o feed before launching ColorCut Pro 3 1 Using Wi Fi to connect to your ColorCut s Live Video Feed The Vision3 registration system fitted in an Intec SC5000 cutter has a camera image echo function whi...

Страница 11: ...ich is how newer devices like some TV remote controls Roku 3 work to do this use a utility like Wi Fi Direct Access point below 2 Use the Wi Fi Direct Access Point This is a paid for utility from the...

Страница 12: ...when initially setting up the HotSpot Each time you activate the HotSpot after this the settings for the SSID and Password will be remembered Your Intec SC5000 is set to make a direct connection to a...

Страница 13: ...ries must be set to match exactly 6 The Intec SC5000 Vision3 sensor s image Echo feature broadcasts only using the 2 4GHz so it is essential that you set the Network Band I to 2 4GHz if you set it to...

Страница 14: ...ect to your computer K It will take between 30 secs to 2 mins for the Intec SC5000 to see the connection and connect to your Hotspot 9 After a short period 30 secs to 2mins you should see a new device...

Страница 15: ...peration you can now enable the connection to your Intec cutter by simply clicking on the Wi Fi icon in the Windows task bar M Bottom right of your screen Next click on the Mobile HotSpot button N tha...

Страница 16: ...uch the normal WindowsOS Wi Fi HotSpot will not work Wi Fi Direct Access Point other alternative apps may be available is a paid for application available from the MicroSoft Store 1 To download it ope...

Страница 17: ...the Access Point Name and the Password ensure that is starts each time with the same settings by clicking the check box next to Start Access Point with latest settings on app startup E Click on the b...

Страница 18: ...olding lines on your artwork Equally when sending cutting lines to the cutter you don t want to confuse the cutter with lines that may be in your printed design The layers feature enables you to turn...

Страница 19: ...eMARKs is also visible Detailed later The cut contour layer is disabled This drawing is ready for printing 4 2 Layers for cutting In this example the main graphics layer is disabled The ColorCut auto...

Страница 20: ...d GREEN to Perforate using a dashed line and the Blade with full pressure NOTE The actions you select a Line Color to perform can be reassigned at any time and the order in which they are performed ca...

Страница 21: ...Intentionally Blank...

Страница 22: ...job and is positioned at the bottom left edge of the sheet The second provides scale Y and skew parameters and is positioned top left in the drawing shown The third mark provides skew and rotation in...

Страница 23: ...r you sets the distance to the centre of the circle not the edge margin so setting a 12 5mm margin in PageMarks preferences will achieve the recommended 10mm margin to the edge of the PageMARK 6 2 Con...

Страница 24: ...sheet Therefore the recommended margins for the highest cut accuracy are shown below Cut lines can extended outside the perimeter of the marks but care should be taken that they do not extend off the...

Страница 25: ...sheet to make removing he waste matrix on your labels easier Also cutting off of the sheet is not recommended as the blade may snag the side of the sheet as it turn to come back onto the sheet area Ty...

Страница 26: ...he marks are placed Based on your page size and then define the margin i e how far from the page edge the centre of the PageMARK should appear or Based on your design size and then define the margin i...

Страница 27: ...k that is located at a different position and fail i e a distance equivalent to the length of your sheet rather than the width ThetermsLandscapeorPortraitintheColorCutProPageMarkspreferences relate to...

Страница 28: ...Mac users Adding PageMARKs is exactly the same for Mac users however Mac users will typically use ColorCut Pro s Job Library feature to assign a job number and QR code where applicable to their jobs...

Страница 29: ...lecting the Layer to Add PageMARKs Launching ColorCut Pro Add PageMARKs with the artwork layer selected will generate an error kRasterArt not supported ColorCut Pro does not know how to interpret the...

Страница 30: ...4 2 Automatically Adding PageMARKs From the File menu in Illustrator or CorelDraw select the menu item ColorCut Pro Add PageMARKs B PageMARKs will be automatically added to your job C and you will see...

Страница 31: ...D enabling your job to print with your artwork AND the PageMARKs visible on your document D 6 5 Job Numbers BarCodes and the Job Library The standard way of adding PageMARKs detailed above provides ac...

Страница 32: ...code to the design At the rear of the job you will note an additional QR code for orientation purposes C If the cutter sees the rear QR code first it knows you have placed the sheet rotated 180degrees...

Страница 33: ...on separate layers you can avoid this Therefore remember to select the Cut line layer With the Cut line layer Not the artwork layer selected select the menu item Add PageMARKs and QR Code from the Fi...

Страница 34: ...e updated replaced This is useful as if you have already printed files with your QR Code and wish to update the cutting profile to change how the printed sheets are cut then re generating the QR Code...

Страница 35: ...Intec Printing Solutions ColorCut Pro User Guide for Intec ColorCut SC5000 Page No 35...

Страница 36: ...ics file In addition the simplified interface is designed to be used by any operator typically a Print Finisher with no specific computer or Graphic Applications skills by providing a START SCAN QR Co...

Страница 37: ...the artwork graphic on separate layers you may simplify the process In this example the graphic layer is active this drawing is ready for printing 8 1 2 Select the layer for the cutting Ensure ONLY t...

Страница 38: ...rCut Pro selected from the FILE menu Adobe Illustrator CorelDRAW The ColorCut Pro splash screen will briefly appear then the main ColorCut Pro application will be displayed You will see a preview of t...

Страница 39: ...ayed are applicable to your cutter 8 2 1 Customising the ColorCut Pro skin to your SC5000 cutter ColorCut Pro supports a number of different Intec cutters with different registration sensing methods n...

Страница 40: ...ted When the Intec ColorCut SC5000 Cutter is connected this should read USB Printing Support x If the Intec ColorCut Pro software cannot sense an Intec ColorCut cutter on the USB connection of your co...

Страница 41: ...ns available to set the proper cutting parameters please see below Before cutting for the first time ensure that you have set up your ColorCut in the Settings dialogue box Prior to first use ColorCut...

Страница 42: ...showing you where to position a job if manually positioning Once a job is retrieved by scanning a QRCode OR by entering a job number the preview of the loaded job will then be displayed Or If you alre...

Страница 43: ...000 device has been selected to ensure that all the settings messages and screens displayed are applicable to your cutter 8 3 1 Customising the ColorCut Pro skin to your SC5000 cutter ColorCut Pro sup...

Страница 44: ...ted When the Intec ColorCut SC5000 Cutter is connected this should read USB Printing Support x If the Intec ColorCut Pro software cannot sense an Intec ColorCut cutter on the USB connection of your co...

Страница 45: ...s please see below Before cutting for the first time ensure that you have set up your ColorCut in the Settings dialogue box Prior to first use ColorCut Pro MUST have the Sensor offset aligned and you...

Страница 46: ...to a specific place on the media i e when cutting shapes out of blank media such as hearts from red card on Valentines Day or Face Shields Visors from Clear Polyester material When cutting without ma...

Страница 47: ...ed direction thus creating a radius instead of a sharp corner Intec ColorCut Digital cut engines have a built in routine to manoeuvre the blade in a way that compensates for this it is known as Knife...

Страница 48: ...s 1 While technically the blade can cut 1 0mm thick material the force required can vary significantly based on material density therefore on typical card based stocks we only recommend up to 350 micr...

Страница 49: ...from your digital printer or up to 5mm rotation from sheet placement Your cut lines are then automatically adapted by ColorCut Pro to compensate for these issues delivering precise and accurate cutti...

Страница 50: ...hen this will show File Output In such circumstances check your connection to your computer and power cycle your Intec ColurCut SC5000 cutter Ensure it is off for 45 seconds to enable the USB cache to...

Страница 51: ...tter includes a Vision3 ARMS system Automatic Registration Mark Sensor The Vison3 ARMS sensor uses an high quality CCD camera to automatically detect Registration Marks PageMARKs enabling accurate cut...

Страница 52: ...centre of the cutting tool automatically 1 Place the Calibration Pen Tool B in to Tool Holder 1 C Normally the position for the Blade Holder You can place and or leave the creasing tool into Tool Hold...

Страница 53: ...your Wi Fi Hot Spot is active your should see a preview of the Vison3 s CCD camera in the Live Preview window If not check the Wi Fi Hot Spot has a device connected and that OBTAIN IP ADDRESS Automati...

Страница 54: ...r US Letter ensure you set SEF Short Edge Feed orientation Then click OK 8 In the main ColorCut Pro application screen click on the SETTINGS button 9 The ColorCut Settings dialogue box will appear Her...

Страница 55: ...the Pen Calibration Tool to repeatedly draw a spiral pattern to simulate a registration mark it will then move the Vision3 sensor over to find the mark and automatically enter the values into your Sen...

Страница 56: ...ng sheets and it is useful to follow the progress of scanning and sensing QR codes as it helps to understand any issues therefore we recommend enabling the echo of the live video from the Vision3 sens...

Страница 57: ...er itself You can change the values by selecting the Tool directly on the LCD panel and using the Hard keys to adjust speed or force as shown on the panel 8 9 7 2 Setting the HOTSPOT SSID The connecti...

Страница 58: ...l run out of activations licenses for your license code and you will not be able to license the new computer Therefore ColorCut Pro will not run In this circumstance you will need to either de activat...

Страница 59: ...use ColorCut pro in an alternative language then use the drop down menu 10 at the bottom of the settings screen to change languages At the time of writing this manual English and Italian are available...

Страница 60: ...ve the Job Preview Window 1 10 2 The Job Preview Window 1 2 When launching ColorCut Pro in Direct mode a preview of the cutting profile on the selected layer will be shown in the Job Preview Window Wh...

Страница 61: ...riod the Live Video preview may appear blank 3 During the connecting period the Live Preview window may change to display a Connecting Please Wait message 3a Once connected it will display the echo of...

Страница 62: ...brightness of the illuminated area particularly with porous substrates like rice paper or reflective foiled materials Adjusting the slider 4a up will increase the brightness while adjusting the slide...

Страница 63: ...t is slightly off centre the cutter will redjust for centre and save the position in the SCAN HISTORY window and move on to the next mark The SC5000 will position the Vision3 sensor over the first Mar...

Страница 64: ...e Media size loaded in the Auto Sheet feeder and the default margin of the 1st PageMark These are required for correct scanning of the PageMARKs QR code The Productivity options also enabling optimisa...

Страница 65: ...tion will be shown 8a 8b The software will remember previous Cut Setting assignments applied to a color from the last time the Color was assigned If a Color has not previously been used the assignment...

Страница 66: ...erform A Material Type Action is a profile consisting of the following saved settings being used Intec Cutting Tool Cutter Crease or Ignore Speed of Tool Force Pressure applied by Tool Type of Line So...

Страница 67: ...the Color Settings 8 on the currently assigned action name Then select the new Material Type Action you wish to apply 10 And click 11 Assign Color To CLEAR a Material Type Action from a Cut setting C...

Страница 68: ...ere will often provide a cleaner cut 10 12 3 Selecting the Line Style of the Cut or Creasing Tool The parameter Line Style 12d controls the type of line that will be cut or creased By default this is...

Страница 69: ...Gs in the cutting lines to hold the elements in the sheet to prevent them from falling out during cutting and causing an obstruction This can be done automatically using the Line Style feature 1 In th...

Страница 70: ...ssign it to the Color Green The preview above 2 updates to reflect the NEW material type Tags 50mm that you created and will show the line with gaps every 50mm Note If your tags are small such as 1mm...

Страница 71: ...name Tag 200mm Select the Tag 200mm material Type fromt he list once added and Edit the Material Type settings as detailed in step 3 above But this time set the Cut length 12e to 200mm 6 Now the Tag...

Страница 72: ...6 Selecting the Force of the Cut Crease The parameter Force 12h controls the Force applied by the tool The range available is 0 750g A cutting force of 250 350g should be sufficient for card or media...

Страница 73: ...items or difficulties when weeding label media The default setting for 13 Overcut is Off 13a To Activate OverCut click on the Purple button on the left side of the OverCut section and a dialogue box w...

Страница 74: ...olored vinyl The manually positioned mode is for unique or custom sized sheets which are not printed and therefore will not have any PageMARKs or QR codes on them To use the SC5000 in Manual media pos...

Страница 75: ...preview area 2 In Job SERVER mode the button 15 will show Scan QR Code which when clicked will load a sheet and scan the QR code to retrieve the job and load it into the cutting preview area 2 then s...

Страница 76: ...urthermore enable automated batch production These settings are all grouped under the Productivity 7 The Sort Method Scan For QRCode on every sheet After Scanning QRCode Code ask before Cutting Automa...

Страница 77: ...cut first on the Y axis only A predictable cutting sort method but not always the fastest Closest point The order of the cutting is sorted such that the ColorCut will cut closest to PageMARK4 first A...

Страница 78: ...have been mixed in the auto feeder or if you loaded the sheets the wrong way around This only works if you use QR codes on the sheets In contrast when operating in DIRECT MODE cutting directly from t...

Страница 79: ...it to none if that color has not been used before then wait for you to confirm the assignment is okay before cutting the job 3a When loading a job for the first time this may be useful as you may not...

Страница 80: ...dard sizes of media Manually in to the SC5000 from the front Typically this may be used for cutting Vinyl lettering on sheets of colored vinyl The manually positioned mode is for unique or custom size...

Страница 81: ...consider is what should happen if an error is encountered This can be a mis feed so the target was not read an error reading a QR code or a blank sheet mixed in with your cut jobs The error handling i...

Страница 82: ...dge of the media being in a different and therefore your registration PageMARK location it is very important to ensure you set the Media Options correctly to match the media size loaded in the Auto Sh...

Страница 83: ...when applying the PageMARKs refer to section 6 in this manual and section 6 3 10c The Media Positioning 11 control sets location that the SC5000 should move to when scanning for the 1st PageMARK The...

Страница 84: ...her placing your origin and any cut lines further down the sheet Decreasing the value will move the sheet further back effectively moving the origin UP the sheet and any cut lines To adjust the Left M...

Страница 85: ...S button 13b A more advanced log can be generated by enabling the Generate Industry 4 0 Log file check box 13c The Industry 4 0 log is an external log file Tab delimited that is generated as each job...

Страница 86: ...k the ADVANCED button to display the Advanced scanning options Checking the ReScan QR Rerty Count 14b check box will instruct the SC5000 to ReScan BOTH Registration PageMARKs and QR codes as set the a...

Страница 87: ...Intec Printing Solutions ColorCut Pro User Guide for Intec ColorCut SC5000 Page No 105...

Страница 88: ......

Страница 89: ...Intec Printing Solutions Ltd Unit 11B Dawkins Road Industrial Estate Poole Dorset BH15 4JP United Kingdom Tel 44 1202 845960 Email sales intecprinters com www intecprinters com Rev 1 MBH Jan 27th 2021...

Отзывы: