4.4.1 DMX-Adressen zuordnen (DMX-PATCH)
und Ausgabewerte invertieren
Nach der Bestätigung der Frage „Output Options?“
mit der Taste 12/YES (2) zeigt das Display „DMX
Patch“ und es können die DMX-Adressen 1 – 144 je
einem Steuerkanal 1 – 96 zugeordnet und die Aus-
gabewerte invertiert werden. Voreingestellt ist:
Abb. 5 Voreinstellung
1) Um die Voreinstellung zu ändern, mit den Ziffern-
tasten 12/+ und 11/- (2) oder per dreistelliger
Direkteingabe über die Zifferntasten 1 – 0 die
DMX-Adresse „DMX Patch Ch: …“ auswählen.
2) Mit der Cursor-Taste
(23) auf „Ctrl Ch: ..“
springen und mit den Tasten 12/+ und 11/- oder
per zweistelliger Direkteingabe über die Ziffern-
tasten den Steuerkanal zuweisen. Verschiedene
DMX-Adressen können auch einem gemeinsa-
men Steuerkanal zugewiesen werden, um so
gleiche Funktionen mehrerer DMX-Geräte paral-
lel steuern zu können.
Wird einer DMX-Adresse der Steuerkanal Null
zugeordnet (Ctrl Ch:00), bleibt der Ausgabewert
immer auf Minimum (bzw. bei Invertierung auf
Maximum). Damit lässt sich ein „kritischer“
Kanal, der z. B. eine Reset-Funktion für ein Gerät
auslöst oder eine Entladungslampe ausschaltet,
gegen unbeabsichtigte Bedienung schützen.
3) Mit der Taste
zur Invertieroption „Inv:“ springen
und mit der Taste 12/YES oder 11/NO wählen,
ob der DMX-Ausgabewert invertiert werden soll
(Anzeige „Y“) oder nicht (Anzeige „N“). Bei akti-
vierter Invertierung ist der Ausgabewert Null,
wenn der Steuerkanal auf Maximalwert gestellt
wurde und umgekehrt.
4) Mit der Taste ESC/SETUP (21) oder der Cursor-
Taste
auf die Eingabe einer neuen DMX-
Adresse springen. Die Bedienschritte für weitere
Adressen wiederholen oder zum Verlassen der
Adressenzuordnung die Taste ESC/SETUP er-
neut betätigen (Anzeige: „Control Options? Y/N“).
Nach der Frage „Control Options?“ kann mit
der Taste ESC/SETUP das Konfigurationsmenü
verlassen werden oder mit der Taste 12/YES zur
Einstellung der Steuerkanaloptionen gesprungen
werden (Anzeige: „Control Ch: 01“, Kap. 4.4.2).
Auf den Seiten 54 und 55 ist eine Tabelle zu Heraus-
kopieren abgebildet, in der Sie die angeschlossenen
DMX-Geräte, deren eingestellte Adressen, Funktionen
und die Steuerkanalkonfiguration eintragen können.
4.4.2 Optionen der Steuerkanäle festlegen
Nach der Bestätigung der Frage „Control Options?“
mit der Taste12/YES (2) können für jeden der 96
Steuerkanäle getrennt die folgenden Eigenschaften
festgelegt werden:
1. Ausgabewert ist vom Schieberegler MASTER
LEVEL (15) abhängig
2. Kanal ist bei Szenenwechsel überblendbar
3. Kanal reagiert auf die Taste BLACKOUT (29)
4. Kanal reagiert auf die Flash-Tasten (12) und die
Taste FULL ON (28)
In der Voreinstellung sind für alle Steuerkanäle
diese Optionen aktiviert.
1) Um die Voreinstellung für einen Steuerkanal zu
ändern, mit den Tasten 12/+ und 11/- (2) oder
per zweistelliger Direkteingabe über die Ziffern-
tasten den Steuerkanal auswählen.
2) Mit der Cursor-Taste
(23) auf den Parameter
„Master Depend:“ springen. Mit der Taste 12/
YES oder 11/NO wählen, ob der Wert des Kanals
vom Master-Regler abhängig sein soll (Anzeige
„Y“) oder nicht (Anzeige „N“).
Eine Abhängigkeit vom Master-Regler ist sehr
sinnvoll für Kanäle zur Steuerung der Helligkeit,
damit die Helligkeit einer Szene mit Hilfe des
Master-Reglers für alle Lampen gemeinsam ge-
dimmt werden kann. Bei anderen Kanälen, wie
z. B. für Bewegungssteuerung (Pan/Tilt) oder
Farbwahl sollte diese Option ausgeschaltet sein.
3) Mit der Cursor-Taste
auf den Parameter
„Crossfade:“ springen. Mit der Taste 12/YES
oder 11/NO wählen, ob der Kanal überblendbar
sein soll (d. h. das Steuerpult berechnet während
einer Überblendung für diesen Kanal Werte zwi-
schen dem Wert der Startszene und der Zielszene
und gibt sie aus) oder nicht (zu Beginn einer Über-
blendung wird sofort der Zielwert ausgegeben).
Die Überblendbarkeit ist sinnvoll bei Kanälen
zur Steuerung der Helligkeit und der Bewegung
(Pan/Tilt). Bei Kanälen zur Farb- oder Gobo-
Wahl kann eine Überblendung mit Zwischenwer-
ten störend wirken.
4) Mit der Cursor-Taste
auf den Parameter
„Blackout:“ springen. Mit der Taste 12/YES
oder 11/NO wählen, ob der Steuerkanal auf die
Taste BLACKOUT (29) reagieren soll (d. h. im
Blackout-Zustand hat der Steuerkanal den Wert
Null) oder nicht.
Die Blackout-Funktion ist sinnvoll bei Kanälen
zur Steuerung der Helligkeit, der Blende, ggf.
auch der Gobos, wenn darüber ein schnelles Ab-
dunkeln erreicht wird. Bei Kanälen zur Bewe-
gungssteuerung sollte die Blackout-Funktion
immer ausgeschaltet werden.
5) Mit der Cursor-Taste
auf den Parameter
„Full/Flash:“ springen. Mit der Taste 12/YES
4.4.1 Assigning DMX addresses (DMX PATCH)
and inverting output values
After confirming the question “Output Options?” with
the button 12/YES (2) the display shows “DMX
Patch” and it is possible to assign the DMX address-
es 1 – 144 to one control channel 1 – 96 each and to
invert the output values. The following values are
preset:
Fig. 5
Presetting
1) To change the presetting, select the DMX ad-
dress “DMX Patch Ch: ...” with the numerical
keys 12+ and 11/- (2) or via the numerical keys
1 – 0 by 3-digit direct input.
2) Go to “Ctrl Ch: ..” with the cursor key
(23) and
assign the control channel with the buttons 12/+
and 11/- or via the numerical keys by two-digit
direct input. Different DMX addresses can also
be assigned to a common control channel to be
able to control the same functions of several
DMX units in parallel.
If the control channel zero is assigned to a
DMX address (Ctrl Ch:00), the output value
always remains at minimum (or in case of inver-
sion at maximum). Thus, a “critical” channel
which e. g. releases a reset function for a unit or
switches off a discharge lamp can be protected
against unintentional operation.
3) Go to the inversion option “Inv:” with the button
and select with the button 12/YES or 11/NO if the
DMX output value is to be inverted (indication
“Y”) or not (indication “N”). With activated inver-
sion the output value is zero if the control channel
has been set to the maximum value and vice
versa.
4) Go to the input of a new DMX address with the
button ESC/SETUP (21) or the cursor key
.
Repeat the operating steps for further addresses
or actuate the button ESC /SETUP again to exit
the address assignment (indication: “Control
Options? Y/N”).
After the question “Control Options?” it is pos-
sible to exit the configuration menu with the but-
ton ESC/SETUP or to go to the adjustment of the
control channel options with the button 12/YES
(indication: “Control Ch: 01”, chapter 4.4.2).
A table for copying is shown on pages 54 and 55 into
which you can enter the connected DMX units, their
adjusted addresses, functions, and the configuration
of the control channel.
4.4.2 Defining the options of the control channels
After confirming the question “Control Options?”
with the button 12/YES (2), it is possible to define
the subsequent characteristics separately for each
of the 96 control channels:
1. Output value depends on the sliding control
MASTER LEVEL (15)
2. Channel can be crossfaded when changing a
scene
3. Channel reacts on the button BLACKOUT (29)
4. Channel reacts on the flash buttons (12) and the
button FULL ON (28)
These options are activated for all control channels
in the presetting.
1) To change the presetting for a control channel,
select the control channel with the buttons 12/+
and 11/- (2) or via the numerical keys by two-
digit direct input.
2) Go to the parameter “Master Depend:” with the
cursor key
(23). With the button 12/YES or
11/NO define whether the value of the channel is
to depend on the master fader (indication “Y”) or
not (indication “N”).
For channels controlling the brightness, it is
very useful to depend on the master fader so that
the brightness of a scene can be dimmed with the
master fader for all lamps in common. This option
should be switched off for other channels, e. g.
for motion control (pan/tilt) or colour selection.
3) Go to the parameter “Crossfade:” with the cur-
sor key
. Define with the button 12/YES or
11/NO whether a crossfading of the channel
should be possible (i. e. during a crossfading, the
controller calculates for this channel values be-
tween the start scene value and the target scene
value and sends them to the output) or not (at the
beginning of a crossfading the target value is
immediately sent to the output).
The possibility of crossfading is useful for
channels controlling the brightness and the
motion (pan/tilt). For channels selecting the
colour or gobo, crossfading with interim values
may have a disturbing effect.
4) Go to the parameter “Blackout:” with the cursor
key
. Select with the button 12/YES or 11/NO
whether the control channel is to react on the but-
ton BLACKOUT (29) [i. e. in the blackout state
the control channel has the value zero] or not.
The blackout function is useful for channels
controlling the brightness, the iris, and, if neces-
sary, also the gobos if a quick darkening is
reached by this function. The blackout function
should always be switched off for channels which
control the motion.
8
D
A
CH
DMX-Adresse
„DMX Patch Ch:“
Steuerkanal
„Ctrl Ch:“
Invertierung
„Inv:“
001
01
N (nein)
002
02
N
…
…
…
096
96
N
097
01
N
098
02
N
…
…
…
144
48
N
DMX address
“DMX Patch Ch:”
Control channel
“Ctrl Ch:”
Inversion
“Inv:”
001
01
N (no)
002
02
N
…
…
…
096
96
N
097
01
N
098
02
N
…
…
…
144
48
N
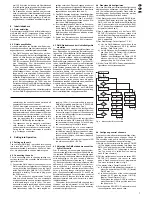
Output Options?
ESC /
SETUP
NO
YES
Control Options?
NO
YES
Reset All Opt’s?
NO
YES
Bk 01/01
Sure ? ? ?
NO
YES
Control Ch:
0
1
Master Depend:
Y
DMX Patch Ch:
0
01
Crossfade:
Y
Blackout:
Y
Full/Flash:
Y
ESC /
SETUP
or
ESC /
SETUP
ESC /
SETUP
Ctrl Ch:
0
1 Inv:N
Ctrl Ch:01 Inv:
N
ESC /
SETUP
or
ESC /
SETUP
ESC /
SETUP
ESC /
SETUP
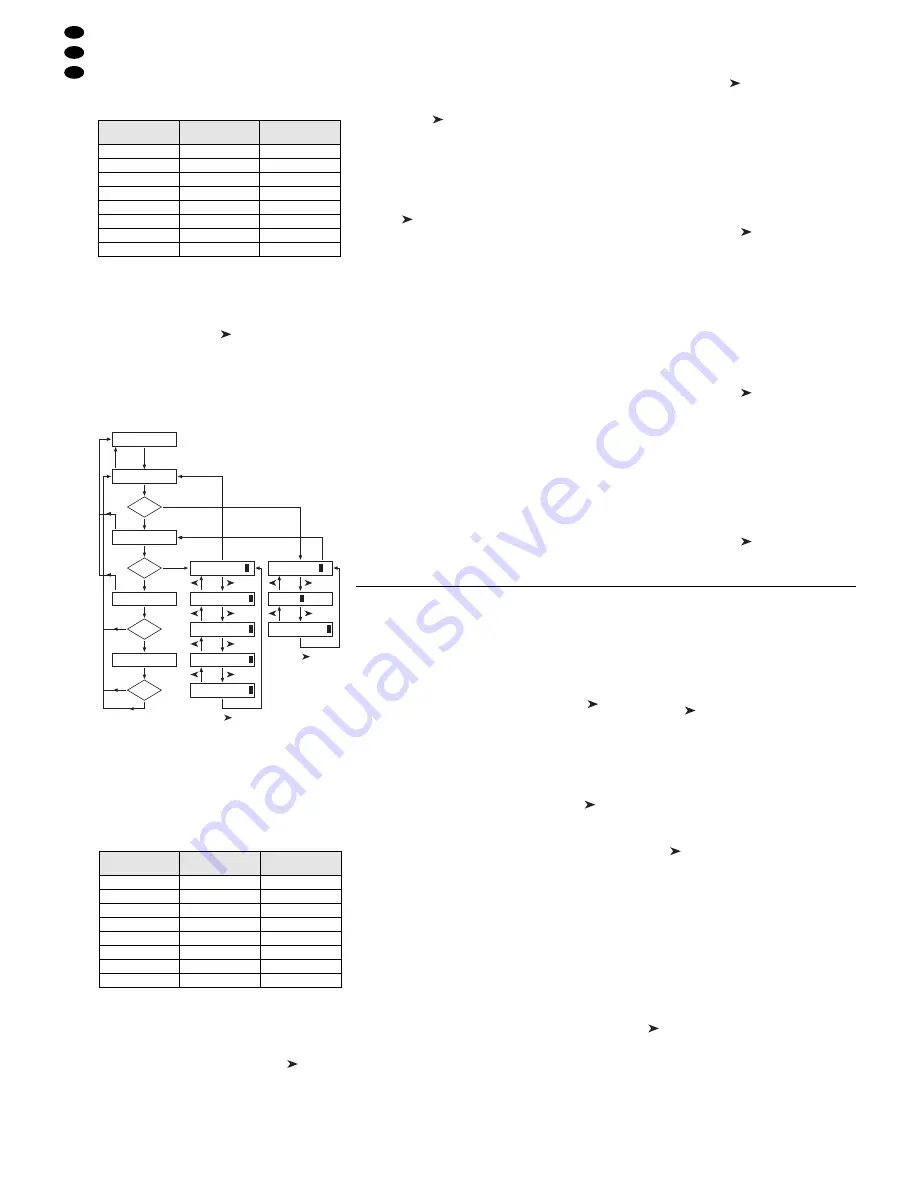
Fig. 6
Menüstruktur / Menu structure

