SPEED nur einmal gedrückt, ist nach dem Ablauf
von ca. 13 Minuten automatisch diese maximale
Zeit als Taktzeit eingestellt. Die Takt-LED erlischt.
Hinweis: Wenn die Einstellung über die Taste
TAP SPEED nicht zu funktionieren scheint, kann
es daran liegen, dass die Überblendzeit mit dem
Regler C.F. TIME zu lang eingestellt wurde.
5) Die zweite Displayzeile zeigt „Start? Y/N/AU/
“.
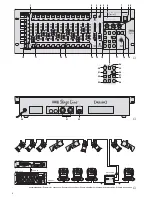
Mit einer der folgenden Tasten wählen, ob die
Sequenz gestartet werden soll und in welchem
Modus:
Taste 11/NO (2): Start abbrechen
Die Sequenz wird nicht gestartet; es kann
eine neue Sequenznummer gewählt werden.
Taste 12/YES (2): zeitgesteuerter Ablauf
Die Sequenz wird zeitgesteuert mit der einge-
stellten Taktzeit gestartet. Die Taktzeit lässt
sich bei laufender Sequenz ändern.
Blinkt die gelbe Takt-LED während einer Über-
blendung auf, wird noch kein neuer Sequenz-
schritt ausgeführt. Die laufende Überblendung
wird erst beendet und mit dem folgenden Auf-
blinken dann zur nächsten Szene überge-
blendet.
Taste BANK/AUDIO (27): audiogest. Ablauf
Die Sequenz wird gestartet und mit Musikim-
pulsen an der Buchse AUDIO IN (32) synchro-
nisiert oder, wenn die Buchse nicht ange-
schlossen ist, über das interne Mikrofon (4).
Das Display zeigt „Audio Trig.“ Die Empfind-
lichkeit mit dem Regler AUDIO SENS. (9) so
einstellen, dass die gelbe Takt-LED im Rhyth-
mus der Musik blinkt. Während einer Über-
blendung werden die Musikimpulse ignoriert.
Cursor-Taste oder (23):
manueller Ablauf
Mit jedem Tastendruck wird die Sequenz
manuell vorwärts (
) oder rückwärts (
)
Schritt für Schritt weitergeschaltet, z. B. bei
Theateraufführungen, wo ein Szenenwechsel
auf ein Stichwort erfolgen muss. Das Display
zeigt „Manu. Step“.
Wird eine der beiden Tasten während einer
Überblendung gedrückt, so wird diese sofort
beendet. Erst bei nochmaligem Drücken wird
der nächste Schritt ausgeführt.
Nach dem Start einer Sequenz zeigt das Display
die Nummer der laufenden Sequenz, die Num-
mer des gerade gezeigten Schrittes sowie die
dazugehörige Bank- und Szenennummer [z. B.
„Seq12 St059 10/04“ für Sequenz Nr. 12, aktuel-
ler Schritt (step) 59, Szene 4 in Bank 10].
6) Während des Ablaufs einer Sequenz kann nach
dem Drücken der Taste SEQUENCE schon die
nächste wiederzugebende Sequenz gewählt
werden. Wenn die Anzeige „Start? Y/N/AU/
“
erscheint, lässt sich die neue Sequenz mit der
entsprechenden Taste starten. Wird jedoch die
Taste 11/NO gedrückt, zeigt die Anzeige wieder
Sequenz-, Schritt-, Bank- und Szenennummer
der noch laufenden Sequenz.
7) Während eines zeit- oder audiogesteuerten Se-
quenzablaufs lässt sich vorzeitig mit der Taste
auf die nächste Szene und mit der Taste
zu-
rück auf die vorherige Szene wechseln. Dabei
bestimmen die Tasten auch die weitere Laufrich-
tung vorwärts (
) oder rückwärts (
).
8) Während eines zeitgesteuerten oder manuellen
Ablaufs kann mit der Taste BANK/AUDIO direkt in
den audiogesteuerten Ablauf gewechselt werden.
9) Während eines audiogesteuerten oder manuel-
len Ablaufs kann durch zweimaliges Drücken der
Taste TAP SPEED im gewünschten Takt direkt in
den zeitgesteuerten Ablauf gewechselt werden.
7.2.1 Manuelle Szenenüberblendung
einer Sequenz
Sequenzen, die ohne eigene Überblendzeiten ge-
speichert wurden, können auch mithilfe der manuel-
len Überblendung ablaufen. Dazu den Regler
C.F. TIME (7) ganz nach rechts in die Position MAN
drehen; die LED unterhalb des Crossfaders (16)
leuchtet. Den Crossfader nun abwechselnd von
Endposition zu Endposition bewegen. Dabei wird
die Sequenz Schritt für Schritt mit manueller Über-
blendung zwischen den Szenen durchlaufen. Mit
den Cursor-Tasten (23) lässt sich die Laufrichtung
vorwärts (
) oder rückwärts (
) ändern.
Hinweis: Wenn manuelle Überblendung eingestellt
ist, erfolgt die Schrittweiterschaltung bei zeit- oder
audiogesteuertem Ablauf auch nur durch Überblen-
den mit dem Crossfader.
7.2.2 Sequenzablauf unterbrechen
Um einen zeit- oder audiogesteuerten Ablauf zu
unterbrechen, die Taste HOLD (3) drücken. Eine
laufende Überblendung wird sofort zu Ende geführt
und das Display zeigt „Halted! Cont? Y/N“. Eine der
folgenden Tasten betätigen:
12/YES (2): zum Fortsetzen (continue) derselben
Sequenz
11/NO (2): zum Beenden der Sequenz; es kann
dann eine andere Sequenz gewählt oder mit der
Taste ESC/SETUP vom Sequenzmodus in den
Direkt-Modus gewechselt werden (die grüne LED
RUN erlischt)
Cursor-Taste oder (23):
zum
Wechseln
auf
manuellen Ablauf
7.2.3 Sequenzablauf beenden
Nach dem letzten Sequenzschritt wird wieder auf
den ersten Schritt gesprungen und so die Sequenz
laufend wiederholt. Um den Ablauf zu beenden, die
Taste SEQUENCE (26) drücken. Es kann dann eine
andere Sequenznummer gewählt werden oder
durch erneutes Drücken der Taste SEQUENCE vom
Sequenzmodus in den Direkt-Modus gewechselt
werden (die grüne LED RUN erlischt).
the first pressing, the yellow rhythm LED lights
up, after the second pressing, it is extinguished.
The time between the two actuations of the but-
ton defines the time until the next change of
scene. If the button TAP SPEED is pressed only
once, after approx. 13 minutes of running, this
maximum time is automatically adjusted as the
rhythm time. The rhythm LED is extinguished.
Note: If the adjustment via the button TAP
SPEED does not seem to function, it may be due
to the fact that the crossfading time adjusted with
the control C.F. TIME is too long.
5) The second display line shows “Start? Y/N/AU/
”. Define with one of the subsequent buttons if
the sequence is to be started and in which mode:
Button 11/NO (2): interrupt start
The sequence is not started; a new sequence
number can be selected.
Button 12/YES (2): time-controlled run
The sequence is started time-controlled with
the adjusted rhythm time. The rhythm time
may be changed while the sequence is run-
ning.
If the yellow rhythm LED flashes while cross-
fading, a new sequence step is not yet made.
The current crossfading is stopped first and
the unit crossfades to the next scene at the
subsequent flashing.
Button BANK/AUDIO (27): audio-controlled run
The sequence is started and synchronized
with music pulses at the jack AUDIO IN (32)
or, if the jack is not connected, via the internal
microphone (4). The display shows “Audio
Trig.”. Adjust the sensitivity with the control
AUDIO SENS. (9) so that the yellow rhythm
LED flashes to the rhythm of the music. While
crossfading, the music pulses are ignored.
Cursor
key or (23):
manual run
Each time the button is pressed, the sequence
is manually advanced step by step in forward
direction (
) or backward direction (
), e. g.
for theatre performances where a change of
scene must be made on cue. The display
shows “Manu.Step”.
If one of the two buttons is pressed while
crossfading, it will stop immediately. By press-
ing again, the next step is made.
After the start of a sequence the display shows
the number of the current sequence, the number
of the step currently displayed and the corre-
sponding bank number and scene number (e. g.
“Seq12 St059 10/04” for sequence No. 12, cur-
rent step 59, scene 4 in bank 10).
6) While a sequence is running, it is possible to
select the next sequence to be reproduced after
pressing the button SEQUENCE. If the display
“Start? Y/N/AU/
” is shown, the new sequence
can be started with the corresponding button.
However, if the button 11/NO is pressed, the dis-
play again shows the numbers of sequence,
step, bank, and scene of the sequence still run-
ning.
7) During a time-controlled or audio-controlled run
of a sequence it is possible to advance to the
next scene before the end with the button
and
return to the previous scene with the button
.
The buttons determine if the unit continues in for-
ward (
) or backward (
) direction.
8) During a time-controlled or manual run it is possi-
ble to change directly into the audio-controlled
run with the button BANK/AUDIO.
9) During an audio-controlled or manual run it is
possible to change directly into the time-con-
trolled run by pressing the button TAP SPEED
twice in the desired rhythm.
7.2.1 Manual scene crossfading of a sequence
Sequences which have been memorized without
individual crossfading times may also run by means
of manual crossfading. For this purpose turn the con-
trol C.F. TIME (7) fully to the right to position MAN;
the LED below the crossfader (16) lights up. Now
move the crossfader alternately from one end posi-
tion to the other end position. The sequence is run
step by step with manual crossfading between the
scenes. With the cursor buttons (23) it is possible to
change the direction: forward (
) or backward (
).
Note: If manual crossfading has been adjusted, the
steps are only advanced by crossfading with the
crossfader in case of time-controlled run or audio-
controlled run.
7.2.2 Interrupting the sequence run
To interrupt a time-controlled or audio-controlled
run, press the button HOLD (3). A current cross-
fading is immediately stopped and the display
shows “Halted! Cont? Y/N”. Actuate one of the sub-
sequent buttons:
12/YES (2) to continue the same sequence
11/NO (2) to stop the sequence; then it is possible to
select another sequence or to change from the
sequence mode into the direct mode with the but-
ton ESC/SETUP (the green LED RUN is extin-
guished)
Cursor button
or
(23): to change to manual run
7.2.3 Stopping the sequence run
After the last sequence step the unit goes to the first
step again. Thus, the sequence is repeated contin-
uously. To stop the run, press the button
SEQUENCE (26). Then it is possible to select an-
other sequence number or to change from the
sequence mode into the direct mode by pressing the
button SEQUENCE again (the green LED RUN is
extinguished).
15
GB
D
A
CH

