P
P
a
a
g
g
e
e
3
3
1
1
They should also not be tightened to the correct torque at this
point, as an adjustment to the timing may still be required
.
-
Install rear bearing (19).
-
Install the shaft assemblies into the gearbox (16) so that the cone and
cup halves of the front bearing (24) are now one unit.
-
Assemble the endplate by installing O-ring (3) and place a nominal
amount (0.05 mm) of shim (73) under the rear bearing cups (19).
Do not
install the rear lip seal (11) until the bearing pre-load has been set.
The lips may give a false rolling torque reading as well as
increasing the risk of damage during assembly.
-
Install endplate assembly onto the gearbox (16) locating on the dowel
(60).
4.2.4 Timing.
-
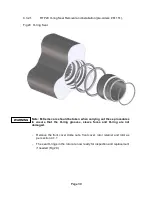
Rotate the shafts (9 and 10) so as to position the gaps made by the
missing splines, in the vertically uppermost position, See Fig 17.
F
F
i
i
g
g
1
1
6
6
S
S
h
h
a
a
f
f
t
t
A
A
s
s
s
s
e
e
m
m
b
b
l
l
y
y
.
.
W
W
A
A
R
R
N
N
I
I
N
N
G
G
Содержание Wright Flow Technologies RTP Series
Страница 1: ...P Pa ag ge e 0 0 INSTALLATION OPERATION AND MAINTENANCE MANUAL FOR THE RANGE OF PUMPS...
Страница 47: ...P Pa ag ge e 4 46 6 5 0 Specifications 5 1 Clearance Chart B A C Radial D C Radial...
Страница 51: ...P Pa ag ge e 5 50 0 B B 100 mm or 4 PORT 80 mm or 3 PORT 5 5 RTP30 Foundation Dimensions Stub Shaft Drive...
Страница 54: ...P Pa ag ge e 5 53 3 5 6 Typical Basic Pump Build RTP20 Shown...
Страница 56: ...P Pa ag ge e 5 55 5 5 8 RTPTM Service History Pump Serial No Date Comments...


