P
P
a
a
g
g
e
e
3
3
0
0
They should also not be tightened to the correct torque at this
point, as an adjustment to the timing may still be required.
-
place a nominal amount (0.05 mm) of shim (73) under the rear bearing
cups
-
Install rear bearing (19).
-
Install the shaft assemblies into the gearbox (16) so that the cone and
cup halves of the front bearing (24) are now one unit.
-
Assemble the endplate by installing O-ring (3)
Do not install the rear
lip seal (11) until the bearing pre-load has been set. The lips may
give a false rolling torque reading as well as increasing the risk of
damage during assembly.
-
Install endplate assembly onto the gearbox (16) locating on the dowel
(60).
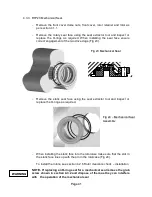
4.2.3 Shaft Assembly – RTP30
-
Install front bearing (24) to the shaft (9 or 10).
-
Install O-rings (26 and 25), to shafts (9 or 10) in the appropriate grooves.
Lightly lubricate all O-rings with a compatible lubricant.
-
Install the gear (14) over the O-rings (26) and secure with retaining bolts
(23). It is recommended that the screws be aligned at the centre of the
slots provided to give an equal amount of adjustment in either direction.
F
F
i
i
g
g
1
1
5
5
S
S
h
h
a
a
f
f
t
t
A
A
s
s
s
s
e
e
m
m
b
b
l
l
y
y
.
.
W
W
A
A
R
R
N
N
I
I
N
N
G
G
Содержание Wright Flow Technologies RTP Series
Страница 1: ...P Pa ag ge e 0 0 INSTALLATION OPERATION AND MAINTENANCE MANUAL FOR THE RANGE OF PUMPS...
Страница 47: ...P Pa ag ge e 4 46 6 5 0 Specifications 5 1 Clearance Chart B A C Radial D C Radial...
Страница 51: ...P Pa ag ge e 5 50 0 B B 100 mm or 4 PORT 80 mm or 3 PORT 5 5 RTP30 Foundation Dimensions Stub Shaft Drive...
Страница 54: ...P Pa ag ge e 5 53 3 5 6 Typical Basic Pump Build RTP20 Shown...
Страница 56: ...P Pa ag ge e 5 55 5 5 8 RTPTM Service History Pump Serial No Date Comments...


