6-3
6. OTHER FUNCTIONS
You can perform a rough frequency calibration using
the external 10 MHz reference frequency signal.
NOTE:
The transceiver has been adjusted and
tested at the factory before being shipped. You
should not have to re-calibrate it.
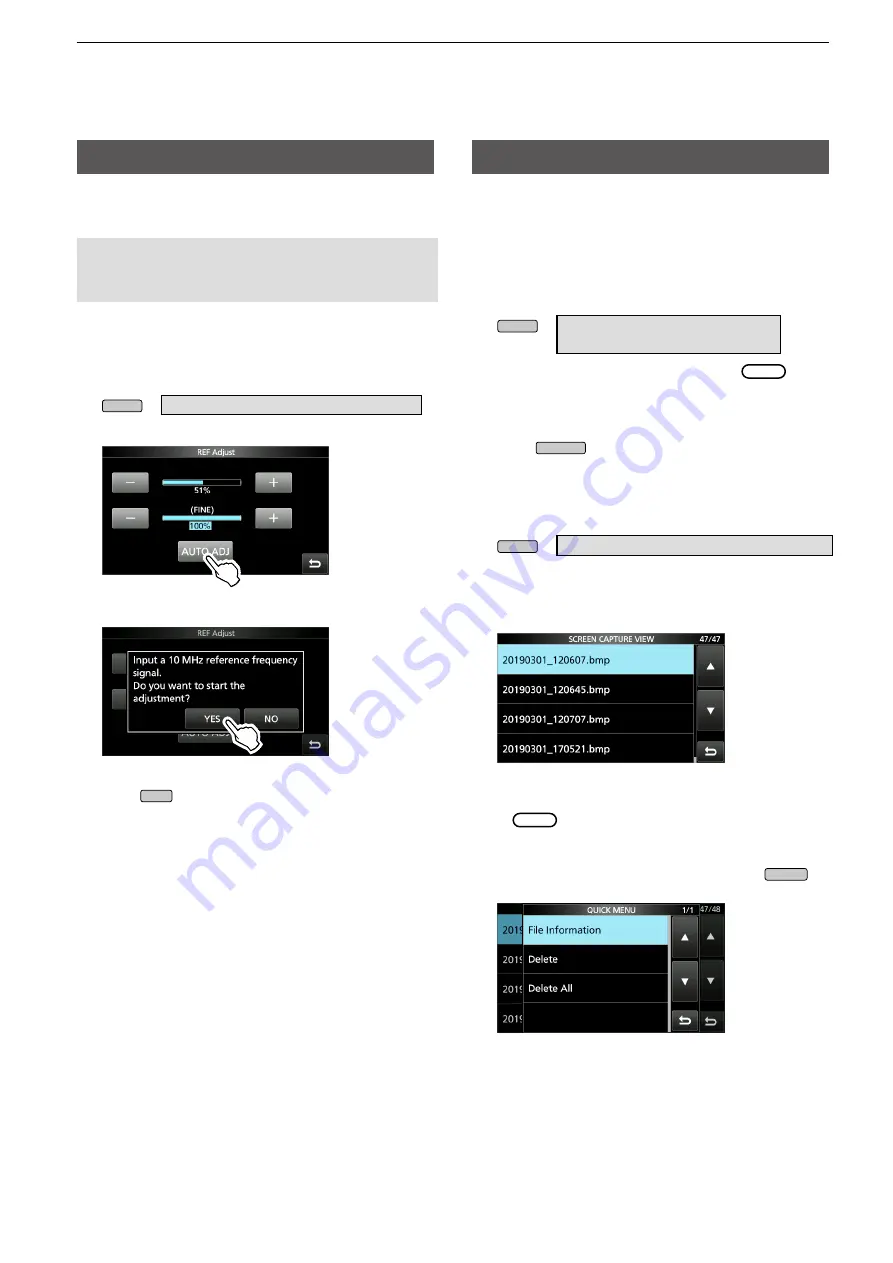
1. Apply a highly accurate and stable 10 MHz
reference frequency signal to the [REF IN 10MHz]
connector.
2. Display the “REF Adjust” screen.
MENU
» SET > Function >
REF Adjust
3. Touch [AUTO ADJ].
4. Touch [YES].
L
After the adjustment, “Finished” is displayed.
5. Push
EXIT
several times to close the FUNCTION
screen.
REF adjustment
Screen Capture function
You can capture the transceiver display onto an SD
card. Most of the screens used in this manual are
captured using this function. However, some displays
cannot be captured.
D
Setting the Screen Capture function
1. Open the “Screen Capture [POWER] SW” screen.
MENU
» SET > Function >
Screen Capture [POWER] SW
2. Select “ON” by rotating and pushing
MULTI
.
D
Capturing a screen
1. Select the desired screen to capture.
2. Push
POWER
to capture the screen.
•The captured screen is saved onto the SD card.
D
Viewing the captured screen
1. Open the SCREEN CAPTURE VIEW screen.
MENU
» SET > SD Card >
Screen Capture View
•The capture list is displayed.
•The latest screen capture is at the top of the list.
2. Touch the desired screen capture to display it.
•The screen capture is displayed.
L
While a screen capture is displayed, you can
scroll through all the screen captures by rotating
MULTI
.
Other options in the capture list
1. While the capture list is displayed, push
QUICK
to
display the QUICK MENU.
2. Select the desired option.
•
File Information:
Displays the name, size, and date of
the selected screen capture.
•
Delete:
The confirmation dialog is displayed before
deleting the file. Select [YES] to delete or
select [NO] to cancel.
•
Delete All:
The confirmation dialog is displayed before
deleting all the files on the list. Select
[YES] to delete or select [NO] to cancel.


