background image

Using Connections  

Composing and Editing Messages  

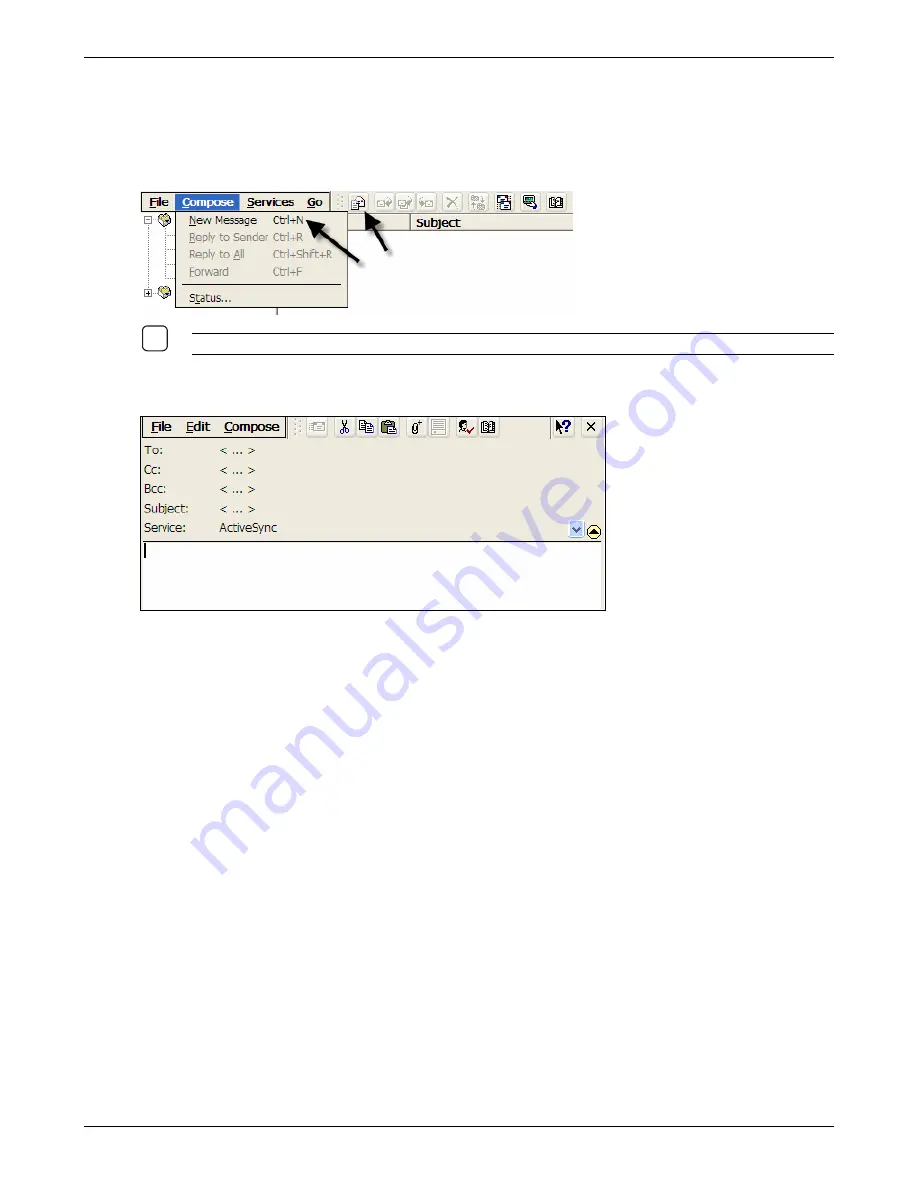
Create a Message: 

1.  In the Message List view, select. 

Compose | New Message

 or 

click the New Message icon


9

N

OTE

:


I

CONS ON THE TOOL BAR ARE AVAILABLE TO PERFORM MANY OF THE MENU OPTIONS

2.  The Compose screen will appear. On this screen, you will find four areas:  The menu/tool bar, the 

header, the body of the message, and the attachments listing. 


3. 

Enter

 the address of one or more recipients, separating them with a semicolon. If the recipient is 

listed in the Address Book, enter a few letters of the recipient's name and select 

Compose | Check 

Names 

(or click on the appropriate icon on the tool bar).. If there is only one match, the e-mail 

address is inserted. If there is more than one match, select the correct address from the Choose E-
mail Recipients dialog box. If there is no match, add a new e-mail address through Choose E-mail 
Recipients.  To include a blind copy, expand the header by selecting 

Compose | Show Full Header


(or click on the appropriate icon on the tool bar). 

4.  To attach a file, select 

File | Attachments | Add Attachment 

(or click on the appropriate icon on 

the tool bar).  Navigate to where the file is stored.  Highlight the file, and click 

OK.


5.  To save the message you are composing or editing, select 

File | Save

. The message is not sent 

and is saved in the Inbox folder of the active service.  

6.  To send the message, select 

File | Send

 (or click on the appropriate icon on the tool bar).  If you 

are working offline, the message is moved to the Outbox folder and will be sent the next time you 
connect. 


Thin Client User’s Guide 

81


Содержание TC5000

Страница 1: ...TC5000 Thin Client User s Guide ...

Страница 2: ...edScreen are trademarks of Citrix Systems Inc Windows CE Windows NT Windows 2000 Windows XP and RDP are trademarks or registered trademarks of Microsoft Corporation All other trademarks and registered trademarks are property of their respective owners Every effort has been made to make this guide as complete and accurate as possible but no warranty of fitness is implied The authors and the publish...

Страница 3: ...up Wizard 13 Step Two Terminal Name Network Properties 14 IP Address 14 Name Servers 15 Step Three Desktop Settings 15 Desktop Area and Refresh Frequency 16 Colors 17 Screen Saver 17 Step Four Additional Settings in the Control Panel 18 122 Key Keyboard Support 18 Date and Time 19 Step Five Finish 19 Creating Connections 20 Overview of the Terminal Connection Manager 20 Connections Tab 21 Configur...

Страница 4: ...on 52 I O 5250 Printer Control Panel Options 52 Terminal Emulation 53 RDP Connection to Windows Terminal Servers 54 ICA Connection to Citrix Servers 55 Microsoft Viewers 56 Running the Viewer 56 Printing from a Viewer 57 Limitations of the Microsoft Viewers 58 TC5000 Printing Overview 59 Windows Media Player 60 E mail 62 Configuring the E mail Client 62 E Mail Overview 68 Receiving Messages 73 Rea...

Страница 5: ...d 120 USB Storage 121 Troubleshooting 122 Firmware Upgrade Process 130 I O Configuration Utility Upgrade Process 133 Uninstalling the I O Configuration Utility 134 Saving Restoring the Thin Client s Configuration 135 Saving a Configuration 135 Restoring a Configuration 136 Restoring Factory Defaults 138 Boot Up Process 138 General Tab Process 138 Accessing the Motherboard s Startup Processes 140 M...

Страница 6: ... remotely configure and update the thin client The term client is used in this guide to represent the I O Thin Client Consistent with our policy of continuous development the product you received may have features in addition to those described in this guide Please visit us at HTUwww iocorp comUTH for current information About this Guide This guide is intended to assist the network administrator o...

Страница 7: ...formation about the TeemTalk terminal emulation suite included in the thin client Client for Windows CE Windows Based Terminals Administrator s Guide This document provides the administrator with detailed information about configuring the ICA client Other resources that may be needed to fully utilize the features and capabilities of the thin client include Network Administrator This individual s a...

Страница 8: ...BE REQUIRED TO AVOID DAMAGE DURING TRANSIT Step Two Prepare 1 The site where you want to install the product must have the following Two 100 120V AC 2A 50Hz 3 pin power outlets one each for the thin client and the display unit NOTE ENSURE THAT THE POWER OUTLET IS PROPERLY REGULATED AND GROUNDED A FLOATING GROUND CHASSIS COULD CAUSE AN ELECTRIC SHOCK 9 Well ventilated clean dry and dust free atmosp...

Страница 9: ...COM1 Microphone Input Line Input Speaker Output USB Ports RCA Video Port S Video Port Video Port PS 2 Keyboard Port See the following page for details about the connectors and cables and the order for connecting them CAUTION BEFORE CONNECTING ANY CABLE ENSURE THAT THE EXTERNAL POWER SUPPLY IS NOT CONNECTED TO THE WALL OUTLET THE POWER MUST BE CONNECTED ONLY AFTER ALL OTHER CONNECTIONS ARE MADE Thi...

Страница 10: ...onnect either a composite or SVGA TV cable When the TV display output is selected the screen will be shown on both the display and on the TV with one exception LCD monitors cannot support the TV output option 9 Connect the output of the AC Transformer to the power inlet CAUTION ENSURE THAT THE SCREWS PROVIDED WITH D TYPE CONNECTORS LPT1 COM1 AND VIDEO PORTS ARE FASTENED CAUTION DO NOT USE A LCD MO...

Страница 11: ...EDs on the Front and Rear Panels The front panel of the thin client has two LEDs on the right and left side of the On Off switch The Power LED on the left side glows green when the unit is switched on and remains on until the unit is switched off The Internal Storage Access LED on the right side flickers red when the thin client is accessing the thin client s firmware or locally stored application...

Страница 12: ... hold the On Off switch on the front panel for about 20 seconds The Power LED will stop glowing NOTE EVEN IF THE THIN CLIENT IS SWITCHED OFF USING THE POWER SWITCH ON THE FRONT PANEL A STANDBY SUPPLY OF POWER IS BEING PROVIDED TO THE MOTHERBOARD TO COMPLETELY SWITCH OFF POWER SUPPLY TO THE UNIT THE EXTERNAL POWER SUPPLY HAS TO BE DISCONNECTED CAUTION BE CERTAIN TO EXIT ALL ACTIVE CONNECTIONS PRIOR...

Страница 13: ...ide you through the process of configuring the thin client 9 NOTE THE SETUP WIZARD IS STARTED AUTOMATICALLY UNDER THE FOLLOWING CIRCUMSTANCES WHEN YOU SWITCH THE THIN CLIENT ON FOR THE FIRST TIME WHEN YOU RESTORE DEFAULT SETTINGS OF THE THIN CLIENT THROUGH THE HGENERALH TAB OF THE TERMINAL PROPERTIES DIALOG BOX The Setup Wizard has several dialog boxes that display in succession Some dialog boxes ...

Страница 14: ... address If the IP address is assigned automatically by DHCP click the Next button on this screen and skip to Display Settings section below If the IP address is to be a static address one that does not change click the Network Properties button to access the IP address setting screens TIP TO IMPLEMENT LPD PRINTING IT IS RECOMMENDED THAT YOU SPECIFY A STATIC IP ADDRESS FOR THE THIN CLIENT THIS IS ...

Страница 15: ...ne of this screen then click the close button the X in the upper right corner Click Next to continue Name Servers If there are DNS or WINS servers in the network select the Name Servers tab Fill in the appropriate IP address for each server Click the OK button on the title line of this screen then click the close button the X in the upper right corner Click Next to continue Step Three Desktop Sett...

Страница 16: ...CD MONITORS AND 1280 X 1024 60 HZ FOR 17 LCD MONITORS 9 If you select a resolution or refresh frequency other than the default setting verify whether your monitor supports the selected setting by clicking the Test button The following prompt is displayed Click OK to continue A test pattern of black and white boxes will be displayed for about five seconds NOTE MONITORS WITH ON SCREEN DISPLAY OSD FE...

Страница 17: ... MONITOR DOES NOT DISPLAY THE SCREEN YOU WILL NEED TO RESTART THE THIN CLIENT SHUT DOWN THE THIN CLIENT BY HOLDING IN THE POWER BUTTON FOR SEVERAL SECONDS UNTIL THE POWER LED GOES OUT PRESS THE POWER BUTTON TO POWER UP THE THIN CLIENT IMMEDIATELY AFTER THE I O SPLASH SCREEN CLEARS PRESS THE F7 KEY SEVERAL TIMES AFTER A FEW SECONDS THE THIN CLIENT S SETTINGS WILL BE RESTORED TO THE FACTORY DEFAULTS...

Страница 18: ...ontinue 122 Key Keyboard Support If an I O 122 key 5250 Thin Client Keyboard is attached select the 122 Key Keyboard icon When the I O 122 key 5250 Thin Client Keyboard is attached and this option is enabled users can switch back and forth between IBM 5250 display sessions and Windows sessions with full keyboard functionality available in both environments Click on the check box to enable this opt...

Страница 19: ...e Click Apply and then OK After these items have been configured click the Next button for the wizard to continue Step Five Finish The above dialog box marks the end of the Setup Wizard Click Finish The screen will clear while the settings are being stored The screen will then will turn black for several seconds while the thin client is restarting When the thin client has restarted the Terminal Co...

Страница 20: ...NNECTION MANAGER IF YOU RESTORE PROPERTIES OF THE THIN CLIENT TO THE FACTORY DEFAULT SETTINGS THE THIN CLIENT AUTOMATICALLY STARTS THE SETUP WIZARD INSTEAD OF DISPLAYING THE TERMINAL CONNECTION MANAGER The Terminal Connection Manager has two tabs The Connections tab displays a list of available connections and allows you to start end connections The Configure tab allows you to add edit and delete ...

Страница 21: ...n to this connection when it was created Type identifies the type of connection Status indicates the connection s status The following table describes what each abbreviation represents Connection Type Description Dialup Dial up connection to a remote server ICA LAN connection to a server that supports Citrix s ICA protocol IOP I O 5250 Printer connection Word Microsoft word processing viewer E mai...

Страница 22: ...ult connection or to automatically start when the thin client is switched on The startup status is displayed in the Startup column on the Connections Tab Creating Connections This section describes the basic procedure for creating connections 1 Click the Configure tab in the Terminal Connection Manager 2 Click the Add button to display the New Connection dialog box 3 From the New Connection dialog...

Страница 23: ...properties 3 Click the Startup button The Connection Startup dialog box is displayed The above dialog box has two radio buttons Make the selected connection your default connection If you select this radio button the connection you selected in step 2 will be highlighted every time you switch on the thin client The word Default will be displayed in the Startup column of the Configure tab of the Ter...

Страница 24: ...m the Terminal Connection Manager window 2 Highlight the connection to start Click Connect NOTE YOU CAN ALSO DOUBLE CLICK ON THE CONNECTION TO START THE CONNECTION 9 Switching Connections When more than one connection is active you can switch between connections by using these key combinations To cycle through active connections press CTRL ALT UPARROW or CTRL ALT DOWNARROW To return to the Connect...

Страница 25: ...re to the printer s command structure PCL Epson and Proprinter The I O 5250 Printer Emulation product and be customized to change the host print attributes if needed CPI page orientation etc I O also has included a number of advanced features in the I O 5250 Printer Emulation These include the ability to send printer specific commands as part of the SCS data stream that the IBM host does not know ...

Страница 26: ...g requirements Be running OS 400 V3R2 or newer with the most recent applicable PTF s applied Have the most recent version of Client Access installed on the AS 400 Have the most recent version of the Telnet server installed on the AS 400 Have the AS 400 s auto configuration function turned on Make certain that the AS 400 can create virtual devices and there are a sufficient number of devices availa...

Страница 27: ...is displayed 3 Select I O 5250 Printer from the drop down list and click OK The I O 5250 Printer Connection configuration screen is displayed NOTE ONLY ONE 5250 PRINTER CONNECTION CAN BE CREATED IF MORE THAN ONE IBM HOST PRINTER CONNECTION IS REQUIRED INSTALL ONE OF I O S MULTI SESSION LAN PRINT SERVERS 9 4 On General tab you will enter the basic required information for establishing a TN5250e pri...

Страница 28: ...LITY IS AVAILABLE THROUGH THIS CONVERSION PROCESS DUE TO THE FACT THAT THE IBM HOST IS ONLY SENDING 3812 COMMANDS SUCH FEATURES AS LINE ALIGNMENT USED FOR ALIGNING CHECKS PRIOR TO PRINTING CAN ONLY BE OBTAINED USING A TRUE IBM 4214 5224 5225 5256 DOT MATRIX EMULATION FOR SUCH APPLICATIONS I O RECOMMENDS THAT YOU USE ONE OF I O S LAN PRINT SERVER PRODUCTS TO PROVIDE THE COMPLETE IBM DOT MATRIX FUNC...

Страница 29: ...ARE THE TN5250E DEFAULTS REFER TO YOUR SYSTEM ADMINISTRATOR FOR ANY CHANGES HERE AS 400 Queue Name Enter the name of the message queue on the IBM host The default value is QSYSOPR AS 400 Library Name Enter the name of the library on the IBM host The default value is LIBL Telnet Port Number Enter the TCP IP port for Telnet on the IBM host The default value is 23 If a firewall is being used port 23 ...

Страница 30: ...Creating Connections Connection Manager screen Then click the Connections tab on the Terminal Connection Manager screen Thin Client User s Guide 30 ...

Страница 31: ...URRENTLY MORE CONNECTIONS MAY BE CREATED BUT ACTUAL USAGE IS LIMITED TO 20 ACTIVE CONNECTIONS 9 1 Click the Configure tab in the Terminal Connection Manager then click the Add button to display the New Connection dialog box 2 Select Terminal Emulation and click OK The Connection Information dialog box will be displayed 3 On the Connection Information screen you will select the emulation type model...

Страница 32: ... Information screen host connection information will be entered TCP IP Select this radio button for an Ethernet connection Modem Refer to the Terminal Emulation User s Guide for detailed instructions Serial Refer to the Terminal Emulation User s Guide for detailed instructions Host Name Enter IP address of the host computer or if available enter the DNS WINS name of the host computer Host Rollover...

Страница 33: ...t this check box to prevent the emulation from echoing repeating keystrokes Suppress TN5250E Select this check box to suppress support for the TN5250E option Force Negotiation These settings determine whether or not the Telnet support for Binary and EOR options are supported The default setting for both options is No No This setting will not force negotiations The host has to decide whether to sup...

Страница 34: ...e name of the device which the server will be requested to assign to this Telnet session If left blank the host will assign a name in the format of QPADEV User Password Library Menu These options enable you to specify the initial entries required on the standard startup screen so that it can be bypassed Each entry can be a maximum of ten characters Program This enables you to specify the name of t...

Страница 35: ...ons NOTE FOR 5250 EMULATION ONLY THE GUI OVERRIDES OPTIONS MAY BE USEFUL REFER TO THE TERMINAL EMULATION USER S GUIDE FOR INSTRUCTIONS ON THE USE OF THESE OPTIONAL CONFIGURATION SELECTIONS 9 Thin Client User s Guide 35 ...

Страница 36: ...SOFT CERTIFIED SYSTEMS ENGINEER MCSE FOR ASSISTANCE IN CREATING AND CONFIGURING RDP CONNECTIONS AND USING THE THIN CLIENT IN MICROSOFT S TERMINAL SERVER ENVIRONMENT 9 1 Click the Configure tab in the Terminal Connection Manager then click the Add button to display the New Connection dialog box 2 Select Microsoft Remote Desktop Client from the drop down list and click OK The first dialog box of the...

Страница 37: ...gon check box to enable the Username Password and Domain fields and provide appropriate input If you do not enable the Automatic Logon option a login prompt will be displayed each time you start the connection Click Next to proceed The following dialog box is displayed 5 After connecting to the server the client displays the Windows desktop by default Instead if you want a particular application t...

Страница 38: ...e end of the WTS Connection Wizard Click Finish to complete the process The name of the connection you created will be added to the list of connections displayed in the Connections tab of the Terminal Connection Manager window Thin Client User s Guide 38 ...

Страница 39: ... any aplications available on the desktop and in any order Published applications are specific applications set up by an administrator for remote users to run When connected users are presented with the application itself The following procedure describes hot to create connections to computers running MetaFrame Presentation Server NOTE CITRIX RECOMMENDS THAT YOU QUICKLY CREATE A CONNECTION AS OUTL...

Страница 40: ...r application click Refresh To define or change server groups or browser protocol click Server Location and go to Step 4 or Scroll through the displayed list and select the server or published application Click Next and go to Step 7 4 The Server Location dialog box appears The client uses the information entered on the Server Location screen to help locate available servers and published applicati...

Страница 41: ...NG CHARACTERS IN YOUR CONNECTION NAME 8 Click Done The connection name will appear in the list of connections in the Connection Manager 9 To complete the process edit the connection you just created Refer to the Editing a Connection Using Connection Manager section of the Client for Windows CE for Windows Based Terminals Administrator s Guide This guide is located on the CD supplied with the thin ...

Страница 42: ... shared network drive through Windows terminal services or Citrix can be viewed a viewer connection must be created TIP IF YOU WILL NOT BE VIEWING FILES OTHER THAN WITHIN A BROWSER CONNECTION OR AS AN E MAIL ATTACHMENT THERE IS NO NEED TO ADD CONNECTIONS FOR THE VIEWERS 1 Click the Configure tab in the Terminal Connection Manager then click the Add button to display the New Connection dialog box 2...

Страница 43: ...application cannot be updated in the same fashion as a standard Windows PC application can add on features like plug ins are not available If more robust browsing capability is required a Windows Terminal Server or Citrix Metaframe server can provide access to Internet Explorer V6 or other browsers 1 Click the Configure tab in the Terminal Connection Manager then click the Add button to display th...

Страница 44: ...e e mail client requires two major steps to setup creating the connection and configuring the e mail services so that e mail can be accessed 1 Click the Configure tab in the Terminal Connection Manager then click the Add button to display the New Connection dialog box 2 Select MS E Mail Client and click OK A new entry will appear in the connections listing 3 Click on the Connections tab then eithe...

Страница 45: ...e Service Definition screen enter the following information Click Next when done Connection Select Network Connection from the drop down list POP3 Host Enter the name of your e mail server that you will use to send an receive messages IMAP4 Host Enter the name of your e mail server that you will use to send an receive messages User ID Enter the user name or mailbox ID you will use to login into yo...

Страница 46: ...for new mail every min Check this option and enter the time interval that you want the e mail client to wait before checking to see if new mail is available If this option is not active you will have to manually initiate the Send Receive operation to receive and or send messages Display a message box when new mail arrives POP3 only Check this option to have a message pop up when mail arrives Send ...

Страница 47: ...he size of attachments you download 11 Click Finish after making the desired configuration selections The Options Screen will be redisplayed and will contain the entry for the e mail service just configured 12 Select the Compose tab Configure the following composition options Include replying to messages Select this option to enable or disable the indent and leading character options Indent Select...

Страница 48: ...leted messages are to be handled On connect disconnet Select this option to have items marked for deletion in the Delete folder removed when a connection or disconnection occurs Immediately Select this option to cause items to be deleted at the time the delete function is taken Manually Select this option to cause the items to be retained until you manually delete them 15 Select the Storage tab De...

Страница 49: ... USED FOR THE SYSTEM OPERATION IT IS SUGGESTED THAT IF ATTACHMENTS ARE TO BE KEPT THAT AN USB STORAGE DEVICE BE USED 9 TIP THE USB STORAGE DEVICE IS ACTIVATED IN THE CONTROL PANEL Click OK after all configuration options have been selected The main e mail screen will be redisplayed Thin Client User s Guide 49 ...

Страница 50: ...el options affecting the printer and print job are described in the Customizing the I O 5250 Printer Session chapter To start an I O 5250 Printer session follow these steps 1 Click on the Connections Tab 2 Click on the I O 5250 Printer entry NOTE PRIOR TO STARTING A PRINTER SESSION MAKE SURE THE PRINTER IS ATTACHED TO THE APPROPRIATE LPT1 COM1 OR USB PORT IS POWERED ON AND YOU HAVE COMPLETED THE C...

Страница 51: ...ing range printing error status messaging etc It may be necessary or the user may desire to change the configuration of one or all print jobs This can be done in two ways 1 use the Control Panel options or 2 using I O s Host Download Commands These are described in detail in the Customizing the I O 5250 Printer Session chapter in the TN5250e Printer Emulation User s Guide NOTE TO SWITCH BACK TO TH...

Страница 52: ... Session button has been pressed Yes Select Yes if you want the changes to be saved so they will be there when you restart the printer connection No Select No to discard the changes TIP REFER TO THE CUSTOMIZING THE I O 5250 PRINTER SESSION CHAPTER IN THE TN5250E PRINTER EMULATION USER S GUIDE FOR A DETAIL DESCRIPTION OF THE USE OF HOST DOWNLOAD COMMANDS I O 5250 Printer Control Panel Options These...

Страница 53: ...tion has not been automated enter the appropriate user name and password 3 Enter appropriate data etc for the host application being used 4 To close the connection click File Exit You may also click the close button the X in upper right corner on the command bar NOTE MORE DETAILED INFORMATION ABOUT THE USE OF TERMINAL EMULATION CONNECTIONS IS PROVIDED IN THE Terminal Emulation User s Guide THIS GU...

Страница 54: ... or click a connection name and then click Connect 2 If the login for this connection has not been automated enter the appropriate user name and password 3 Run Windows applications as needed 4 To close the connection click File Exit You may also click the close button the X in upper right corner on the command bar NOTE REFER TO YOUR MCSE AND MICROSOFT DOCUMENTATION ON THE USE OF TERMINAL SERVICES ...

Страница 55: ...tions as needed 4 To close the connection click File Exit You may also click the close button the X in upper right corner on the command bar NOTE MORE DETAILED INFORMATION ABOUT THE USE OF ICA CONNECTIONS IS PROVIDED IN THE CITRIX ICA CLIENT FOR WINDOWS CE WINDOWS BASED TERMINALS ADMINISTRATOR S GUIDE THIS GUIDE IS LOCATED ON THE CD SUPPLIED WITH THE THIN CLIENT IT MAY ALSO BE ACCESSED FROM THE CO...

Страница 56: ...nce a viewer connection is setup it is a simple matter of navigating to the document s location to view the document Running the Viewer 1 On the Connections tab in the Connections Manager double click the desired viewer connection or click the connection name and then click Connect 2 Click File Open and navigate to the location where the document is stored 3 Viewing options are available from the ...

Страница 57: ...path name such as HT IR600 550 50 PrintTH Paper Size Select the appropriate size of paper Draft Mode Check this box to cause the printer to print in draft mode Margins Enter the desired margins Print Range Select the range to print Orientation Select the orientation of the page Advanced Presents a collection of advanced printing options Color Enables color printing if supported by the printer NOTE...

Страница 58: ...cuments or documents that contain large graphical elements may not open or may not display all of the content File viewers do not use ClearType Font recommendations The Microsoft file viewers map missing fonts to those that are installed on the available system The following list shows fonts that you should include in your platform for optimal performance with the Microsoft Office viewers and the ...

Страница 59: ...must have a LPR printer created and the appropriate print driver installed The thin client is the LPD device LPR is the sending side and LPD is the receiving side Local Printing Viewer E mail and Internet Explorer prints to a PCL printer that is attached to the thin client No other printer configuration is required on the thin client Note Microsoft only supports HP LaserJet or compatible PCL print...

Страница 60: ... Video Redirector wvx Windows Media Redirector wmx Non streaming local playback audio formats Waveform Audio wav Sound File snd UNIX audio au Audio Interchange File Format aif aiff aifc Non streaming local playback video formats Audio Video Interleaved avi Audio Codecs Microsoft Pulse Code Modulation PCM Microsoft GSM 6 10 Audio GSM 610 Microsoft CCITT G 711 A Law and u Law Microsoft Adaptive Diff...

Страница 61: ...wing output formats on the primary GDI surface PAL1 PAL2 PAL4 PAL8 xRGB1555 RGB565 RGB24 BGR24 and xRGB8888 ARGB8888 Windows Media Video supports the following YUV formats for overlay surfaces YUYV YUV422 YUY2 and YV12 Planar YUV Thin Client User s Guide 61 ...

Страница 62: ...uble click the E Mail connection or click the E Mail connection name to highlight it and then click Connect 2 The E mail main screen will appear On this screen will be the folders for incoming mail out going sent and deleted mail Additional folders can be created as needed In the larger portion of the screen can be found the listing of e mails in each folder Menus allow access to the various funct...

Страница 63: ...ord Enter the password for your e mail account If you do not enter the password each time you connect to the e mail server you will be prompted to enter the password Save Password Check this box to have your password remembered so that you will not be asked for it each time you connect to the e mail server Domain If you are connecting to a network that uses Windows NT domain security enter the Win...

Страница 64: ...or new mail Display a message box POP3 option Check this option to be informed when new mail is received Play a sound IMAP4 option Check this option to be informed when new mail is received Send using POP3 option Check this option to send mail using the MIME format messages are sent with extended characters Only display messages Check this option if you want to specify the number of days in the pa...

Страница 65: ...very time a connection is made Get file attachments Check this option to have all attachments to messages downloaded when the full message is downloaded This option will also use storage space If the USB storage option has been selected in the Control Panel then attachments will be stored in the external USB device Get file attachments and meeting requests IMAP4 option Check this option to downloa...

Страница 66: ... be made to an e mail service 1 From the E mail screen click Services Options and the Options screen will be displayed 2 Click the Properties button The same screens are presented that are used in adding a service refer to Configuring the E mail Client Thin Client User s Guide 66 ...

Страница 67: ...Using Connections Thin Client User s Guide 67 ...

Страница 68: ...ssage or folder will be removed from the current folder and moved to the Deleted local folder The message will be deleted according to the setup options taken on the Services Options Delete tab Folder New Folder Creates a new folder Folder Rename Folder The highlighted folder is renamed Empty Deleted local The messages stored in the deleted folder are immediately deleted Print The highlighted mess...

Страница 69: ... thin client as well as configure the e mail client Connect Connects the e mail server and downloads the messages according to the options selected on the Inbox Preferences screen Service This section of the menu will list the e mail services that have been setup The default or active service will have a bullet in front of it To change services just click on the service Offline Folder IMAP4 only A...

Страница 70: ...llow cause the full message including meeting requests and file attachments to be downloaded Options from Services Menu The Options Menu allows you to create remove and change e mail services It addition it allows you to access configuration options for composing new messages reading messages selecting deletion and storage options Services Tab ADD Evokes the setup wizard used initially to setup th...

Страница 71: ...essage Close message Causes the current message to be closed after responding Leave message open Causes the current message to be left open after responding Delete Tab On connect disconnect Causes the messages to be deleted when a connection is established or disconnected Immediately Causes messages to be deleted immediately when the delete option is taken Manually Messages that have been moved to...

Страница 72: ...hin client s flash Go Menu The Go menu provides access the Address Book Tool Bar The Tool Bar located to the right of the menus provides quick one click access to certain menu functions Tool Bar Button Description Create new mail message Reply to the current message Reply to all who received the current message Forward current message Delete the highlighted message Offline Folder IMAP4 only Send R...

Страница 73: ... which service to download messages from 1 Select the Services menu Click on the desired service A bullet will appear by the service NOTE IF ONLY ONE SERVICE WAS SETUP BY DEFAULT IT WILL BE AUTOMATICALLY USED IT WILL ALREADY HAVE A BULLET BY IT 9 Downloading Messages Downloading messages can be accomplished in one of two ways Automatically if the Check for new mail every min option was selected on...

Страница 74: ...tion to download only the header or the complete message You may also choose to download meeting notices and attachments Downloading only the message header consumes less internal storage than the full message notices and attachments If you selected on the Inbox Preferences screen to only download the message header you may download the full message Select File Get Full Copy while in the message w...

Страница 75: ...nd the attachments listing At this point you can reply to the sender reply to all senders forward the message view and save attachments and delete the message TIP TO SEE MORE HEADER INFORMATION SELECT THE INVERTED TRIANGLE IN THE LOWER RIGHT CORNER OF THE HEADER AREA SELECT THE TRIANGLE AGAIN TO COLLAPSE THE HEADER AREA 9 NOTE ICONS ON THE TOOL BAR ARE AVAILABLE TO PERFORM MANY OF THE MENU OPTIONS...

Страница 76: ...to Presents a dialog box allowing you to choose where to move the message Copy to Presents a dialog box allowing you to choose where to copy the message Delete Allows you to delete the message Messages will be deleted according to the settings on the Options Delete tab Large Font Increases the font size of the message Print Presents a printer dialog box for sending the message to the locally attac...

Страница 77: ... a copy of the message The body of the message may be included depending upon the settings on the Options Compose Tab You may edit the message as desired Forward Opens the Compose screen allowing you to enter the appropriate addresses You may edit the message as desired Options Opens the Options Dialog screens See Options from Services Menu for description of these options Tool Bar Icons The Tool ...

Страница 78: ...he Get file attachment box on the Inbox Preferences screen see Services Options Properties 1 On the Message List screen select a message 2 At the bottom of the message click on the desired attachment The proper file viewer will load NOTE VALID DOCUMENT TYPES ARE MICROSOFT WORD DOCUMENTS POWERPOINT FILES EXCEL SPREAD SHEETS ACROBAT PDF FILES AND MOST IMAGES 9 3 To save the attachment you must open ...

Страница 79: ...or Forward a Message 1 Open the message and then select Compose Reply to Sender Reply to All or Forward You also may use the respective icons on the tool bar 2 The Compose screen will appear The original message may be also included depending upon the settings on the Options Compose screen Enter your response 3 Select File Send Add the Sender to Address Book Open the message and then select Compos...

Страница 80: ...sage 2 Select File Print and the following screen appears Make the appropriate selections based upon the printer attached Click the OK button on the Title line upper right hand corner of the dialog box Printer Microsoft only provides one print driver a PCL laser driver for the locally attached printer Port Select the appropriate serial or parallel port If a USB printer is attached select LPT2 Net ...

Страница 81: ...ss is inserted If there is more than one match select the correct address from the Choose E mail Recipients dialog box If there is no match add a new e mail address through Choose E mail Recipients To include a blind copy expand the header by selecting Compose Show Full Header or click on the appropriate icon on the tool bar 4 To attach a file select File Attachments Add Attachment or click on the...

Страница 82: ...ng you to choose where to store the attachment Show Attachments Toggles on and off the display of attachments in the lower portion of the message screen Large Font Increases the font size of the message Close Closes the message You may also click on the X button on the Menu Tool Bar line Edit Menu Undo Reverses the last action Cut Removes the selected text Copy Copies the selected text to the clip...

Страница 83: ...ded header to be presented or collapsed Options Causes the Options dialog box to be presented Tool Bar Icons The Tool Bar located to the right of the menus provides quick one click access to certain menu functions Tool Bar Button Description Send the message Cut the selected text Copy the selected text Paste the contents of the clipboard Add an attachment Show attachments in the attachments block ...

Страница 84: ...L BE DELETED IF YOU HAVE NOT SELECTED THE OPTION TO DOWNLOAD ATTACHMENTS ONCE THE MESSAGE IS MOVED YOU WILL BE ABLE TO ACCESS THE MESSAGE ONLY FROM YOUR THIN CLIENT Delete a message 1 On the Message List view Select the message 2 Select File Delete Messages are moved to the Deleted local folder and deleted according to the option you have selected in Services Options Delete tab On connect disconne...

Страница 85: ...you are using POP3 and you drag messages to a folder you created the link is broken between the messages and their copies on the e mail server The next time you connect the e mail server will see that the messages are missing from the thin client s Inbox and delete them from the e mail server This prevents you from having duplicate copies of a message but it also means that you will no longer have...

Страница 86: ...ent Note that there will be a slight delay as the screens are being repainted on the PC it takes a few moments for the screens to be compressed and transmitted to the PC 1 On the PC start the I O Configuration Utility The local subnet will be scanned and will display a listing of I O Corporation devices For remote sub nets set the scan options on the View Scan Options screen to display the devices...

Страница 87: ...configuration The configuration may then be sent back to the thin client if it were restored to factory defaults Or a master configuration could be created and then sent to other thin clients so that the setup and installation of multiple thin clients can be may easier 1 On the PC start the I O Configuration Utility The local subnet will be scanned and will display a listing of I O Corporation dev...

Страница 88: ...ved it can be sent back to the thin client to restore the customized configuration settings that were originally set up on the thin client The file may also be a master configuration file that can be sent or pushed to any number of thin clients where a standard configuration has been established 1 listing of I O Corporation devices For remote sub nets set the scan options on the View Scan Options ...

Страница 89: ...screen enter the name of the previously saved configuration file or click the Browse button to find a file stored in a different directory Click OK to send the file to the thin client 4 The configuration file be sent to the thin client Thin Client User s Guide 89 ...

Страница 90: ...IS POWERED DOWN DURING THIS PROCESS THE FLASH MAY BECOME CORRUPTED AND REQUIRED RETURNING THE THIN CLIENT FOR REPAIR 5 After the configuration file has been sent to the thin client you will be asked to confirm resetting the thin client Click Yes 6 The thin client will restart and display the Connections Manager screen Thin Client User s Guide 90 ...

Страница 91: ... as on the I O Configuration Utility This name will also be used to identify this thin client to other computers when connected in a Microsoft or Citrix network environment The name cannot begin with a numeric value nor can it contain the following characters or space Reset to Factory Defaults Check this box to cause the thin client to be restored to the factory defaults You will be asked if you r...

Страница 92: ... MONITORS PREFER THE RESOLUTION AND REFRESH RATE TO BE SET TO MATCH THEIR NATIVE RESOLUTION GENERALLY THIS IS 1024 X 728 60 HZ FOR 15 LCD MONITORS AND 1280 X 1024 60 HZ FOR 17 LCD MONITORS 9 If you select a resolution or refresh frequency other than the default setting verify whether your monitor supports the selected setting by clicking the Test button The following prompt is displayed Click OK t...

Страница 93: ... DISPLAY THE SCREEN IF YOU HAVE SELECTED AN UNSUPPORTED SETTING AND THE MONITOR DOES NOT DISPLAY THE SCREEN YOU WILL NEED TO RESTART THE THIN CLIENT SHUT DOWN THE THIN CLIENT BY HOLDING IN THE POWER BUTTON FOR SEVERAL SECONDS UNTIL THE POWER LED GOES OUT PRESS THE POWER BUTTON TO POWER UP THE THIN CLIENT IMMEDIATELY AFTER THE I O SPLASH SCREEN CLEARS PRESS THE F7 KEY SEVERAL TIMES AFTER A FEW SECO...

Страница 94: ...the Internet Explorer 6 for CE application The screens may also be accessed by taking the View Options menu selection when running Internet Explorer IE General Tab Start Page Enter the Web you want the Internet Explorer to go to when IE is started Search Page Enter the Web page you want to go to when selecting the Search option on the IE menu Cache Size Enter the amount of RAM to use for caching W...

Страница 95: ...F THE INTERNET CONNECTION IS BEING MADE THROUGH THE ETHERNET LAN NO CHANGES ARE REQUIRED ON THIS PAGE Security Tab Select the various security levels and cookies options desired for the IE connection Advanced Tab Select the display sound scripting and links options as desired Thin Client User s Guide 95 ...

Страница 96: ...l THE PRINTERS WITH THIS TOOL ARE USED ONLY BY RDP CONNECTIONS TO WINDOWS 2000 OR LATER SERVERS WITH TERMINAL SERVICES ACTIVE RDP PRINTERS ARE NOT USED BY ICA INTERNET EXPLORER OR ANY OF THE VIEWERS 9 To setup a RDP printer click the Add Printer icon and follow the Add Printer Wizard Thin Client User s Guide 96 ...

Страница 97: ...Advanced Configuration Keyboard The options on this screen are used to enable and customize how character repeat will function Thin Client User s Guide 97 ...

Страница 98: ...ty terminal emulation connections may be configured but if only one is used the program memory utilization will be small for example 4000kb If all twenty terminal emulation connections were active the program memory utilization would be much larger for example 15000kb The thin client has successfully been tested with twenty sessions active The limit of active sessions will be determined by the amo...

Страница 99: ...Advanced Configuration Copyrights This screen displays the copyrights for various modules used in the thin client Thin Client User s Guide 99 ...

Страница 100: ...Advanced Configuration Mouse Use these options to set the double click rate of the mouse buttons and to test that rate Thin Client User s Guide 100 ...

Страница 101: ...onfiguration Volume and Sounds These two screens are used to enable sounds for various application actions set the default volumn and customize sounds and schemes to the user s desire Thin Client User s Guide 101 ...

Страница 102: ...iguration Certificates This screen shows the various certificates that are available on the thin client These are organized by different types that are selected in the left drop down box Thin Client User s Guide 102 ...

Страница 103: ...Advanced Configuration Regional Settings Thin Client User s Guide 103 ...

Страница 104: ...he languages number formatting currency formatting time formats and date formats that are used by the various applications that are both available locally as well as when connected to a Microsoft terminal server or Citrix server Thin Client User s Guide 104 ...

Страница 105: ...ew connection double click the Make New Connection icon The following screen will be presented Select the type of new connection to create and follow the appropriate wizard Note Refer to your network administrator Microsoft Certified Systems Engineer or Citrix Network Engineer for information necessary for complete the screens in this section to create and use these types of connections Thin Clien...

Страница 106: ...Advanced Configuration Dial UP Connection Use the following screens to create a modem connection and set the various configuration values for the modem s use Thin Client User s Guide 106 ...

Страница 107: ...Advanced Configuration Thin Client User s Guide 107 ...

Страница 108: ...Advanced Configuration Thin Client User s Guide 108 ...

Страница 109: ...vanced Configuration Direct Connection Use these screens to setup and configure a direct connection no modem is used to be used by the thin client for connection to the server Thin Client User s Guide 109 ...

Страница 110: ...Advanced Configuration Thin Client User s Guide 110 ...

Страница 111: ...Advanced Configuration Virtual Private Network PPTP Use these screens to establish a VPN connection for the thin client Thin Client User s Guide 111 ...

Страница 112: ...Advanced Configuration Thin Client User s Guide 112 ...

Страница 113: ...Advanced Configuration Virtual Private Network L2TP Use the screens in this section to create a L2TP type of VPN connection Thin Client User s Guide 113 ...

Страница 114: ...Advanced Configuration Thin Client User s Guide 114 ...

Страница 115: ...Advanced Configuration PPP over Ethernet PPPoE Use these screens to setup a PPP over Ethernet connection for the thin client Thin Client User s Guide 115 ...

Страница 116: ...Advanced Configuration Thin Client User s Guide 116 ...

Страница 117: ...come active allowing you to select the baud rate used to communicate with the serial printer Print Header Page Check this box to have the header page printed at the beginning of each LPR LPD print job Print Trailer Page Check this box to have the trailer page printer at the end of each LPR LPD print job Supress Blank Page Check this box to eliminate the blank page that often occurs at the end of t...

Страница 118: ...ry and management protocol used in large enterprise networks to determine what devices are connected into their network Enter on this screen the device name location and contact information that will be provided to SNMP applications Thin Client User s Guide 118 ...

Страница 119: ...CLIENT FOR WINDOWS CE WINDOWS BASED TERMINALS ADMINISTRATOR S GUIDE LOCATED ON THE UTILITY CD FOR DETAILS ON SELECTING THE GLOBAL ICA CONFIGURATION OPTIONS THIS MANUAL IS ALSO AVAILABLE FROM THE HELP MENU OF THE I O CONFIGURATION UTILITY 9 NOTE REFER TO YOUR CITRIX CERTIFIED NETWORK ENGINEER FOR ASSISTANCE IN SETTING UP THE ICA CLIENT AND GLOBAL SETTINGS 9 Thin Client User s Guide 119 ...

Страница 120: ...yboard layout for display terminal emulation connections Selecting this option will create keyboard macros in each terminal emulation session Removing the selection will delete the keyboard macros NOTE FOR DETAILS ON THE USE OF THE KEYBOARD MACROS IN THE TERMINAL EMULATION SESSIONS REFER TO THE TERMINAL EMULALTION USER S GUIDE 9 Thin Client User s Guide 120 ...

Страница 121: ... e mail attachments If a large amount of e mail attachments are to be stored it is recommended that this storage option be used There is a limited amount of kFlash that is available which should be reseved for storage of cookies settings etc By default USB storage is enabled Thin Client User s Guide 121 ...

Страница 122: ...nt found on the back of the logic unit Date of purchase Version of operating system on the IBM host system Model number of printer if attached Concise description of problem Summary of events and actions that occurred just prior to the failure General Troubleshooting Problem Solution The Power LED on front panel does not glow when the thin client is switched on 9 Ensure that the AC Transformer is ...

Страница 123: ...ection between the printer and the thin client 9 Ensure that the printer is properly configured in the application s print manager function 9 Ensure that the printer has not been paused The serial printer connected to the thin client does not print 9 Ensure that the printer is plugged into the proper power outlet 9 Ensure that the printer is switched on and online 9 Check the connection between th...

Страница 124: ...ddresses as the host and display station Answer any host messages Vary off the device and end the Telnet session 1 To vary off a device on the AS 400 at a command line enter wrkdevd device name press ENTER Select the work with status option then the vary off option 2 To end the Telnet sessions on the AS 400 at a command line enter netstat select the Work with TCP IP Connection Status option press ...

Страница 125: ...hold the Alt key Press RESET 0004 9 Your attempted to enter data into a field that does not allow keyboard input Press RESET 0005 9 You attempted to enter data when the cursor was not in an input field Data cannot be entered in a protected area of the display 9 Press RESET Move the cursor to a valid input field 0006 9 After pressing the SysReq Attn key and before pressing the Enter key or the RESE...

Страница 126: ...ata or to enter the last character into the field 0013 9 After pressing the Insert key you attempted to leave a field Press RESET 0014 9 A key function was pressed that moves the cursor out of the field However the requirements of the mandatory fill field have not been met Mandatory fill fields must be filled completely or left blank Press RESET and enter data to fill the entire field or move the ...

Страница 127: ...D or FIELD EXIT key 0021 9 The cursor is positioned in a mandatory enter field Data must be entered before you can exit the field by pressing the Field Field or Field Exit key Press RESET and enter the required data 0022 9 A system error occurred when using the Insert or Delete key Press RESET Verify if the insert or delete function was done properly If not correct the field 0023 9 The Hex key was...

Страница 128: ...tions time out expired with out valid data received Recovery must be made at the remote control unit 0045 9 Data Set Ready will not activate Recovery must be made at the remote control unit 0050 9 Either the Clear to Send line was inactive while the Request to Send line was active or the Clear to Send line was active while the Request to Send line was inactive Recovery must be made at the remote c...

Страница 129: ...0097 9 On line verification test not supported by the host program were trying to run Press RESET and continue to use display module with out performing the verification tests 0099 9 An error occurred before after or during the sign on Press RESET and if error occurs again contact your system administrator Thin Client User s Guide 129 ...

Страница 130: ...UGGESTED THAT WHEN YOU UPGRADE THE FIRMWARE THAT YOU ALSO UPGRADE THE I O CONFIGURATION UTILITY AT THE SAME TIME IT WILL BE FOUND IN THE CONFIGURATION UTILITY DIRECTORY GENERALLY YOU WILL WANT TO USE THE MOST RECENT VERSION OF THE I O CONFIGURATION UTILITY 9 4 On the PC extract the firmware file from the zip file and move the firmware file to the directory where the I O Configuration Utility was i...

Страница 131: ...OR STAYS AT 99 FOR 30 SECONDS OR SO THE PROGRAM IS DOING SOME WORK IN THE BACKGROUND 9 11 On the thin client a message will appear informing the user that an update is in progress CAUTION DO NOT TURN OFF THE THIN CLIENT DURING THIS PROCESS DOING SO WILL CORRUPT THE FLASH AND REQUIRE THE UNIT TO BE RETURNED FOR REPAIR 12 When the firmware download is complete you will be prompted to reset the thin ...

Страница 132: ...Connection Manager screen when restarted NOTE OCCASIONALLY IT MAY BE NECESSARY TO CYCLE THE POWER TO THE DISPLAY STATION FOR THE NEW FIRMWARE TO BE RECOGNIZED IN SOME RARE CIRCUMSTANCES IT MAY BE NECESSARY TO RESTORE FACTORY DEFAULTS TO GET THE NEW FIRMWARE TO BE RECOGNIZED 9 Thin Client User s Guide 132 ...

Страница 133: ...ity some of the files may be self extracting zip files and will have an extension of exe Look for a file in the format of IOCU zip The will be the version number NOTE THE README TXT FILE CONTAINS UP TO DATE INSTRUCTIONS ON OBTAINING THE LATEST I O CONFIGURATION UTILITY AND FIRMWARE UPDATES TIP THE I O CONFIGURATION UTILITY IS BACKWARD COMPATIBLE AND WILL MANAGE DISPLAY STATIONS PRINT SERVERS AND I...

Страница 134: ...Utility may be uninstalled using Microsoft s Add Remove Programs process 1 Click START SETTINGS CONTROL PANEL 2 Select the Add Remove Programs icon 3 Scroll to the I O Configuration Utility entry and take the remove option 4 Follow the on screen prompts Thin Client User s Guide 134 ...

Страница 135: ...ION FILE IT WILL CONTAIN ALL THIN CLIENT CONFIGURATION PARAMETERS THIS COULD CAUSE PROBLEMS IF STATIC IP ADDRESSES ARE USED IN THE LAN A MASTER IP ADDRESS SHOULD BE USED WHEN SAVING THE CONFIGURATION FILE THEN AFTER THE MASTER CONFIGURATION IS BEING SENT TO ANOTHER THIN CLIENT THE IP ADDRESS OF THE TARGET THIN CLIENT MUST BE CHANGED Saving a Configuration 1 Start the I O Configuration Utility 2 On...

Страница 136: ...ighlight the desired thin client 3 On the Options menu select the Thin Client Config Copy option then select Send Configuration 4 Enter the name of the saved configuration file You may need to use the Browse feature to find the configuration file Click OK 5 A message will appear alerting you that the configuration file is being sent to the thin client Thin Client User s Guide 136 ...

Страница 137: ...he thin client a brief message will appear alerting the user that the configuration file is being downloaded After a few seconds the thin client will restart The new configuration will be applied Thin Client User s Guide 137 ...

Страница 138: ...OCESS BEFORE PROCEEDING IT MIGHT BE WISE TO COPY THE THIN CLIENT S CONFIGURATION PRIOR TO RESETTING THE FACTORY DEFAULTS Boot Up Process 1 When the thin client is initially being powered up press the F7 key several times immediately after the I O Splash screen has cleared 2 The Setup Wizard will then begin General Tab Process 1 From the Connection Manager press the F2 key to display the Terminal P...

Страница 139: ...ing 4 Click the OK button on the title bar on the upper right hand corner of the screen 5 Respond to the message by click Yes 6 The thin client will restart and display the Setup Wizard Thin Client User s Guide 139 ...

Страница 140: ...ss the ESC key immediately when you see the message Press ESC key to display network boot option menu This option should be set to Option 4 Boot according to BIOS setting BIOS Settings press and hold the ESC key immediately upon bootup when you see the motherboard splash screen The CMOS Setup Utility will be presented Thin Client User s Guide 140 ...

Страница 141: ...included with your SYSTEM you may install and use the component s of the Desktop Software in accordance with the terms of the end user license agreement provided with such component s In the absence of a separate end user license agreement for particular component s of the Desktop Software you may install and use only one 1 copy of such component s on a single computer with which you use the SYSTE...

Страница 142: ...are the same brand and model as the SYSTEM and contain a duly licensed copy of the same version and language release of the SOFTWARE ADDITIONAL SYSTEMS provided that 1 Manufacturer has supplied a corresponding serialized sticker for each additional copy of the ROM Upgrade and 2 you affix a serialized sticker per Manufacturer s instructions for each unit of ROM Upgrade you install If the SYSTEM SOF...

Страница 143: ...antially in accordance with the accompanying written materials for a period of ninety 90 days from the date of receipt Any implied warranties on the SOFTWARE are limited to ninety 90 days Some states jurisdictions do not allow limitations on duration of an implied warranty so the above limitation may not apply to you Customer Remedies Manufacturer s and its suppliers entire liability and your excl...

Страница 144: ...ment is subject to restrictions as set forth in subparagraph c 1 ii of the Rights in Technical Data and Computer Softwareclause at DFARS 252 227 7013 or subparagraphs c 1 and 2 of the Commercial Computer Software Restricted Rights at 48 CFR 52 227 19 as applicable Manufacturer is Microsoft Corporation One Microsoft Way Redmond WA 98052 6399 Thin Client User s Guide 144 ...

Страница 145: ... THE PRODUCTS ARE SOLD AS IS WITHOUT FURTHER OBLIGATION OR LIABILITY ON THE PART OF I O I O EXPRESSLY EXCLUDES ANY IMPLIED WARRANTIES OF MERCHANTABILITY AND FITNESS FOR A PARTICULAR PURPOSE EXCEPT AS EXPRESSLY SET FORTH HEREIN IN NO EVENT SHALL I O BE LIABLE FOR ANY CLAIMS OR DAMAGE ARISING DIRECTLY OR INDIRECTLY FROM THE FURNISHING OR FAILURE TO FURNISH PRODUCTS SPARE OR REPLACEMENT PARTS INFORMA...

Страница 146: ...orization RMA number for the failed product Replacement Units Replacement units are shipped from I O s stock of refurbished units subject to availability Replacement units carry the same warranty as remaining on the original product I O s COE Repair Policy applies only to warranted product failures Buyer guarantees payment for non warranted product repairs or replacement Buyer will pay reasonable ...

Страница 147: ...S WITHOUT FURTHER OBLIGATION OR LIABILITY ON THE PART OF I O I O EXPRESSLY EXCLUDES ANY IMPLIED WARRANTIES OF MERCHANTABILITY AND FITNESS FOR A PARTICULAR PURPOSE EXCEPT AS EXPRESSLY SET FORTH HEREIN IN NO EVENT SHALL I O BE LIABLE FOR ANY CLAIMS OR DAMAGE ARISING DIRECTLY OR INDIRECTLY FROM THE FURNISHING OR FAILURE TO FURNISH PRODUCTS SPARE OR REPLACEMENT PARTS INFORMATION OR SERVICES HEREUNDER ...

Страница 148: ... Representative will assist you in identifying the nearest I O authorized repair depot I O s Customer Support Representative will provide you with an RMA transmittal form referencing the assigned RMA number and the authorized repair depot address Return Your Failed Unit Return the failed product to the I O authorized repair depot previously identified enclosing the RMA transmittal form When you re...

Страница 149: ...esired operation This device is in conformity with the protection requirements of EC Council Directives 72 23 EEC and 89 336 EEC on the approximation of the laws of the Member States relating to Standard EN60950 Safety of Information Technology Equipment Standard EN50082 1 Generic Immunity Standard for Residential Commercial and Light Industrial Products and Standard EN55022 Limits and Methods of ...

Отзывы: