


Introduction
Classification overview
The Hewlett Packard Enterprise G2 Series Metered, Switched, and Metered & Switched Power Distribution
Units are intelligent PDUs designed to distribute power to IT equipment installed in a rack. These PDUs are
either single-phase (1Ph) or three-phase (3Ph) models with electrical metering and switching capabilities.
Each PDU provides power distribution to IT loads through C13, C19, or NEMA 5-20R outlets. The quantity
and location of outlets vary by model. The PDUs allow you to connect and manage these outlets from a single
power connection. The PDUs are managed from a web interface or a Command Line Interface (CLI) and are
viewed from a local display.
HPE PDUs are designed for use with HPE Standard, Advanced, and Enterprise racks, but are compatible
with most third-party data center racks. The PDU models vary in form factor, with several mounting
configurations available, including the following:
• HPE Metered PDU— Provides real-time local and remote power monitoring at each load segment,
enabling users to obtain information about power usage and available circuit capacity.
• HPE Switched PDU—Offers the same features as Metered PDUs and also provides controlled on/off
switching of individual outlets and groups of outlets, power sequencing delays to minimize inrush currents,
and support for unauthorized equipment provisioning.
• HPE Metered & Switched PDU—Offers the same features as Switched PDUs and also provides individual
outlet metering instead of load segment metering.
Features
The Hewlett Packard Enterprise G2 Series Metered, Switched, and Metered & Switched Power Distribution
Units have the following features:
• Lower profile on Vertical PDUs—Increases the serviceability area in the back of the rack.
• Multiple mounting option on Vertical PDUs—Can be mounted with outlets facing toward center, front or
back of the rack.
• Higher operating temperature—All G2 Series PDUs are rated for 60˚C (140˚F) operating temperature.
• Colored receptacles—Help to easily differentiate load segments and phases.
• Integrated cord retention on all C13 and C19 receptacles—Eliminates the need for cord retention brackets.
• Optional locking cords on all C13 and C19 receptacles—Eliminates the need for tie wraps on both ends of
the power cord connection.
• 1U PDUs with multiple mounting options—Can be mounted horizontally in a U space or in the true 0U
space between the RETMA rails.
• Hot Swappable Network Management Module—Allows power distribution during module replacement,
eliminating downtime.
• 1 Gb Ethernet—Eliminates the need for older network switches.
• Daisy-chain configuration—Enables networking of up to four of the same PDUs on one IP address.
• Enhanced sensor support—Supports up to six physical sensors (with optional hub) and eight
measurements per PDU, with a total of 32 measurements in a maximum daisy-chain configuration.
Introduction
9
Содержание HPE G2 Series
Страница 16: ...3 Secure the tie wrap 16 Introduction ...
Страница 20: ...20 Introduction ...
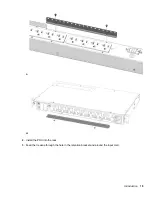
Страница 23: ...Installing the PDU 23 ...
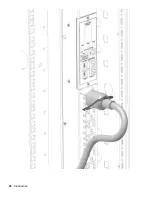
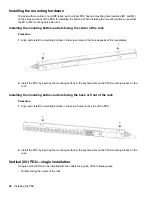
Страница 25: ... Outlets facing the back of the rack Installing the PDU 25 ...
Страница 26: ... Outlets facing the front of the rack 26 Installing the PDU ...
Страница 28: ... Two mid height PDUs with outlets facing towards the center of the rack 28 Installing the PDU ...
Страница 29: ... Four half height PDUs with outlets facing towards the center of the rack Installing the PDU 29 ...
Страница 31: ... Half height Installing the PDU 31 ...
Страница 34: ...2 Place the locking tape directly above the unit on the rack PDU mounting bracket 34 Installing the PDU ...
Страница 35: ...Installing the PDU 35 ...
Страница 37: ...2 Install the PDU in the rack frame Installing the PDU 37 ...
Страница 47: ...3 Install the PDU Installing the PDU 47 ...
Страница 49: ...Installing the PDU 49 ...
Страница 64: ...Web menu options Menu Illustration Overview Alarms 64 Remote configuration ...
Страница 65: ...Menu Illustration Help Table Continued Remote configuration 65 ...
Страница 66: ...Menu Illustration Language 66 Remote configuration ...
Страница 67: ...Menu Illustration Logs Remote configuration 67 ...
Страница 68: ...Menu Illustration Settings 68 Remote configuration ...
Страница 84: ...84 Remote configuration ...
Страница 92: ...92 Configuring local access ...
Страница 95: ...LED state Description Green red orange blinking Upgrading Off In USB mode OLED menu structure Local display 95 ...
Страница 99: ...Local display 99 ...
Страница 101: ...Local display 101 ...
Страница 107: ...Local display 107 ...
Страница 120: ...120 Connecting and configuring optional hardware ...
Страница 157: ...2 Pull out the Network Management Module from the PDU 3 Insert the new Network Management Module Appendix 157 ...
Страница 158: ...4 Align the Network Management Module and tighten the captive nuts by turning them clockwise 158 Appendix ...
Страница 160: ...3 Connect the ribbon cable to the replacement Network Management Module and the PDU 160 Appendix ...
Страница 161: ...4 Insert the replacement Network Management Module into the PDU and tighten the two screws Appendix 161 ...


