


• Server address
• Port number
• Port type
• Base DN
• User search DN
• Login name attribute
• User entry object class
• Test name
• Password
4.
In the
Bind DN
field, enter the name of the account to be used to access the AD.
For example:
CN=myuser,CN=Users,DC=EMEA,DC=mydomain,DC=com
5.
In the
Base DN for Search
field, enter
DC=subdomain,DC=mydomain,DC=com.
6.
In the
Login Name Attribute
field, enter
sAMAccountName
(typically).
7.
In the
User Entry Object Class
field, enter
person
.
8.
Add a role name
PDUAdmin
with the admin privilege.
NOTE:
The role must be added before testing the configuration.
9.
Test the configuration.
After successful testing, enable and save the LDAP configuration.
Configuring RADIUS
IMPORTANT:
LDAP and RADIUS cannot be configured at the same time.
Procedure
1.
Navigate to the User Accounts screen in the web UI.
2.
Enter the RADIUS Server details for RADIUS Configuration, and then enable RADIUS configuration.
• Server—
<Radius Server IP>
• Secret—
<Secret Passphrase>
named RADIUS with the admin privileges.
4.
Logout of the web UI.
5.
Verify that the RADIUS Server is enabled in the Network.
6.
Log in to the web UI with username and password you configured for the RADIUS server.
You can now log in to the PDU and access the webpage.
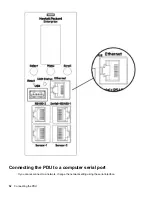
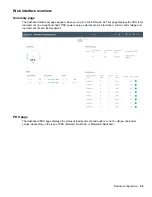
Remote configuration
59
Содержание HPE G2 Series
Страница 16: ...3 Secure the tie wrap 16 Introduction ...
Страница 20: ...20 Introduction ...
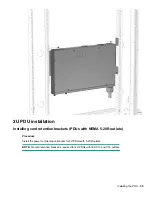
Страница 23: ...Installing the PDU 23 ...
Страница 25: ... Outlets facing the back of the rack Installing the PDU 25 ...
Страница 26: ... Outlets facing the front of the rack 26 Installing the PDU ...
Страница 28: ... Two mid height PDUs with outlets facing towards the center of the rack 28 Installing the PDU ...
Страница 29: ... Four half height PDUs with outlets facing towards the center of the rack Installing the PDU 29 ...
Страница 31: ... Half height Installing the PDU 31 ...
Страница 34: ...2 Place the locking tape directly above the unit on the rack PDU mounting bracket 34 Installing the PDU ...
Страница 35: ...Installing the PDU 35 ...
Страница 37: ...2 Install the PDU in the rack frame Installing the PDU 37 ...
Страница 47: ...3 Install the PDU Installing the PDU 47 ...
Страница 49: ...Installing the PDU 49 ...
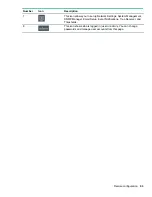
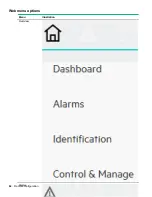
Страница 64: ...Web menu options Menu Illustration Overview Alarms 64 Remote configuration ...
Страница 65: ...Menu Illustration Help Table Continued Remote configuration 65 ...
Страница 66: ...Menu Illustration Language 66 Remote configuration ...
Страница 67: ...Menu Illustration Logs Remote configuration 67 ...
Страница 68: ...Menu Illustration Settings 68 Remote configuration ...
Страница 84: ...84 Remote configuration ...
Страница 92: ...92 Configuring local access ...
Страница 95: ...LED state Description Green red orange blinking Upgrading Off In USB mode OLED menu structure Local display 95 ...
Страница 99: ...Local display 99 ...
Страница 101: ...Local display 101 ...
Страница 107: ...Local display 107 ...
Страница 120: ...120 Connecting and configuring optional hardware ...
Страница 157: ...2 Pull out the Network Management Module from the PDU 3 Insert the new Network Management Module Appendix 157 ...
Страница 158: ...4 Align the Network Management Module and tighten the captive nuts by turning them clockwise 158 Appendix ...
Страница 160: ...3 Connect the ribbon cable to the replacement Network Management Module and the PDU 160 Appendix ...
Страница 161: ...4 Insert the replacement Network Management Module into the PDU and tighten the two screws Appendix 161 ...


