


Installation and Service Manual
Overhaul
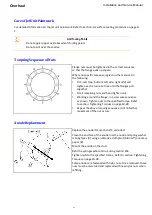
Steering shaft bushes
To replace the steering shaft bushes, carry out the following:
Press out the old bush using a suitable sized drift [3].
Remove and discard o-ring [2] fitted to the forward end of the forward steering bush [3].
Clean the bore of all old Loctite
®
and primer.
Apply a thin coating of primer 7471 to the whole surface of the bore and allow to dry.
Do NOT apply primer 7471 to the contact face of the bush.
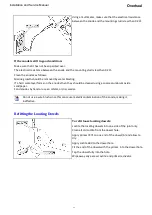
Coat the primed bores and the unprimed outer face of the bushes with Loctite 680.
Press the bushes firmly into the bores until the shoulder of the bush is level with the outer face of the
bore.
Rotate the bush when fitting to distribute the Loctite
®
evenly.
Wipe away any excess Loctite
®
and primer/activator.
Smear a new o-ring [2] with grease and fit to the o-ring groove at the front of the forward bush [3].
Steering Nozzle Assembly Removal
The nozzle, nozzle housing and nozzle insert can be removed as a complete assembly from the jet unit.
Should it be necessary to remove just the nozzle from the nozzle housing. Refer to section: Remove the
Nozzle from the Nozzle Housing.
To remove the nozzle housing complete with nozzle and nozzle insert, carry out the following actions:
Remove the reverse duct. Refer to section: Reverse Duct Removal on page 9-6.
Remove the splash guard and steering crank. Refer to section: Remove the Steering Shaft on page 9-12.
With the steering shaft already removed from the jet unit, remove the 4 nuts [27] and spring washers
[28] from the studs [26]. Refer to drawing: HJ21201000 Base Jet Assembly.
Tap off the nozzle housing [9] complete with nozzle and nozzle insert, using a rubber hammer. Remove
off studs [26].
Remove the nozzle housing, nozzle and nozzle insert complete from the jet unit. Note the orientation of
the nozzle in the steering housing as the nozzle can be fitted either nozzle up or nozzle down.
Remove the nozzle insert [20] from the recess in the rear of the nozzle housing.
Inspecting the nozzle components
The nozzle may be removed without removing the nozzle housing and nozzle insert.
To remove the nozzle from the nozzle housing, carry out the following actions:
With the steering shaft [1] and steering crank [4] removed from the jet unit, check the steering crank
bush [15] for security and wear. Replace if worn or loose.
Rotate nozzle [16] through its full arc of travel to check for stiffness or wear in the steering pivot bushes
[10] and the pivot sleeves [13].
While supporting the nozzle, unscrew and remove the nozzle securing bolts [12], pivot sleeves [13] and
the stepped adjusting washers [14]. Note that the pivot sleeves [13] are threaded onto the attachment
bolts [12].
Rotate the nozzle slightly and pull rearwards to remove the nozzle from the nozzle housing.
9-13
Содержание HJ212
Страница 1: ...HJ212 Installation and Service Manual R3A3 Jet unit Manual ...
Страница 20: ...Product Description Installation and Service Manual 2 6 ...
Страница 56: ...Commissioning Installation and Service Manual 6 4 ...
Страница 62: ...Fault Finding Installation and Service Manual 7 6 ...
Страница 82: ...Maintenance Installation and Service Manual 8 20 ...
Страница 137: ...Installation and Service Manual Appendix Notes 10 21 ...
Страница 141: ...Installation and Service Manual Appendix Notes 10 25 ...
Страница 164: ...Appendix Installation and Service Manual 10 48 ...
Страница 166: ......
Страница 169: ......
Страница 171: ......
Страница 172: ......
Страница 174: ...5 4 13 5 4 1307 0 3 453 5 4 4 4 05 50 64 8 53 5 50 5 5 3 454 0 8 50 0 5 54 3 5 0 5 8 50 0 5 11307 4 P 4 3 8 5 ...
Страница 175: ......
Страница 176: ......
Страница 177: ......
Страница 178: ......
Страница 181: ......
Страница 185: ......
Страница 186: ......
Страница 188: ......
Страница 195: ......
Страница 196: ......
Страница 197: ...Notes ...


