3-9
Chapter 3 Cutting along Printed Data
3.5
Flow of Creating Registration Marks to Cutting
The flow from creating the registration marks using the dedicated application to cutting the plot is explained in
this chapter.
Graphtec Pro Studio
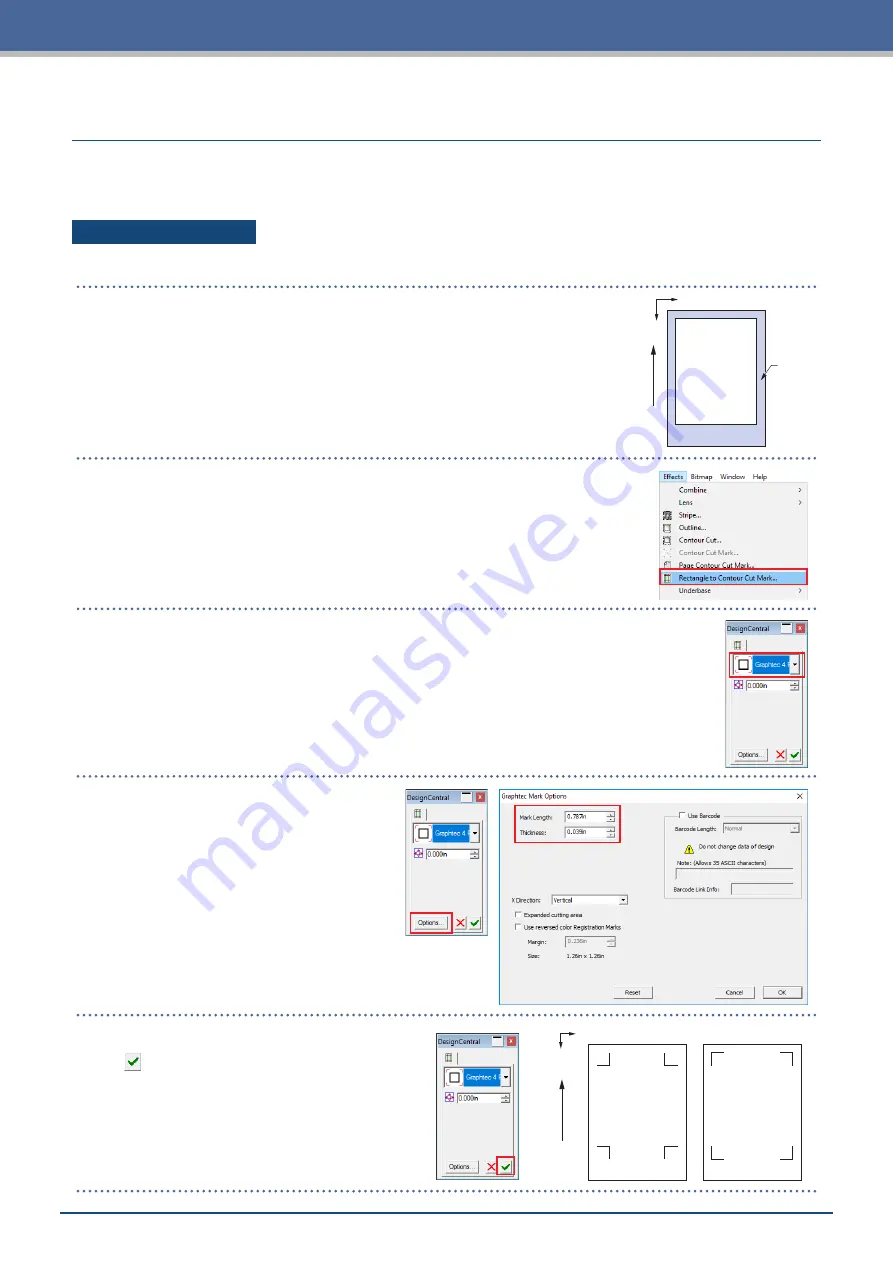
[1] Creating the registration marks
Margin
X
Y
Media T
ransport Dir
ection
1.
Using the "Rectangle" tool in Graphtec Pro Studio, create a rectangle over
the design.
A margin is required at the edge of the media when creating the rectangle.
As the printing position may vary depending on the printer used to print
the design, it is recommended that a few extra millimeters be allowed for
the margin.
2.
Select the rectangle, and then select "Effects" – " Rectangle to Contour
Cut Mark...".
3.
On the "Design Central" screen, select the type of registration mark.
4.
Click the "Options".
The "Graphtec Mark Options" screen
will appear where you can specify
the length and line thickness of the
registration marks.
After specifying each item, close the
screen.
Media T
ransport Dir
ection
X
Y
Registration Mark Type 1
Registration Mark Type 2
5.
On the "Design Central" screen, click the
" ".
Registration marks will be created over the
design.
Содержание CELITE-50
Страница 1: ...USER S MANUAL CE LITE 50 UM 151...
Страница 2: ......
Страница 10: ......
Страница 22: ......
Страница 78: ......
Страница 101: ...5 23 Chapter 5 Detailed Settings 3 Select ON or OFF for WIDTH DETECTION...
Страница 112: ......
Страница 116: ...A 4 Appendix A 3 Appearance Drawing 164 784 227 173 400 Units mm Dimension error 5 mm...
Страница 118: ...A 6 Appendix 3 PIECES Previous Page HOME SELECT FILE...
Страница 119: ...A 7 Appendix TOOL ARMS MODE 1 MODE 2 MODE 3 CHECK MARK SCAN SENSOR OFFSET ADJ Next Page MENU...
Страница 120: ...A 8 Appendix INTERFACE ADVANCE TEST Previous Page AREA MEDIA MENU...
Страница 127: ......
Страница 128: ......


