6-5
Chapter 6 Troubleshooting
6.3
Confirming the Operation of the Main Unit
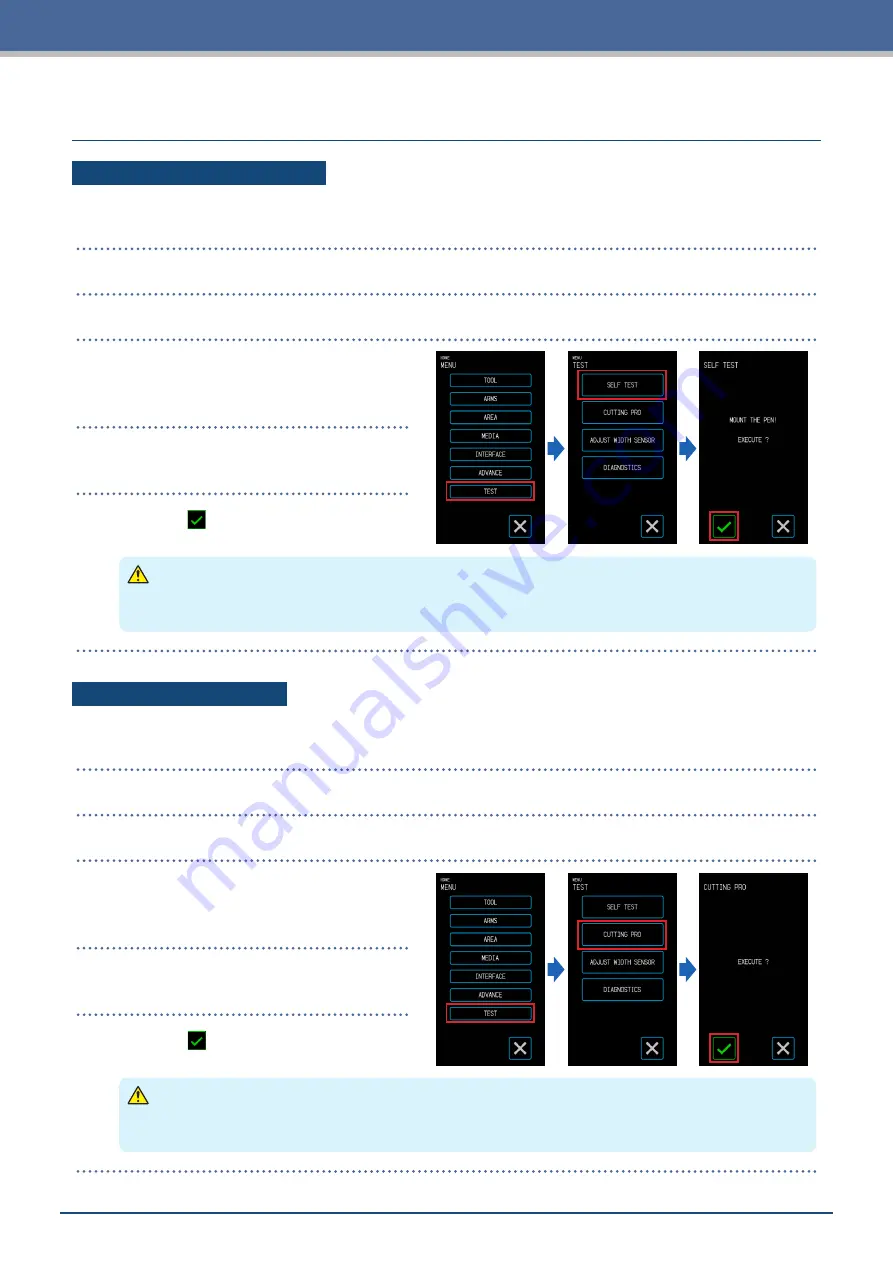
Plotting the Self Test Pattern
Plot the self test pattern to check the operation of the device.
Once the printing is started, the process cannot be paused or canceled midway.
1.
Load media that is at least A3-sized.
2.
Set a drawing pen in the tool holder and select a CONDITION NO.
3.
From the "MENU" screen, open the "TEST"
screen.
4.
Touch the "SELF TEST".
5.
When the (Execute) is touched, printing
of the self test pattern will start.
CAUTION
When the "Execute" is touched, the media and tool carriage will start moving. Be careful to avoid contact
with your body or any object.
Plotting the Test Pattern
Plot the test pattern (a shape named CUTTING PRO) to check the operation of the device.
Once the printing is started, the process cannot be paused or canceled midway.
1.
Load media that is at least A3-sized.
2.
Set a drawing pen in the tool holder and select a CONDITION NO.
3.
From the "MENU" screen, open the "TEST"
screen.
4.
Touch the "CUTTING PRO".
5.
When the (Execute) is touched, printing
of the test pattern will start.
CAUTION
When the "Execute" is touched, the media and tool carriage will start moving. Be careful to avoid contact
with your body or any object.
Содержание CELITE-50
Страница 1: ...USER S MANUAL CE LITE 50 UM 151...
Страница 2: ......
Страница 10: ......
Страница 22: ......
Страница 78: ......
Страница 101: ...5 23 Chapter 5 Detailed Settings 3 Select ON or OFF for WIDTH DETECTION...
Страница 112: ......
Страница 116: ...A 4 Appendix A 3 Appearance Drawing 164 784 227 173 400 Units mm Dimension error 5 mm...
Страница 118: ...A 6 Appendix 3 PIECES Previous Page HOME SELECT FILE...
Страница 119: ...A 7 Appendix TOOL ARMS MODE 1 MODE 2 MODE 3 CHECK MARK SCAN SENSOR OFFSET ADJ Next Page MENU...
Страница 120: ...A 8 Appendix INTERFACE ADVANCE TEST Previous Page AREA MEDIA MENU...
Страница 127: ......
Страница 128: ......


