Section 4 • Repair Procedures
Part No. 227656
GR-20J • GR-26J
4 - 15
September 2016
TOP
BOTTOM
P
P
P
P
d
c
b
a
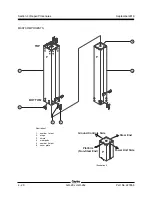
How to Disassemble the Mast,
GR-26J
Bodily injury hazard. This
procedure requires specific repair
skills, lifting equipment and a
suitable workshop. Attempting this
procedure without these skills and
tools could result in death or
serious injury and significant
component damage. Dealer
service is strongly recommended.
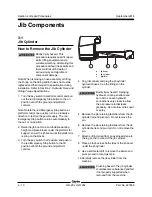
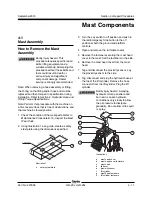
1 Remove the mast assembly. See 4-1,
How to
Remove the Mast Assembly.
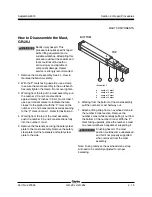
2 With the 'P' mark facing upwards, use a clamp
to secure the mast assembly to the workbench.
Securely tighten the clamp. Do not over tighten.
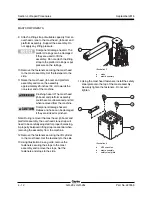
3 Working from the top of the mast assembly, pull
the number 2, 3 and 4 mast sections
approximately 12 inches / 30 cm. Out of mast 1,
use a permanent marker to indicate the face
closest to the platform with the 'P' mark on the
number 2, 3 and 4 mast sections corresponding
to the 'P' mark on mast 1. Refer to Illustration 3.
4 Working from the top of the mast assembly,
push the number 2, 3 and 4 mast sections fully
into the number 1 mast.
5 Remove the fasteners securing the safety steel
plate to the mast assembly. Remove the safety
steel plate. Set the fasteners and safety steel
plate to the side.
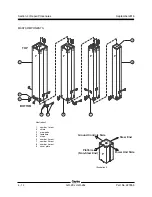
Illustration 3
a
number 1 mast
b
number 2 mast
c
number 3 mast
d
number 4 mast
6 Working from the bottom of the mast assembly,
pull the number 4 mast half way out.
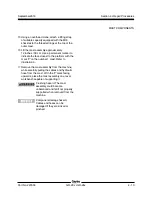
7 Attach a lifting strap from an overhead crane to
the number 4 mast section. Remove the
number 4 mast while carefully pulling it out from
the bottom of the number 3 mast. With the 'P'
mark facing upwards, place the number 4 mast
on a level workbench capable of supporting it.
Crushing hazard. The mast
section could become unbalanced
and fall if not properly supported
when removed from the mast
assembly.
Note: During removal, the overhead crane strap
will need to be carefully adjusted for proper
balancing.
MAST COMPONENTS
Содержание GR-26J
Страница 12: ...September2016 GR 20J GR 26J Part No 227656 This page intentionally left blank ...
Страница 75: ...Section 4 Repair Procedures Part No 227656 GR 20J GR 26J 4 29 September2016 This page intentionally left blank ...
Страница 109: ...Section 6 Schematics Part No 227656 GR 20J GR 26J 6 3 September2016 ECM Pin out Legend ...
Страница 118: ...Section 6 Schematics 6 12 GR 20J GR 26J Part No 227656 September2016 This page intentionally left blank ...

