154
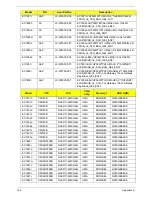
Appendix A
EC1801j
NIS
5 in 1-Build in
SP1x2HMW
SP1x2HMW
BT
2.1
6CELL2.8
EC1802h
NIS
5 in 1-Build in
SP1x2HMW
SP1x2HMW
N
6CELL2.8
EC1802u
NIS
5 in 1-Build in
SP1x2HMW
SP1x2HMW
N
6CELL2.8
EC1802m
NIS
5 in 1-Build in
SP1x2HMW
SP1x2HMW
N
6CELL2.8
EC1803a
NIS
5 in 1-Build in
SP1x2HMW
SP1x2HMW
BT
2.1
6CELL2.8
EC1804a
NIS
5 in 1-Build in
SP1x2HMW
SP1x2HMW
BT
2.1
6CELL2.8
EC1802e
NIS
5 in 1-Build in
SP1x2HMW
SP1x2HMW
N
6CELL2.8
EC1801i
NIS
5 in 1-Build in
SP1x2HMW
SP1x2HMW
BT
2.1
6CELL2.8
EC1806i
NIS
5 in 1-Build in
SP1x2HMW
SP1x2HMW
BT
2.1
6CELL2.8
EC1805i
NIS
5 in 1-Build in
SP1x2HMW
SP1x2HMW
BT
2.1
6CELL2.8
Model
Extra
SW1
Card Reader
Wireless LAN
Wireless LAN1
Blue
tooth
Battery
Содержание EC14
Страница 6: ...VI ...
Страница 10: ...X Table of Contents ...
Страница 34: ...24 Chapter 1 ...
Страница 50: ...40 Chapter 2 ...
Страница 60: ...50 Chapter 3 5 Pull the memory module out ...
Страница 71: ...Chapter 3 61 8 Lift up and pull the button board to main board FCC free ...
Страница 75: ...Chapter 3 65 4 Lift off the LCD Board 5 Unlock and remove the LED board FCC from the mainboard ...
Страница 89: ...Chapter 3 79 4 Lift the LCD panel out lifting the bottom of the panel first ...
Страница 93: ...Chapter 3 83 5 Remove the antennas completely ...
Страница 99: ...Chapter 3 89 3 Apply adhesive and stick the microphone down ...
Страница 104: ...94 Chapter 3 Replacing the RTC Battery 1 Place the RTC battery into the holding clips on the main board ...
Страница 108: ...98 Chapter 3 3 Connect the speaker connector ...
Страница 116: ...106 Chapter 3 5 Relay the WLAN cables around and through the lower case ...
Страница 127: ...Chapter 3 117 4 Place the HDD cover in from one edge 5 Tighten the four captive screws ...
Страница 128: ...118 Chapter 3 Replacing the Battery 1 Slide the battery into position 2 Close the locking latch ...
Страница 129: ...Chapter 3 119 Replace the Dummy Card Push the dummy card into the slot until it clicks into place ...
Страница 130: ...120 Chapter 3 ...
Страница 170: ...160 ...


