


150
Chapter 6
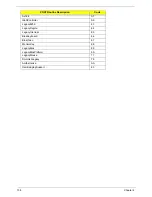
Screw List
MAINBOARD GS45 ICH9M CPU SU4100B W/O RAM
FOR 3G
MB.PJ306.002
MEMORY
Memory NANYA SO-DIMM DDRII 667 2GB
NT2GT64U8HD0BN-3C LF 128*8 0.07um
KN.2GB03.011
Memory SAMSUNG SO-DIMM DDRII 667 2GB
M470T5663QZ3-CE6 LF
KN.2GB0B.003
Memory SAMSUNG SO-DIMM DDRII 667 2GB
M470T5663EH3-CE6 LF 128*8 0.055um
KN.2GB0B.011
Memory HYNIX SO-DIMM DDRII 667 2GB
HYMP125S64CP8-Y5 LF
KN.2GB0G.004
Heatsink
THERMAL MODULE UMA
60.SA107.006
SPEAKER
SPEAKER SET
23.SA107.001
MISCELLANEOUS
LOWER CASE SCREW RUBBER
47.WF807.001
UPPER CASE RUBBER
47.WF807.002
LOWER CASE RUBBER FOOT - FRONT (LONG)
47.WF807.003
LOWER CASE RUBBER FOOT - REAR
47.WF807.004
LCD BEZEL RUBBER
47.WF807.005
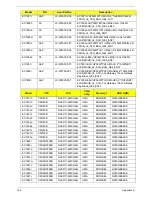
PARTNAME
ACER P/N
SCREW M2*3.0 I (BNI,NYLOK)IRON 86.WF807.001
SCREW M2*5-I(BZN)(NYLOK)
86.TG607.004
SCREW M2.0*2.5-I (BNI,NYLOK)IRON
86.W0907.005
SCREW M3.0*3.5-I(NI)(NYLOK)STEEL
86.WF807.002
CATEGORY
PARTNAME
ACER P/N.
Содержание EC14
Страница 6: ...VI ...
Страница 10: ...X Table of Contents ...
Страница 34: ...24 Chapter 1 ...
Страница 50: ...40 Chapter 2 ...
Страница 60: ...50 Chapter 3 5 Pull the memory module out ...
Страница 71: ...Chapter 3 61 8 Lift up and pull the button board to main board FCC free ...
Страница 75: ...Chapter 3 65 4 Lift off the LCD Board 5 Unlock and remove the LED board FCC from the mainboard ...
Страница 89: ...Chapter 3 79 4 Lift the LCD panel out lifting the bottom of the panel first ...
Страница 93: ...Chapter 3 83 5 Remove the antennas completely ...
Страница 99: ...Chapter 3 89 3 Apply adhesive and stick the microphone down ...
Страница 104: ...94 Chapter 3 Replacing the RTC Battery 1 Place the RTC battery into the holding clips on the main board ...
Страница 108: ...98 Chapter 3 3 Connect the speaker connector ...
Страница 116: ...106 Chapter 3 5 Relay the WLAN cables around and through the lower case ...
Страница 127: ...Chapter 3 117 4 Place the HDD cover in from one edge 5 Tighten the four captive screws ...
Страница 128: ...118 Chapter 3 Replacing the Battery 1 Slide the battery into position 2 Close the locking latch ...
Страница 129: ...Chapter 3 119 Replace the Dummy Card Push the dummy card into the slot until it clicks into place ...
Страница 130: ...120 Chapter 3 ...
Страница 170: ...160 ...


