Chapter 6
149
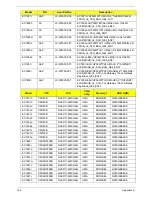
Keyboard GATEWAY GP1T SJM11 87KS Black
Portuguese Texture
KB.I110G.017
Keyboard GATEWAY GP1T SJM11 86KS Black Russian
Texture
KB.I110G.018
Keyboard GATEWAY GP1T SJM11 87KS Black SLO/
CRO Texture
KB.I110G.019
Keyboard GATEWAY GP1T SJM11 87KS Black Spanish
Texture
KB.I110G.020
Keyboard GATEWAY GP1T SJM11 87KS Black Sweden
Texture
KB.I110G.021
Keyboard GATEWAY GP1T SJM11 87KS Black Swiss/G
Texture
KB.I110G.022
Keyboard GATEWAY GP1T SJM11 86KS Black Thailand
Texture
KB.I110G.023
Keyboard GATEWAY GP1T SJM11 87KS Black Turkish
Texture
KB.I110G.024
Keyboard GATEWAY GP1T SJM11 87KS Black UK
Texture
KB.I110G.025
Keyboard GATEWAY GP1T SJM11 86KS Black Chinese
Texture
KB.I110G.006
Keyboard GATEWAY GP1T SJM11 86KS Black US
International Texture
KB.I110G.026
Keyboard GATEWAY GP1T SJM11 86KS Black US
International w/ Hebrew Texture
KB.I110G.027
Keyboard GATEWAY GP1T SJM11 87KS Black US w/
Canadian French Texture
KB.I110G.028
LCD
LED LCD AUO 11.6" WXGA Glare B116XW02 V0 LF
200nit 8ms 500:1
LK.11605.001
LED LCD CMO 11.6" WXGA Glare N116B6-L02 LF
200nit 10ms 500:1
LK.1160D.001
LED LCD SAMSUNG 11.6" WXGA Glare LTN116AT01-
A01 LF 200nit 8ms
LK.11606.001
LED LCD LPL 11.6" WXGA Glare LP116WH1-TLA1 LF
200nit 8ms 500:1
LK.11608.001
LED LCD AUO 11.6" WXGA Glare B116XW02 V0 1A
(3G) LF 200nit 8ms 500:1
LK.11605.003
MAINBOARD
MAINBOARD GS45 ICH9M CPU SU3500B W/O RAM
FOR 3G
MB.SA506.001
MAINBOARD GS45 ICH9M CPU SU3500B W/O RAM
FOR NON 3G
MB.SA106.001
MAINBOARD GS45 ICH9M CPU CM723B W/O RAM
FOR 3G
MB.SAA06.001
MAINBOARD GS45 ICH9M CPU CM723B W/O RAM
FOR NON 3G
MB.SA706.001
MAINBOARD GS45 ICH9M CPU SU2700B W/O RAM
FOR 3G
MB.PJ306.003
MAINBOARD GS45 ICH9M CPU SU2700B W/O RAM
FOR NON 3G
MB.PJ306.004
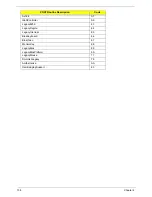
CATEGORY
PARTNAME
ACER P/N.
Содержание EC14
Страница 6: ...VI ...
Страница 10: ...X Table of Contents ...
Страница 34: ...24 Chapter 1 ...
Страница 50: ...40 Chapter 2 ...
Страница 60: ...50 Chapter 3 5 Pull the memory module out ...
Страница 71: ...Chapter 3 61 8 Lift up and pull the button board to main board FCC free ...
Страница 75: ...Chapter 3 65 4 Lift off the LCD Board 5 Unlock and remove the LED board FCC from the mainboard ...
Страница 89: ...Chapter 3 79 4 Lift the LCD panel out lifting the bottom of the panel first ...
Страница 93: ...Chapter 3 83 5 Remove the antennas completely ...
Страница 99: ...Chapter 3 89 3 Apply adhesive and stick the microphone down ...
Страница 104: ...94 Chapter 3 Replacing the RTC Battery 1 Place the RTC battery into the holding clips on the main board ...
Страница 108: ...98 Chapter 3 3 Connect the speaker connector ...
Страница 116: ...106 Chapter 3 5 Relay the WLAN cables around and through the lower case ...
Страница 127: ...Chapter 3 117 4 Place the HDD cover in from one edge 5 Tighten the four captive screws ...
Страница 128: ...118 Chapter 3 Replacing the Battery 1 Slide the battery into position 2 Close the locking latch ...
Страница 129: ...Chapter 3 119 Replace the Dummy Card Push the dummy card into the slot until it clicks into place ...
Страница 130: ...120 Chapter 3 ...
Страница 170: ...160 ...


