


41
Fájlok törlése
FIGYELEM!
A készülék memóriája fontos rendszerfájlokat tartalmaz, melyeket nem sza-
bad letörölnünk. Amennyiben nem ismerjük egy adott fájl rendeltetését, NE
töröljük azt.
1.
Nyissuk meg a
Garmin
meghajtót, kötetet.
2.
Ha szükséges, nyissuk meg a mappát, kötetet.
3.
Válasszuk ki a kívánt fájlt.
4.
Nyomjuk le számítógépünk billentyűzetén a
Delete
gombot.
MEGJEGYZÉS!
A MAC operációs rendszerek korlátozott támogatást nyúj-
tanak az MTP fájltranszfer módnak. A Garmin meghajtót Windows operációs
rendszerrel futó számítógépen nyissuk meg. A készülékről a zenefájlokat a
Garmin Express alkalmazás segítségével töröljük.
Készülék karbantartása
Tisztítás, ápolás
FIGYELEM!
Ne használjunk éles tárgyat a készülék tisztításához.
Ne használjunk erős vegyszereket, oldószereket, rovarriasztókat, mivel ezek ká-
rosíthatják a műanyag elemeket.
Amennyiben a készüléket tengervíz, klór, naptej, kozmetikai szer, alkohol,
vagy egyéb erős hatású vegyszer éri, tiszta, bő vízzel öblítsük át a készülé-
ket. Amennyiben a készülék maró hatású vegyszernek tartósan kitéve ma-
rad, a készülékház visszafordíthatatlanul károsodhat.
Lehetőleg kerüljük az erős rázkódásokat, ütéseket, ne bánjunk durván a ké-
szülékkel, mivel ez jelentősen lecsökkenti annak élettarmát.
Ne tároljuk olyan helyen a készüléket, ahol tartósan szélsőséges hőmérsék-
letnek van kitéve, mivel ez véglegesen károsíthatja a készüléket.
Ne használjuk tovább a készüléket, amennyiben károsodás, sérülés nyoma-
it észleljük vagy a megadott tárolási hőmérsékleti tartományon kívül eső hő-
mérsékleten tároltuk a készüléket.
Tisztítás
FIGYELEM!
A töltő csatlakoztatásakor az elektromos érintkezőkön kirakódó pára, verejték
még kis mennyiségben is rozsdásodást okozhat. A rozsdásodás akadályozza a
töltést és a fájlok átvitelét.
Enyhén szappanos vízzel megnedvesített kendővel töröljük át a készüléket,
majd töröljük szárazra.
Tisztítást követően várjunk, amíg a készülék teljesen meg nem szárad.
TIPP!
További információkért lásd a
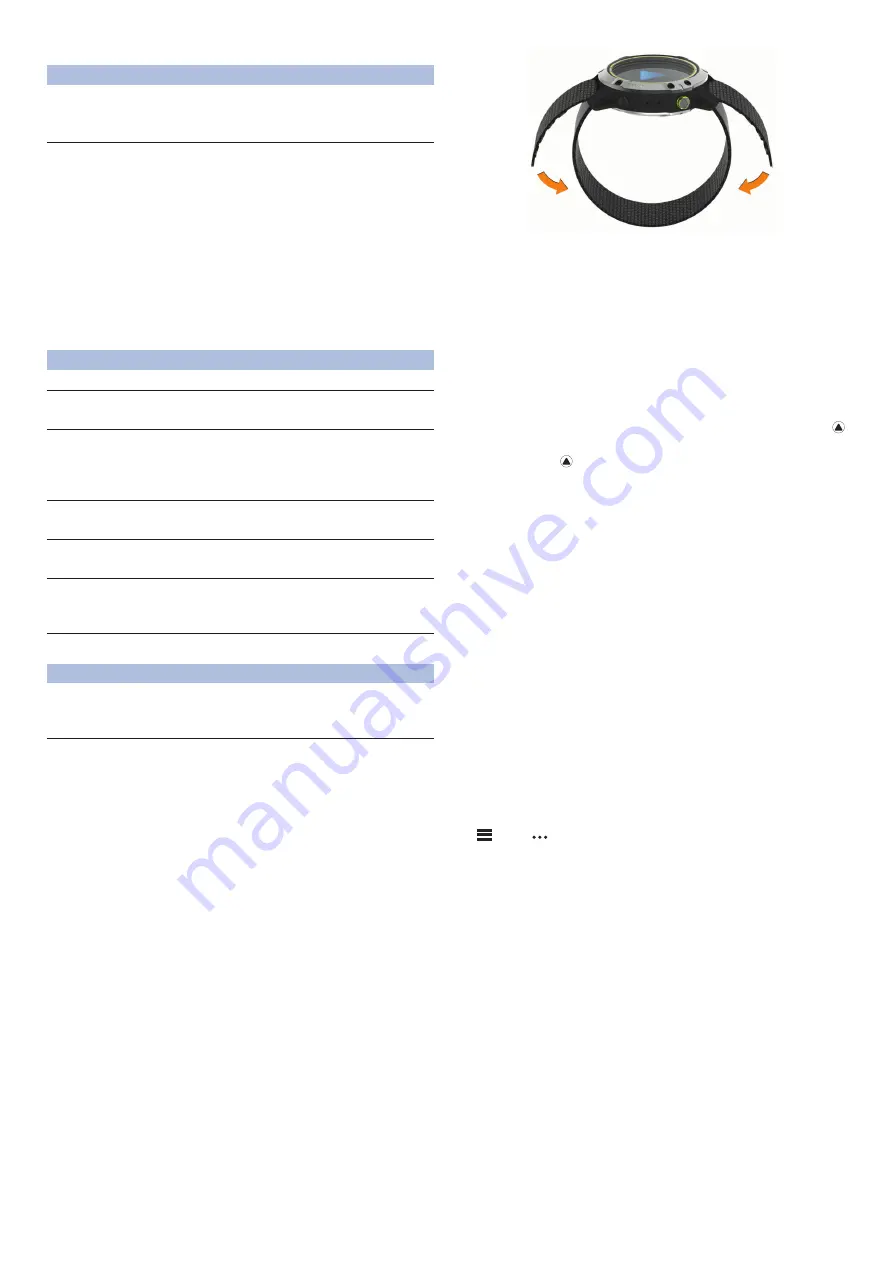
UltraFit nejlon szíj cseréje
1.
A szíj egyik végét fűzzük át az óra test és a tüske közötti nyíláson.
Deleting Files
NOTICE
If you do not know the purpose of a file, do not delete it. Your
device memory contains important system files that should not
be deleted.
1
Open the
Garmin
drive or volume.
2
If necessary, open a folder or volume.
3
Select a file.
4
Press the
Delete
key on your keyboard.
NOTE:
If you are using an Apple
®
computer, you must empty
the Trash folder to completely remove the files.
Device Maintenance
Device Care
NOTICE
Do not use a sharp object to clean the device.
Avoid chemical cleaners, solvents, and insect repellents that can
damage plastic components and finishes.
Thoroughly rinse the device with fresh water after exposure to
chlorine, salt water, sunscreen, cosmetics, alcohol, or other
harsh chemicals. Prolonged exposure to these substances can
damage the case.
Avoid pressing the keys under water.
Avoid extreme shock and harsh treatment, because it can
degrade the life of the product.
Do not store the device where prolonged exposure to extreme
temperatures can occur, because it can cause permanent
damage.
Cleaning the Device
NOTICE
Even small amounts of sweat or moisture can cause corrosion
of the electrical contacts when connected to a charger.
Corrosion can prevent charging and data transfer.
1
Wipe the device using a cloth dampened with a mild
detergent solution.
2
Wipe it dry.
After cleaning, allow the device to dry completely.
TIP:
For more information, go to
www.garmin.com/fitandcare
.
Cleaning the Nylon Strap
• Hand wash the nylon strap with a mild detergent, such as
dishwashing liquid.
• Do not put the nylon strap in a washing machine or dryer.
• When drying the nylon strap, hang it up or lay it flat, and
allow it to dry completely.
• For more information, go to
www.garmin.com/fitandcare
.
Changing the UltraFit Nylon Strap
1
Pull one end of the strap through the opening between the
pin and the watch body.
2
Pull the other end of the strap through the other side of the
device.
3
Attach the hook and loop closures on the strap to fit your
wrist.
Troubleshooting
My device is in the wrong language
You can change the device language selection if you have
accidently selected the wrong language on the device.
1
Hold
MENU
.
2
Scroll down to the last item in the list, and press .
3
Press .
4
Select your language.
5
Press .
Is my smartphone compatible with my
device?
The Enduro device is compatible with smartphones using
Bluetooth technology.
Go to
www.garmin.com/ble
for compatibility information.
My phone will not connect to the device
If your phone will not connect to the device, you can try these
tips.
• Turn off your smartphone and your device, and turn them
back on again.
• Enable Bluetooth technology on your smartphone.
• Update the Garmin Connect app to the latest version.
• Remove your device from the Garmin Connect app and the
Bluetooth settings on your smartphone to retry the pairing
process.
• If you bought a new smartphone, remove your device from
the Garmin Connect app on the smartphone you intend to
stop using.
• Bring your smartphone within 10 m (33 ft.) of the device.
• On your smartphone, open the Garmin Connect app, select
or , and select
Garmin Devices
>
Add Device
to enter
pairing mode.
• From the watch face, hold
MENU
, and select
Phone
>
Pair
Phone
.
Can I use my Bluetooth sensor with my
watch?
The device is compatible with some Bluetooth sensors. The first
time you connect a sensor to your Garmin device, you must pair
the device and sensor. After they are paired, the device
connects to the sensor automatically when you start an activity
and the sensor is active and within range.
1
Hold
MENU
.
Device Maintenance
41
2.
A szíj másik végét fűzzük át a másik nyíláson az ábrán látható módon.
3.
A szíjon lévő tépőzáras megoldással igazítsuk csuklónkra a szíjat.
3.
Helyezzük vissza az elemtartó rekesz fedelet, majd teljesen húzzuk azt
meg.
Hibaelhárítás
A menürendszer nem a kívánt nyelven jelenik meg
Előfordulhat, hogy véletlenül egy nem kívánt nyelvet választottunk ki a készü-
léken, azonban ilyen esetben visszaállíthatjuk a kívánt nyelvre.
1.
Nyomjuk le hosszan a
MENU
-t.
2.
Görgessük le a lista aljáig, az utolsó elemig, majd nyomjuk meg a
Introduction
WARNING
See the
Important Safety and Product Information
guide in the
product box for product warnings and other important
information.
Always consult your physician before you begin or modify any
exercise program.
Getting Started
When using your watch the first time, you should complete these
tasks to set it up and get to know the basic features.
1
Press
LIGHT
to turn on the watch (
Buttons
, page 1
).
2
Follow the on-screen instructions to complete the initial
setup.
During the initial setup, you can pair your smartphone with
your watch to receive notifications, sync your activities, and
more (
Pairing Your Smartphone
, page 2
).
3
Charge the device (
Charging the Device
, page 2
).
4
Start an activity (
Starting an Activity
, page 2
).
Buttons
LIGHT
• Press to turn the backlight on and off.
• Press to turn the device on.
• Hold to view the controls menu.
UP·MENU
• Press to scroll through the widget loop and menus.
• Hold to view the menu.
DOWN
• Press to scroll through the widget loop and menus.
• Press to view the activity list and start or stop an activity.
• Press to choose an option in a menu.
BACK·LAP
• Press to return to the previous screen.
• Press to record a lap, rest, or transition during a multisport
activity.
• Hold to view the watch face from any screen.
Using the Watch
• Hold
LIGHT
to view the controls menu.
The controls menu provides quick access to frequently used
functions, such as turning on do not disturb mode, saving a
location, and turning the watch off.
• From the watch face, press
UP
or
DOWN
to scroll through
the widget loop.
Your watch comes preloaded with widgets that provide at-a-
glance information. More widgets are available when you pair
your watch with a smartphone.
• From the watch face, press to start an activity or open an
app (
Activities and Apps
, page 2
).
• Hold
MENU
to customize the watch face, adjust settings, and
pair wireless sensors.
Viewing the Controls Menu
The controls menu contains options, such as turning on do not
disturb mode, locking the keys, and turning the device off. You
can also open the Garmin Pay
™
wallet.
NOTE:
You can add, reorder, and remove the options in the
controls menu (
Customizing the Controls Menu
, page 36
).
1
From any screen, hold
LIGHT
.
2
Press
UP
or
DOWN
to scroll through the options.
Enabling Airplane Mode
You can enable airplane mode to disable all wireless
communications.
NOTE:
You can add options to the controls menu (
Customizing
the Controls Menu
, page 36
).
1
Hold
LIGHT
.
2
Select .
Viewing Widgets
Your device comes preloaded with several widgets, and more
are available when you pair your device with a smartphone.
• Press
UP
or
DOWN
.
The device scrolls through the widget loop and displays
summary data for each widget.
• Press to view widget details.
TIP:
You can press
DOWN
to view additional screens for a
widget, or press to view additional options and functions
for a widget.
• From any screen, hold
BACK
to return to the watch face.
• If you are recording an activity, press
BACK
to return to the
activity data pages.
Customizing the Watch
• From the watch face, hold
MENU
to change the watch face.
• From the widget screens, hold
MENU
to customize the
widget options.
• From the controls menu, hold
MENU
to add, remove, and
reorder the controls.
• From any screen, hold
MENU
to change additional settings.
Introduction
1
gombot.
3.
Nyomjuk meg a
Introduction
WARNING
See the
Important Safety and Product Information
guide in the
product box for product warnings and other important
information.
Always consult your physician before you begin or modify any
exercise program.
Getting Started
When using your watch the first time, you should complete these
tasks to set it up and get to know the basic features.
1
Press
LIGHT
to turn on the watch (
Buttons
, page 1
).
2
Follow the on-screen instructions to complete the initial
setup.
During the initial setup, you can pair your smartphone with
your watch to receive notifications, sync your activities, and
more (
Pairing Your Smartphone
, page 2
).
3
Charge the device (
Charging the Device
, page 2
).
4
Start an activity (
Starting an Activity
, page 2
).
Buttons
LIGHT
• Press to turn the backlight on and off.
• Press to turn the device on.
• Hold to view the controls menu.
UP·MENU
• Press to scroll through the widget loop and menus.
• Hold to view the menu.
DOWN
• Press to scroll through the widget loop and menus.
• Press to view the activity list and start or stop an activity.
• Press to choose an option in a menu.
BACK·LAP
• Press to return to the previous screen.
• Press to record a lap, rest, or transition during a multisport
activity.
• Hold to view the watch face from any screen.
Using the Watch
• Hold
LIGHT
to view the controls menu.
The controls menu provides quick access to frequently used
functions, such as turning on do not disturb mode, saving a
location, and turning the watch off.
• From the watch face, press
UP
or
DOWN
to scroll through
the widget loop.
Your watch comes preloaded with widgets that provide at-a-
glance information. More widgets are available when you pair
your watch with a smartphone.
• From the watch face, press to start an activity or open an
app (
Activities and Apps
, page 2
).
• Hold
MENU
to customize the watch face, adjust settings, and
pair wireless sensors.
Viewing the Controls Menu
The controls menu contains options, such as turning on do not
disturb mode, locking the keys, and turning the device off. You
can also open the Garmin Pay
™
wallet.
NOTE:
You can add, reorder, and remove the options in the
controls menu (
Customizing the Controls Menu
, page 36
).
1
From any screen, hold
LIGHT
.
2
Press
UP
or
DOWN
to scroll through the options.
Enabling Airplane Mode
You can enable airplane mode to disable all wireless
communications.
NOTE:
You can add options to the controls menu (
Customizing
the Controls Menu
, page 36
).
1
Hold
LIGHT
.
2
Select .
Viewing Widgets
Your device comes preloaded with several widgets, and more
are available when you pair your device with a smartphone.
• Press
UP
or
DOWN
.
The device scrolls through the widget loop and displays
summary data for each widget.
• Press to view widget details.
TIP:
You can press
DOWN
to view additional screens for a
widget, or press to view additional options and functions
for a widget.
• From any screen, hold
BACK
to return to the watch face.
• If you are recording an activity, press
BACK
to return to the
activity data pages.
Customizing the Watch
• From the watch face, hold
MENU
to change the watch face.
• From the widget screens, hold
MENU
to customize the
widget options.
• From the controls menu, hold
MENU
to add, remove, and
reorder the controls.
• From any screen, hold
MENU
to change additional settings.
Introduction
1
gombot.
4.
Válasszuk ki a kívánt nyelvet.
Az okostelefonom kompatibilis a készülékemmel?
Az Enduro óra Bluetooth vezeték nélküli technológiával ellátott okostelefonokkal
kompatibilis.
A kompatibilis okostelefon listáját a
oldalon találjuk.
A telefon nem csatlakozik a készülékhez
Amennyiben az okostelefon nem csatlakozik a készülékhez, megpróbálkoz-
hatunk az alábbi lépésekkel:
• Kapcsoljuk ki, majd kapcsoljuk újra be a készüléket és az okostelefont.
• Az okostelefonon kapcsoljuk be a Bluetooth funkciót.
• Bizonyosodjunk meg róla, hogy az okostelefonunk a Garmin Connect al-
kalmazás legújabb verzióját futtatja.
• Távolítsuk el a készüléket a Garmin Connect alkalmazásból és az
okostelefon Bluetooth beállításaiból a párosítás újbóli megkísérelése ér-
dekében.
• Ha új okostelefont vásároltunk, távolítsuk el a Garmin Connect alkalma-
zásból azt a készüléket, amellyel nem kívánjuk továbbra a készüléket
használni.
• A telefont és a készüléket hozzuk 10 méteres távolságon belül.
• Az okostelefonon indítsuk el a Garmin Connect alkalmazást, válasszuk a
• Bring your phone within 10 m (33 ft.) of the device.
• On your smartphone, open the Garmin Connect Mobile app,
select or , and select
Garmin Devices
>
Add Device
to
enter pairing mode.
• On your device, hold
LIGHT
, and select to turn on
Bluetooth technology and enter pairing mode.
Can I use my Bluetooth sensor with my
watch?
The device is compatible with some Bluetooth sensors. The first
time you connect a sensor to your Garmin device, you must pair
the device and sensor. After they are paired, the device
connects to the sensor automatically when you start an activity
and the sensor is active and within range.
1
Hold
MENU
.
2
Select
Settings
>
Sensors & Accessories
>
Add New
.
3
Select an option:
• Select
Search All
.
• Select your sensor type.
You can customize the optional data fields (
Customizing the
Data Screens
, page 22
).
Resetting Your Device
1
Hold
LIGHT
for at least 25 seconds.
2
Hold
LIGHT
for one second to turn on the device.
Restoring All Default Settings
NOTE:
This deletes all user-entered information and activity
history.
You can restore all of the device settings to the factory default
values.
1
Hold
MENU
.
2
Select
Settings
>
System
>
Restore Defaults
>
Yes
.
Acquiring Satellite Signals
The device may need a clear view of the sky to acquire satellite
signals. The time and date are set automatically based on the
GPS position.
1
Go outdoors to an open area.
The front of the device should be oriented toward the sky.
2
Wait while the device locates satellites.
It may take 30–60 seconds to locate satellite signals.
Improving GPS Satellite Reception
• Frequently sync the device to your Garmin Connect account:
◦ Connect your device to a computer using the USB cable
and the Garmin Express application.
◦ Sync your device to the Garmin Connect Mobile app using
your Bluetooth enabled smartphone.
◦ Connect your device to your Garmin Connect account
using a Wi
‑
Fi wireless network.
While connected to your Garmin Connect account, the device
downloads several days of satellite data, allowing it to quickly
locate satellite signals.
• Take your device outside to an open area away from tall
buildings and trees.
• Remain stationary for a few minutes.
The temperature reading is not accurate
Your body temperature affects the temperature reading for the
internal temperature sensor. To get the most accurate
temperature reading, you should remove the watch from your
wrist and wait 20 to 30 minutes.
You can also use an optional tempe external temperature
sensor to view accurate ambient temperature readings while
wearing the watch.
Maximizing the Battery Life
You can do several things to extend the life of the battery.
• Reduce the backlight timeout (
Changing the Backlight
Settings
, page 26
).
• Reduce the backlight brightness.
• Use UltraTrac GPS mode for your activity (
UltraTrac
,
page 24
).
• Turn off Bluetooth wireless technology when you are not
using connected features (
Connected Features
, page 19
).
• When pausing your activity for a longer period of time, use
the resume later option (
Stopping an Activity
, page 2
).
• Turn off activity tracking (
Turning Off Activity Tracking
,
page 14
).
• Use a Connect IQ watch face that is not updated every
second.
For example, use a watch face without a second hand
(
Customizing the Watch Face
, page 24
).
• Limit the smartphone notifications the device displays
(
Managing Notifications
, page 19
).
• Stop broadcasting heart rate data to paired Garmin devices
(
Broadcasting Heart Rate Data to Garmin Devices
, page 7
).
• Turn off wrist-based heart rate monitoring (
Turning Off the
Wrist Heart Rate Monitor
, page 7
).
NOTE:
Wrist-based heart rate monitoring is used to calculate
vigorous intensity minutes and calories burned.
Activity Tracking
For more information about activity tracking accuracy, go to
garmin.com/ataccuracy
.
My daily step count does not appear
The daily step count is reset every night at midnight.
If dashes appear instead of your step count, allow the device
to acquire satellite signals and set the time automatically.
My step count does not seem accurate
If your step count does not seem accurate, you can try these
tips.
• Wear the device on your non-dominant wrist.
• Carry the device in your pocket when pushing a stroller or
lawn mower.
• Carry the device in your pocket when actively using your
hands or arms only.
NOTE:
The device may interpret some repetitive motions,
such as washing dishes, folding laundry, or clapping your
hands, as steps.
The step counts on my device and my Garmin
Connect account don't match
The step count on your Garmin Connect account updates when
you synchronize your device.
1
Select an option:
• Synchronize your step count with the Garmin Connect
application (
Using Garmin Connect on Your Computer
,
page 20
).
• Synchronize your step count with the Garmin Connect
Mobile app (
Manually Syncing Data with Garmin Connect
Mobile
, page 20
).
2
Wait while the device synchronizes your data.
Synchronizing can take several minutes.
Troubleshooting
29
-t vagy
• Bring your phone within 10 m (33 ft.) of the device.
• On your smartphone, open the Garmin Connect Mobile app,
select or , and select
Garmin Devices
>
Add Device
to
enter pairing mode.
• On your device, hold
LIGHT
, and select to turn on
Bluetooth technology and enter pairing mode.
Can I use my Bluetooth sensor with my
watch?
The device is compatible with some Bluetooth sensors. The first
time you connect a sensor to your Garmin device, you must pair
the device and sensor. After they are paired, the device
connects to the sensor automatically when you start an activity
and the sensor is active and within range.
1
Hold
MENU
.
2
Select
Settings
>
Sensors & Accessories
>
Add New
.
3
Select an option:
• Select
Search All
.
• Select your sensor type.
You can customize the optional data fields (
Customizing the
Data Screens
, page 22
).
Resetting Your Device
1
Hold
LIGHT
for at least 25 seconds.
2
Hold
LIGHT
for one second to turn on the device.
Restoring All Default Settings
NOTE:
This deletes all user-entered information and activity
history.
You can restore all of the device settings to the factory default
values.
1
Hold
MENU
.
2
Select
Settings
>
System
>
Restore Defaults
>
Yes
.
Acquiring Satellite Signals
The device may need a clear view of the sky to acquire satellite
signals. The time and date are set automatically based on the
GPS position.
1
Go outdoors to an open area.
The front of the device should be oriented toward the sky.
2
Wait while the device locates satellites.
It may take 30–60 seconds to locate satellite signals.
Improving GPS Satellite Reception
• Frequently sync the device to your Garmin Connect account:
◦ Connect your device to a computer using the USB cable
and the Garmin Express application.
◦ Sync your device to the Garmin Connect Mobile app using
your Bluetooth enabled smartphone.
◦ Connect your device to your Garmin Connect account
using a Wi
‑
Fi wireless network.
While connected to your Garmin Connect account, the device
downloads several days of satellite data, allowing it to quickly
locate satellite signals.
• Take your device outside to an open area away from tall
buildings and trees.
• Remain stationary for a few minutes.
The temperature reading is not accurate
Your body temperature affects the temperature reading for the
internal temperature sensor. To get the most accurate
temperature reading, you should remove the watch from your
wrist and wait 20 to 30 minutes.
You can also use an optional tempe external temperature
sensor to view accurate ambient temperature readings while
wearing the watch.
Maximizing the Battery Life
You can do several things to extend the life of the battery.
• Reduce the backlight timeout (
Changing the Backlight
Settings
, page 26
).
• Reduce the backlight brightness.
• Use UltraTrac GPS mode for your activity (
UltraTrac
,
page 24
).
• Turn off Bluetooth wireless technology when you are not
using connected features (
Connected Features
, page 19
).
• When pausing your activity for a longer period of time, use
the resume later option (
Stopping an Activity
, page 2
).
• Turn off activity tracking (
Turning Off Activity Tracking
,
page 14
).
• Use a Connect IQ watch face that is not updated every
second.
For example, use a watch face without a second hand
(
Customizing the Watch Face
, page 24
).
• Limit the smartphone notifications the device displays
(
Managing Notifications
, page 19
).
• Stop broadcasting heart rate data to paired Garmin devices
(
Broadcasting Heart Rate Data to Garmin Devices
, page 7
).
• Turn off wrist-based heart rate monitoring (
Turning Off the
Wrist Heart Rate Monitor
, page 7
).
NOTE:
Wrist-based heart rate monitoring is used to calculate
vigorous intensity minutes and calories burned.
Activity Tracking
For more information about activity tracking accuracy, go to
garmin.com/ataccuracy
.
My daily step count does not appear
The daily step count is reset every night at midnight.
If dashes appear instead of your step count, allow the device
to acquire satellite signals and set the time automatically.
My step count does not seem accurate
If your step count does not seem accurate, you can try these
tips.
• Wear the device on your non-dominant wrist.
• Carry the device in your pocket when pushing a stroller or
lawn mower.
• Carry the device in your pocket when actively using your
hands or arms only.
NOTE:
The device may interpret some repetitive motions,
such as washing dishes, folding laundry, or clapping your
hands, as steps.
The step counts on my device and my Garmin
Connect account don't match
The step count on your Garmin Connect account updates when
you synchronize your device.
1
Select an option:
• Synchronize your step count with the Garmin Connect
application (
Using Garmin Connect on Your Computer
,
page 20
).
• Synchronize your step count with the Garmin Connect
Mobile app (
Manually Syncing Data with Garmin Connect
Mobile
, page 20
).
2
Wait while the device synchronizes your data.
Synchronizing can take several minutes.
Troubleshooting
29
-t, majd válasszuk a
Garmin készülékek
>
Készülék hoz-
záadása-
t a párosítás módba lépéshez.
• Az készülék óra számlapján nyomjuk le hosszan a
MENU
gombot, majd
válasszuk
Telefon
>
Telefon párosítása
pontot.
Az órámmal használhatom a Bluetooth technológiával
működő érzékelőmet?
A készülék kompatibilis egyes Bluetooth technológiával működő érzékelők-
kel. Amikor először csatlakoztatjuk az érzékelőt a Garmin készülékkel, páro-
sítanunk kell őket. Párosítás után a készülék automatikusan csaltakozik az
érzékelőhöz, amikor megkezdünk egy tevékenységet és az érzékelő aktív és
hatáskörön belül található.