


12 Computer Operations
466
Co
m
p
ut
e
r O
p
er
at
io
n
s
12
This feature is not available depending on the version of the CSV format file or the model of the
machine.
•
Using CentreWare Internet Services, you can download a blank form of the Address Book (CSV
format file) to a computer. After completing the form on a computer, batch registration of it (a CSV
format file) on the machine is available via CentreWare Internet Services. For more information,
refer to the help of CentreWare Internet Services.
1
Start up the computer, and a web browser.
2
Enter the machine's IP address or Internet address in the browser address field, and press
the <Enter> key.
Note
•
If your network uses DNS (Domain Name System) and the machine's host name is registered in the
domain name server, you can access the machine using the URL with the combination of the host
name and the domain name. For example, if the host name is "myhost", and the domain name is
"example.com", then the URL is "myhost.example.com".
•
Ask your system administrator for the IP address or Internet address.
•
When specifying a port number, add ":" and the port number after the address. The default port
number is "80".
•
When the Authentication feature is enabled on the machine, enter a user ID and passcode in the
[User Name] and [Password] fields respectively. Ask your system administrator for the user ID and
passcode.
•
If communications are encrypted, you must specify an address that starts with "https" instead of
"http" to access CentreWare Internet Services.
3
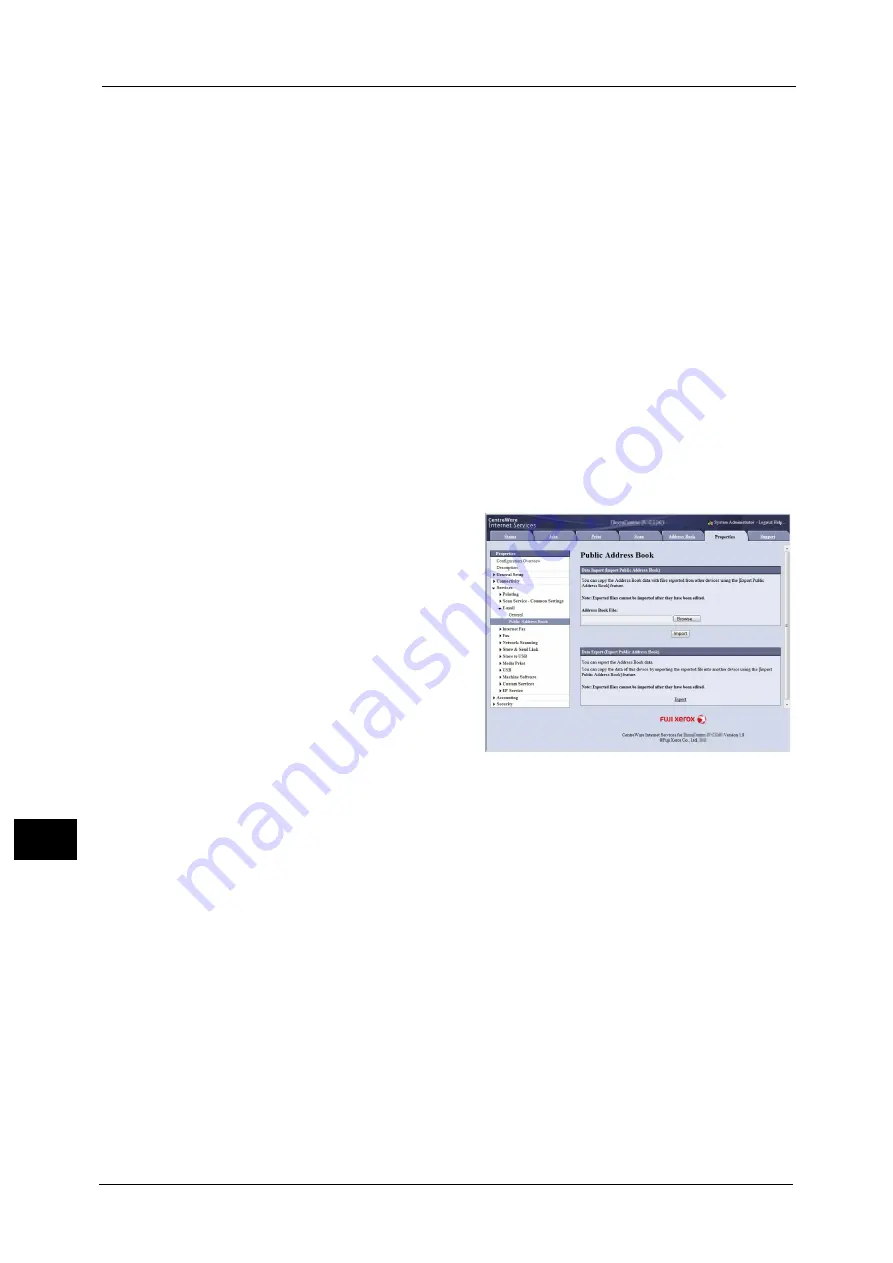
Click the [Properties] tab, and select
[Services] > [E-mail] > [Public Address
Book] in the left frame on the screen.
4
Click [Export] in [Data Export (Export Public Address Book)].
5
Click [Save] in the Security Warning dialog box.
6
Specify the destination to save the file in.
7
Enter the IP address or Internet address of another machine (ApeosPort-V C7785/C6685/
C5585, DocuCentre-V C7785/C6685/C5585) in the browser address field, and press the
<Enter> key.
8
Click the [Properties] tab, and select [Public Address Book] in the left frame on the screen.
Note
•
[Data Import (Import Public Address Book)] on the [Properties] tab is not available for the Address
Book data created based on a CSV file which is downloaded from the [Export File with Column
Headings only] or [Download Template] on [Address Book] tab. For the Address Book data, perform
[Import] on the [Address Book] tab.
9
Click [Browse] in [Data Import (Import Public Address Book)] to specify the file saved in
step 6.
10
Click [Import].
Содержание apeosport-v c5585
Страница 12: ...12 ...
Страница 31: ...Safety Notes 31 Before Using the Machine 1 ...
Страница 80: ...2 Product Overview 80 Product Overview 2 3 Click OK ...
Страница 124: ...3 Copy 124 Copy 3 Lighten Darken Adjusting the Copy Density 1 Use and to select from seven density levels ...
Страница 188: ...3 Copy 188 Copy 3 ...
Страница 284: ...4 Fax 284 Fax 4 ...
Страница 301: ...Operations during Scanning 301 Scan 5 Original Size Specifying a Scan Size P 365 4 Press the Start button ...
Страница 331: ...E mail 331 Scan 5 Note This item is available for Microsoft Word format ...
Страница 378: ...5 Scan 378 Scan 5 ...
Страница 412: ...8 Stored Programming 412 Stored Programming 8 ...
Страница 436: ...11 Job Status 436 Job Status 11 Print this Job Report Prints the Job Report ...
Страница 478: ...12 Computer Operations 478 Computer Operations 12 ...
Страница 479: ...13 Appendix This chapter contains a glossary of terms used in this guide Glossary 480 ...
Страница 486: ...13 Appendix 486 Appendix 13 ...


