Installation
8.
Ref.1912
· 301 ·
DDS
HARDWARE
If a drive is assigned the 0 identifier, the module will be ignored.
For example, a machine has four drives identified as 1, 2, 3 and 4. To ignore
the second one, another one must be renamed so they are consecutive. The
easiest solution for a situation like this will be 1, 0, 3 and 2.
Interconnection
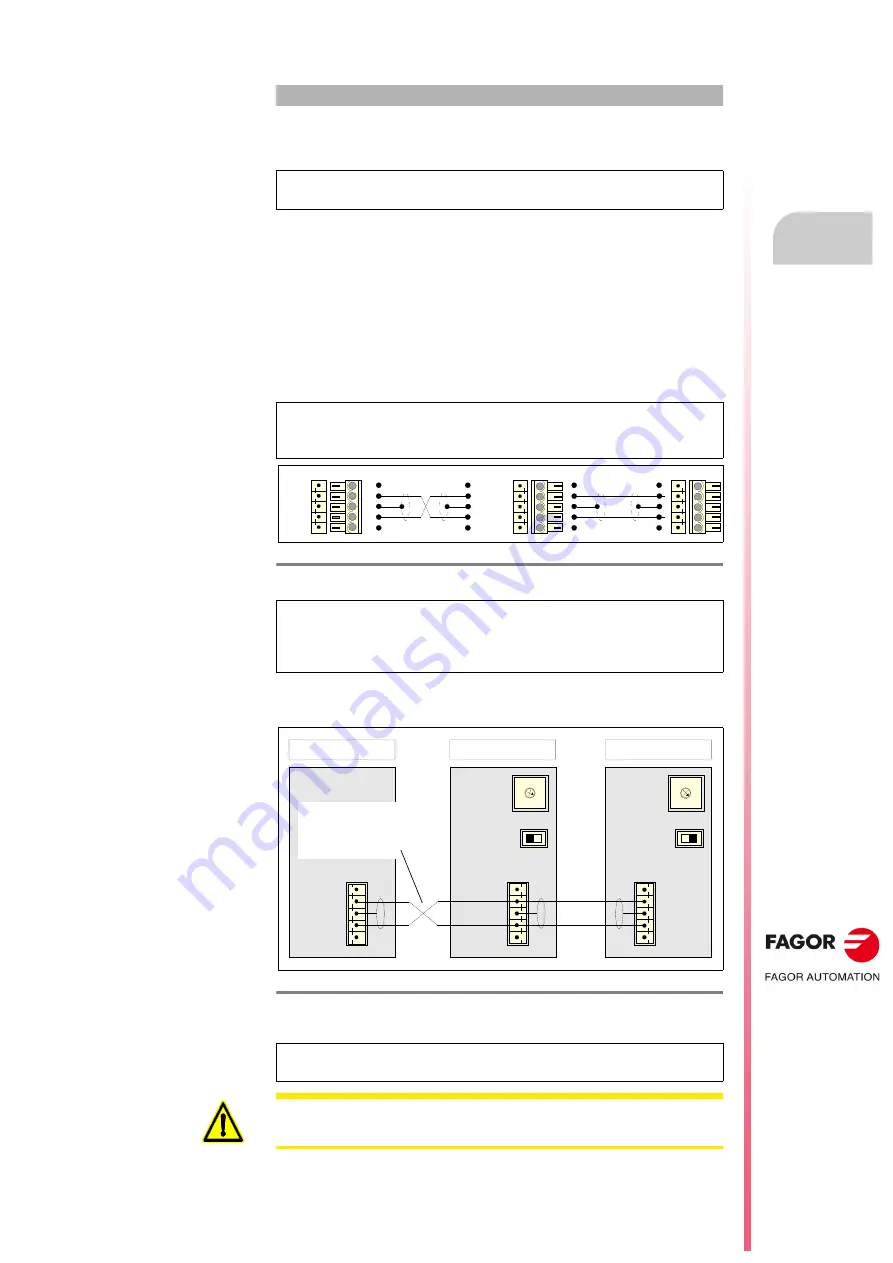
Connect in the CAN field bus all the drives that will be governed by the CNC.
Use the CAN cable to connect the first drive to the adjacent one (this one
will then be the second drive) through their X6 connectors.
Repeat this procedure with the second drive and so on up to the last
drive.
Use a CAN cable to connect the X6 connector of the first drive to the
CAN connector of the CNC model being used.
Making all these connections will conclude the connection process. See
figure.
Example
NOTE.
Remember that
the DRIBUSID parameters of the CNC can also
be modified the same way.
NOTE.
Note that the CAN cable is supplied without connectors. Before
connecting it, put the cable and connectors together as indicated in figure
.
F. H8/38
CAN cable to connect a CNC and two drives.
NOTE.
Note that the connectors of the intermediate modules (when
connecting several drives in the bus) receive two wires, in each pin of the
CAN connector, coming from each adjacent module. The connectors of the
modules at either end only receive one.
F. H8/39
General connection diagram for the CAN bus between the drives and the
master device (CNC, etc.). CAN cable connection.
NOTE.
No more than six drives (axes+spindles) can be connected in the
CAN BUS.
ISO GND
CAN L
SHIELD
CAN H
SHIELD
1
2
3
4
5
5
4
3
2
1
Pin
Pin
SHIELD
CAN H
SHIELD
CAN L
ISO GND
5
4
3
2
1
Pin
Pin
5
4
3
2
1
C DE
F
0
B
A
9
8
1
7
2
6
3
5
4
ADDRESS=1
LINE TERM=0
0 1
SHIELD
CAN H
SHIELD
CAN L
ISO GND
DRIVE MODULE 1
C DE
F
0
B
A
9
8
1
7
2
6
3
5
4
ADDRESS=2
LINE TERM=1
0 1
SHIELD
CAN H
SHIELD
CAN L
ISO GND
DRIVE MODULE 2
ISO GND
CAN L
SHIELD
CAN H
SHIELD
CNC
1
1
1
Pay attention to this
wire crossing when
connecting the cables.
WARNING.
The bending radius of the CAN cable must always be more than
50 mm.
Содержание DDS APS-24
Страница 1: ...DRIVE DDS Hardware manual Ref 1912...
Страница 6: ...6 Ref 1912 DDS HARDWARE 6 I This page intentionally left blank...
Страница 9: ......
Страница 10: ......
Страница 11: ......
Страница 12: ......
Страница 16: ...Ref 1912 DDS HARDWARE 16...
Страница 20: ...Ref 1912 DDS HARDWARE 20...
Страница 179: ...3 Drives Ref 1912 179 DDS HARDWARE...
Страница 180: ...3 Drives Ref 1912 DDS HARDWARE 180...
Страница 200: ...4 AUXILIARY MODULES Auxiliary modules Ref 1912 DDS HARDWARE 200...
Страница 260: ...7 Cables Ref 1912 DDS HARDWARE 260...
Страница 397: ...Sales models 12 Ref 1912 397 DDS HARDWARE 12 9 Order example F H12 21 Order example...
Страница 404: ...13 Compatibility Ref 1912 DDS HARDWARE 404...
Страница 405: ......


