


4 Fitting Instructions
4.1 Before You Begin
Before fitting the FaderMate system to the console, it is strongly advised that you perform
a ‘dry run’. That is, you should find a suitably large area (e.g. a large table) and assemble
the system electrically (except for the audio connections) to ensure that everything works
as expected before modifying the console.
It is extremely important to respect the order of operations described in this section.
WARNING: The FCU system is implemented as a bare circuit board which contains
several devices which may be damaged by Electrostatic Discharge (ESD). Proper
handling precautions must be observed.
If in doubt, please seek the help of an appropriately-qualified technician before
proceeding.
4.2 Setting FCU IDs
The MCU deals with the routing of data between the individual FCUs in a FaderMate
installation and the computer running the DAW with which the system is communicating.
In order to route MIDI data appropriately between a particular FCU and a given MIDI
interface input/output pair, it is necessary that the MCU knows
How many FCUs are connected and;
Where (physically) each FCU resides in the installation
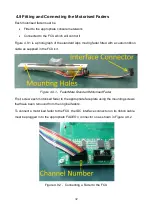
For this reason, each FCU circuit board includes an
ID Selection
switch. Figure 4.2.1
highlights the location of
SW1 (ID Selection Switch).
18
Содержание Master Control Unit
Страница 1: ...Product Fitting Guide v1 0 0 October 2018 2018 FaderMate All rights reserved 1...
Страница 11: ...Figure 3 3 1 FCU Circuit Board Dimensions 11...
Страница 23: ...Figure 4 4 4 Data Connections 23...
Страница 26: ...Figure 4 5 4 Daisychain Power Connections Block Diagram 26...
Страница 36: ...Version History Version Date Author Details 1 0 0 08 October 2018 AJN First release 36...


