QuadroFXO Manual II: Administrator's Guide
Administrator's Menus
QuadroFXO (SW Version 3.0.x)
50
The
Duplicate
functional button is used to create a routing pattern with the settings of an exiting one. This is to avoid configuring a new routing entry
completely by duplicating an existing entry with different settings.
To use the
Duplicate
button only one record may be selected, otherwise an error
will occur: “One row should be selected”. The
Duplicate
button opens the
Local Call Routing Wizard
where all fields except the
Pattern
field are
already filled in.
Pattern
for the new route will be required anyway.
The
Move Up/Move Down
buttons are used to move local routing patterns one level up or down within the
Local Routing
table. The consecution of
the routing patterns is important when making routing calls as the
Local Routing
table is parsed from the top down and routing will take place
according to the first pattern that matches the dialed number. The
Move To
button is used to move the selected entry to some other position in the
Local Routing Table, which will increase or decrease the selected pattern’s priority. Pressing the button will open the page where the row number
should be specified, together with the position the selected entry is to be placed (before or after the defined row).
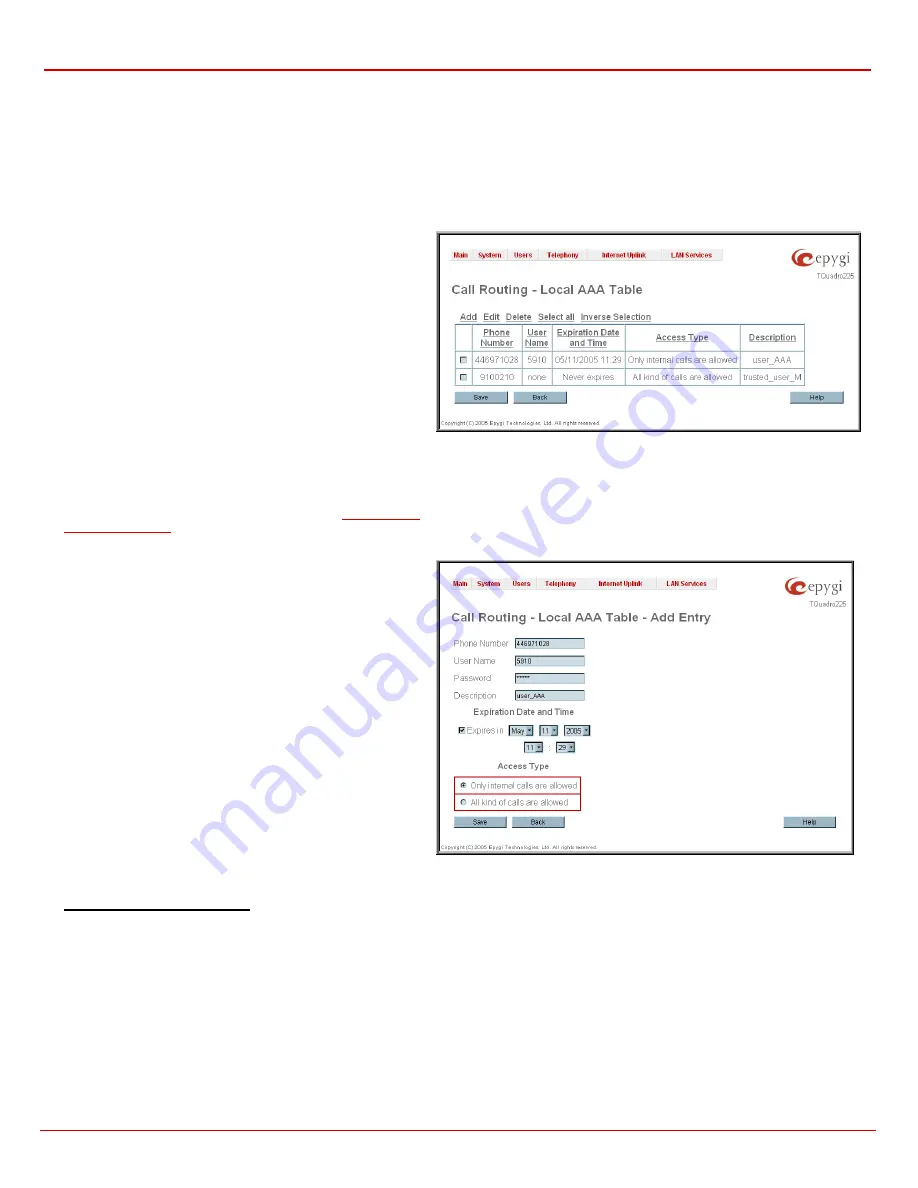
The
Local AAA Table
page allows to manage local authentication
and authorization database. Callers dialing the routes which have
an AAA (Authentication, Authorization, and Accounting) option
enabled, will pass the authorization on
Local AAA Table
by phone
number or username/password, depending on corresponding entry
configuration on this page.
If the detected phone number of the caller dialing a route which
has AAA option enabled, is registered in the
Local AAA Table
,
caller passes authorization automatically. If the caller ID service is
disabled or the caller’s phone number is not registered, the caller is
asked to enter registration user name and password.
The
Add
functional button opens the
Call Routing – Local AAA
Table - Add Entry
page where new local AAA record can be
created.
Fig. II-74: PSTN User Registration page
The
Call Routing – Local AAA Table - Add Entry
page offers the
following input options:
The
Phone Number
text field requires caller’s phone number.
Only numeric and wildcard characters (see chapter
) are allowed for this field. '[' , ']' , ',', '-', ‘{‘, ‘}’
are used to define a range or a quantity of numbers. For example,
2{13-17, ww, a-c} means that the dialed number may be 213, 214,
215, 216, or 217, 2ww, 2a, 2b and 2c to match the specified phone
number; in the case of 2[3,7], the dialed number may be 23 or 27
to match the specified phone number.
The
Username
text field requires the authentication user name.
Only numeric values are allowed for this field, otherwise the
“Incorrect Username - digits allowed only” error message occurs.
The
Password
text field requires the authentication password.
Only numeric values are allowed for this field, otherwise the
“Incorrect Password - digits allowed only” error message occurs.
The
Description
text field required an optional description about
the calling party.
The
Expiration Date
and Time
drop down lists are used to set the
date and time when the registration is to expire.
The
Expires in
checkbox is used to enable the
Expiration Date
and Time
feature.
The
Access Type
radio buttons allow to switch between
permissions for the caller:
•
Only internal calls are allowed
:
Only calls within the same
Quadro are allowed.
•
All kinds of calls are allowed
: PBX, SIP and PSTN routing
calls are allowed.
Fig. II-75: PSTN User Registration - Add Entry page
To make a Local Routing pattern
1.
Click on the
Local Routing Table
link on the
Call Routing
page.
2.
Press
the
Add
button on the
Local Routing
page.
3.
Specify
the
Pattern
in the corresponding field.
4.
Select
the
Number of Discarded Symbols
and
Prefix
if required.
5.
Select
the
Call Type
from the drop down list.
6.
Define
the
Metric
or leave the default.
7.
Enter a
Description
if needed.
8.
Enable the
Filter on Caller / Call Type / Modify Caller ID
checkbox, if the route functionality should be limited depending on inbound caller
information.
9.
Enable
Set Date/Time Period(s)
checkbox, if route
should be functional within certain time/date interval.
10.
Press
Next
.
11.
Select user or attendant extension from
Use Extension Settings
drop down on behalf of which the call will be placed.


