


EPSON Stylus COLOR 860/1160
Revision C
Disassembly and Assembly
Disassembly Procedures
86
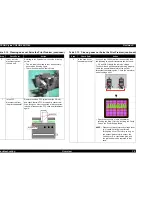
Figure 4-8. Installing the Printhead
C H E C K
P O I N T
n
Make sure that the earth board is installed at the right corner
of the CR unit correctly. There are 2 pins used to determine
the location. Refer to Figure 4-8.
n
When you install the printhead to the carriage, make sure
that the protrusion on the carriage side is placed in the U-
ditch of the printhead. Refer to Figure 4-8.
C A U T I O N
n
Since the ink cartridge once taken out can not be used
again, be sure to install a new ink cartridge when you
return the printer to the user.
n
Before packing the printer for transportation, make sure
new ink cartridges are installed and the carriage is locked
with the CR lock lever securely.
A D J U S T M E N T
R E Q U I R E D
When you replace the printhead unit, perform the following
adjustments. (Refer to Chapter 5 for more details.):
1.
Initial ink charge (Refer to Chapter 5/Section 5.2.3.9.)
2.
Head Voltage ID Input (Refer to Chapter 5/Section 5.2.3.5.)
3.
Head Angular Adjustment (Refer to Chapter 5/Section
5.2.3.6.)
4.
Bi-D Adjustment (Chapter 5 /Section 5.2.3.7.)
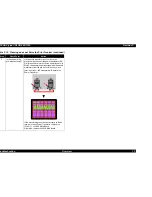
Printhead Surface
Printhead Circuit Board
Carriage Assembly
Printhead
Nozzle Selector is included in the printhead.
Содержание Stylus COLOR 1160
Страница 8: ...C H A P T E R PRODUCTDESCRIPTION ...
Страница 28: ...C H A P T E R OPERATINGPRINCIPLES ...
Страница 53: ...C H A P T E R TROUBLESHOOTING ...
Страница 74: ...C H A P T E R DISASSEMBLYANDASSEMBLY ...
Страница 116: ...C H A P T E R ADJUSTMENT ...
Страница 150: ...C H A P T E R MAINTENANCE ...
Страница 160: ...APPENDIX C H A P T E R ...
Страница 171: ...PSON Stylus COLOR 860 1160 Revision C ppendix Circuit Board Component Layout 171 Figure 7 5 C298PNL Component Layout ...