91
English
Страница 1: ...UltraProf M A N U A L...
Страница 2: ...se on line at www eliet eu ELIET Copyright 2007 ELIET All Rights Reserved The texts images graphics in this ELIET booklet are all subject to Copyright and other intellectual property protection These...
Страница 3: ...e in the boxed areas Stock no MA Serial Number Year of Manufacture 20 2 Warranty 2 1 Warranty card To be eligible to obtain warranty you must mail the completed warranty card within one month of the d...
Страница 4: ...miliar with operating such equipment it is still advisable to read these pages carefully At ELIET all our machines and devices are subjected to a policy of continuous change and there fore the speci c...
Страница 5: ...ng order The spark arrester must be attached to the engine exhaust system in such a manner that ames or heat from the system will not ignite ammable material Failure of the owner operator of the equip...
Страница 6: ...17 7 3 Safety instructions 18 7 3 1 General safety instructions 18 7 3 2 Careful and security conscious use 19 7 3 3 Responsibilities of the Operator 19 7 3 4 Personal Protective Equipment PPE 20 7 3...
Страница 7: ...4 Engine maintenance 50 11 4 1 Checking the oil level in the engine crankcase re lling the engine oil 50 11 4 1 1 Checking the oil level 50 11 4 1 2 Topping up the oil 51 11 4 2 Engine oil change 52 1...
Страница 8: ...ing the parking brake 71 11 6 General lubrication 72 11 6 1 Lubricating the pivot points 72 11 6 2 Greasing via the grease zerks tted 73 11 6 3 Lubricating the bearings 73 11 6 4 Lubricating chains sp...
Страница 9: ...nformation and or ac tions or to denote where you can nd additional information relating to the subject 5 2 Caution Caution This notice identi es safe usage habits This is done to prevent incorrect ac...
Страница 10: ...g of the descriptions provided in this user manual 1 Feed belt 2 Feed roller 3 Safety Screen 4 Rotor 5 Shredding chamber 6 Screen 7 Discharge conveyor 8 Discharge conveyor hydrau lic quick release cou...
Страница 11: ...s 22 hp B S Vanguard 24 hp Honda GX 670 1 air lter 2 oil gauge 3 oil ller plug 4 oil drain plug 5 oil lter 6 spark plugs 7 fuel lter Display 1 Start key 2 Oil level warning light 3 ABM indicator light...
Страница 12: ...achine always remains in optimal condition You can contact him for ELIET original spare parts and lubricants These service parts are manufactured to the same stringent accuracy requirements and standa...
Страница 13: ...refully in its entirety before attempting to operate this machine 2 Always wear the appropriate protective garment when operating the machine protective gloves safety goggles hear ing protectors 3 Per...
Страница 14: ...ve is located and on the chain guard of the feed roller and on the feed belt and discharge conveyor They point out the hazard represented by a chain or belt drive It is strictly forbidden to oper ate...
Страница 15: ...e left safety guard It reminds the opera tor to leave the suction side of the cooling air for the engine unobstructed Art no BQ 505 010 340 This sticker 1 is located on the side of the feeding hopper...
Страница 16: ...on the battery holder It warns the user of the potential hazards of battery acid Order number BQ 505 010 180 This sticker 3 is located on the feeding hopper at the feed opening It reminds the user to...
Страница 17: ...terial Any attempt by the operator to insert his hands beyond this steel sheet is strictly forbidden Sound absorption 4 The acoustic housing accommodating the engine and the shredding chamber gives ex...
Страница 18: ...ual if you have any doubts about an action that you are about to perform Always observe the applicable regulations of the Labour Inspectorate to avoid accidents If the instructions stated in this manu...
Страница 19: ...he machine may have a diameter in excess of 100 mm Never use a step when feeding garden waste into the machine Never work in conditions where light intensity is less than 500 Lux Avoid inhaling the ex...
Страница 20: ...will only be heard to a limited degree ELIET does not recommend using ear defenders that have inbuilt music equipment because of this Shredding may result in dust production If this dust irritates you...
Страница 21: ...anufacturer this model will take branches up to 140 mm diameter This diameter must not be exceeded in the interest of your own personal safety and to ensure a long life cycle of the machine The chippe...
Страница 22: ...the carburettor checked regularly by an approved service centre Having the ignition checked regularly and if required replacing the spark plugs Should the above be ignored the engine may start to fun...
Страница 23: ...ORQUE LOADING 76 NM The machine could be packed with no oil in the engine crankcase and no fuel in the fuel tank If needed top up following the instructions of the engine manual supplied with the mach...
Страница 24: ...nsure a better combustion in the engine Lead free 98 octane Verify that the air lter has not been contaminated too much see 11 4 3 Satisfy yourself that the shredding knives are rmly in place and in g...
Страница 25: ...extremely explosive Fire and explosion caused by petrol can result in serious burns or damage to property Thus always take note of the following points Do not add fuel while engine is running Always a...
Страница 26: ...ine with the material to be shredded Foreign objects are de ned as Any non organic object or branchy material in excess of the stated capacity such as metal stone plastic PVC cords etc Some of these c...
Страница 27: ...blade shaft can rotate freely This is to avoid starter mechanism overloading Ensure the shredder hopper is empty no garden waste no tools etc Verify that the discharge belt conveyor is folded upwards...
Страница 28: ...s dangerous as soon as the motor starts running The engine must therefore be switched off immediately if you encounter a situation where you no longer have control over the work B Stopping the machine...
Страница 29: ...t the discharge belt conveyor is not running The handlebar is provided with a rotational control lever This lever allows you to operate wheel drive If the control lever is turned forwards the machine...
Страница 30: ...ncontrollably starts to gain speed turn the control handle in the opposite direction so that the oil pressure can brake the wheel motors If you wish to move the machine over a small distance without s...
Страница 31: ...at the garden waste does not contain any foreign objects Always insert branches with the thickest part rst Thicker branches or trunks must by preference be shredded with all their twigs side branches...
Страница 32: ...ding hopper contains two synchronously operating feed arrangements a Feed belt This belt will assist in feeding small garden waste The feed belt drives the garden waste in the direction of the feed ro...
Страница 33: ...scharge belt conveyor can be switched off by pressing the black control lever in the farthest position position 4 reverse feed Move the black control handle back to position 2 feed to again activate t...
Страница 34: ...ire length Every time the engine speed picks up again the ABM will again start the feeding and the machine will again process the full load Since we are here dealing with the limit of what the machine...
Страница 35: ...ng wet garden waste for a protracted period of time This can continue to build up and block a section of the sieve screen This will reduce the surface area along which the chippings can exit the shred...
Страница 36: ...9 2 Energize the starting motor Close the throttle valve choke This will supply petrol to the carburettor The engine will start once fuel ows to the carburettor B Lack of oil in the engine The engine...
Страница 37: ...rify that the switch is still correctly attached A switch can become loose or shift due to vibration Check the wiring of the switch for an open of damage Measure the correct operation of the switch us...
Страница 38: ...ermine the cause the problem will probably be of a technical nature This may be related to fault in the engine or a fault in the electric system of the machine Please contact your authorized ELIET dea...
Страница 39: ...aulically these hydraulics determine to a large extent the performance of the shredding We recommend consulting an authorized ELIET dealer should there be any problems with the hydrau lics There are a...
Страница 40: ...uring your regular visit to an authorized ELIET dealer or an engine service centre Request that the following be performed when it is again put in for a service An overhaul of the carburettor A check...
Страница 41: ...1 5 6 Tensioning the chain Re t the discharge belt conveyor in its original position See AP A P1 9 7 5 Rotor stalls The rotor is blocked during shredding due to an unfortunate concurrence of events Th...
Страница 42: ...s Set the black control lever for the feed mechanism to the STOP position position 1 or 3 Turn the control handle for the wheel drive to the required direction and simultaneously push the machine forw...
Страница 43: ...and composed when loading and unloading the shredder so that the machine does not tip 450 kg over and give rise to an accident When walking down a slope move down backwards facing the machine Take car...
Страница 44: ...r and Serial Number of both the machine and the engine and also describe the problem in detail Caution Only use genuine ELIET replacement parts These service parts are manufac tured to the same strict...
Страница 45: ...rom ELIET s HQ so that they can provide you with an impeccable after sales service Warning If the safety guards need to be removed to perform maintenance work put these back correctly once the mainten...
Страница 46: ...tarting up the new machine Within the rst 10 hours after changing a belt WHAT Check the belt tension see 11 5 4 Tension the belt see 11 5 4 11 2 2 Regular maintenance schedule A Daily maintenance Caut...
Страница 47: ...rom the ignition switch Wear suitable clothing Perform maintenance after 50 hours 11 2 2 B Reverse the RESISTTM blades 11 5 3 1 Change the air lter 11 4 5 Replace the oil lter 11 4 3 D Maintenance aft...
Страница 48: ...cleaning the machine will lead to Premature wear of the bearings gaskets and drive belts Increased risk of re Decreased cooling ef ciency of the engine Reduced performance A detrimental effect on the...
Страница 49: ...l containing molybdenum disulphide This spray lubricates and also dissolves rust Once spent lubricant has been wiped away it is important that new lubricant is applied to continue to guarantee the cor...
Страница 50: ...ion intake is free from obstruction 1 Verify that the black air box ts in properly with the engine so that the cooling air is not mixed with hot air 2 Always clean debris from engine cooling ns 3 Veri...
Страница 51: ...at the top of the engine for topping up the oil You can unscrew the ller cap manually Since the location of the lling operation is not easily accessible use a ller hose or a modi ed funnel to avoid sp...
Страница 52: ...r Also change the oil lter with every second oil change Frequency every 100 hours The oil lter is located on the side of the engine near the hydraulic oil tank First drain all the oil see 11 4 3 Hold...
Страница 53: ...Remove the lter element Clean the cartridge by shaking off the coarse dust and blowing off the ne dust using compressed air Always blow from the inside towards the outside Also clean the lter cover a...
Страница 54: ...rs Switch off the engine and remove the ignition key from the ignition switch If a fuel shut off valve is available on the engine close it Warning Always allow the machine to cool down this is to avoi...
Страница 55: ...NGK ZGR5A Switch the engine off and allow it to cool for a while Remove the key from the ignition Disconnect the two spark plug caps from the spark plugs Clean the area around the spark plug and remov...
Страница 56: ...these shredding actions set certain criteria that the blades must meet for an optimal shredding ef ciency A The top of the blade in particular is important with regard to the primary shredding Since...
Страница 57: ...y shredding Always observe the original set up of the blades when reversing or replac ing them See 11 5 3 1 in which the rules are explained 11 5 2 Sharpening the blades Correct and timely sharpening...
Страница 58: ...only grind away a small adjustment of the metal to again obtain a sharp cutting edge This ensures that the times that you grind will be very short and will ensure that you always work with the best po...
Страница 59: ...lades After grinding carefully close the shredding chamber re t the discharge belt conveyor and close the safety guards See APA P1 11 5 3 Reversing and renewing the shredding knives If blades are shar...
Страница 60: ...e B Side with the clearly visible teeth pro le A Reversing the blades of group 1 Rule Ensure that the blades from blade group 1 are always facing with their rear side B towards the side walls of the s...
Страница 61: ...anted blades One blade will point F the front side to the right and the other will point F the front side to the left for the straight blades Perform the following steps to consistently apply this rul...
Страница 62: ...use a self grip wrench It is useful to put a wedge screwdriver in between the blade disks to ensure it is easy to release them First remove any dirt between the blade plates before you insert a new b...
Страница 63: ...nsion The machine is equipped with a long drive belt The belt will show some sagging stretching after a certain number of working hours which means that it will lose tension Insuf cient ten sion on th...
Страница 64: ...ion of 10 mm on the belt 4 Once the correct tension has been achieved align both the pulleys To this effect a bolt M10 is provided By turning this clockwise you can pull the motor bed plate towards yo...
Страница 65: ...of the body then tension is correct Measure the distance from the rear of the guide plate to the support block of the pressure bolt on both sides see drawing Turn the pressure bolts further until thi...
Страница 66: ...hain wheels In addition a high radial tension will have a detrimental effect on the seals and bearings Note Also determine the wear on the chain and chain wheel when checking the chain tension Should...
Страница 67: ...ntre between the two chain wheels towards the working and slack strands and you measure a distance between them of 55 mm the tension has been correctly adjusted Retighten the securing bolts M8 A F 13...
Страница 68: ...the hydraulic oil lter 2 A speci c tool can be used for this authorised ELIET dealer 2 Always place a tray under the lter 2 L because when you unscrew items oil may ow Apply a lm of new oil to the se...
Страница 69: ...the new gas spring using a reverse sequence to that given for removal Always install the piston rod on the arm and the piston body on the frame It is extremely important that you ensure there is a co...
Страница 70: ...peed sensor that is also xed to the pump bed plate For correct speed detection it is essential that the distance when the nearest wing passes past the sensor face is 6 mm Measure this distance accurat...
Страница 71: ...s essential that the parking brake holds the machine in its position for the stability of the load when transporting the machine in a van or a trailer A plate is pressed against the rear tyres when th...
Страница 72: ...pivot points This group includes the following locations on the machine 1 Handlebar pivot point 2 Discharge belt conveyor locking pin and feed roller arm 3 Shielding panels pivot points 4 Oscillating...
Страница 73: ...t of the joints Caution Be very careful when applying new grease into the ball bearings The pressure that builds up may break the seals 11 6 3 Lubricating the bearings This group includes the followin...
Страница 74: ...ds and components as necessary to expose the drive See AP A P5 Wipe away all traces of lubricant in and around the drive Use penetrating oil containing molybdenum disulphide MoS2 to dissolve the lubri...
Страница 75: ...nt areas with damaged paint or cover with grease in order to prevent rust Original ELIET paint RAL 2004 in the same colour is available from your ELIET Dealer Store the machine in a dry place that is...
Страница 76: ...gonomic and safe feeding chute Feeding height 1000 mm Feeding opening H x W 570 mm x 700 mm Anti projection shield Compact Design L x W x H 2080 x 890 x 1410 mm Ecological Exhaust purifyer Reductions...
Страница 77: ...and risks associated with the machine Within this framework the necessary steps have been taken in line with Machinery Directive 2006 42 EC in order to ensure complete operator safety when used correc...
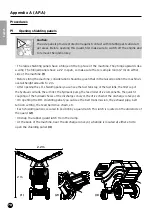
Страница 78: ...erall height amounts to 2 m After opening the L H shielding panel you can see the fuel tank cap of the fuel tank the ller cap of the hydraulic oil tank the air lter the hydraulic pump the feed roller...
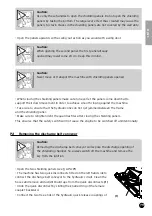
Страница 79: ...ensure that the hydraulic lines do not get jammed between the frame and the shielding panel Make sure to retighten re t the guard lachtes after closing the shielding panels This ensures that the safet...
Страница 80: ...ways be sure to lock the discharge belt conveyor This is to make sure that the discharge belt conveyor is kept pressed against a safety switch In this way the safety switch cannot set off accidentally...
Страница 81: ...ieve apply a small amount of grease to the peg for a true sliding t in the pivot point Caution Ensure the peg is indeed inserted all the way in the hinges up to against the sieve in such a way as to a...
Страница 82: ...tch Rotate the lip of the latch 180 until it engages in the small recess this action will get the pin to retract fully to allow to lower the feed roller Finally gently lower the arm of the feed roller...
Страница 83: ...of the machine Caution Removing the cover shield gives you complete access to the battery Wear suitable protective clothing such as protective gloves safety goggles Always switch off the machine and r...
Страница 84: ...ti purpose grease LR EP2 Bolt head acc DIN 931 912 ed Thread Strength 8 8 10 9 Normal threadtype M4 3 0 4 4 M5 5 9 8 7 M6 10 15 M8 25 36 M10 49 72 M12 85 125 M14 135 200 M16 210 310 M18 300 430 M20 42...
Страница 85: ...igns of leakage x Check the machine for signs of abnormal wear or fractures x Check the bolts for correct tightness Blades wheels bearings engine etc x Inspect the blades and if necessary sharpen them...
Страница 86: ...exhaust pipe or by faulty engine cleaning Fire hazard due to spilling petrol Intoxication by inhaling exhaust gases Irritation of the airways or lung problems due to inhaling the dust produced Jamming...
Страница 87: ...e instructions for mounting meters with double sided tape 4 Attach the sensor tamper proof lock NOTE These installation steps may have already been performed by your original equipment manufacturer ME...
Страница 88: ...mode the meter is in Usage or Tachometer After maintenance is completed reset the ashing icons by PRESSING and HOLDING the Mode Button until the icon clears takes approximately four 4 seconds FIRST A...
Страница 89: ...urs for rental use after twelve months or 100 running hours in semi professional or in professional use Customers who wish to bene t from this warranty must register their purchase with ELIET To do so...
Страница 90: ...shall send the ordered parts to the dealer under normal delivery and payment conditions Step 7 ELIET Technical Service Department shall examine the faulty component before accept ing or rejecting any...
Страница 91: ...91 English...
Страница 92: ......