background image

2. HOW TO CALIBRATE THE MONITOR

21

5


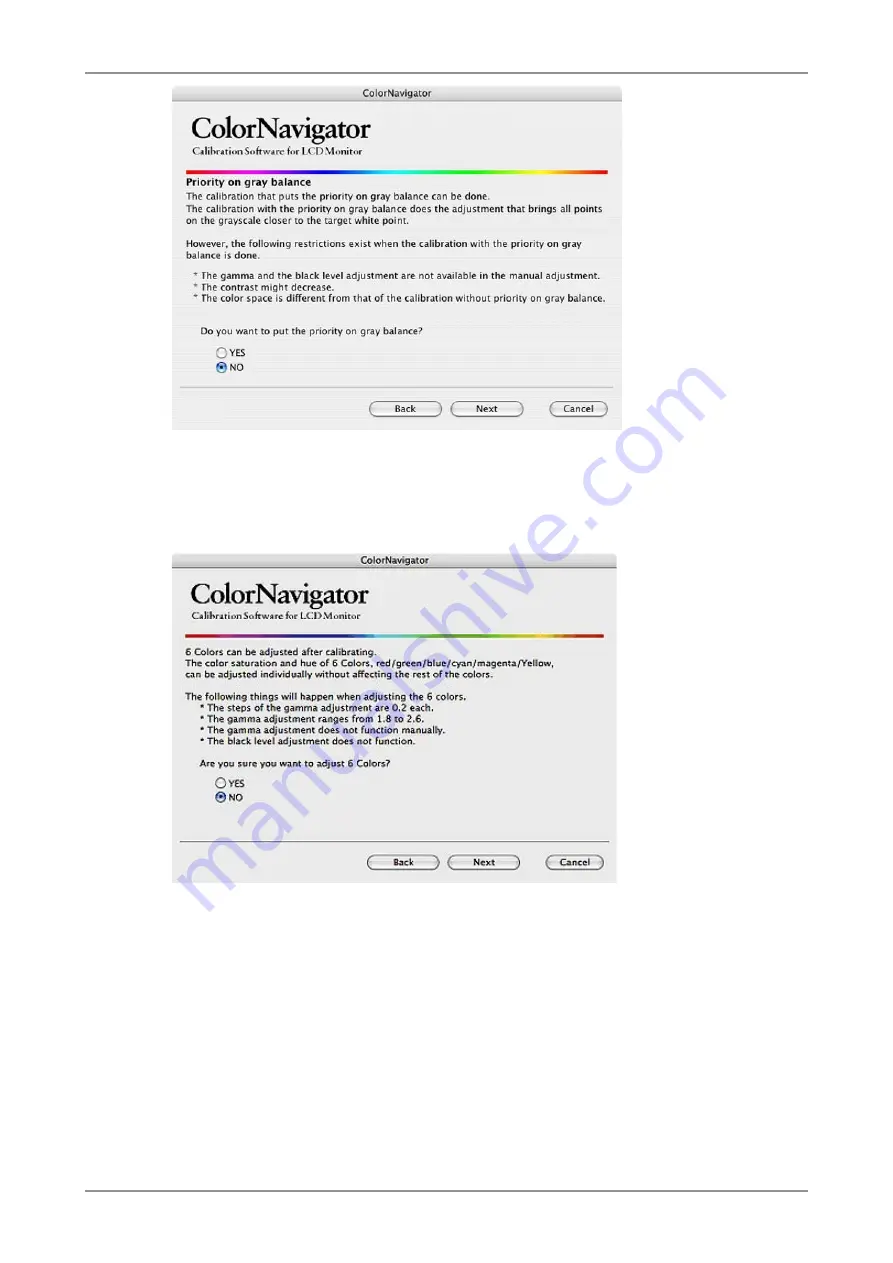
If the monitor is CG18, CG19 or CG21, the following window will appear

If adjusting the 6 Colors after calibrating, click the radio button "Yes" in "Are you sure you want 
to adjust 6 Colors?".

6


Proceed the "Auto Adjust" button (analog input only) 

Follow the software instructions and click the monitor auto adjust function.

Содержание ColorNavigator

Страница 1: ...t result 34 4 1 Flow Diagram 34 4 2 Switching the adjustment result 35 4 3 Editing the Adjustment Result 37 5 Measurement a monitor 38 5 1 Flow Diagram 38 5 2 Measurement procedure 39 5 3 Deleting a m...

Страница 2: ...2006 EIZO NANAO CORPORATION All rights reserved Windows is a registered trademark of Microsoft Corporation Apple Macintosh iMac iBook MacOS and ColorSync are registered trademarks of Apple Computer In...

Страница 3: ...h based on the measurement result 6 Color adjustment function 1 Manual adjustment function white balance brightness black level gamma 1 Measures ambient light 1 Measures paper white 1 Emulation of Mon...

Страница 4: ...construction four choices in accordance with the aim is as follows Choose one of the four options on the starup screen to adjust the monitor settings A B C D Default is supposed to be in a simple mode...

Страница 5: ...EIZO USB Cable MD C93 Measurement Device EIZO ColorEdge CX1 GretagMacbeth eye one system ColorVision Spyder2 1 MonacoOPTIXXR DTP94 X RiteOPTIXXR2 DTP94B 1 1 Supporting Mac OS X only NOTE You cannot us...

Страница 6: ...nstall ColorNavigator on the start menu The ColorNavigator installer starts up Follow the instructions to complete the installation NOTE The ColorNavigator software overwrites its package if the softw...

Страница 7: ...ls refer to the user s manual of the measurement device If the measurement device is connected after starting up ColorNavigator it cannot be detected Be sure to connect the measurement device before s...

Страница 8: ...Measurement Device EIZO ColorEdge CX1 GretagMacbeth eye one system ColorVision Spyder2 1 MonacoOPTIXXR DTP94 X RiteOPTIXXR2 DTP94B 1 Unsupporting Windows XP 64 bit Edition NOTE USB Hub may be required...

Страница 9: ...r installer starts up Follow the instructions to complete the installation NOTE Double click the Setup exe icon if the menu does not open automatically The ColorNavigator software overwrites its packa...

Страница 10: ...Measurement Device 1 Connect the USB upstream of monitor and the USB downstream port of computer with the EIZO USB Cable MD C93 MD C93 2 Connect the measurement device to downstream port of computer...

Страница 11: ...tors in a multiple monitor environment refer to 7 USING COLORNAVIGATOR WITH MULTIPLE MONITOR ENVIRONMENT 2 1 Calibration Procedure Simple mode Calibration by selecting the target from list Flow Diagra...

Страница 12: ...ghtness and color conditions to re stabilize 2 Set the display resolution and colors Set the monitor color at Thousands 16bit or more million 24 bit or more recommended 1024 x 768 or higher is recomme...

Страница 13: ...g is not shown if the measurement device is detected correctly 3 Select a function Select Calibrate brightness white point and gamma of the monitor then generate its pro le NOTE Be sure to disable Set...

Страница 14: ...measurement device Initialize the measurement device according to the instructions Initialization takes a few seconds NOTE Be sure that light does not seep through to the sensor of the measurement dev...

Страница 15: ...n mode The calibration result is only registered in CAL mode The result is not registered in other modes The gure displayed in this window depends on the type of measurement device connected to the co...

Страница 16: ...h to the sensor of the measurement device during initialization Be sure to attach the measurement device to the monitor closely 9 Generate a pro le Click Save to generate a pro le When the pro le has...

Страница 17: ...alibration mode The calibration result is only registered in CAL mode The result is not registered in other modes Use CAL mode for the monitor Once the monitor is calibrated by ColorNavigator avoid ad...

Страница 18: ...NOTE The suitable modes for the display image are available on the monitor ne contrast mode When performing the calibration with ColorNavigator the monitor automatically switches to the CAL mode i e...

Страница 19: ...t be in the power save mode Quit the other applications before starting up the ColorNavigator Disable the screen saver so it will not be activated during adjustment and measurement NOTE To obtain prec...

Страница 20: ...n the grayscale closer to the target white point Select priority gray balance to correct RGB color balance of the grayscale in the middle tone However the following restrictions exist when the calibra...

Страница 21: ...he following window will appear If adjusting the 6 Colors after calibrating click the radio button Yes in Are you sure you want to adjust 6 Colors 6 Proceed the Auto Adjust button analog input only Fo...

Страница 22: ...o changed by measuring paper white Set the gamma About L the selectable gamma value refer to About ColorNavigator NOTE If setting the target white by color coordinates assign the target between 0 24 a...

Страница 23: ...s detected during the initialization process When ColorVision Spyder2 connected to the computer this window will be skipped 9 Proceed calibration The measurement window appears on the screen Tilt the...

Страница 24: ...ars are displayed on the right bottom corner while adjustment is in progress Message display area Instructions or any software messages will be displayed while the adjustment is in progress Progress c...

Страница 25: ...to the monitor closely Tips Manual Adjustment It is possible to adjust the result manually Click Manual Adjustment to adjust the monitor manually Refer to 6 2 Manual Adjustment for details 11 Generat...

Страница 26: ...our OS after the pro le is saved or the calibration result will be lost 2 3 Periodic Readjustment Periodic Readjustment The monitor brightness and color gradually alter To compensate for changes calib...

Страница 27: ...can be set between 50 and 1 000 hours The setup varies depending on the time The timer can be set between 50 and 1 000 hours The setup varies depending on the time Time Setup 50 100 hrs every 10 hr 1...

Страница 28: ...nitor 3 How to emulate the monitor Tips This function is only available on CG220 and CG221 3 1 Flow Diagram The software ow if choosing Emulate the monitor adjustment and generate a pro le on the star...

Страница 29: ...mputer must be suf ciently warmed up Once the monitor goes in the power save mode it takes a while for the brightness and color conditions to re stabilize 2 Set the display resolution and colors Set t...

Страница 30: ...e point can be set with numerical input Set the monitor color reproduction Set the monitor gamma About L the selectable gamma value refer to About ColorNavigator Set the monitor brightness while displ...

Страница 31: ...ed emulation The measurement window appears on the screen Proceed with emulation in accordance with the instruction ColorNavigator sequentially shows some patterns for emulating the monitor Emulation...

Страница 32: ...y image are available on the monitor ne contrast mode When performing the emulation with ColorNavigator the monitor automatically switches to the EMU mode i e Emulation mode The emulation result is on...

Страница 33: ...rNavigator icon on the title bar and select Preferences Timer tab to open the timer setup window Show Warning check box Enable the check box to activate timer The timer can be set between 50 and 1 000...

Страница 34: ...the adjustment result 4 1 Flow Diagram The software ow if choosing Adjust the monitor with the past adjustment result on the startup window is shown below NOTE To proceed this function calibrate or e...

Страница 35: ...ed folder ColorNavigator Windows Double click the Shortcut to ColorNavigator icon on the desktop Quit other applications before starting up the ColorNavigator Disable the screen saver so it will not...

Страница 36: ...justment result 5 Con gure the monitor Click Apply to change the monitor color settings based on the selected adjustment result A message will appear if the con guration is completed Tips This functio...

Страница 37: ...up the Preferences Tips ColorNavigator can store up to twenty 20 calibration and twenty 20 emulation records If the storage area of ColorNavigator is full and calibrates or emulates the monitor more...

Страница 38: ...38 5 Measurement a monitor 5 Measurement a monitor 5 1 Flow Diagram The software ow if choosing Measure the monitor on the startup window is shown below...

Страница 39: ...To obtain precise emulation results the monitor and computer must be suf ciently warmed up Once the monitor goes in the power save mode it takes a while for the brightness and color conditions to re s...

Страница 40: ...en starting up ColorNavigator the startup window will appear Select Adjust the monitor with the past adjustment record 4 The measurement record list window will appear Up to twenty 20 measurement resu...

Страница 41: ...yder2 connected to the computer this window will be skipped 6 Proceed monitor measurement The measurement window appears on the screen Proceed with measurement in accordance with the instruction Color...

Страница 42: ...f the storage area of ColorNavigator is full To delete unnecessary measurement result manually refer to the instructions as below Procedure 1 Select a measurement record to delete Select unnecessary m...

Страница 43: ...ightness Procedure for Measuring Ambient Light NOTE The following measurement device enables ambient light measurement Eye One Pro Eye One Display2 Eye One Display LT 1 1 Supporting Mac OS X 10 3 9 or...

Страница 44: ...ttaching refer to the user s manual of the measurement device 4 Measure the ambient light Hold the measurement device as below with keeping ambient light head side towards outside Move it under the am...

Страница 45: ...1 Click Measure the target on the con guration window 2 Select EPSON Photo paper on the mode selection window 3 Initialize the measurement device The initialization window of the measurement device w...

Страница 46: ...s below with keeping the sensor towards the paper Move it approximately 25 cm away from the paper and maintain it parallel to the paper and click Measure The use of the photo stands is recommended so...

Страница 47: ...erence in the color between images and print less noticeable and does not correct the colors The color management settings of each device may not be appropriate when the color of the monitor image is...

Страница 48: ...a value refer to About ColorNavigator Change the hue and saturation of 6 colors Adjust the hue of red green blue cyan magenta and yellow As the slide bar moves to the left the saturation goes low As t...

Страница 49: ...8 CG19 or CG21 white point and brightness may be available in manual adjustment 2 Measure the monitor After adjusting manually click OK of the manual adjustment palette The manual adjustment palette w...

Страница 50: ...ter Select a monitor to run the software while starting up ColorNavigator NOTE The functions such as calibration and generating a pro le are only available on the ColorEdge CG series monitors Startup...

Страница 51: ...on the startup window The process for each function is the same as a single monitor environment NOTE Some selected monitors to activate ColorNavigator may limit the functions on the startup window 3...

Страница 52: ...e measurement device is placed on the base plate or not Measurement Error Adjustment Error File Error Select another white balance or retry Proceed Check the color coordinates that arebetween 0 24 and...

Страница 53: ......

Отзывы: