ECOWATER
S Y S T E
M S
Service Information
30
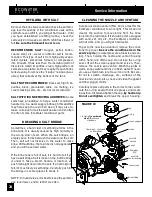
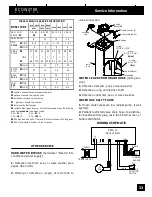
3 -- Valve Bypass
OUTLET
VALVE
INLET
VALVE
BYPASS
VALVE
water
flow
to conditioner
from conditioner
D
for
SERVICE:
-- Open
the
inlet
and
outlet valves.
-- Close
the
bypass valve.
D
for
BYPASS:
-- Close
the
inlet
and
outlet valves.
-- Open
the
bypass valve.
EcoWater Bypass Valves
CAUTION: ALWAYS relieve water pressure in the
EcoWater conditioner
,
as follows, before removing
parts from the valve or resin tank.
DE--
PRESSURIZE
1.
Put bypass valve(s) in bypass position.
2.
Do Manual Advance step1, page 28, (fill water to brine tank will
depressurize the resin tank).
PRESSURIZE
1.
Put bypass valve(s) in service position.
2.
Do Manual Advance steps 2--5, page 28, to return unit to service.
ALTERNATE METHOD
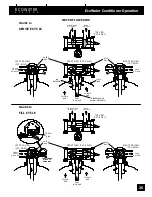
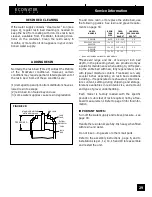
3--VALVE BYPASS
ECOWATER BYPASS VALVE
DE--
PRESSURIZE
1.
Close the INLET valve.
2.
Open HOT and COLD conditioned water
house faucets.
3.
Close the OUTLET valve and open the
BYPASS valve.
4.
Close all house faucets.
PRESSURIZE
1.
Open HOT and COLD house faucets.
2.
Close the BYPASS valve and open the
OUTLET valve.
3. Slowly,
open the INLET valve.
4.
Close all house faucets
DE--
PRESSURIZE
1.
Close the house main water supply valve.
2.
Open HOT and COLD
conditioned
water
faucets.
3.
Push or rotate the bypass valve handle to
bypass position.
Note: For hard water bypass to house fau-
cets, reopen the main water supply valve.
PRESSURIZE
1.
Open HOT and COLD house faucets
(main water supply valve open).
2.
Pull or rotate the bypass valve handle to
service position.
3.
Close all house faucets.
BYPASS
SERVICE
PUSH
IN
for
bypass
PULL
OUT
for
service
ECOWATER CONDITIONER OPERATION, ELECTRONIC CHECKOUT
ALWAYS MAKE THE INITIAL CHECKS FIRST
INITIAL CHECKS:
1.
Does the time display show the correct time of
day?
..
.If display is blank,
check power source to the Eco-
Water conditioner.
...
If time is incorrect,
power was off for over 2 days.
The conditioner resumes normal operation, when
power returns, but regenerations occur at the wrong
time.
...
If an error code shows
in the display (example: Er-
ror 3), go to AUTOMATIC ELECTRONIC DIAGNOS-
TICS, following.
2.
Are plumbing bypass valve(s) in
service
position
(all the way open or closed, as applies).
3.
Are the inlet and outlet pipes connected to the
EcoWater conditioner inlet and outlet respectively.
4.
Is the transformer plugged into a ‘‘live’’, grounded
wall outlet, and the power cable fastened securely?
5.
The valve drain hose must be free of kinks and
sharp bends, and not elevated over 8’above the
floor.
6.
Is there salt in the brine tank?
7.
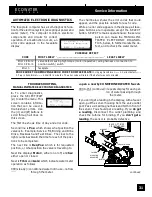
Is the brine tubing connected? See FIG. 9, page
10.
8.
Press SELECT/EXIT (
¿
) to enter Primary Menu.
Move the cursor so that it is next to Set Hardness.
Press the SELECT/EXIT (
¿
) button once to display
the hardness setting. Be sure it is the correct setting
for the household’s water supply. ---- Make a hard-
ness test of the raw water and compare with the
hardness setting. Also test a conditioned water sam-
ple to verify if a problem exists. ----Press SELECT/
EXIT (
¿
) button to exit to Normal View Screens.
If you do not find a problem after making the initial
checks, do MANUAL INITIATED ELECTRONIC
DIAGNOSTICS, and the MANUAL ADVANCE RE-
GENERATION CHECK, pages 31 and 32.
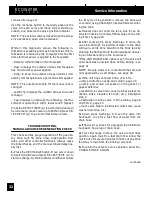
E.A.S.E.:
EcoWater digital demand timers have the latest diagnostic technology. With E.A.S.E., or Electronic Au-
tomated Service Evaluation, a service person or homeowner can transmit operational data through the telephone,
to a personal computer (PC). The PC processes the data to determine if all electrical functions are working normally,
or helps to identify a problem should one occur. Ask your participating EcoWater dealer for more information on
this feature.

