13
Unit installation
SPLIT RACK AIR CONDITIONER USER MANUAL
UM.ICUBE2.0-SRAC.SG.0822 August 2022 www.eaton.com
Serial number
Specifications
Remarks
Refrigerant
R410A
The oversea type is not has the
refrigerant in the unit. It must been charged in the field.
Frozen oil
FV50S
The additional is required when
connecting copper tubes more than 10m or adding
cryogenic components
Oil storage bend
Please refer to “2.6 Pipeline connection”
When the outdoor unit is higher than
the outdoor unit by more than 6, the oil bend should be
installed every 6-7.5 m.
2.6.3 Outdoor unit installation
•
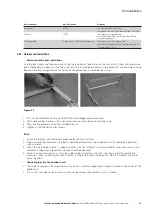
External unit bracket installation
Use the level meter and tape measure to find the position of fixed holes on the wall, and fix them with expansion
bolts. Noticeably the bolts must not be used less. The installation bracket must be horizontal, and the hole spacing
between the left and right brackets and the air conditioner base should be the same.
Figure 2.7
1. First fix the left bracket with one M10X100 or more bigger expansion screw.
2. After determining the level with a horizontal ruler, put other bolts on the other side.
3. Then put the outdoor unit on the installed bracket.
4. Tighten all the M8X30 anchor screws.
ote:
N
1. Install the bracket with crossbeam produced by the manufacturer.
2. When assembling the bracket, the bolts should be pierced from top to bottom, and all should be tightened
with a wrench.
3. When the installation surface is wood and other with not sufficient structural strength, measures such as rein-
forcement, support and reduction vibration should be adopted.
4. Avoid rainy and snowy days as far as possible during installation, and wear seat belts and other protective
measures when installing more than 2 meters in height to ensure the personal safety of installers and avoid
harm to others.
•
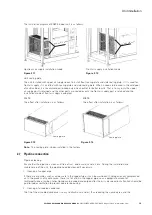
Connect pipes for the outdoor units
1. The wrench unscrews the large and small valve nuts, and the copper pipe trumpet is aimed at the center of the
globe valve.
2. First screw the tube nut by hand until it cannot be turned, then tighten it with a wrench.


