background image

Eaton 93PM-L 20–200kW (208V) UPS Installation and Operation Manual 164000724—Rev 01

13

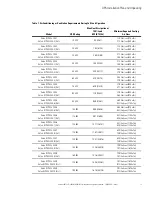
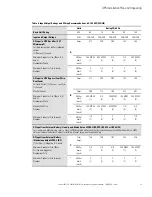
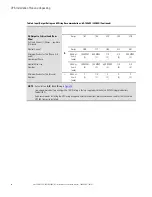
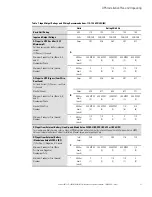
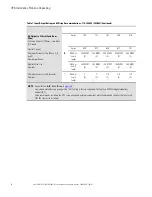
Table 1. Air Conditioning or Ventilation Requirements During Full Load Operation

Model

UPS Rating

Max Heat Dissipation at

100% Load

KW (BTU/Hr)

Minimum Required Cooling

Air Flow

Eaton 93PM-L 200-1

Eaton 93PM-L 200-2 (N+1)

10 kW

.90 (3063)

130 liter/sec (275 cfm)
212 liter/sec (450 cfm)

Eaton 93PM-L 200-1

Eaton 93PM-L 200-2 (N+1)

20 kW

1.80 (6125)

130 liter/sec (275 cfm)
212 liter/sec (450 cfm)

Eaton 93PM-L 200-2

Eaton 93PM-L 200-3 (N+1)

30 kW

2.69 (9188)

212 liter/sec (450 cfm)
295 liter/sec (625 cfm)

Eaton 93PM-L 200-2

Eaton 93PM-L 200-3 (N+1)

40 kW

3.59 (12250)

212 liter/sec (450 cfm)
295 liter/sec (625 cfm)

Eaton 93PM-L 200-3

Eaton 93PM-L 200-4 (N+1)

50 kW

4.49 (15313)

295 liter/sec (625 cfm)
378 liter/sec (800 cfm)

Eaton 93PM-L 200-3

Eaton 93PM-L 200-4 (N+1)

60 kW

5.39 (18375)

295 liter/sec (625 cfm)
378 liter/sec (800 cfm)

Eaton 93PM-L 200-4

Eaton 93PM-L 200-5 (N+1)

70 kW

6.28 (21438)

378 liter/sec (800 cfm)
471 liter/sec (975 cfm)

Eaton 93PM-L 200-4

Eaton 93PM-L 200-5 (N+1)

80 kW

7.18 (24500)

378 liter/sec (800 cfm)
460 liter/sec (975 cfm)

Eaton 93PM-L 200-5

Eaton 93PM-L 200-6 (N+1)

90 kW

8.08 (27563)

460 liter/sec (975 cfm)

543 liter/sec (1150 cfm)

Eaton 93PM-L 200-5

Eaton 93PM-L 200-6 (N+1)

100 kW

8.98 (30626)

460 liter/sec (975 cfm)

543 liter/sec (1150 cfm)

Eaton 93PM-L 200-6

Eaton 93PM-L 200-7 (N+1)

110 kW

9.87 (33688)

543 liter/sec (1150 cfm)
625 liter/sec (1325 cfm)

Eaton 93PM-L 200-6

Eaton 93PM-L 200-7 (N+1)

120 kW

10.77 (36751)

543 liter/sec (1150 cfm)
625 liter/sec (1325 cfm)

Eaton 93PM-L 200-7

Eaton 93PM-L 200-8 (N+1)

130 kW

11.67 (39813)

625 liter/sec (1325 cfm)
708 liter/sec (1500 cfm)

Eaton 93PM-L 200-7

Eaton 93PM-L 200-8 (N+1)

140 kW

12.57 (42876)

625 liter/sec (1325 cfm)
708 liter/sec (1500 cfm)

Eaton 93PM-L 200-8

Eaton 93PM-L 200-9 (N+1)

150 kW

13.46 (45938)

708 liter/sec (1500 cfm)
791 liter/sec (1675 cfm)

Eaton 93PM-L 200-8

Eaton 93PM-L 200-9 (N+1)

160 kW

14.36 (49001)

708 liter/sec (1500 cfm)
791 liter/sec (1675 cfm)

Eaton 93PM-L 200-9

Eaton 93PM-L 200-10 (N+1)

170 kW

15.26 (52063)

791 liter/sec (1675 cfm)
873 liter/sec (1850 cfm)

Eaton 93PM-L 200-9

Eaton 93PM-L 200-10 (N+1)

180 kW

16.16 (55126)

791 liter/sec (1675 cfm)
873 liter/sec (1850 cfm)

UPS Installation Plan and Unpacking

Содержание 93PM-L IAC-B

Страница 1: ...p n 164000724 Revision 01 20 200 kW 208V UPS Installation and Operation Manual Eaton 93PM L UPS ...

Страница 2: ...press written approval of Eaton IMPORTANT SAFETY INSTRUCTIONS SAVE THESE INSTRUCTIONS This manual contains important instructions that you should follow during installation and maintenance of the UPS and batteries Please read all instructions before operating the equipment and save this manual for future reference CONSIGNES DE SÉCURITÉ IMPORTANTES CONSERVER CES INSTRUCTIONS Ce manuel comporte des ...

Страница 3: ...is Manual 6 1 7 Symbols Controls and Indicators 6 1 8 For More Information 7 1 9 Getting Help 7 1 10 Equipment Registration 8 2 2 S Sa af fe et ty y W Wa ar rn niin ng gs s 9 9 3 3 U UP PS S I In ns st ta alllla at tiio on n P Plla an n a an nd d U Un np pa ac ck kiin ng g 1 11 1 3 1 Creating an Installation Plan 11 3 2 Preparing the Site 11 3 2 1 Environmental and Installation Considerations 11 3...

Страница 4: ...gurations 109 6 6 U UP PS S O Op pe er ra at tiin ng g I In ns st tr ru uc ct tiio on ns s 1 11 11 1 6 1 UPS Controls and Indicators 111 6 2 Using the Control Panel 113 6 2 1 Status Indicators 113 6 2 2 System Events 114 6 2 3 Using the LCD Touch Screen 114 6 2 4 Using the Menu 115 6 2 5 Mimic Screen 116 6 2 6 Display Menu Operation 116 6 2 7 Sign In 123 6 2 8 System Controls 124 6 3 Single UPS Op...

Страница 5: ... 4 2 Installing PredictPulse 137 8 8 U UP PS S M Ma aiin nt te en na an nc ce e 1 13 39 9 8 1 Important Safety Instructions 139 8 2 Performing Preventive Maintenance 140 8 2 1 DAILY Maintenance 140 8 2 2 MONTHLY Maintenance 140 8 2 3 ANNUAL Maintenance 142 8 2 4 BATTERY Maintenance 142 8 3 Installing Batteries 142 8 4 Recycling the Used Battery or UPS 142 8 5 Maintenance Training 143 9 9 P Pr ro o...

Страница 6: ...vi Eaton 93PM L 20 200kW 208V UPS Installation and Operation Manual 164000724 Rev 01 Table of Contents ...

Страница 7: ...ved 73 Figure 16 UPS Top and Back Strap Install Locations 74 Figure 17 UPS Base Strap Install Location 75 Figure 18 UPS Deadfront Top Brace Install Location 75 Figure 19 UPS Conduit and Wire Entry Locations 78 Figure 20 UPS Inter Cabinet Wiring Access Location 79 Figure 21 Component Locations 80 Figure 22 Power Terminal Detail 81 Figure 23 Interface Terminal Locations 84 Figure 24 Interface Termin...

Страница 8: ...ngs User Screen 120 Figure 49 Typical Information Screen 120 Figure 50 Typical About Screen 121 Figure 51 Typical Settings Configuration 1 Screen 121 Figure 52 Typical Settings Configuration 2 Screen 122 Figure 53 Typical Statistics Screen 122 Figure 54 Sign In Password Screen 123 Figure 55 Sign In Keypad 124 Figure 56 Typical System Control Screen 125 Figure 57 Typical UPS Control Screen 126 Figu...

Страница 9: ... 14 Input Output Ratings and Wiring Recommendations 60 100 kW Single Input Bypass 220 208 41 Table 15 Input Output Ratings and Wiring Recommendations 110 150 kW Single Input Bypass 220 208 43 Table 16 Input Output Ratings and Wiring Recommendations 160 200 kW Single Input Bypass 220 208 45 Table 17 UPS External Power Cable Terminations 46 Table 18 Supplied External Wiring Terminal Hardware Kit 47 ...

Страница 10: ...x Eaton 93PM L 20 200kW 208V UPS Installation and Operation Manual 164000724 Rev 01 List of Tables ...

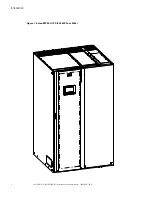
Страница 11: ...y the load instead of transferring to bypass The UPS is housed in a single free standing cabinet with safety shields behind the door for hazardous voltage protection Power wiring is installed through the bottom or the top of the cabinet Figure 1 shows the Eaton 93PM L 200 kW Four Wire UPS NOTE Startup and operational checks must be performed by an authorized Eaton Customer Service Engineer or the ...

Страница 12: ...2 Eaton 93PM L 20 200kW 208V UPS Installation and Operation Manual 164000724 Rev 01 Figure 1 Eaton 93PM L UPS 200 kW Four Wire Introduction ...

Страница 13: ...ter reliability the Eaton 93PM L UPS can be configured for internal redundancy When configured the UPS automatically becomes redundant if the load is at or below the capacity of the UPMs minus the capacity of one UPM Under normal conditions the UPMs in the UPS share the load equally If one or more UPMs becomes unavailable and the load is at or below the capacity of remaining UPMs the remaining UPM...

Страница 14: ...er to critical systems The IAC B is installed in a line and match configuration The IAC B may be installed on either the right or left side of the UPS cabinet 1 1 2 2 3 3 I In nt te eg gr ra at te ed d A Ac cc ce es ss so or ry y C Ca ab biin ne et t P Po ow we er r D Diis st tr riib bu ut tiio on n The Integrated Accessory Cabinet Power Distribution IAC PD provides power distribution options for ...

Страница 15: ...d acid batteries An external battery disconnect switch or tie point must be used when battery systems are located separate from the UPS cabinet and wiring exceeds the number of battery terminals available A supplemental 48 Vdc shunt trip signal for the battery disconnect device is provided by the UPS but is not required for normal operation 1 1 4 4 B Ba as siic c S Sy ys st te em m C Co on nf fiig...

Страница 16: ...nual for additional information such as important operating and maintenance instructions This symbol indicates that you should not discard the UPS or the UPS batteries in the trash This product contains sealed lead acid batteries and must be disposed of properly For more information contact your local recycling reuse or hazardous waste center This symbol indicates that you should not discard waste...

Страница 17: ...ion 208V 4 Wire IAC PD 480V 3 Wire IAC PD 480V 4 Wire IAC PD Installation and Operation Manual for the following additional information Installation instructions including site preparation planning for installation wiring and safety information and detailed illustrations of cabinets with dimensional and connection point drawings Operation including breakers standard features and optional accessori...

Страница 18: ...ion and Operation Manual 164000724 Rev 01 1 1 1 10 0 E Eq qu uiip pm me en nt t R Re eg giis st tr ra at tiio on n Please visit www eaton com pq register to register your new Eaton UPS Eaton UPS Accessory Model Number Serial Number Introduction ...

Страница 19: ...mbient temperature must not exceed 40 C 104 F Do not operate near water or excessive humidity 95 maximum The system is not intended for outdoor use As a result of the connected loads high leakage current is possible Connection to earth ground is required for safety and proper product operation Do not check UPS operation by any action that includes removal of the earth ground connection with loads ...

Страница 20: ...install or operate the UPS system close to gas or electric heat sources Lead acid batteries can present a risk of fire because they generate hydrogen gas Do not smoke when near batteries Do not cause flame or spark in battery area Discharge static electricity from body before touching batteries by first touching a grounded metal surface The operating environment should be maintained within the par...

Страница 21: ...reate a logical plan for installing the system 3 3 2 2 P Pr re ep pa ar riin ng g t th he e S Siit te e For the UPS system to operate at peak efficiency the installation site should meet the environmental parameters outlined in this manual The operating environment must meet the weight clearance and environmental requirements specified 3 3 2 2 1 1 E En nv viir ro on nm me en nt ta all a an nd d I ...

Страница 22: ...ncerns for any servers that are exposed to them Failure to follow guidelines may void your warranty The basic environmental requirements for operation of the UPS are Ambient Temperature Range 5 40 C 41 104 F Recommended Operating Range 5 40 C 41 104 F Maximum Relative Humidity 5 95 noncondensing CAUTION If battery systems are located in the same room as the UPS the battery manufacturer s environme...

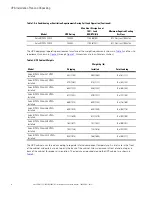
Страница 23: ...00 4 Eaton 93PM L 200 5 N 1 80 kW 7 18 24500 378 liter sec 800 cfm 460 liter sec 975 cfm Eaton 93PM L 200 5 Eaton 93PM L 200 6 N 1 90 kW 8 08 27563 460 liter sec 975 cfm 543 liter sec 1150 cfm Eaton 93PM L 200 5 Eaton 93PM L 200 6 N 1 100 kW 8 98 30626 460 liter sec 975 cfm 543 liter sec 1150 cfm Eaton 93PM L 200 6 Eaton 93PM L 200 7 N 1 110 kW 9 87 33688 543 liter sec 1150 cfm 625 liter sec 1325 ...

Страница 24: ...talled 574 1263 515 1133 8 at 64 142 Eaton 93PM L 200 with 3 UPMs Installed 605 1332 546 1202 8 at 68 150 Eaton 93PM L 200 with 4 UPMs Installed 637 1401 578 1271 8 at 72 159 Eaton 93PM L 200 with 5 UPMs Installed 668 1470 609 1340 8 at 76 168 Eaton 93PM L 200 with 6 UPMs Installed 699 1539 640 1409 8 at 80 176 Eaton 93PM L 200 with 7 UPMs Installed 731 1608 672 1478 8 at 84 185 Eaton 93PM L 200 w...

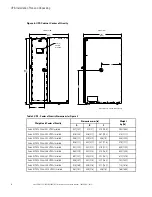
Страница 25: ... of Cabinet with Top Exhaust 457 mm 18 minimum clearance for ventilation From Top of Cabinet with Rear Exhaust 457 mm 18 From Back of Cabinet with Rear Exhaust 457 mm 18 minimum clearance for ventilation From Back of Cabinet with Top Exhaust None Required From Right Side of Cabinet None Required From Left Side of Cabinet None Required UPS Installation Plan and Unpacking ...

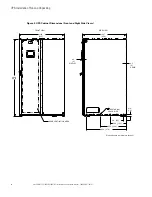
Страница 26: ...re 2 UPS Cabinet Dimensions Front and Right Side Views 1880 74 0 1100 43 3 1067 42 0 6 5 3 DISPLAY 4 3 2 HDWR 47 4 1 9 58 2 3 388 15 3 630 24 8 960 37 8 DOOR VENTILATION AREA FRONT VIEW M10 THD 8X 4 EACH SIDE SIDE VIEW Dimensions are in millimeters inches UPS Installation Plan and Unpacking ...

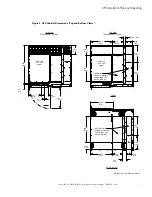
Страница 27: ...M ENTRY CONDUIT LANDING FOR AC INPUT AC OUTPUT AND DC 565 5 22 3 270 10 6 70 5 2 8 160 6 3 416 16 4 500 19 7 246 9 7 670 26 4 TOP VIEW REAR EXHAUST OPTION SERVICE ACCESS PANEL TOP ENTRY CONDUIT LANDING FOR AC INPUT AC OUTPUT AND DC 965 38 0 34 1 3 321 12 6 12 5 541 21 3 88 3 5 224 8 8 TOP VIEW TOP EXHAUST OPTION SERVICE ACCESS PANEL BOTTOM VIEW FRONT FRONT Dimensions are in millimeters inches UPS ...

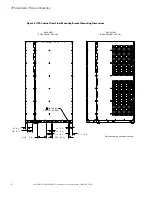
Страница 28: ...igure 4 UPS Cabinet Rear Floor Mounting Bracket Mounting Dimensions 62 2 4 119 4 7 104 4 1 210 5 8 3 67 5 2 7 30 1 2 365 14 4 30 1 2 REAR 8 EA FRT M8 THD 8X BACK VIEW TOP EXHAUST OPTION BACK VIEW REAR EXHAUST OPTION Dimensions are in millimeters inches UPS Installation Plan and Unpacking ...

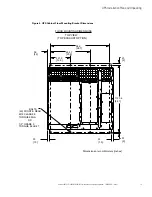
Страница 29: ...oor Mounting Bracket Dimensions 59 2 3 327 3 12 9 654 7 25 8 982 38 7 1120 4 44 1 23 9 23 9 33 1 3 33 1 3 FLOOR MOUNTING DIMENSIONS BOLTS 4X FRONT REAR M12 CLASS 8 8 TORQUE 66Nm OR 1 2 GRADE 5 TORQUE 64 LB FT TOP VIEW TOP EXHAUST OPTION Dimensions are in millimeters inches UPS Installation Plan and Unpacking ...

Страница 30: ... 876 34 5 536 21 1 467 18 4 515 1133 Eaton 93PM L 200 with 3 UPMs Installed 856 33 7 539 21 2 456 18 546 1202 Eaton 93PM L 200 with 4 UPMs Installed 846 33 3 540 21 3 447 17 6 578 1271 Eaton 93PM L 200 with 5 UPMs Installed 843 33 2 542 21 3 438 17 2 609 1340 Eaton 93PM L 200 with 6 UPMs Installed 860 33 9 544 21 4 430 16 9 640 1409 Eaton 93PM L 200 with 7 UPMs Installed 881 34 7 545 21 5 423 16 7...

Страница 31: ...rs sized for the fully rated UPS kW frame size installed instead of the derated kW ordered Wiring for the maximum kW frame size will allow a full power rating upgrade without having to modify the site wiring infrastructure For external wiring use 75 C copper wire Wire sizes listed in Table 5 through Table 16 are for copper wiring only If wire is run in an ambient temperature greater than 40 C larg...

Страница 32: ...pment uses four wires The rectifier feed into this equipment uses three wires The phases must be symmetrical about ground from a Wye source phase rotation clockwise A B C for proper equipment operation If installing an external maintenance bypass all feeds to the UPS including the Rectifier Input Breaker RIB if installed must have a service disconnect independent of the maintenance bypass power pa...

Страница 33: ...urrent Amps 48 96 144 192 240 Minimum Conductor Size Phase A B and C Number per Phase AWG or kcmil each 6 1 1 1 3 0 1 250 MCM 1 400 MCM 1 Neutral Wire Size Number AWG or kcmil each 3 1 2 0 1 300 MCM 1 500 MCM 1 4 0 2 Minimum Conductor Size Ground Number AWG or kcmil each 8 1 6 1 4 1 2 1 1 0 1 DC Input from External Battery Line Up and Match Eaton 93PM L IBC SW IBC LW or IBC LHW For Line Up and Mat...

Страница 34: ...hase AWG or kcmil each 8 1 3 1 1 0 1 3 0 1 250 MCM 1 Neutral Wire Size Number AWG or kcmil each 3 1 2 0 1 300 MCM 1 500 MCM 1 4 0 2 Minimum Conductor Size Ground Number AWG or kcmil each 8 1 8 1 6 1 4 1 2 1 NOTE Callout letters A B C and D map to Figure 40 Line up and match battery wiring with a 105 C rating is factory supplied with the Eaton 93PM L Integrated Battery Cabinet IBC Eaton recommends ...

Страница 35: ... 288 337 385 433 481 Minimum Conductor Size Phase A B and C Number per Phase AWG or kcmil each 500 MCM 1 4 0 2 250 MCM 2 300 MCM 2 400 MCM 2 Neutral Wire Size Number AWG or kcmil each 300 MCM 2 350 MCM 2 500 MCM 2 3 0 4 4 0 4 Minimum Conductor Size Ground Number AWG or kcmil each 1 0 1 2 2 2 2 2 2 1 0 2 DC Input from External Battery Line Up and Match Eaton 93PM L IBC SW IBC LW or IBC LHW For Line...

Страница 36: ...G or kcmil each 350 MCM 1 500 MCM 1 3 0 2 4 0 2 250 MCM 2 Neutral Wire Size Number AWG or kcmil each 300 MCM 2 350 MCM 2 500 MCM 2 3 0 4 4 0 4 Minimum Conductor Size Ground Number AWG or kcmil each 2 1 1 0 1 4 2 2 2 2 2 NOTE Callout letters A B C and D map to Figure 40 Line up and match battery wiring with a 105 C rating is factory supplied with the Eaton 93PM L Integrated Battery Cabinet IBC Eato...

Страница 37: ...529 577 625 673 721 Minimum Conductor Size Phase A B and C Number per Phase AWG or kcmil each 500 MCM 2 500 MCM 2 300 MCM 3 350 MCM 3 400 MCM 3 Neutral Wire Size Number AWG or kcmil each 250 MCM 4 300 MCM 4 500 MCM 3 3 0 6 4 0 6 Minimum Conductor Size Ground Number AWG or kcmil each 1 0 2 1 0 2 2 3 2 3 1 0 3 DC Input from External Battery Line Up and Match Eaton 93PM L IBC SW IBC LW or IBC LHW For...

Страница 38: ... each 300 MCM 2 350 MCM 2 400 MCM 2 500 MCM 2 500 MCM 2 Neutral Wire Size Number AWG or kcmil each 250 MCM 4 300 MCM 4 300 MCM 4 350 MCM 4 400 MCM 4 Minimum Conductor Size Ground Number AWG or kcmil each 2 2 2 2 1 0 2 1 0 2 1 0 2 NOTE Callout letters A B C and D map to Figure 40 Line up and match battery wiring with a 105 C rating is factory supplied with the Eaton 93PM L Integrated Battery Cabine...

Страница 39: ...ps 769 817 865 913 962 Minimum Conductor Size Phase A B and C Number per Phase AWG or kcmil each 500 MCM 3 500 MCM 3 500 MCM 3 500 MCM 4 500 MCM 4 Neutral Wire Size Number AWG or kcmil each 4 0 6 250 MCM 6 300 MCM 6 4 0 8 4 0 8 Minimum Conductor Size Ground Number AWG or kcmil each 1 0 3 1 0 3 1 0 3 1 0 4 1 0 4 DC Input from External Battery Line Up and Match Eaton 93PM L IBC SW IBC LW or IBC LHW ...

Страница 40: ...mil each 300 MCM 3 300 MCM 3 350 MCM 3 400 MCM 3 400 MCM 3 Neutral Wire Size Number AWG or kcmil each 4 0 6 250 MCM 6 300 MCM 6 300 MCM 6 300 MCM 6 Minimum Conductor Size Ground Number AWG or kcmil each 2 3 2 3 2 3 1 0 3 1 0 3 NOTE Callout letters A B C and D map to Figure 40 Line up and match battery wiring with a 105 C rating is factory supplied with the Eaton 93PM L Integrated Battery Cabinet I...

Страница 41: ...Current Amps 45 91 136 182 227 Minimum Conductor Size Phase A B and C Number per Phase AWG or kcmil each 6 1 1 1 3 0 1 250 MCM 1 350 MCM 1 Neutral Wire Size Number AWG or kcmil each 3 1 2 0 1 300 MCM 1 500 MCM 1 4 0 1 Minimum Conductor Size Ground Number AWG or kcmil each 8 1 6 1 4 1 2 1 2 1 DC Input from External Battery Line Up and Match Eaton 93PM L IBC SW IBC LW or IBC LHW For Line Up and Matc...

Страница 42: ... per Phase AWG or kcmil each 8 1 3 1 1 0 1 3 0 1 250 MCM 1 Neutral Wire Size Number AWG or kcmil each 3 1 2 0 1 300 MCM 1 500 MCM 1 4 0 1 Minimum Conductor Size Ground Number AWG or kcmil each 8 1 8 1 6 1 4 1 2 1 NOTE Callout letters A B C and D map to Figure 40 Line up and match battery wiring with a 105 C rating is factory supplied with the Eaton 93PM L Integrated Battery Cabinet IBC Eaton recom...

Страница 43: ...s 273 318 364 409 455 Minimum Conductor Size Phase A B and C Number per Phase AWG or kcmil each 500 MCM 1 4 0 2 250 MCM 2 300 MCM 2 350 MCM 2 Neutral Wire Size Number AWG or kcmil each 300 MCM 2 350 MCM 2 500 MCM 2 3 0 4 4 0 4 Minimum Conductor Size Ground Number AWG or kcmil each 1 0 1 2 2 2 2 2 2 2 2 DC Input from External Battery Line Up and Match Eaton 93PM L IBC SW IBC LW or IBC LHW For Line ...

Страница 44: ... AWG or kcmil each 300 MCM 1 400 MCM 1 500 MCM 1 4 0 2 250 MCM 2 Neutral Wire Size Number AWG or kcmil each 300 MCM 2 350 MCM 2 500 MCM 2 3 0 4 4 0 4 Minimum Conductor Size Ground Number AWG or kcmil each 2 1 1 0 1 1 0 1 2 2 2 2 NOTE Callout letters A B C and D map to Figure 40 Line up and match battery wiring with a 105 C rating is factory supplied with the Eaton 93PM L Integrated Battery Cabinet...

Страница 45: ...s 500 545 591 636 682 Minimum Conductor Size Phase A B and C Number per Phase AWG or kcmil each 400 MCM 2 500 MCM 2 300 MCM 3 300 MCM 3 350 MCM 3 Neutral Wire Size Number AWG or kcmil each 250 MCM 4 300 MCM 4 500 MCM 3 3 0 6 4 0 6 Minimum Conductor Size Ground Number AWG or kcmil each 1 0 2 1 0 2 2 3 2 3 2 3 DC Input from External Battery Line Up and Match Eaton 93PM L IBC SW IBC LW or IBC LHW For...

Страница 46: ...or kcmil each 300 MCM 2 300 MCM 2 350 MCM 2 400 MCM 2 500 MCM 2 Neutral Wire Size Number AWG or kcmil each 250 MCM 4 300 MCM 4 300 MCM 4 350 MCM 4 400 MCM 4 Minimum Conductor Size Ground Number AWG or kcmil each 2 2 2 2 2 2 1 0 2 1 0 2 NOTE Callout letters A B C and D map to Figure 40 Line up and match battery wiring with a 105 C rating is factory supplied with the Eaton 93PM L Integrated Battery ...

Страница 47: ... 727 773 818 864 909 Minimum Conductor Size Phase A B and C Number per Phase AWG or kcmil each 400 MCM 3 500 MCM 3 500 MCM 3 500 MCM 3 500 MCM 4 Neutral Wire Size Number AWG or kcmil each 4 0 6 250 MCM 6 300 MCM 6 300 MCM 6 4 0 8 Minimum Conductor Size Ground Number AWG or kcmil each 1 0 3 1 0 3 1 0 3 1 0 3 1 0 4 DC Input from External Battery Line Up and Match Eaton 93PM L IBC SW IBC LW or IBC LH...

Страница 48: ...or kcmil each 500 MCM 2 300 MCM 3 300 MCM 3 350 MCM 3 400 MCM 3 Neutral Wire Size Number AWG or kcmil each 500 MCM 4 250 MCM 6 300 MCM 6 300 MCM 6 300 MCM 6 Minimum Conductor Size Ground Number AWG or kcmil each 1 0 2 2 3 2 3 2 3 1 0 3 NOTE Callout letters A B C and D map to Figure 40 Line up and match battery wiring with a 105 C rating is factory supplied with the Eaton 93PM L Integrated Battery ...

Страница 49: ...l Battery Line Up and Match Eaton 93PM L IBC SW IBC LW or IBC LHW For Line Up and Match wiring refer to Eaton 93PM Integrated Battery Cabinet Installation Manual Small Welded or Eaton 93PM Universal Integrated Battery Cabinet Installation Manual Large and Large High Rate DC Input from External Battery Standalone Eaton 93PM L IBC 1 Positive 1 Negative 1 Ground C Total Amps 23 45 68 90 113 Minimum C...

Страница 50: ...e Ground Number AWG or kcmil each 8 1 8 1 6 1 4 1 2 1 NOTE Callout letters B C and D map to Figure 40 Line up and match battery wiring with a 105 C rating is factory supplied with the Eaton 93PM L Integrated Battery Cabinet IBC Eaton recommends installing the UPS using wiring and external overcurrent protection breakers sized for the fully rated UPS kW frame size installed UPS Installation Plan an...

Страница 51: ... Line Up and Match Eaton 93PM L IBC SW IBC LW or IBC LHW For Line Up and Match wiring refer to Eaton 93PM Integrated Battery Cabinet Installation Manual Small Welded or Eaton 93PM Universal Integrated Battery Cabinet Installation Manual Large and Large High Rate DC Input from External Battery Standalone Eaton 93PM L IBC 1 Positive 1 Negative 1 Ground C Total Amps 136 158 181 203 226 Minimum Conduc...

Страница 52: ...e Ground Number AWG or kcmil each 2 1 1 0 1 4 2 2 2 2 2 NOTE Callout letters B C and D map to Figure 40 Line up and match battery wiring with a 105 C rating is factory supplied with the Eaton 93PM L Integrated Battery Cabinet IBC Eaton recommends installing the UPS using wiring and external overcurrent protection breakers sized for the fully rated UPS kW frame size installed UPS Installation Plan ...

Страница 53: ...and Match Eaton 93PM L IBC SW IBC LW or IBC LHW For Line Up and Match wiring refer to Eaton 93PM Integrated Battery Cabinet Installation Manual Small Welded or Eaton 93PM Universal Integrated Battery Cabinet Installation Manual Large and Large High Rate DC Input from External Battery Standalone Eaton 93PM L IBC 1 Positive 1 Negative 1 Ground C Total Amps 248 271 294 316 339 Minimum Conductor Size ...

Страница 54: ...Ground Number AWG or kcmil each 2 2 2 2 1 0 2 1 0 2 1 0 2 NOTE Callout letters B C and D map to Figure 40 Line up and match battery wiring with a 105 C rating is factory supplied with the Eaton 93PM L Integrated Battery Cabinet IBC Eaton recommends installing the UPS using wiring and external overcurrent protection breakers sized for the fully rated UPS kW frame size installed UPS Installation Pla...

Страница 55: ... Line Up and Match Eaton 93PM L IBC SW IBC LW or IBC LHW For Line Up and Match wiring refer to Eaton 93PM Integrated Battery Cabinet Installation Manual Small Welded or Eaton 93PM Universal Integrated Battery Cabinet Installation Manual Large and Large High Rate DC Input from External Battery Standalone Eaton 93PM L IBC 1 Positive 1 Negative 1 Ground C Total Amps 361 384 407 429 452 Minimum Conduc...

Страница 56: ... supplied by Eaton and show the location of the UPS power cable terminals Table 17 UPS External Power Cable Terminations Terminal Function Terminal Function Bus Landings using back to back lugs Tightening Torque Nm lb in Screw Size and Type AC Input to UPS Rectifier E1 Phase A 4 2 bolt mounting 35 310 M12 Hex E2 Phase B 4 2 bolt mounting 35 310 M12 Hex E3 Phase C 4 2 bolt mounting 35 310 M12 Hex A...

Страница 57: ...tion Parts and Tools Not Supplied by Eaton Part Size Quantity Notes Long Barrel 2 Hole Lug 6 AWG As Required Copper wire only 4 AWG 2 AWG 1 AWG 1 0 AWG 2 0 AWG 3 0 AWG 4 0 AWG 250 MCM 300 MCM 350 MCM 500 MCM Manual Hydraulic Crimp Tool 14 Ton 1 Die Set N A 1 NOTE For additional information and or assistance contact an Eaton service representative see paragraph 1 9 Getting Help Conduit sizes were c...

Страница 58: ... UPS Rectifier A B C Ground 4 1 1 AC Input to UPS Bypass A B C Neutral Ground 5 1 1 4 1 AC Output A B C Neutral Ground 5 1 1 DC Battery Positive Negative Ground 3 3 4 1 93PM L 200 1 93PM L 200 2 N 1 20 kW 208 or 220 Vac AC Input to UPS Rectifier A B C Ground 4 1 1 4 1 AC Input to UPS Bypass A B C Neutral Ground 5 2 1 AC Output A B C Neutral Ground 5 1 1 2 1 DC Battery Positive Negative Ground 3 3 ...

Страница 59: ...nd 5 3 1 AC Output A B C Neutral Ground 5 2 1 2 1 DC Battery Positive Negative Ground 3 1 1 93PM L 200 3 93PM L 200 4 N 1 50 kW 208 or 220 Vac AC Input to UPS Rectifier A B C Ground 4 2 1 2 1 AC Input to UPS Bypass A B C Neutral Ground 5 3 1 AC Output A B C Neutral Ground 5 2 1 2 1 DC Battery Positive Negative Ground 3 1 1 4 1 93PM L 200 3 93PM L 200 4 N 1 60 kW 208 or 220 Vac AC Input to UPS Rect...

Страница 60: ...ound 5 2 1 2 2 AC Output A B C Neutral Ground 5 3 1 DC Battery Positive Negative Ground 3 1 1 2 1 93PM L 200 4 93PM L 200 5 N 1 80 kW 208 or 220 Vac AC Input to UPS Rectifier A B C Ground 4 2 2 AC Input to UPS Bypass A B C Neutral Ground 5 3 2 AC Output A B C Neutral Ground 5 2 1 2 2 DC Battery Positive Negative Ground 3 2 1 93PM L 200 5 93PM L 200 6 N 1 90 kW 208 or 220 Vac AC Input to UPS Rectif...

Страница 61: ...round 6 3 2 AC Output A B C Neutral Ground 6 2 1 2 2 DC Battery Positive Negative Ground 3 2 1 93PM L 200 6 93PM L 200 7 N 1 110 kW 208 or 220 Vac AC Input to UPS Rectifier A B C Ground 4 2 1 2 2 AC Input to UPS Bypass A B C Neutral Ground 6 3 2 AC Output A B C Neutral Ground 6 2 1 2 2 DC Battery Positive Negative Ground 3 2 1 93PM L 200 6 93PM L 200 7 N 1 120 kW 208 or 220 Vac AC Input to UPS Rec...

Страница 62: ...A B C Neutral Ground 6 4 3 1 2 2 DC Battery Positive Negative Ground 3 2 1 2 1 93PM L 200 7 93PM L 200 8 N 1 140 kW 208 Vac 220 Vac AC Input to UPS Rectifier A B C Ground 4 3 2 1 2 2 208 or 220 Vac AC Input to UPS Bypass A B C Neutral Ground 6 2 1 2 3 AC Output A B C Neutral Ground 6 4 2 DC Battery Positive Negative Ground 3 2 1 2 1 93PM L 200 8 93PM L 200 9 N 1 150 kW 208 or 220 Vac AC Input to U...

Страница 63: ... 208 Vac 220 Vac AC Output A B C Neutral Ground 6 3 1 2 4 3 2 DC Battery Positive Negative Ground 6 2 2 93PM L 200 9 93PM L 200 10 N 1 170 kW 208 or 220 Vac AC Input to UPS Rectifier A B C Ground 4 2 1 2 3 AC Input to UPS Bypass A B C Neutral Ground 6 3 3 AC Output A B C Neutral Ground 6 3 1 2 3 DC Battery Positive Negative Ground 6 2 2 93PM L 200 9 93PM L 200 10 N 1 180 kW 208 or 220 Vac AC Input...

Страница 64: ...Vac AC Input to UPS Rectifier A B C Ground 4 3 2 1 2 3 AC Input to UPS Bypass A B C Neutral Ground 6 3 4 3 AC Output A B C Neutral Ground 6 4 3 1 2 3 DC Battery Positive Negative Ground 6 2 2 93PM L 200 10 200 kW 208 or 220 Vac AC Input to UPS Rectifier A B C Ground 4 3 3 AC Input to UPS Bypass A B C Neutral Ground 6 3 4 AC Output A B C Neutral Ground 6 4 3 DC Battery Positive Negative Ground 3 2 ...

Страница 65: ...M L 200 2 Eaton 93PM L 200 3 N 1 40 kW 80 Rated 200A 175A 100 Rated 150A 150A Eaton 93PM L 200 3 Eaton 93PM L 200 4 N 1 50 kW 80 Rated 225A 225A 100 Rated 200A 175A Eaton 93PM L 200 3 Eaton 93PM L 200 4 N 1 60 kW 80 Rated 300A 300A 100 Rated 225A 225A Eaton 93PM L 200 4 Eaton 93PM L 200 5 N 1 70 kW 80 Rated 350A 300A 100 Rated 250A 250A Eaton 93PM L 200 4 Eaton 93PM L 200 5 N 1 80 kW 80 Rated 400A...

Страница 66: ...ted 800A 700A 100 Rated 600A 600A Eaton 93PM L 200 9 Eaton 93PM L 200 10 N 1 170 kW 80 Rated 800A 800A 100 Rated 700A 600A Eaton 93PM L 200 9 Eaton 93PM L 200 10 N 1 180 kW 80 Rated 800A 800A 100 Rated 700A 700A Eaton 93PM L 200 10 190 kW 80 Rated 1000A 800A 100 Rated 700A 700A Eaton 93PM L 200 10 200 kW 80 Rated 1000A 1000A 100 Rated 800A 700A CAUTION To reduce the risk of fire connect only to a ...

Страница 67: ...0 Rated 110A 100A 100 Rated 90A 80A Eaton 93PM L 200 2 Eaton 93PM L 200 3 N 1 40 kW 80 Rated 150A 150A 100 Rated 125A 110A Eaton 93PM L 200 3 Eaton 93PM L 200 4 N 1 50 kW 80 Rated 175A 175A 100 Rated 150A 150A Eaton 93PM L 200 3 Eaton 93PM L 200 4 N 1 60 kW 80 Rated 225A 200A 100 Rated 175A 175A Eaton 93PM L 200 4 Eaton 93PM L 200 5 N 1 70 kW 80 Rated 250A 250A 100 Rated 200A 200A Eaton 93PM L 200...

Страница 68: ... 600A 500A 100 Rated 450A 400A Eaton 93PM L 200 8 Eaton 93PM L 200 9 N 1 160 kW 80 Rated 600A 600A 100 Rated 450A 450A Eaton 93PM L 200 9 Eaton 93PM L 200 10 N 1 170 kW 80 Rated 600A 600A 100 Rated 500A 450A Eaton 93PM L 200 9 Eaton 93PM L 200 10 N 1 180 kW 80 Rated 700A 600A 100 Rated 500A 500A Eaton 93PM L 200 10 190 kW 80 Rated 700A 70A 100 Rated 600A 500A Eaton 93PM L 200 10 200 kW 80 Rated 70...

Страница 69: ... 93PM L 200 1 Eaton 93PM L 200 2 N 1 10 kW 100 Rated 25A Eaton 93PM L 200 1 Eaton 93PM L 200 2 N 1 20 kW 100 Rated 45A Eaton 93PM L 200 2 Eaton 93PM L 200 3 N 1 30 kW 100 Rated 70A Eaton 93PM L 200 2 Eaton 93PM L 200 3 N 1 40 kW 100 Rated 90A Eaton 93PM L 200 3 Eaton 93PM L 200 4 N 1 50 kW 100 Rated 125A Eaton 93PM L 200 3 Eaton 93PM L 200 4 N 1 60 kW 100 Rated 150A Eaton 93PM L 200 4 Eaton 93PM L...

Страница 70: ...ace wiring up to 30V Class 2 circuit wiring must be segregated from Class 1 wiring The Class 2 wire should be rated for 150V 1A minimum Because of the battery shunt trip wiring route in the UPS cabinet the wire should be rated for a minimum of 600V Use twisted pair wires for each input and return or common All interface wiring and conduit is to be supplied by the customer When installing external ...

Страница 71: ...ks must be performed by an authorized Eaton Customer Service Engineer or the warranty terms specified on in Chapter 10 Warranty become void This service is offered as part of the sales contract for the UPS Contact an Eaton service representative in advance a minimum two week notice is required to reserve a preferred startup date WARNING The UPS cabinet is heavy see Table 2 If unpacking and unloadi...

Страница 72: ...ence of physical damage and compare each item with the Bill of Lading If damage has occurred or shortages are evident contact an Eaton service representative immediately to determine the extent of the damage and its impact on further installation NOTE While waiting for installation protect the unpacked cabinet from moisture dust and other harmful contaminants Failure to store and protect the UPS p...

Страница 73: ...Eaton 93PM L 20 200kW 208V UPS Installation and Operation Manual 164000724 Rev 01 63 Figure 8 UPS Cabinet as Shipped on Single Pallet UPS Installation Plan and Unpacking ...

Страница 74: ...64 Eaton 93PM L 20 200kW 208V UPS Installation and Operation Manual 164000724 Rev 01 Figure 9 UPS Cabinet and Wireway as Shipped on Two Pallets UPS Installation Plan and Unpacking ...

Страница 75: ...only with a forklift or damage may occur NOTE For the following steps verify that the forklift or pallet jack is rated to handle the weight of the cabinet see Table 3 2 for cabinet weight The UPS cabinet is bolted to a pallet consisting of four metal angle supports secured to two wood supports To remove the pallet 1 If not already accomplished use a forklift or pallet jack to move the UPS cabinet ...

Страница 76: ...llet Skid Left Side Cabinet Support Floor Protectors 2 places front 2 places rear Jacking Bolts 2 places front 2 places rear Front Cabinet Support Right Side Cabinet Support Rear Cabinet Support Cabinet Support Bolts 2 places at each corner Cabinet Mounting Bolts 8 Places Front 8 Places Rear Skid Mounting Bolts 8 places front 8 places rear UPS System Installation ...

Страница 77: ...aces front 6 places rear Front Cabinet Support Skid Mounting Bolts 6 places front 6 places rear Floor Protectors 2 places front 2 places rear Jacking Bolts 2 places front 2 places rear Rear Cabinet Support Cabinet Support Bolts 2 places at each corner Left Side Cabinet Support Right Side Front Corner Post NOTE This post is only used during shipment and will be removed during the installation proce...

Страница 78: ...2 places right side Pallet Skid Left Side Cabinet Support Front Cabinet Support Skid Mounting Bolts 4 places front 4 places rear Rear Cabinet Support Cabinet Support Bolts 2 places at each corner Right Side Cabinet Support Floor Protectors 2 places front 2 places rear Jacking Bolts 2 places front 2 places rear Left Side Front Corner Post NOTE This post is only used during shipment and will be remo...

Страница 79: ...s before the supports can be removed 8 Carefully and evenly lower the cabinet by turning each jacking bolt consecutively two full turns maximum until the casters contact the floor and the cabinet is no longer supported by the jacking bolts 9 After the UPS is resting on the floor remove the jacking bolts and floor protectors Recycle them in a responsible manner 10 Remove the cabinet support bolts f...

Страница 80: ...nd rear floor mounting bracket kit is available for permanently mounting the UPS 18 If two pallet shipment configuration was utilized continue to Step 19 otherwise proceed to Step 28 19 Two Pallet Shipment Preparing the Wireway to attach to the UPS With the Wireway positioned near the installation location of the UPS remove the following Wireway Hang Panel Deadfront Deadfront Top Brace and left Fr...

Страница 81: ...64000724 Rev 01 71 Figure 13 Wireway Two Pallet Shipment Parts Removal 200kW Wireway with Panels and Post removed Wireway Hang Panel Wireway Deadfront Left Front Corner Post Removed Back and Base Straps 2x stacked Top Strap Deadfront Top Brace UPS System Installation ...

Страница 82: ...S cabinet lower the Wireway s four leveling feet evening till the casters are not in contact with the floor 22 Remove the Wireway s four caster outriggers see Figure 14 and recycle the outriggers and bolts in a responsible manner Figure 14 Wireway Caster Outriggers Wireway Caster Outrigger 2 places left side 2 places right side 23 Remove the UPS cabinet s right Front Corner Post see Figure 15 recy...

Страница 83: ...ent 24 Using a pallet jack carefully maneuver the Wireway next to the UPS cabinet 25 Match the Wireway s height with the UPS cabinet by adjusting the Wireway s leveling feet 26 Using the Top Strap the Back Strap and the Base Strap removed in Step 20 and the retained hardware attach the Wireway to the UPS cabinet see Figure 16 and Figure 17 for strap installation locations UPS System Installation ...

Страница 84: ...ual 164000724 Rev 01 Figure 16 UPS Top and Back Strap Install Locations TOP VIEW TOP EXHAUST OPTION TOP VIEW REAR EXHAUST OPTION TOP STRAP INSTALL LOCATION BACK VIEW TOP EXHAUST OPTION BACK VIEW REAR EXHAUST OPTION BACK STRAP INSTALL LOCATION UPS System Installation ...

Страница 85: ...t area see Figure 18 for installation location Figure 18 UPS Deadfront Top Brace Install Location DEADFRONT TOP BRACE LOCATION 28 If permanently mounting the UPS using the customer supplied left and right side floor mounting brackets proceed to Step 29 if using the front and rear floor mounting brackets proceed to Step 33 otherwise proceed to Step 36 29 Locate the customer supplied left and right ...

Страница 86: ...are for later use 2 Remove the screws securing the internal safety shield deadfront panel and remove the panel to gain access to the input output and battery power wiring terminals Retain the hardware for later use 3 Bottom Entry Wiring Remove the bottom conduit plate see Figure 19 from the bottom of the UPS Identify all conduit requirements and mark their location Drill and punch all conduit hole...

Страница 87: ...ult of the connected loads high leakage current is possible Connection to earth ground is required for safety and proper product operation Do not check UPS operation by any action that includes removal of the earth ground connection with loads attached 11 Ground the UPS according to local and or national electrical wiring codes by routing and connecting the ground wire to the input ground lug Figu...

Страница 88: ...s TOP VIEW TOP EXHAUST OPTION PLATE CONDUIT WIRING CONTROL ENTRY TOP SERVICE ACCESS PANEL TOP VIEW REAR EXHAUST OPTION SERVICE ACCESS PANEL TOP ENTRY CONDUIT LANDING FOR AC INPUT AC OUTPUT AND DC BOTTOM ENTRY CONTROL WIRING CONDUIT PLATE BOTTOM ENTRY CONDUIT LANDING FOR AC INPUT AC OUTPUT AND DC BOTTOM VIEW UPS System Installation ...

Страница 89: ...9 Figure 20 UPS Inter Cabinet Wiring Access Location Inter cabinet wiring access to route interface wiring between cabinets Inter cabinet wiring access knockouts Remove knockouts as required to route power wiring between cabinets Left Side View Right Side View UPS System Installation ...

Страница 90: ...Component Locations ACCESS SWITCH BYPASS SERVICE START BATTERY UPM SLIDE LOCK BAYS COMMUNICATION MINI SLOT 20kW POWER MODULE QTY 1 10 MODULES CONFIGURABLE 2X GROUND STUDS FOR CABINET TO CABINET WIRING TO BYPASS AC INPUT RECTIFIER TO UPS AC INPUT TO LOAD AC OUTPUT DC INPUT UPS System Installation ...

Страница 91: ...put to UPS Rectifier E1 E2 E3 E9 Phase A E10 Phase B E11 Phase C E12 Output Neutral AC Output to Load E9 E10 E11 E12 E4 Battery Input E5 1 Battery Input Ground Compression Lugs NOTE UPS right side view into Wireway 4 4 5 5 B Ba at tt te er ry y P Po ow we er r W Wiir riin ng g CAUTION When sizing the battery system do not exceed the internal battery charger capabilities See Chapter 9 Product Speci...

Страница 92: ...uiilld diin ng g A Alla ar rm m a an nd d R Re ella ay y C Co on nt ta ac ct t C Co on nn ne ec ct tiio on ns s NOTE 1 If installing interface wiring connections between standalone cabinets or separate devices conduit must be installed between each cabinet or device NOTE 2 Disconnect terminal block plugs from terminal blocks to wire plugs To install wiring 1 Verify the UPS system is turned off and...

Страница 93: ...h 3 2 4 and Table 25 for wiring and termination requirements and Figure 28 for terminal assignments 15 If wiring battery detect connections proceed to paragraph 4 6 2 Installing Battery Detect Interface Connections if wiring battery shunt trip connections proceed to paragraph 4 6 3 Installing Battery Shunt Trip Interface Connections if wiring bypass shunt trip connections proceed to paragraph 4 6 ...

Страница 94: ...00kW 208V UPS Installation and Operation Manual 164000724 Rev 01 Figure 23 Interface Terminal Locations SHUNT TRIP TERMINAL LOCATION INTERFACE TERMINALS MINI SLOT COMMUNICATION BAYS CANBUS TERMINALS UPS System Installation ...

Страница 95: ...5 RTN 2 ALM_5 3 ALM_4 RTN 4 ALM_4 5 ALM_3 RTN 6 ALM_3 7 ALM_2 RTN 8 ALM_2 9 ALM_1 RTN 10 ALM_1 1 GND E 2 GND ISO 3 CANBL 4 CANBH 1 CANBL 2 CANBL_1 1 2 TX 3 RX 4 5 GND ISO 6 7 8 9 12V_ISO 1 EPO_A_B 2 GND ISO 3 EPO_B 4 EPO_A 1 NC_OUT 2 NO_OUT 3 COM CUSTOMER INPUT ALARMS CUSTOMER CAN RS232 EPO RELAY OUTPUT UPS System Installation ...

Страница 96: ...stallation and Operation Manual 164000724 Rev 01 Figure 25 Bottom Access Interface Wiring Location WireTie Anchors Bottom Entry Conduit Landings for Customer Interface Wiring Bottom Access Interface Wiring Channel UPS System Installation ...

Страница 97: ...rammable UPS alarm activated by a remote dry contact closure Twisted Pair Wires 18 AWG 14 30 AWG 2 lb in 0 22 0 25 Nm 7 Building Alarm 2 Return 6 Building Alarm 3 Input Programmable UPS alarm activated by a remote dry contact closure Twisted Pair Wires 18 AWG 14 30 AWG 2 lb in 0 22 0 25 Nm 5 Building Alarm 3 Return 4 Building Alarm 4 Input Programmable UPS alarm activated by a remote dry contact c...

Страница 98: ... Output General purpose normally open NO relay contact Twisted Pair Wires 18 AWG 14 30 AWG 2 lb in 0 22 0 25 Nm 3 Relay Contact Common Figure 28 Relay Contact Terminal Block Connector Assignments UPS Relay Output 1 2 3 NO_Out NC_Out Com 4 4 6 6 2 2 I In ns st ta alllliin ng g B Ba at tt te er ry y D De et te ec ct t I In nt te er rf fa ac ce e C Co on nn ne ec ct tiio on ns s NOTE 1 The UPS batter...

Страница 99: ...ge and Large High Rate or the Eaton 93PM Integrated Battery Cabinet Small Welded IBC SW 432V and 480V Installation Manual listed in paragraph 1 8 for battery cabinet wiring access information and instructions 9 Route the wiring along the interface wiring channel see Figure 25 to the UPS building alarm terminals See Figure 23 and Figure 24 for UPS interface terminal locations 10 Secure the wiring t...

Страница 100: ...l locations Refer to the Eaton 93PM Universal Integrated Battery Cabinet Installation Manual Large and Large High Rate or the Eaton 93PM Integrated Battery Cabinet Small Welded IBC SW 432V and 480V Installation Manual listed in paragraph for battery cabinet wiring access information and instructions 8 Proceed to Step 12 9 Bottom Entry Wiring Route the battery shunt trip wiring from the battery cab...

Страница 101: ...nel and remove the panel to gain access to the battery shunt trip wiring terminals Retain the hardware for later use 5 If wiring the bypass shunt trip connections using bottom entry access proceed to Step 6 if wiring the battery shunt trip connections using top entry access proceed to Step 8 6 Bottom Entry Wiring Route the bypass shunt trip wiring through the bottom of the UPS to the UPS bypass sh...

Страница 102: ...kW 208V UPS Installation and Operation Manual 164000724 Rev 01 Figure 29 Shunt Trip Terminal Location SHUNT TRIP TERMINAL LOCATION UPS FRONT VIEW UPS RIGHT SIDE VIEW WIREWAY IS REMOVED TO SHOW DETAIL UPS System Installation ...

Страница 103: ... Trip Connections and Wire Terminations Terminal Name Description Recommended Minimum Wire Size Size of Pressure Termination Tightening Torque 1 48 Vdc Bypass Shunt Trip Output Contacts used to open bypass breaker or disconnect Twisted Pair Wires 18 AWG 14 30 AWG 2 lb in 0 22 0 25 Nm 2 48 Vdc Bypass Shunt Trip 5 48 Vdc Battery Shunt Trip Output Contacts used to open battery breaker or disconnect T...

Страница 104: ...ttom of the UPS proceed to Step 8 otherwise proceed to Step 13 4 Top Entry Wiring Remove the top interface entry conduit landing plates to drill or punch holes see Figure 4 5 5 Reinstall the interface entry plates and install the conduit 6 Route the UPS building alarm interface wiring through the top interface entry conduit landing plates to the UPS building alarm terminals See Figure 19 for wirin...

Страница 105: ...nding plate to the Minislot card terminals See Figure 21 for wiring access information and Figure 23 for Minislot card locations 7 Proceed to Step 11 8 Remove the bottom interface entry conduit landing plate to drill or punch holes see Figure 19 9 Reinstall the interface entry plate and install the conduit 10 Bottom Entry Wiring Route the Minislot card interface wiring through the bottom interface...

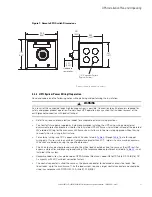
Страница 106: ...er sources are removed See Chapter 6 UPS Operating Instructions for shutdown instructions 2 Securely mount the REPO switch Recommended locations include operator s consoles or near exit doors See for enclosure dimensions and wiring knockouts 3 If not already opened open the front door by lifting the latch from the bottom and turning to the right counterclockwise and swing the door open 4 If wiring...

Страница 107: ...gure 34 for a normally closed REPO See paragraph 3 2 2 UPS System Power Wiring Preparation for wiring and termination requirements and Figure 32 for terminal assignments 15 If using a normally closed REPO switch connect a jumper wire between pins 3 and 4 on the REPO terminal block 16 If you are installing multiple REPO switches wire additional switches in parallel with the first REPO 17 If require...

Страница 108: ... UPS EPO from a remote switch Twisted Pair Wires 18 AWG 16 30 AWG 2 lb in 0 22 0 25 Nm 4 NO 4 EPO_B Figure 33 Normally Open REPO Switch Wiring 3 1 2 4 3 4 Table 28 Normally Closed REPO Connections and Wire Terminations From REPO Station Switch Con tact Block Either Block UPS REPO Terminal Name Description Recom mended Minimum Wire Size Size of Wire Termi nation Tighten ing Torque 3 NO 1 EPO_A_B In...

Страница 109: ...lations without any accessory cabinets such as an External Battery Cabinet Startup and operational checks for parallel systems or installations with accessory cabinets must be performed by an authorized Eaton Customer Service Engineer or the warranty terms specified on page Warranty become void This service is offered as part of the sales contract for the UPS Contact an Eaton service representativ...

Страница 110: ...les are properly sized and terminated o Battery cables are terminated on E4 and E5 o Battery shunt trip signal wiring is connected from the UPS to the battery disconnect o Battery detect signal wiring is connected from the UPS to the battery disconnect o A ground conductor is properly installed o Building alarms and alarm relays are wired appropriately Optional o LAN drops are installed Optional o...

Страница 111: ..._______________________ _________________________________________________________________________ _________________________________________________________________________ _________________________________________________________________________ _________________________________________________________________________ _________________________________________________________________________ ______...

Страница 112: ...102 Eaton 93PM L 20 200kW 208V UPS Installation and Operation Manual 164000724 Rev 01 UPS System Installation ...

Страница 113: ...e the parameters specified in Chapter 9 Product Specifications Product Specifications the UPS uses a backup battery supply to maintain power to the critical load for a specified period of time or until the utility power returns For extended power outages the UPS allows you to either transfer to an alternative power system such as a generator or shut down your critical load in an orderly manner The...

Страница 114: ... manually With the exception of an optional external battery cabinet no other cabinets or equipment are required for the single UPS to successfully support its applied loads 5 5 2 2 1 1 M Mo od de es s The Eaton 93PM L UPS supports a critical load in four different modes of operation In Energy Saver System ESS mode commercial AC power is supplied directly to the critical load through the internal ...

Страница 115: ...ad When the input line returns to normal operating range the UPS returns to ESS operation For charging batteries the UPS will not enter ESS mode until charger is 25 or less of maximum charger current When operating in ESS the UPS superior detection and control algorithms continuously monitor incoming power quality and allow the fast engagement of power converters Typical transition time to double ...

Страница 116: ...ugh the UPS system when the UPS is operating in Normal mode The battery converter derives its input from the regulated DC output of the rectifier and provides a bucked regulated DC voltage charge current to the battery The battery is always connected to the UPS and ready to support the inverter should the utility input become unavailable The inverter produces a three phase AC output to a customer ...

Страница 117: ...ass mode The UPS automatically switches to Bypass mode if it detects an overload load fault or internal failure if configured for capacity If configured for redundancy N 1 the UPS would remain on line in Normal mode if one UPM failed The UPS can also be transferred from Normal mode to Bypass mode manually The bypass source supplies the commercial AC power to the load directly Figure 38 shows the p...

Страница 118: ...verter Battery Switchgear Battery Inverter Inverter Switchgear Output Static Switch Closed Open Switchgear 5 5 2 2 5 5 B Ba at tt te er ry y M Mo od de e The UPS automatically transfers to Battery mode if a utility power outage occurs or if the utility power does not conform to specified parameters In Battery mode the battery provides emergency DC power that the inverter converts to AC power Figur...

Страница 119: ...al load and the duration of the battery discharge battery current limit alarms may be seen for a short time due to the current required to recharge the battery Figure 39 Path of Current Through the UPS in Battery Mode Bypass Input Rectifier Input Rectifier Switchgear Main Power Flow Trickle Current Energized De Energized Rectifier Battery Converter Battery Switchgear Battery Inverter Inverter Swit...

Страница 120: ...YPASS INPUT BREAKER WITH 48 60VDC SHUNT TRIP IS REQUIRED UPMs 2 10 UPM 1 FUSE UPS CABINET BATTERY SWITCHGEAR BATTERY CONVERTER FUSE FUSE RECTIFIER INVERTER RECTIFIER SWITCHGEAR INVERTER SWITCHGEAR OPTIONAL SINGLE FEED JUMPER AC INPUT TO RECTIFIER AC INPUT TO BYPASS SEE NOTE 3 EXTERNAL BATTERY CABINET BATTERY BREAKER AC OUTPUT TO LOAD STATIC SWITCH FUSE E1 E2 E3 E6 E7 E8 E12 E9 E10 E11 E12 E4 E5 FU...

Страница 121: ...rconnections to ensure the installation was successful and the system operates properly NOTE 2 Read this section of the manual and have thorough knowledge of UPS operation before attempting to operate any of the controls 6 6 1 1 U UP PS S C Co on nt tr ro olls s a an nd d I In nd diic ca at to or rs s The controls and indicators identified and described in this section are used to set up control a...

Страница 122: ...112 Eaton 93PM L 20 200kW 208V UPS Installation and Operation Manual 164000724 Rev 01 Figure 41 UPS Controls and Indicators CONTROL PANEL DOOR LATCH UPS Operating Instructions ...

Страница 123: ...horizontal row of status indicators 2 See paragraph 6 2 1 Status Indicators The following paragraphs describe using the UPS control panel to monitor the UPS See paragraph 6 2 3 Using the LCD Touch Screen for use of the operational controls When the unit powers up the screen displays the as shown in Figure 42 6 6 2 2 1 1 S St ta at tu us s I In nd diic ca at to or rs s The four symbols on the botto...

Страница 124: ...en to display the active events screen This screen shows any currently active alarms notices or commands For more information on using the events screen see paragraph 6 2 6 Display Menu Operation System Event Horns The system event horn beeps to alert an operator that an event needing attention is taking place The horn cycles at a half second rate To silence the horn touch any control panel button...

Страница 125: ...perational controls acknowledgments action confirmations and screen prompts You can use the LCD touch screen to Look at a log of UPS events alarms notices and commands see paragraph 6 2 6 Display Menu Operation Monitor UPS operation see paragraph 6 2 6 Display Menu Operation Set UPS parameters see paragraph 6 2 6 Display Menu Operation Control UPS operation see paragraphs 6 2 6 Display Menu Operat...

Страница 126: ...and time for the time stamp display language the unit name meter subscripts password and view the firmware version numbers Used only by service personnel NOTE Screens shown are representative examples of system operation The screen data will vary based on system activity at the time of observation 6 6 2 2 5 5 M Miim miic c S Sc cr re ee en n Figure 44 shows the Main Menu and Mimic screen The Mimic...

Страница 127: ...navigation bar to display an overview of UPS operation including information on load efficiency and consumption If there is an error an error indicator is displayed next to the affected part Active events log can be opened by tapping the error indicator UPS Module Map Tap the UPS MODULE MAP tab on the secondary menu navigation bar to display the status of each UPM System Overview Tap the SYSTEM OV...

Страница 128: ...ondary menu navigation bar to display the screen Tap the function to be changed Make and save the changes Follow screen prompts to accept or abort changes For additional functions tap the 2 button SeeFigure 51 and Figure 52for configuration screens Statistics Statistics Summary Tap the STATISTICS tab on the main menu navigation bar to display a summary of UPS statistics see Figure 53 Statistics De...

Страница 129: ...Eaton 93PM L 20 200kW 208V UPS Installation and Operation Manual 164000724 Rev 01 119 Figure 46 Typical Active Events Screen Figure 47 Typical System Log Screen UPS Operating Instructions ...

Страница 130: ...120 Eaton 93PM L 20 200kW 208V UPS Installation and Operation Manual 164000724 Rev 01 Figure 48 Typical Settings User Screen Figure 49 Typical Information Screen UPS Operating Instructions ...

Страница 131: ...Eaton 93PM L 20 200kW 208V UPS Installation and Operation Manual 164000724 Rev 01 121 Figure 50 Typical About Screen Figure 51 Typical Settings Configuration 1 Screen UPS Operating Instructions ...

Страница 132: ...122 Eaton 93PM L 20 200kW 208V UPS Installation and Operation Manual 164000724 Rev 01 Figure 52 Typical Settings Configuration 2 Screen Figure 53 Typical Statistics Screen UPS Operating Instructions ...

Страница 133: ...ge the Level 1 and Level 2 default passwords when system commissioning startup is performed To Sign in 1 Tap the lock button in the upper right corner of the screen The sign in screen is displayed see Figure 54 2 Tap the password entry area on the screen 3 Enter the password using the keypad displayed and tap the return key see Figure 55 Level 1 default password is 1111 Settings Level 2 default pa...

Страница 134: ... use the command menu screens Table 33 lists the typical System Status Screen Messages that are displayed during UPS operation For UPS operating instructions using the System Controls see paragraph 6 2 8 System Controls Figure 56 through Figure 60 show the major control screens Table 32 Controls Menu Operation Function Subfunction Operation System Controls The CONTROLS tab on the main menu navigat...

Страница 135: ...Operation Charger TURN ON CHARGER TURN OFF CHARGER sets the battery charger on or off Battery Test RUN BATTERY TEST starts the battery test Table 33 Typical System Status Messages Function Message UPS Double Conversion Bypass ESS Bypass Off On Available Charger Charger Resting Charger Figure 56 Typical System Control Screen UPS Operating Instructions ...

Страница 136: ...126 Eaton 93PM L 20 200kW 208V UPS Installation and Operation Manual 164000724 Rev 01 Figure 57 Typical UPS Control Screen Figure 58 Typical UPM Select Screen UPS Operating Instructions ...

Страница 137: ...Eaton 93PM L 20 200kW 208V UPS Installation and Operation Manual 164000724 Rev 01 127 Figure 59 Typical UPM Control Screen Figure 60 Typical EAA Control Screen UPS Operating Instructions ...

Страница 138: ...tem Control screen is displayed 7 Tap the GO ONLINE button 8 If requested enter the Level 1 password Default password is 1111 The rectifier and inverter turn on The inverter continues to ramp up to full voltage Once the inverter reaches full voltage the UPS inverter switchgear closes and the static switch turns off Power is now supplied to the critical load in double conversion mode It takes appro...

Страница 139: ...selecting UPM 3 to start UPM 3 The UPM 3 rectifier and inverter turn on When the inverter reaches full voltage the UPS is ready to transfer to the Double Conversion mode and supply the critical load 6 6 3 3 4 4 S St ta ar rt tiin ng g a a S Siin ng glle e U UP PM M To Start a single UPM 1 Close the UPS input feeder circuit breaker 2 If dual feed close the UPS Bypass input feeder circuit breaker 3 ...

Страница 140: ...enu navigation bar The EAA CONTROLS screen is displayed 3 Tap the DISABLE ESS button The UPS transfers to Double Conversion mode The NORMAL status indicator is illuminated 6 6 3 3 8 8 T Tr ra an ns sf fe er r f fr ro om m D Do ou ub blle e C Co on nv ve er rs siio on n M Mo od de e t to o E ES SS S M Mo od de e To transfer the load to HE Normal mode 1 Tap the CONTROLS tab on the main menu navigati...

Страница 141: ...UTDOWN The power module is turned off The remaining UPMs continue to supply the critical load Logic power remains on 6 6 3 3 1 11 1 S Siin ng glle e U UP PM M R Re es st ta ar rt t To restart a single UPM from a shutdown state 1 Tap the CONTROLS tab on the main menu navigation bar The System Control screen is displayed 2 Tap the MODULES CONTROLS tab on the secondary Control menu navigation bar The...

Страница 142: ...t intended to determine if the batteries are able to support the load NOTE 2 The battery test is only able to be initiated when the battery is fully charged This normally occurs within 72 hours of the start of a charging cycle The command will not be shown if the test is not able to be run To start the battery test 1 Tap the CONTROLS tab on the main menu navigation bar The System Control screen is...

Страница 143: ...m a LOAD OFF command see paragraph 6 3 15 Using the UPS LOAD OFF Command must be given using the front panel controls and all breakers opened A UPS emergency power off is initiated by the REPO pushbutton switch In an emergency you can use this switch to control the UPS output The REPO switch de energizes the critical load and powers down the UPS immediately without asking for verification The UPS ...

Страница 144: ...the key rotate the key back to the vertical position 3 Restart the UPS by following the procedure in paragraph 6 3 1 Starting the UPS in Double Conversion Mode or 6 3 2 Starting the UPS in Bypass Mode WARNING Power is present inside the UPS cabinet until the upstream input feeder circuit breakers and battery breakers are opened Figure 61 REPO Operation Activated Pushbutton locked into place Deacti...

Страница 145: ...lity data with an easy to use interface Industrial Relay Card Minislot IRC MS can be used to indicate the operating status of the UPS system using the customer s monitoring equipment The Industrial Relay Card uses five isolated normally open or normally closed dry relay contacts to indicate the UPS status Normal Bypass Battery and Alarm modes can be monitored See Table 34 for default triggers The ...

Страница 146: ...l warranty expires PredictPulse may also be subscribed to for free as part of a 90 day trial period PredictPulse availability and first year bundled offers may vary by market For more information visit www eaton com predictpulse 7 7 4 4 1 1 P Pr re ed diic ct tP Pu ulls se e S Se er rv viic ce e F Fe ea at tu ur re es s PredictPulse provides proactive monitoring an online dashboard mobile app with...

Страница 147: ...n ns st ta alllliin ng g P Pr re ed diic ct tP Pu ulls se e A quick start guide and self installation wizard tool are available at www eaton com predictpulse The latest updates installation tips and information on connecting PredictPulse are also available at that link For installation support or questions about PredictPulse contact predictpulsesupport eaton com PredictPulse relies on a PXGMS card...

Страница 148: ...138 Eaton 93PM L 20 200kW 208V UPS Installation and Operation Manual 164000724 Rev 01 Communication ...

Страница 149: ...ualified service personnel only LETHAL VOLTAGE PRESENT This unit should not be operated with the cabinet doors open or protective panels removed Do not make any assumptions about the electrical state of any cabinet in the UPS system Each battery string is an energy source in itself DO NOT ATTEMPT TO ACCESS ANY INTERNAL AREA OF THE BATTERY STRING YOURSELF VOLTAGES ARE ALWAYS PRESENT IN THE BATTERY ...

Страница 150: ...ed If an alarm lamp is illuminated or the Normal status indicator is not illuminated contact an Eaton service representative 8 8 2 2 2 2 M MO ON NT TH HL LY Y M Ma aiin nt te en na an nc ce e Perform the following steps monthly 1 Monitor system parameters as described in paragraph 6 2 Using the Control Panel 2 Check the UPS air filter located behind the front door and wash or replace as necessary ...

Страница 151: ...enance Periodic inspections of the UPS should be made to determine if components wiring and connections exhibit evidence of overheating Particular attention should be given to the compression lug connections Maintenance procedures should specify that the compression lug connections be retorqued to values listed in this manual UPS Maintenance ...

Страница 152: ...ui s imposent Pour le remplacement utiliser le même nombre et modéle des batteries L élimination des batteries est règlementée Consulter les codes locaux à cet effet CAUTION Do not discard the UPS or the UPS batteries in the trash This product contains sealed lead acid batteries and must be disposed of properly For more information contact your local recycling reuse or hazardous waste center Speci...

Страница 153: ... aiin niin ng g A basic training course available from Eaton gives you a competent working knowledge of the UPS system operation and teaches you how to perform first level corrective maintenance For more information about training and other services contact the Customer Reliability Center see paragraph 1 9 Getting Help UPS Maintenance ...

Страница 154: ...144 Eaton 93PM L 20 200kW 208V UPS Installation and Operation Manual 164000724 Rev 01 UPS Maintenance ...

Страница 155: ...3PM L 200 2 Eaton 93PM L 200 3 N 1 35 kW Eaton 93PM L 200 7 Eaton 93PM L 200 8 N 1 135 kW Eaton 93PM L 200 2 Eaton 93PM L 200 3 N 1 40 kW Eaton 93PM L 200 7 Eaton 93PM L 200 8 N 1 140 kW Eaton 93PM L 200 3 Eaton 93PM L 200 4 N 1 45 kW Eaton 93PM L 200 8 Eaton 93PM L 200 9 N 1 145 kW Eaton 93PM L 200 3 Eaton 93PM L 200 4 N 1 50 kW Eaton 93PM L 200 8 Eaton 93PM L 200 9 N 1 150 kW Eaton 93PM L 200 3 ...

Страница 156: ...Table 5 through Table 16 Reduced for Generator Adjustable Input Current Harmonic Content 3 5 THD at full load Power Factor Minimum 0 99 Line Surges 6 kV OC 3 kA SC per ANSI 62 41 and IEC 801 4 Battery Voltage 240 cell 480Vdc Battery Charging Capacity 7 A maximum per 20 kW module at full load at nominal input voltage 9 9 2 2 2 2 U UP PS S O Ou ut tp pu ut t UPS Output Capacity 100 rated current Out...

Страница 157: ...0 C without derating Storage Temperature 25 to 55 C excluding batteries prolonged storage above 40 C causes rapid battery self discharge Relative Humidity operating and storage 5 to 95 noncondensing Acoustical Noise 200 kW at 100 load 65 dBA at a 1m distance per ISO 7779 Agency Markings Safety UL1778 5th Ed CSA22 2 No 107 3 14 3rd Ed EMI Emissions Meets IEC 62040 2 C2 CISPR 22 VCCI and FCC Part 15...

Страница 158: ...148 Eaton 93PM L 20 200kW 208V UPS Installation and Operation Manual 164000724 Rev 01 Product Specifications ...

Страница 159: ...ts that are replaced may be new or reconditioned All parts replaced by Eaton shall become the property of Eaton LIMITED WARRANTY PERIOD The period covered by this Warranty for Product installed and currently located in the fifty 50 United States and the District of Columbia is six 6 months from the date of Product purchase for labor coverage when no startup is performed by an authorized Eaton Cust...

Страница 160: ... Warranty the End User must register the product warranty via mail or online at www powerquality eaton com ProductRegistration product registration use the Product in a normal way follow the Product s user s guide and protect against further damage to the Product if there is a covered defect OTHER LIMITATIONS Eaton s obligations under this Warranty are expressly conditioned upon receipt by Eaton o...

Страница 161: ...Eaton 93PM L 20 200kW 208V UPS Installation and Operation Manual 164000724 Rev 01 151 Warranty ...

Страница 162: ...16400072401 164000724 01 ...

Отзывы: