


The operations below explains how to carry out various
settings related to the packet transmission and 64K data
transmission. There are two types of setting methods; “auto
setting” for easy operation and “manual setting” for the user
familiar to a personal computer. Before setting, confirm that
the FOMA phone is connected to your personal computer.
“
スタート
(Start)” “
プログラム
(Programs)”
Open “
FOMA PC設定ソフト
(FOMA PC
setup software)”
<For Windows
®
XP>
Select “
スタート
(Start)”
→
“
すべてのプログラム
(All programs)”
→
Open “FOMA PC
設定ソフト
(FOMA PC setup software)”
On the “FOMA PC setup software”, you can easily create FOMA
dial-up setting by answering (selecting and entering) the displayed
questions according to the information of “connection method” and
“connected provider” you selected.
・
See this page for setting the packet transmission from
“
かんたん設定
(Easy Setting)”.
・
See page 473 for setting the 64K data transmission from
“
かんたん設定
(Easy Setting)”.
・
See page 477 for setting “W-TCP
設定
(W-TCP setup)”.
・
See page 478 for setting “
接続先
(APN)
設定
[access point name
(APN setting)]”.
1
Setting Transmission
The packet transmission is charged according to the
amount of data you sent and received, regardless of the
transmission time and distance. (Maximum download
speed: 384 kbps, Maximum upload speed: 64 kbps)
You are advised to use mopera U for connecting to the
Internet via the FOMA phone. mopera U supports the
broadband connection option and international
roaming. (You need to subscribe to it separately.) If you
want to connect to the internet right now, use mopera
to have transmission setup done.
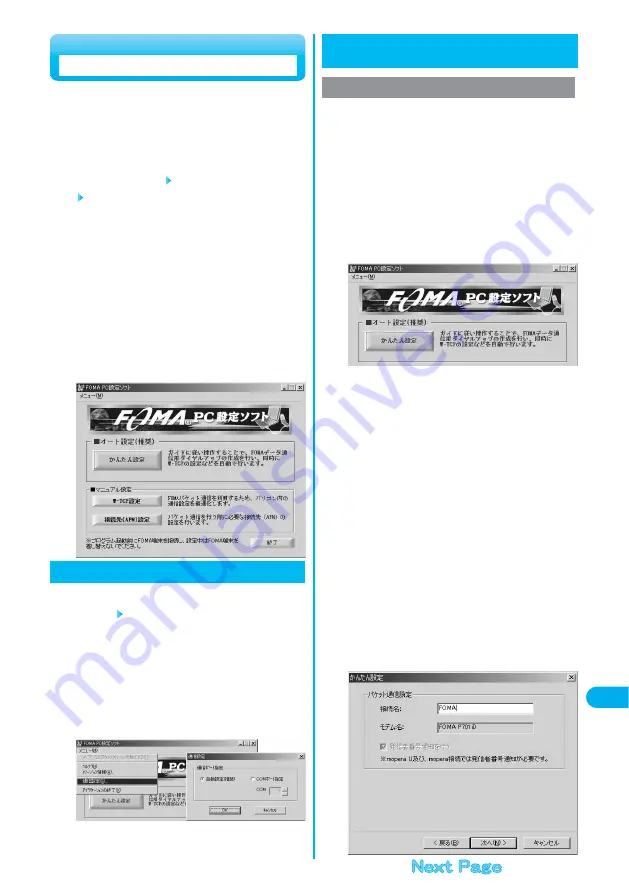
Click “
かんたん設定
(Easy setting)”.
1
Selecting Packet Transmission from
かんたん設定
(Easy Setting)
Using mopera U or mopera as an access point
Select “
パケット通信
(Packet transmission)”,
then click “
次へ
(Next)”.
Confirm that “
パケット通信
(Packet transmission)” is checked, then
click “
次へ
(Next)”.
2
Select “mopera U
への接続
(Connect to
mopera U)” or “mopera
への接続
(Connect to
mopera)”, then click “
次へ
(Next)”.
To use mopera U, select “mopera U
への接続
(Connect to mopera U)”.
To use mopera, select “mopera
への接続
(Connect to mopera)”.
When “mopera U
への接続
(Connect to mopera U)” is selected, the
confirmation display appears asking whether you have signed up for it.
Click “
はい
( YES)”.
●
See page 472 for using a provider other than mopera U or mopera.
3
471
Data
Transmission
Click “OK”.
●
The system obtains the access point name (APN) setting from the
FOMA phone connected to the personal computer. Wait for a while.
4
Enter an access point name, then click “
次へ
(Next)”.
You can specify any name for the currently created connection.
Enter a plain name in the “
接続名
(Access point name)” field.
●
You cannot enter the following half-pitch symbols:
¥
, /, :,
*
, ?, !, <, >, |, and ”.
5
“
メニュー
(Menu)” of the FOMA PC setup
software Select “
通信設定
(Transmission setup)”
・自動設定(推奨)
[Auto-setup (recommended)]
The connected FOMA phone is automatically specified. Usually,
select “Auto-setup”.
・
COM
ポート指定
(Specifying COM port)
To specify a COM port, specify the COM port number the FOMA
phone is connected to. (COM 1 to COM 99)
※
With Windows
®
98 and Windows
®
Me, the APN information cannot be obtained
or written while connecting to APN when you have specified the
port number later than COM 20.
●
See page 479 for how to specify the COM port number.
1
Click “OK”.
The settings are applied.
2
Specifying Transmission Port
Содержание FOMA P701iD
Страница 98: ...96...
Страница 339: ...i channel What is i channel 338 Using i channel 340 Using Detailed Functions 341 337...
Страница 344: ...342...
Страница 460: ...458...
Страница 502: ...500...
Страница 567: ...565 Index 566 How To Use Quick Manual 572 Quick Manual The end of this volume Index Quick Manual...


