4 - 14
How Do I ...?
DigiGate-700
for Windows
™
®
1. From the
Main Menu,
Click
on the
Editor
button.
2. From the
DigiGate Word Processor
menu,
Click
on the
DigiEdit
button.
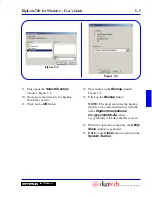
3. This will open the
DigiEdit Word Processor
window.
4.
Click
inside the text area and type your letter.
5. When you reach a point in your document to insert a data item,
Click
on
Insert
in the windows Menu
Bar to open the
Insert
menu.
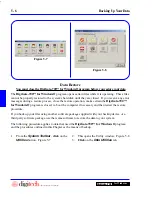
6.
Select
Database
from the menu to open the
Insert Database Item
window.
7. Use the scroll bar to find the data field you want and
Click
on the data item.
8.
Click
on the
OK
button to insert the data field.
9. The data item will be inserted into the document at the cursor position.
10. Data items are enclosed in double brackets.
11. When your document prints, the information in that field of the tenant record will be printed in place of
the bracketed field name and all text will be adjusted for the size of the substitution.
12. One document will be printed for each record selected in the database.
NOTE: See Page 3-64 and 3-67 in Chapter 3.
Create a Custom Document
Print Mail Merge Letters and Notifications
1. From the
DigiGate Word Processor
menu,
Click
on the
Merge
button.
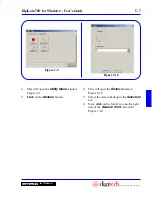
2. This will open the
Merge
window with the
File to Print
tab active.
3.
Click
on the
Print Setup
button.
4. This opens the
Print Setup
window.
Select
the printer you want to use.
5.
Click
on the
OK
button.
6. On the
Merge
window,
Click
on the button to the right of the
Select File To Print
field or type in the
name of a text file you want to use.
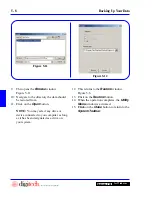
7. From the
Open
window,
Click
on the file name you want to use and
Click
on the
Open
button to select
the file.
8. With your document
Selected
,
Click
on the
Unit Info
tab.
9. This will activate the
Unit Info
window, which allows you to limit your selection to a specific unit (
Unit
Number
field), all units by status (
Unit Status
field), and other groupings.
10. When you have made all necessary selections,
Click
on the
Tenant Info
tab.
11. This will activate the
Tenant Info
screen, which allows you to further limit your selection to a specific
tenant (
Last Name
field), and/or by
Keypad Zone
,
Time Zone
,
Profile
.
12. When you have made all necessary selections,
Click
on the
OK
button to print the letters.
NOTE: See Page 3-68 in Chapter 3.
Содержание DigiGate-700
Страница 1: ...World Class Security Solutions DigiGate User s Guide ...
Страница 2: ......
Страница 3: ...User s Guide DigiGate 700 ...
Страница 166: ...This Page Left Blank Intentionally 3 86 Operating Instructions DigiGate 700 for Windows ...
Страница 202: ...This Page Left Blank Intentionally B 8 Appendix Title DigiGate 700 for Windows ...
Страница 208: ...D 4 Merge Data Fields Descriptions DigiGate 700 for Windows This Page Left Blank Intentionally ...
Страница 214: ...This Page Left Blank Intentionally E 6 Upgrading DOS Software to Windows DigiGate 700 for Windows ...
Страница 224: ...This Page Left Blank Intentionally G 6 DigiGate 700 for Windows Program Error Codes ...
Страница 244: ...This Page Left Blank Intentionally K 8 DigiGate 700 for Windows Program Registration Codes ...
Страница 262: ...X 10 Index DigiGate 700 for Windows This Page Left Blank Intentionally 2 3 ...
Страница 263: ......
Страница 264: ......
Страница 265: ......
Страница 266: ...DigiGate User s Guide Digitech International Inc 800 523 9504 toll free www digitech intl com ...


