background image

3 - 82

Operating Instructions

DigiGate-700

for Windows

®

1.

Click

 the 

Move In

 button on the 

Main Menu

screen.

2.

Select

 a unit and 

Click

 on the 

OK

 button.

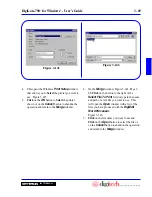
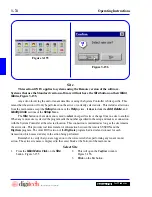
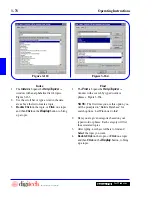
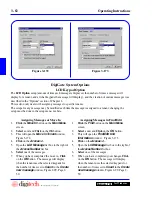
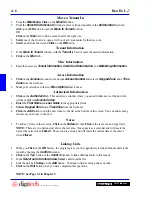
3. This will open the 

Move In Tenant

 window.

Figure 3-172.

4.

Click

 on the 

Access

 tab.

5. Open the 

LCD Message

 list box to the right of

the 

Access Number

 list box.

6.

Select

 one of the messages.

7. When you have completed the move in, 

Click

on the 

OK

 button.  The message will display

when the tenant uses the selected keypads for
the number of times set in 

Count

 in the

 Create

new message

 window, Figure 2-99, Page 2-

50.

1.

Click

 the 

Find

 button on the 

Main Menu

screen.

2.

Select

 a unit and 

Click

 on the 

OK

 button.

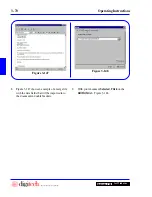
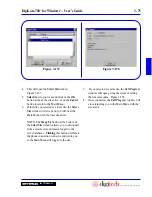
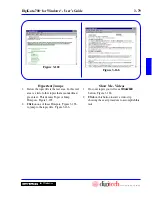
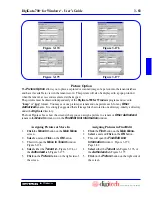
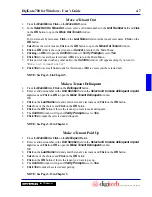
3. This will open the 

Find/Edit Unit

Information

 window.   Figure 3-173.

4.

Click

 on the 

Access

 tab.

5. Open the 

LCD Message

 list box to the right of

the 

Access Number

 list box.

6.

Select

 one of the messages.

7. When you have completed your changes,

 Click

on the 

OK

 button.  The message will display

when the tenant uses the selected keypads for
the number of times set in 

Count

 in the

 Create

new message

 window, Figure 2-99, Page 2-

50.

Figure 3-172

Figure 3-173

The

 LCD Option

 setup (amount of time each message is displayed, the number of times a message will

display for a tenant, and at what keypads the message will display),  and the creation of custom messages was
described in the “Options” section of Chapter 2.
This section only deals with assigning messages to specific tenants.
The setups for any message may be modified each time the message is assigned to a tenant, changing the
setup must be done in the setup menu, not here.

LCD Keypad Option

DigiGate System Options

Assigning Messages at Move In

Assigning Messages in Find/Edit

Содержание DigiGate-700

Страница 1: ...World Class Security Solutions DigiGate User s Guide ...

Страница 2: ......

Страница 3: ...User s Guide DigiGate 700 ...

Страница 4: ...Digitech Interna tional Inc Microsoft MS DOS and Windows are registered trademarks of Microsoft Corporation Other brands and their products are trademarks or registered trademarks of their respective holders and should be noted as such Acrobat Reader Copyright 1987 2003 Adobe Systems Incorporated All rights reserved Adobe the Adobe logo Acrobat and the Acrobat logo are trademarks of Adobe Systems ...

Страница 5: ... 5 Terms Used 1 5 Windows 95 Screen Objects 1 6 Windows 95 Controls 1 7 Installing the DigiGate 700 for Windows Software 1 8 SiteEdit Information and Installation 1 14 Installing SiteEdit 1 14 Minimum System Requirements 1 14 Chapter 2 Setting Up a New Site 2 1 Introduction 2 2 Starting the DigiGate 700 for Windows Program 2 2 To Start the Program 2 2 System Setup 2 5 Security Levels 2 5 User IDs ...

Страница 6: ...om Messages 2 52 Default Preset Messages 2 52 Default Custom Messages 2 52 Chapter 3 Operating Instructions 3 1 Introduction 3 2 Move In Renting a Unit 3 2 Selecting a Unit 3 2 Tenant Information 3 4 Misc Information 3 4 Access Information 3 5 Unit Information 3 5 Authorized Information 3 6 Notes 3 6 Linking Units 3 7 Move Out Vacating a Unit 3 8 Delinquent Making a Tenant Delinquent or Paid Up 3 ...

Страница 7: ...4 Setup Info 3 45 Activity Reports 3 46 Onsite 3 46 Activity Log 3 47 Transactions 3 49 Utility 3 51 System Controller Utilities 3 51 Clear SysCon 3 51 Set Controller 3 52 Download All 3 53 Clear Areas 3 54 Version 3 55 Date Time 3 56 Activity Log 3 57 Clear Graphics 3 58 Access Code 3 58 Backup 3 60 Data Utilities 3 60 Restore 3 61 Remove 3 62 Word Processing Editor 3 64 DigiEdit 3 64 Screen Layo...

Страница 8: ...ter 4 How Do I 4 1 Install the DigiGate 700 for Windows program 4 2 Start the DigiGate 700 for Windows program 4 3 Quit the DigiGate 700 for Windows program 4 3 Backup my data 4 3 Add Units 4 4 Unit Numbers 4 4 Unit Size Information 4 4 Misc Unit Information 4 4 Unit Features 4 4 Door Alarm Options 4 4 Delete Units 4 5 Modify Units 4 5 Size 4 5 Misc 4 5 Features 4 5 Door Alarms 4 5 Move a Tenant I...

Страница 9: ...g Up Your Data 5 1 Introduction 5 2 Backup Strategies 5 2 Data Backup 5 3 Data Restore 5 6 Appendix A Default Settings Values A 1 Introduction A 2 Default Settings A 2 Default Values A 3 Appendix B Preparation for System Setup B 1 Introduction B 2 Do I need User ID and Security Levels B 2 What information should I gather about my tenants B 2 What information should I gather about my units B 4 What...

Страница 10: ...action Messages H 1 Introduction H 2 Activity Log Messages H 2 AccessActivities H 2 Misc SysCon Activities H 2 Board Activities H 2 TimeActivities H 2 AlarmActivities H 4 Transaction Messages H 4 Appendix I The DigiGraphics System I 1 Introduction I 2 Controlling the Display I 3 Scanning I 3 Zoom I 3 Site Status I 4 Activity Log I 4 Programming the Display I 5 The Menu I 5 Scanning Speeds I 6 The ...

Страница 11: ...L Setting Up the LE Software Version L 1 Copying the Desktop Icon L 2 Renaming the Copy of Desktop Icon L 4 Changing the Properties of the New Desktop Icon L 5 Changes in the LE Version L 7 The Main Menu L 7 The Report Menu L 7 The Utility Menu L 8 The Setup Menu L 8 Index X 1 ...

Страница 12: ...actual agreements Thereafter interest shall be charged on any due and unpaid balance at a rate equal to one and one half percent 1 1 2 per month from the due date until paid in full In no event shall the interest be greater than the maximum permitted by applicable law If the SELLER deems it necessary to employ an attorney or collection agency to collect this account or any part thereof the PURCHAS...

Страница 13: ...oduct resulting from accident disaster misuse or abuse extraneous causes including lightning and transient currents or modifications of the product not specifically approved by Digitech Limited Warranty service may be obtained by pre paid delivery of the product to the warranty service location during the warranty period providing a Return of Materials Authorization Number RMA has been issued Clai...

Страница 14: ...tive units still under warranty will be repaired as stated in the original warranty agreement The warranty period for repaired items shall be 90 days or the remainder of the original warranty period whichever is greater Non Warranty Repairs Defective items not covered under warranty will be repaired and charged based on the current charges in effect at the time of the repair The warranty period fo...

Страница 15: ...0 0799 Tech Support 800 523 9504 1 How to Reach Digitech International Inc 2 What Is Needed to Run DigiGate 700 for Windows 3 DigiTech Customer Support 4 Contacting the Service Department 5 What You Need When You Call the Service Department 6 Conventions Used in this Guide 7 The Windows 95 Interface 8 Installing the DigiGate 700 for Windows Software Corporate Address Phone Fax E Mail and Web Site ...

Страница 16: ... call will be handled on a priority basis The information needed by your Service Technician is listed on the following page 1 3 Having this information available when you call will shorten the time needed to diagnose and correct your problem It will also reduce the time required for a technician to return a call because calls are being processed as efficiently as possible DigiTech Customer Support...

Страница 17: ...roller Serial Port Com1 Com4 ______________ Any other Serial Devices attached to your PC ______________ ______________ I e Mouse Modem Serial Printer and the Serial Ports where they are attached Exactly what you did before the error occured ____________________________ _______________________________________________________________________________ __________________________________________________...

Страница 18: ...u t e S t i n U b a t l l i w t n o f l a m r o n s e d i u G e h t d n u o r a s n o i t a t o u Q e d i u g e h t n i s n o i t c e s r e h t o t n e s e r p e r o t d e s u e b s e t o u q n i d e s o l c n e t x e t e h t e z i s a h p m e o t r o n o n o i t c e s p u t e S m e t s y S e h t e e S e g a p n i p e t s e n o r o t s i l a n i m e t i n a e t a c i d n i o t d e s U r o f d e s ...

Страница 19: ...o e v i t c a s i d e t c e l e S n o c i h p a r g r o t x e t e h t d n u o r a e l g n a t c e r d e t t o d a s b a t r o s n o t t u b n O y l l a u s u e n i l l a c i t r e v d i l o s a s d l e i f y r t n e t x e t r o F r o s r u c e h t s e t a c i d n i t c e j b o e h t f o e c a f e h t r o s e x o b t s i l h t i W d e r e t n e e b l l i w t x e t e r e h w n o i t i s o p e h t d ...

Страница 20: ...the right of the text area When opened the list will show one of the rows items selected with the Cursor You can select any item in the list by clicking on it or by moving the cursor up or down with the directions arrow keys and pressing the Enter key The list will close and your selection will be displayed in the text area Radio Buttons Figure 1 5 shows a Radio Button set A Radio Button set is an...

Страница 21: ...are allowed are shown in dark letters and actions not allowed are dimmed Restore will open a Window that has been minimized to its original state Move and Size are self explanatory Minimize reduces the Window to an icon on the Task Bar the same as _ Maximize expands the Window to full screen the same as the Box Symbol and Close removes the Window and closes the program or routine the same as X Hor...

Страница 22: ...he installation process close all applications running on your computer 2 On the Windows 95 Task Bar Click on the Start button Figure 1 16 3 Select Settings then Control Panel Figure 1 16 4 Double Click on Add Remove Programs Figure 1 17 Installing the DigiGate 700 for Windows Software ...

Страница 23: ... 1 19 5 When theAdd Remove Programs window opens Select the Install Uninstall tab 6 Click the Install button Figure 1 18 7 When the screen shown in Figure 1 19 appears insert the Disk labeled DigiGate 700 for Windows Installation Disk 1 into the floppy disk drive A or insert the CD ROM into the CD drive ...

Страница 24: ...ing from a CD ROM use the letter of the CD ROM drive in place of the A Do NOT type the quotation marks 9 Click on the Finish button 10 Note the Back button Clicking on this button at any time it is active will return you to the previous step in the installation procedure where you can edit the entry 11 Figure 1 21 shows the Setup window which loads the installation Wizard in Windows 95 Wait this o...

Страница 25: ...e any other programs running Click on the Cancel button to close the DigiGate installation close all other programs that may be running and restart the Installation 13 If there are no other programs running Click on the Next button 14 Figure 1 23 shows the User Information window Here you should enter your Name and the Company name 15 Click on the Next button ...

Страница 26: ...ndows You may accept this type in your choice or select from the list of existing groups on your PC 17 When all is correct Click on the Next button 18 Figure 1 25 shows the Start Copy Files window This Window shows you the selec tions you have made to this point If any of these are incorrect you can Click on the Back button and correct the entry 19 When all is correct Click on the Next button ...

Страница 27: ...top the Installation at any time Click on the Cancel button 22 If you are installing from floppy disks you will be asked to change disks several times during the installation procedure Figure 1 27 Check that you are inserting the correct numbered disk each time and then Click on the OK button If you put in the wrong disk the screen asking you to change disks will be repeated until you insert the c...

Страница 28: ...mpletely enclosed in a unit SiteEdit allows you to resize or move unit numbers anywhere on the image When working with unit numbers take care that they don t move outside any units or touch a unit border from the inside The unit number database works only with images named SITE PCX When images with other names are created they are saved without unit numbers The image editor creates 256 color PCX f...

Страница 29: ...tart the Program Security Levels User IDs Required Fields System Configuration Tenant Profile Codes Marketing Codes Insurance Codes Credit Card Codes Time Zones Door Alarms Defining Holidays Serial Port Unit Types Unit Features Door Types Floor Types Unit Sizes Unit Numbers Unit Size Information Misc Unit Information Unit Features Door Alarm Options Removing Units from the Database Finding a Unit ...

Страница 30: ...igiGate 700 for Windows program for the first time you need to make sure that the DigiTech System Controller is powered up and connected to one of the serial ports on your PC When the program starts it searches for the System Controller If found the information about the connection is stored If not detected you should check for proper power connection and data connection to the PC If your location...

Страница 31: ... first time the program is started you will have to enter the default User ID and Pass word These are USER for the User ID and 1234 for the Password as shown in Figure 2 4 Note that all characters typed into the Password text box are shown as asterisks 8 Click on OK to continue or Cancel to return to the desktop NOTE If you plan to set up User Security for your DigiGate 700 for Windows software we...

Страница 32: ...em Controller and set the system for communications with the System Controller if it is found 14 If the System Controller cannot be located an Error window will be shown with a prompt of System Controller not found Figure 2 7 15 Click on the OK button to continue NOTE Not finding the System Controller will not affect the setup described in this chapter It will however affect the operation of your ...

Страница 33: ...at specific information MUST be entered The DigiGate 700 system requires some fields in order to operate correctly You can determine which other fields must be completed for each tenant or unit Default fields let you define information that will be entered into the record for you automatically whenever you add a new tenant or unit i e City State Area Code etc This can save valuable time during the...

Страница 34: ...Consider this to be the Top Level or master security level in the system 5 Click on the Add button to enter another security level 6 This will open the Add Security Level window Figure 2 11 7 The window opens with blank fields To add a new level Select the Security Level field and type the two character code you choose We have used RM as the Security Level code and Relief Manager as the Descriptio...

Страница 35: ...efine Security Level window Figure 2 10 Page 2 6 The line will be blue when it is selected 12 Click on the Edit button 13 This will open the Edit Security Level window Figure 2 13 This window is the same as the Add window Change the information you want and Click on the OK button to accept the changes or the Cancel button to discard the changes 14 To Delete an existing level Click on the line you ...

Страница 36: ...sed 1357 here Figure 2 15 7 Click on one of the selections Yes No in the Verify Prompts radio button set Figure 2 15 NOTE We strongly suggest that you check the Yes selection for Verify Prompts This will cause a Confirm window Figure 2 19 Page 2 10 to appear whenever you have started a destructive action such as deleting a record etc This gives you a chance to verify that you want to do this and t...

Страница 37: ...y Activity Log radio button set Click on one of the selections Yes No to have the monitor display or not display respectively Figure 2 17 12 If you selected Yes in the Display set you can set the number of items to display and the length of time the Monitor displays Select the Number of Activities to Display text box Here you can type in the number you prefer or use the spinner arrows on the right...

Страница 38: ...ges or the Cancel button to discard the changes 18 To Delete an existing User Click on the line you want to delete in the white portion of the User IDs window Figure 2 14 Page 2 8 The line will be blue when it is selected 19 Click on the Delete button You will be asked to confirm your decision if the Verify Prompts option has been selected in the User ID setup Figure 2 19 20 Click on the Yes butto...

Страница 39: ...elds you want to make mandatory when you enter tenant information 5 When all Tenant Information fields have been set as you want them Click on the Unit Information tab 6 This opens the Unit Information window which shows the fields you can require when you enter unit information Figure 2 21 7 Select the fields you want to make mandatory when you enter unit information NOTE Be careful before you Se...

Страница 40: ...ure 2 23 Default Field Values The System Configuration window is used to set the default values for the DigiGate 700 for Windows system The information here will be entered into every new tenant record automatically saving you data entry time This tenant information may be changed in the tenant record for cases that do not match the default Even though some of this information will be entered in t...

Страница 41: ...he program Figure 2 25 10 The first consideration is User Security and Require User IDs Click on the check box to activate or deactivate this feature When activated the DigiGate Log On window allows users to start the program with their own configuration allows restriction of features to certain users and tracking of user activity on the system If deactivated all users have access to all functions...

Страница 42: ...e program installation This file is predefined and included with the shipped program NOTE The DigiGate 700 for Windows program uses Microsoft Backup which MUST be installed on your computer before you can use the DigiGate backup function 17 Clicking on the folder at the right side of this field opens the Windows 95 98 Browse window Figure 2 27 You MUST be familiar with creating Windows backup sets...

Страница 43: ...r or project manager Site informa tion may be modified as needed To add or delete sites contact your reseller or project manager 3 Select the Site and Click on the Edit button Figure 2 29 Figure 2 28 Figure 2 29 Remote Software Site Definitions This section ONLY applies to systems using the Remote version of the software Systems that use the Standard version software will not have the Site button ...

Страница 44: ... site enter the telephone number of the modem at the remote site in the Modem Number field If this is a headquarters or local site leave this field blank 8 The Data Path field will hold the location of the Unit and Tenant files for this site The data path was set up before shipping your software and has been created on your PC during installation of the program DO NOT CHANGE THIS INFORMATION UNLES...

Страница 45: ... the Add Button Figure 2 33 Figure 2 32 Figure 2 33 Tenant Profile Codes Miscellaneous Setup This section deals with information about your tenants their use of the Unit payment method etc The information in this section can be set as the default for fields to be entered at Move In It may also be modified at the time of Move In when necessary You may also decide which of these are needed for your ...

Страница 46: ...t available for editing only the Descrip tion field may be changed 10 Select the Description field and change the information 11 Click on OK to accept the changes or Cancel to discard the information entered 12 To delete an existing type Select the record you want to delete in the Modify Profile Types window Figure 2 33 Page 2 17 The line will be blue when it is Selected 13 Click on the Delete but...

Страница 47: ...Windows 1 Click on the Misc Setup tab of the Setup Menu then Click on the Marketing button Figure 2 36 2 This will open the Modify Marketing Types window Figure 2 37 3 To add a new code Click on the Add button Figure 2 37 Figure 2 36 Figure 2 37 Marketing Codes ...

Страница 48: ...not available for editing only the Descrip tion field may be changed 10 Select the Description field and change the information 11 Click on OK to accept the changes or Cancel to discard the information entered 12 To delete an existing type Select the record you want to delete in the Modify Marketing Types window Figure 2 37 Page 2 19 The line will be blue when it is Selected 13 Click on the Delete...

Страница 49: ...Windows 1 Click on the Misc Setup tab of the Setup Menu then Click on the Insurance button Figure 2 40 2 This will open the Modify Insurance Types window Figure 2 41 3 To add a new code Click on the Add button Figure 2 41 Figure 2 40 Figure 2 41 Insurance Codes ...

Страница 50: ...not available for editing only the Descrip tion field may be changed 10 Select the Description field and change the information 11 Click on OK to accept the changes or Cancel to discard the information entered 12 To delete an existing type Select the record you want to delete in the Modify Insurance Types window Figure 2 41 Page 2 21 The line will be blue when it is Selected 13 Click on the Delete...

Страница 51: ...dows 1 Click on the Misc Setup tab of the Setup Menu then Click on the Credit Card button Figure 2 44 2 This will open the Modify Credit Card Types window Figure 2 45 3 To add a new code Click on the Add button Figure 2 45 Figure 2 44 Figure 2 45 Credit Card Codes ...

Страница 52: ...s not available for editing only the Descrip tion field may be changed 10 Select the Description field and change the information 11 Click on OK to accept the changes or Cancel to discard the information entered 12 To delete an existing type Select the record you want to delete in the Modify Credit Card Types window Figure 2 45 Page 2 23 The line will be blue when it is Selected 13 Click on the De...

Страница 53: ...hips with two pre defined Time Zones 0 and 1 The zero time zone is fixed and cannot be modified Time Zone 0 is for 24 Hr Access Time Zone 1 is labeled Normal Hours and is set for 6 AM to 10 PM These times can be modified 3 To add a new code Click on the Add button Figure 2 49 Time Zones System Controller Setup This section deals with technical information about your Site and the way your Gate Syst...

Страница 54: ...differ into the fields needed 9 Click on OK to accept and add a new zone or Cancel to discard the information entered Figure 2 50 NOTE Clicking on the Closed button to the right of Holiday times will make the gate inactive for the Holidays you define later in this chapter Figure 2 51 10 To edit an existing Time Zone Select the record you want to edit in the Define Time Zones window Figure 2 49 Pag...

Страница 55: ...ed in Unchecked means that the unit will remain armed when vacant Figure 2 53 4 To arm or disarm all vacant units at your location click on the appropriate button in the list Arm Vacant Units or Disarm Vacant Units then Click on the OK button to immedi ately arm or disarm the vacant units NOTE This option allows very flexible control over your units For example you may want your vacant units disar...

Страница 56: ... and type in your description 7 Select and open the Month list box and Select the correct month Figure 2 55 8 In the calendar displayed for Day Click on the day of the Holiday you are defining 9 Click on OK to accept and add a new holiday or Cancel to discard the information entered 10 To edit a holiday Select it from the list Figure 2 54 Click on the Edit button and change the information you cho...

Страница 57: ...t is different for local and remote sites As stated before remote systems are connected to modems that communicate over phone lines by the TAPI interface provided in Windows 95 TAPI Telephony Application Programming Interface was developed jointly by Microsoft and Intel and enables Windows applications to share telephony devices with each other and provides a common means of handling different med...

Страница 58: ...f Storage 3 To add a new type Click on the Add button Figure 2 59 Figure 2 58 Figure 2 59 Unit Types Unit Setup This section deals with what information you want to maintain at your location Unit Types Unit Features Door Types Floor Types and Unit Sizes are all optional information The necessity of entering information here will be determined by what you entered in the Required Fields section You ...

Страница 59: ...information entered 8 To edit an existing Unit Type Select the record you want to edit in the Modify Unit Types window Figure 2 59 Page 2 30 9 Click on the Edit button This will open the Edit Unit Type window Figure 2 61 10 Follow Steps 5 through 7 11 To delete a Unit Type Select the record you want to delete in the Modify Unit Types window Figure 2 59 Page 2 30 12 Click on the Delete button You w...

Страница 60: ...try will always be capitalized 6 Select the Description field and type in your description 7 Click on OK to accept and add a new type or Cancel to discard the information entered 8 To edit an existing Unit Feature Select the record you want to edit in the Modify Unit Features window Figure 2 62 9 Click on the Edit button This will open the Edit Unit Feature window Follow steps 6 and 7 10 To delete...

Страница 61: ...up Menu then Click on the Door Types button Figure 2 64 2 This will open the Modify Door Types window Figure 2 65 NOTE The DigiGate 700 for Windows system ships with two predefined Door Types Rollup Door and Swing Door 3 To add a new type Click on the Add button Figure 2 65 Figure 2 64 Figure 2 65 Door Types ...

Страница 62: ...ation entered 8 To edit an existing Door Type Select the record you want to edit in the Modify Door Types window Figure 2 65 Page 2 33 9 Click on the Edit button This will open the Edit Door Type window Figure 2 67 10 Follow steps 6 and 7 11 To delete a Door Type Select the record you want to delete in the Modify Door Types window Figure 2 65 Page 2 33 12 Click on the Delete button You will be ask...

Страница 63: ... the Setup Menu then Click on the Floors button Figure 2 68 2 This will open the Modify Floor Types window Figure 2 69 NOTE The DigiGate 700 for Windows system ships with one predefined Floor Type Ground Level 3 To add a new type Click on the Add button Figure 2 69 Figure 2 68 Figure 2 69 Floor Types ...

Страница 64: ...tion entered 8 To edit an existing Floor Type Select the record you want to edit in the Modify Floor Type window Figure 2 69 Page 2 35 9 Click on the Edit button This will open the Edit Floor Type window Figure 2 71 10 Follow steps 6 and 7 11 To delete a Floor Type Select the record you want to delete in the Modify Floor Type window Figure 2 69 Page 2 35 12 Click on the Delete button You will be a...

Страница 65: ...tab of the Setup Menu then Click on the Unit Sizes button Figure 2 72 2 This will open the Modify Unit Sizes window Figure 2 73 NOTE The DigiGate 700 for Windows system ships with NO predefined Unit Sizes 3 To add a new type Click on the Add button Figure 2 73 Figure 2 72 Figure 2 73 Unit Sizes ...

Страница 66: ...mation or Cancel to discard the information entered 10 To edit an existing Unit Size Select the record you want to edit in the Modify Unit Sizes window Figure 2 73 Page 2 37 11 Click on the Edit Button 12 This will open the Edit Unit Size window Figure 2 75 13 Follow steps 6 through 9 14 To delete a Unit Size Code Select the record you want to delete in the Modify Unit Sizes window Figure 2 73 Pag...

Страница 67: ...numbers by a value other than one enter the value in the Increment By field 6 If you do not have Required Fields or Door Alarm information for this group Click on the OK button The Add Unit Progress bar will reflect the units being added Otherwise continue with the following steps Figure 2 76 Figure 2 77 Adding Units Before you can rent units at your location you must create add the units in the D...

Страница 68: ...d Price fields will display the information you entered earlier in the set up procedure Figure 2 78 1 If you selected Unit Type Door Type Floors or Inside Outside as Required Fields Click on the Misc tab and Select the proper descriptions from the appropriate list boxes If necessary Click on the proper Inside or Outside selection Figure 2 79 Figure 2 78 Figure 2 79 Unit Size Information Misc Unit ...

Страница 69: ...d the Slot field will be activated Until a board is selected this field is deactivated and cannot be selected Use the Up or Down arrows at the right side of the box to increase or decrease the number in the Slot field or type a number in directly This number is the starting slot number for the group of units you are adding 4 Select the Alarm Zone list box and from the list of boards Select the cor...

Страница 70: ...arting Unit Number and the Ending Unit Number fields 5 Click on the Delete button to remove these units from the database or on the Cancel button to abandon this operation and return to the Setup Menu 6 Clicking on the Delete button Figure 2 82 opens the Confirm window with the prompt of Delete Units Figure 2 83 7 Click on the Yes button to continue and delete these units or the No button to aband...

Страница 71: ...w in the grid is a unit 3 Select a unit row in the grid and Click the Edit button to modify unit information as described in the following sections or the Close button to abandon this operation and return to the Setup Menu Figure 2 85 Figure 2 84 Figure 2 85 Modifying Units Modifying Units may be used to do price changes unit feature changes or fix errors found from the initial loading of units Th...

Страница 72: ...ize description from the Size list box The Square Feet Height and Price fields will display the information you entered earlier in the set up procedure Figure 2 86 1 To modify Unit Type Door Type Floors or Inside Outside Click on the Misc tab and Select the proper descriptions from the appropriate list boxes If necessary Click on the proper Inside or Outside selection Figure 2 87 Figure 2 86 Figur...

Страница 73: ...LARM SECTION You can render your system INOPERABLE 1 To modify individual door alarms Click on the Door Alarm tab 2 Select the Mux list box and from the list of boards Select the correct board Figure 2 89 3 For the Slot field use the Up or Down arrows at the right side of the box to increase or decrease the number in the Slot field 4 To modify the alarm zone Select the Alarm Zone list box and from...

Страница 74: ...k box as needed Figure 2 90 3 Click on the OK button to modify the unit or on the Cancel button to abandon the operation 4 This opens the Confirm window with a prompt of Modify Unit Figure 2 91 5 Click on the Yes button to complete the modifications or on the No button to abandon the operation and return to the Modify Unit Information window Figure 2 91 Unit Status Figure 2 90 ...

Страница 75: ...ections to complete the setup of your Site The LCD Keypad s display is used to notify your tenants of actions or situations occurring with their entry or exit of the facility or of a specific message you have for them In addition to the Main Screen there are preprogramed default messages to notify the person entering of the status of their actions or their account condition These will vary in numb...

Страница 76: ...m You cannot edit this number only the description activity code message timer count and the Keypads that it will be displayed on For the Main Screen all you can change is the description timer and Keypads that it will be displayed on 5 Make any changes you need as shown in Figures 2 94 and 2 95 6 Click on the LCD Screen tab Figure 2 95 Figure 2 95 Figure 2 94 ...

Страница 77: ...ne Four are the fields where you can edit the message text Make any changes you need to the text will appear in the simulated LCD screen above as it would at the keypad 9 When done Click on the OK button 10 This will return you to the Add Edit LCD Message window Click on the Close button or Select another message and Edit Figure 2 97 Figure 2 96 Figure 2 97 ...

Страница 78: ...r may be changed with the arrows on the right side of the field This setting repre sents the number of seconds the message will remain on the LCD screen at the keypad 6 The Count may be changed with the arrows on the right side of the field This setting repre sents the number of times the message will display on the LCD screen when an assigned tenant uses the keypad 7 Select the Input Points Keypa...

Страница 79: ... on the Close button or Select another function Figure 2 101 NOTE There may be a total of 64 messages in the system numbered from 0 to 63 This number includes Preset and Custom messages Preset messages are defined in the software before it is shipped to the site based on the number of LCD Keypads and messages needed for each of them All available numbers above the Preset messages are available for...

Страница 80: ... the office Default Preset Messages Description Message Main This message is usually preset to the Site Name Access Granted Access code verified Please proceed with caution when gate is fully opened Bad Time Zone The facility is closed at this time Please try again during normal hours Bad Keypad Zone Access to this area is not available with this number Please see manager Description Message Bad P...

Страница 81: ...nting a Unit Vacating a Unit Making Tenants Delinquent or Paid up Move or Copy a Tenant Record to Another Unit Finding Editing unit or tenant information Operating the Gate Unit Reports Misc Reports Activity Reports System Controller Utilities Data Utilities DigiEdit Creating Merge Documents Merge Alarm Zone Arm Disarm Unit Selecting the Site in Remote Systems Quitting the Program Introduction Dig...

Страница 82: ... operations in Chapter 4 How Do I If you have more than one site controlled by this software system always verify that you are connected to the correct site before manipulating tenants or units You can quickly locate this information in the center block of the status bar at the bottom of the Main Menu 1 From the Main Menu Click on the Move In button Figure 3 1 2 This will open the Select Unit to M...

Страница 83: ...at size code Figure 3 4 NOTE From this list you can view the codes for the unit s features which should aid in selecting the correct type of unit for your new tenant 6 Select a unit from the list and Click on the OK button 4 This will open a list box of size codes Select one of the choices Figure 3 3 Figure 3 3 Figure 3 4 ...

Страница 84: ... this screen click on the Access tab 1 This will open the Move In Tenant window with the Tenant tab active Figure 3 5 NOTE The information that you must enter here depends on what was set as Required Fields in Chapter 2 Page 2 11 The tenant s Last Name is always required The fields you have set up as Default Values in Chapter 2 Page 2 12 will already be filled out 2 Enter the information desired 3...

Страница 85: ...e screen for Access Information which is required Figure 3 7 2 Enter a unique Access Number and select a Keypad Zone and a Time Zone from the list boxes 3 There are two Misc Options check boxes The first allows you to prevent a tenant from ever being locked out or made delinquent You may use this for Management units or for trade outs for services etc 4 The second allows you to Tag a unit NOTE A t...

Страница 86: ...the Yes button to return to the Select Unit to Move In screen Figure 3 2 Page 3 2 without moving the tenant in Click on the No button to return to the Move In Tenants screen Figure 3 10 1 This activates a screen where you can add other users of the unit who will have a different Access Number Figure 3 9 2 Enter the First Name and Last Name in the appropriate fields 3 Enter a unique Access Number 4...

Страница 87: ...the opportunity to link additional units to the tenant by opening the Confirm window Figure 3 11 2 Click on the NO button to simply add the new tenant or Click on Yes to link additional units to this tenant Figure 3 11 Figure 3 12 NOTE The DigiGate 700 for Windows program will allow you to rent multiple units to the same tenant and allow the tenant to use one access code for all the units rented T...

Страница 88: ... open the Move Out Tenant window Figure 3 16 Page 3 9 OR If you want to find a tenant by last name Click on the Last Name field and enter all or part of the tenant s last name and Click on the OK button NOTE You can type a space in this field and Click on the OK button to list all tenants 1 From the Main Menu Click on the Move Out button Figure 3 13 Figure 3 13 Figure 3 14 Move Out Vacating a Unit...

Страница 89: ...t edit any information the view is only to let you verify that you have selected the correct tenant 6 Click on the OK button if this is the tenant you want to move out or the Cancel button to return to the Select Unit to Move Out screen Figure 3 14 Page 3 8 4 This will open a list of tenants with their unit numbers Select one of the choices and Click on the OK button Figure 3 15 Figure 3 15 Figure...

Страница 90: ...d units Figure 3 18 10 Click Yes to vacate all linked units for this tenant or No to vacate just the selected unit 7 Clicking on the OK button Figure 3 16 Page 3 9 will open the Confirm window Figure 3 17 if Verify Prompts is set to Yes in the User IDs setup 8 Click Yes to vacate the selected unit or No to return to the Move Out Tenant window Figure 3 17 Figure 3 18 ...

Страница 91: ...e Make Tenant Paid Up window Figure 3 23 Page 3 13 OR If you want to find a tenant by last name Click on the Last Name field and enter all or part of the tenant s last name and Click on the OK button NOTE You can type a space in this field and Click on the OK button to list all tenants Figure 3 19 Figure 3 20 Delinquent Making a Tenant Delinquent or Paid Up This selection on the Main Menu is used ...

Страница 92: ...e tenant screen will open with one of two titles depending on the state of the unit If the unit s status is Rented the Make Tenant Delinquent window will open Figure 3 21 NOTE All information here has been disabled you cannot edit any information the view is only to let you verify that you have selected the correct tenant 2 Click on the OK button if this is the tenant you want to make delinquent o...

Страница 93: ...epending on the state of the unit If the unit s status is Delinquent the Make Tenant Paid Up window will open Figure 3 23 NOTE All information here has been disabled you cannot edit any information the view is only to let you verify that you have selected the correct tenant 2 Click on the OK button if this is the tenant you want to pay up or the Cancel button to return to the Select unit to make d...

Страница 94: ...enants 1 From the Main Menu Figure 3 25 Click on the Transfer button Figure 3 25 Figure 3 26 Transfer Move Copy Tenant Record to Another Unit This selection on the Main Menu is used to move a tenant from one unit to another or to link one or more additional units to a tenant When we use the term Copy we are referring to Linking When units are linked they carry the same information on the tenant si...

Страница 95: ...oving Next you are going to select the target unit or unit that the information is going to be copied or moved to in Figure 3 28 6 Select a unit by clicking on the line showing that unit 7 Click on the Link button Figure 3 28 if you want to copy the information to the selected unit NOTE The tenant will now occupy both units 4 This will open a list of tenants with their unit numbers Select one of t...

Страница 96: ...t is moved out of the old or Source unit and moved into the new or Target unit 8 The Confirm window Figure 3 29 will open if Verify Prompts is set to Yes in the User IDs setup 9 Click Yes to link the selected unit or No to return to the Select units to transfer copy to screen NOTE You may repeat this process to link as many units as necessary Figure 3 29 Figure 3 30 ...

Страница 97: ...o the Main Menu Figure 3 32 11 The Confirm window Figure 3 31 will open if Verify Prompts is set to Yes in the User IDs setup 12 Click Yes to transfer the tenant and return to the Main Menu or No to return to the Select units to transfer copy to screen without transferring the tenant Figure 3 31 Figure 3 32 ...

Страница 98: ...Information This selection on the Main Menu is used to find tenants or units and edit the tenant information In general the instructions here will follow those in the Move In section of this chapter NOTE If the fields on this screen are dimmed grey and you cannot edit any information the fields have been disabled Check the title bar of the window for the phrase RECORD LOCKED If you see this the in...

Страница 99: ...s set as Required Fields in Chapter 2 Page 2 11 The tenant s Last Name is always required 6 Change the information desired 7 Click on the Misc tab NOTE If you have purchased the Picture Option see the Options section at the end of this chapter for instructions on using the option 4 This will open a list of tenants with their unit numbers Select one of the choices and click on the OK button Figure ...

Страница 100: ...en click on the Unit tab NOTE If you have purchased the LCD Keypad Option see the Options section at the end of this chapter for instructions on using the option 8 This will activate a screen for additional Tenant Information Credit Card Information and Marketing Information Figure 3 37 9 Change the information desired 10 When you have completed this screen click on the Access tab Figure 3 37 Figu...

Страница 101: ...ave Modifications prompt 22 Click on the Yes button to change the data or the No button to cancel the update NOTE If you have purchased the Picture Option see the Options section at the end of this chapter for instructions on using the option 14 This will activate a screen for reviewing the unit information on the tenant Figure 3 39 NOTE This screen is only for viewing the information See Modifyin...

Страница 102: ...hen you are done Click on the Notes tab 23 To add a new Authorized Tenant to the list Click on the New button Figure 3 41 24 This will add a new record to the Other Authorized Tenants list box and blank the fields in the Other Authorized area of the screen 25 Enter the First Name and Last Name in the appropriate fields and a unique Access Code 26 Select a Keypad Zone and a Time Zone from the list ...

Страница 103: ...re updated or discarded based on the selections made in these two choices 35 This activates the text area where you can add to or edit any of the information there Figure 3 44 36 To edit the Notes in the text area Click in the text area and type freely NOTE There are two buttons just above the text area One appears as a calendar and will insert the date at the cursor when Clicked The second is a c...

Страница 104: ... one of these Figure 3 47 1 From the Main Menu Click on the Gate button Figure 3 46 Figure 3 46 Figure 3 47 Gate Operate the Gate The Gate option on the main menu opens one window and allows you to open the gate run through normal open close sequence hold the gate open lock the gate in the open position and close a gate that has been held open Only two decisions need be made which action to take a...

Страница 105: ...points are usually associated with Keypads or other entry devices The gate on your site that normally opens when you use the entry device is the one that will open when that control point is chosen For example you have two keypads at your main gate an entry keypad that is assigned to the Gate One control point and an exit keypad that is assigned to the Gate Two control point Selecting either of th...

Страница 106: ...played for reports with multiple pages 7 Click on the first or left button to go to the first page of the report Figure 3 52 8 Click on the second button left facing arrow to go back one page or to the prior page of the report Figure 3 52 9 Click on the third button right facing arrow to go forward one page or to the next page of the report Figure 3 52 10 Click on the last or right button to go to...

Страница 107: ...Select the printer to use the range of pages to print and the number of copies of each page to print 4 Click on the OK button to accept the selection or on the Cancel button to abandon the selection Figure 3 54 5 Click on the last or right button Figure 3 53 to print the report 6 The Windows 95 Printing progress window will open and show the progress of the report Figure 3 55 7 Click on the Cancel...

Страница 108: ... the report as in the File Name field 5 Click on the Save button to save the report or the Cancel button to abandon the operation Figure 3 57 6 To open a report saved previously Click on the last or right button Figure 3 56 7 This will open the Windows 95 Open window Figure 3 58 8 Select an existing file in the list by Clicking on it 9 Click on the Open button 10 This will open the Report Display ...

Страница 109: ...name The second line is the report title and the third is the column headings for the report Figure 3 59 4 Figure 3 60 shows the report footer 5 The report footer displays the date and time the report was generated the site software s serial number and the page number Figure 3 60 6 Any totals are displayed on the last page of the report below the columns and above the date time etc Figure 3 60 Fig...

Страница 110: ...umns displayed are Unit Number First Name Last Name Home Phone Work Phone and Price 5 The totals at the end of the report are Total Units listed in the report and Total Rent Month for the listed units 6 Click on the Close button to return to the Report Menu Delinquent Units This section now shows how to run the Unit Reports and looks at the format of each report The controls for each of the report...

Страница 111: ... button 3 This will open the report display window with the title of All Units and run the All Units report Figure 3 64 4 The columns displayed are Unit Number Size Sq Feet Price and Status NOTE The Status field will be V for Vacant R for Rented D for Delinquent U for Damaged or Unrentable 5 The total at the end of the report is Total Units listed in the report 6 Click on the Close button to retur...

Страница 112: ...nits button 3 This will open the report display window with the title of Rented Units and run the Rented Units report Figure 3 66 4 The columns displayed are Unit Number First Name Last Name Company and Status The Status value is shown as R for Rented or D for Delinquent 5 The total at the end of the report is Total Units listed in the report 6 Click on the Close button to return to the Report Men...

Страница 113: ...k on the Vacant Units button 3 This will open the report display window with the title of Vacant Units and run the Vacant Units report Figure 3 68 4 The columns displayed are Unit Number Size Sq Feet Height Price and Vacant Since 5 The totals at the end of the report are Total Units listed in the report Total Rent Month for the listed units 6 Click on the Close button to return to the Report Menu ...

Страница 114: ...en the Report Menu window Figure 3 69 2 Click on the Linked Units button 3 This will open the report display window with the title of Linked Units and run the Linked Units report Figure 3 70 4 The columns displayed are Unit and Linked Unit 5 The are NO totals at the end of the report 6 Click on the Close button to return to the Report Menu Linked Units ...

Страница 115: ...ick on the Damaged Units button 3 This will open the report display window with the title of Unrentable Units and run the Damaged Units report Figure 3 72 4 The columns displayed are Unit Number Size Sq Feet Door Type Floor Price and Date the unit was marked damaged 5 The total at the end of the report is Total Units listed in the report 6 Click on the Close button to return to the Report Menu Dam...

Страница 116: ... 2 Click on the Marketing button 3 This will open the report display window with the title of Marketing and run the Marketing report Figure 3 74 4 The rows displayed here are Drive By Previous Tenant Referral and Yellow Pages 5 The report will list the totals for all Marketing Code categories set up in Chapter 2 Page 2 16 6 Click on the Close button to return to the Report Menu Marketing ...

Страница 117: ... 2 Click on the Authorized button 3 This will open the report display window with the title of Authorized Tenants and run the Authorized Tenants report Figure 3 76 4 The columns displayed are Unit Number First Name Last Name Access Number Time Zone and Keypad Zone 5 The total at the end of the report is Total Units listed in the report 6 Click on the Close button to return to the Report Menu Autho...

Страница 118: ...7 2 Click on the Never Locked button 3 This will open the report display window with the title of Never Locked Units and run the Never Locked Units report Figure 3 78 4 The columns displayed are Unit Number First Name Last Name and Company Name 5 The totals at the end of the report are Total Units listed in the report 6 Click on the Close button to return to the Report Menu Never Locked ...

Страница 119: ...is allows you to be very specific in the tenants or units you select For example You could design a report to list all delinquent tenants in 10x10 units who rented because they were previous tenants and who selected Deans Homer Insurance This may seem far fetched but shows the detail that may be designed into this report 4 Select the Unit Status you want and values for any of the other fields on t...

Страница 120: ...een made Click on the OK button to run and display the report or the Cancel button to abandon the operation 10 Clicking on the OK button Figure 3 81 will open the report display window with the title of Custom Report and run the Custom Report Figure 3 82 11 The columns displayed are Unit Number First Name Last Name Home Phone and Work Phone 12 The total at the end of the report is Total Units list...

Страница 121: ...ays Vacant button 3 This will open the report display window with the title of Number of days units vacant and run the Days Vacant report Figure 3 84 4 The columns displayed here are Unit Vacant Since Date Rent Amount and Number Days Vacant 5 The totals at the end of the report are Total Units listed in the report Total Rent Month for the listed units 6 Click on the Close button to return to the R...

Страница 122: ...nit Info tab active Figure 3 86 NOTE The fields on this and the Tenant Info screen allow you to filter or select records based on the fields Selecting a value in one of the fields allows only units or tenants that have the selected value This allows you to be very specific in the tenants or units you select 4 Select the Tenant Status you want and a value for Unit Size if you want to limit the labe...

Страница 123: ...ons have been made Click on the OK button to run and display the report or the Cancel button to abandon the operation 8 Clicking on the OK button Figure 3 87 will open the report display window with the title of Labels and run the mailing label report Figure 3 88 9 The labels are listed or printed if you select in a 3 across format on 1 x 2 5 8 labels Avery 5160 or equivalent 10 Click on the Close...

Страница 124: ...ot Report and run the Mux Slot Report Figure 3 90 4 The columns displayed are Unit Number Mux Number Slot and Status A for Armed or D for Disarmed 5 There are no totals for this report 6 Click on the Close button to return to the Report Menu Misc Reports Mux Slot This section shows how to run the Misc Reports and looks at the format of each report The controls for each of the reports in the displa...

Страница 125: ...solving any problems that may occur at a later date 3 This will open the Confirm window with the prompt Print setup information Figure 3 92 4 Click on the Yes button to print the reports or on the No button to return to the Report Menu 5 Clicking on the Yes button will open the Windows 95 Print window where you can select printers etc 6 After making printer and page selections Click on the OK butt...

Страница 126: ...ea and Count number of times the code has been used for entry without being used for exit May denote tailgating 5 The total at the end of the report is Total Units listed in the report 6 Click on the Close button to return to the Report Menu Figure 3 94 Figure 3 95 Activity Reports This section shows how to run the Activity Reports and looks at the format of each report The controls for each of th...

Страница 127: ...k on the Activity Log button 3 This will open the Select activities to be displayed window with the Activity tab active Figure 3 97 4 You can select the types of activity that you want to include in the report by Selecting checking or Deselecting unchecking any of the check boxes on this screen 5 The All and None buttons will Select or Clear all the check boxes respectively 6 When all selections a...

Страница 128: ...ure 3 99 The current date is shown at the bottom of the window 11 At the top of the window are left and right arrow buttons Click on these to change the month backward and forward respectively 12 Click on the correct day 13 Repeat steps 9 12 for the Ending Date field 14 When all selections have been made Click on the OK button to run the report or on the Cancel button to abandon the operation 15 T...

Страница 129: ...ab Figure 3 101 2 Click on the Transactions button 3 This will open the Transaction Log window with the Activities tab active Figure 3 102 4 You can select the types of activity that you want to include in the report by Selecting checking or Deselecting unchecking any of the check boxes on this screen 5 The All and None buttons will select or Clear all the check boxes respectively 6 When all selec...

Страница 130: ...1 This will open the calendar Figure 3 104 The current date is shown at the bottom of the window 12 At the top of the window there are left and right arrow buttons Click on these to change the month backward and forward respectively 13 Click on the correct day 14 Repeat steps 10 13 for the Ending Date field 15 When all selections have been made Click on the OK button to run the report or on the Ca...

Страница 131: ...igure 3 107 3 Click on the Yes button to clear the SysCon or on the No button to abandon the operation NOTE To restore the System Controller after doing a Clear SysCon do Set Controller then Download All Pages 3 52 and 3 53 System Controller Utilities Utility This section deals with System Controller utilities and Data Utilities The following utilities are routines that you may use to control and ...

Страница 132: ...t in the way you decided in Chapter 2 2 This will open the Set System Controller window Figure 3 109 3 Click on the OK button to set the SysCon or on the Cancel button to abandon the operation 4 In the two data areas at the top of the screen you will see the operation being performed and the information being transferred Figure 3 109 5 When the operation has been completed you will return to the U...

Страница 133: ...word time zone keypad zone etc This sets the controller for the access conditions you have chosen for each individual tenant 2 This will open the Download All Units window Figure 3 111 3 Click on the OK button to download the rented units or on the Cancel button to abandon the operation 4 You will see the operation being performed and the unit numbers for the information being transferred in the t...

Страница 134: ...lso if you have had your installer set the AntiPassBack option to Hard any tenants in the area cleared WILL NOT be able to use the keypads to open the exit gate 2 This will open the Clear Control Areas window Figure 3 113 3 All control areas defined in your system setup will be listed in the white data area on the screen Select Check or Deselect Uncheck these control areas as needed NOTE The All a...

Страница 135: ...lity Menu with the System Controller tab active Click on the Version button Figure 3 114 2 This will open the Version Information window Figure 3 115 3 This screen displays the software version the SysCon chip version and the path to all data files in the system 4 Click on the OK button to return to the Utility Menu ...

Страница 136: ...ight of the field to increase or decrease the numbers 4 To change the date Select the month day or year and type your choice or Click on the down arrow to the right of the Date field Figure 3 117 5 This will open the calendar Figure 3 118 The current date is shown at the bottom of the window 6 At the top of the window are left and right arrow buttons Click on these to change the month backward and...

Страница 137: ...tab active Click on the Activity Log button Figure 3 119 2 This will open the DigiGate Activity Log window Figure 3 120 3 This allows you to view the activity that has occurred at your location The actual window displayed can be changed in the Setup section Chapter 2 Page 2 9 to modify the number of activities or the length of time the window remains active ...

Страница 138: ...uld be cleared of highlighting and the Utility Menu remains active NOTE Flashing Tenants on Site highlights can only be cleared with Clear Control Area See Page 3 54 1 From the Utility Menu with the System Controller tab active Click on the Access Code button Figure 3 121 NOTE This operation retrieves the information stored in the SysCon which can be used for diagnostics and compared to the inform...

Страница 139: ... bar on the right to scan the information 7 Click on the Print button to print a listing of this information to the screen or on the Close button to return to the Utility Menu 8 Clicking on the Print button Figure 3 123 opens the report display window with the title of Access Codes Retrieved from System Controller and runs the Access Codes Retrieved from System Controller report Figure 3 124 9 The...

Страница 140: ...set shipped with the DigiGate 700 for Windows program and a second line prompt of A backup is about to begin would you like to continue Figure 3 126 3 Click on the Yes button to start the backup or on the No button to abandon the operation NOTE The DigiGate 700 for Windows default profile for backup is SiteOne SET The default backup drive for this profile is the A floppy drive The backup file crea...

Страница 141: ...se the DigiGate 700 for Windows program before you make any attempt to restore your data The DigiGate 700 for Windows program opens certain files while it is operating These files cannot be properly restored to the systems hard disk until they are closed If you receive any error messages during a restore process close the restore operation make certain the DigiGate 700 for Windows program is close...

Страница 142: ...nsaction Log 4 To change the date select the month day or year and type your choice or Click on the down arrow to the right of the Date field Figure 3 130 5 This will open the calendar Figure 3 131 The current date is shown at the bottom of the window 6 At the top of the window are left and right arrow buttons Click on these to change the month backward and forward respectively 7 Click on the corr...

Страница 143: ...he Cancel button to abandon the operation and return to the Utility Menu Figure 3 132 10 This will open the Confirm window with a prompt of Prune Data Figure 3 133 11 Click on the Yes button to delete the records or on the No button to abandon the operation and return to the Utility Menu WARNING This operation is removing data from your computer permanently Figure 3 133 ...

Страница 144: ...ns buttons for document file handling These are Create a New Document Open File Save file Print Document Cut Copy Paste and Undo LastAction 6 The second row contains controls for text formatting These are Font Name Font Size Bold Text Italic Text Underline Left Justified Centered Right Justified and Flush both sides 7 The last two buttons on the second line will insert the Date and Time respective...

Страница 145: ...nk document 3 Selecting Open opens an existing document 4 Selecting Save saves the open file using the existing name location and type 5 Selecting Save As also saves the open file but allows you to change the name location and file type 6 Selecting Printer Setup opens the Windows 95 Print Setup window to select and configure the printer you will use 7 Selecting Page Setup allows you to change or s...

Страница 146: ...in text to locate and additional text to replace the selection found NOTE The first 3 options Cut Copy and Paste duplicate the actions of the fifth sixth and seventh Document Control icons 1 Clicking on Insert on the menu bar opens the Insert menu Figure 3 139 2 Selecting Database opens the Insert Database Item window The operation of this window is explained in the next section Creating Merge Doc...

Страница 147: ... your document prints the information in that field of the tenant record will be printed in place of the bracketed field name and all text will be adjusted for the size of the substitution 9 One document will be printed for each record selected in the database Figure 3 142 Figure 3 140 Figure 3 141 Creating Merge Documents In order to create documents for Mail Merge you need to know how to create ...

Страница 148: ...00 for Windows 1 From the DigiGate Word Processor menu Click on the Merge button Figure 3 143 2 This will open the Merge window with the File to Print tab active Figure 3 144 3 Click on the Print Setup button Figure 3 144 Figure 3 143 Merge ...

Страница 149: ... Merge window 6 On the Merge window Figure 3 144 Page 3 68 Click on the button to the right of the Select File To Print field or type in the name and path of a text file you want to use This will open the Open window with a list of the files you have produced with the DigiEdit Word Processor Figure 3 146 7 Click on the file name you want to use and Click on the Open button to select the file or on...

Страница 150: ...700 for Windows Figure 3 148 Figure 3 147 8 Figure 3 147 shows an example of a merge file with the data fields that will be imported into the document in double brackets 9 With your document Selected Click on the Unit Info tab Figure 3 148 ...

Страница 151: ...upings based on size type etc 11 When you have made all necessary selections Click on the Tenant Info tab 12 This will activate the Tenant Info window Figure 3 150 which allows you to further limit your selection to a specific tenant Last Name field and or by Keypad Zone Time Zone Profile etc 13 When you have made all necessary selections Click on the OK button to print the letter s or on the Canc...

Страница 152: ...oups of units An Alarm Zone is similar to a Time Zone or a Keypad Zone in that it is the defining control for when and how alarms are generated what signaling device is used and for how long and what happens when the alarm is over In short it tells the DigiGate 700 for Windows system what to do when an alarm condition exists for how long to do it and what to do afterwards Each individual device a ...

Страница 153: ...ing 6 Click on the OK button to perform the action or on the Cancel button to abandon the operation and return to the Main Menu NOTE If an alarm is sounding Selecting Acknowledge and Clicking on OK will turn the siren off and reset the alarm zone Selecting the Arm or Disarm selected Alarm Zone will perform the stated function when OK is Clicked 4 Select check or Deselect uncheck the Alarm Zones ch...

Страница 154: ...another When any remote site is selected the program calls the number specified in the setup and makes a connection with the System Controller at the selected location This connection is maintained as long as the site remains the active site This provides real time transfer of information between the remote SYSCON and the DigiGate program The older DOS version of the DigiGate program had to dial a...

Страница 155: ...you will be at the Main Menu with the local site active NOTE The Hang Up button at the bottom of the Select Site window allows you to disconnect from a remote site and remain logged to the site s databases Clicking this button will break the phone connection to the site and return you to the Main Menu still logged to the site 7 If you selected a remote site the Call Progress window will open givin...

Страница 156: ...empt to connect with the remote System Controller but will still log you to the remote site s database Any changes made will be saved in the databases but the information will have to be downloaded to the remote System Controller at a later time 11 After three attempts to connect The Error window will open with a message that communications could not be established Figure 3 160 12 Click on the OK ...

Страница 157: ...s Figure 3 162 4 The Contents button will return you to the DigiGate 700 for Windows Contents screen from any other topic screen 5 The Back button will always return to the previous topic you had active Figure 3 162 Figure 3 161 The DigiGate 700 for Windows Help system was developed using the Microsoft Windows Help Compiler Therefore it is fully compliant with the Windows Interface Standard The He...

Страница 158: ...ton to bring up a topic 1 The Find tab opens the Help Topics window with a search by typed words or phrases Figure 3 164 NOTE The first time you use this option you will be prompted to Build a Database for search options Let Windows do this 2 Here you are given categories based on your typed word or phrase Each category will list the associated topics 3 After typing use the scroll bars to find and...

Страница 159: ... other topics that are underlined green text This denotes Topic or Jump Hotspots Figure 3 165 2 Click on one of these Hotspots Figure 3 165 to jump to the topic title Figure 3 166 1 On some topics you will see a Show Me button Figure 3 166 2 Click on this button to start a video clip showing the exact procedure to accomplish this task Hypertext Jumps Show Me Videos ...

Страница 160: ...rm window will open asking you to verify your decision Figure 3 168 3 Click on the Yes button to quit the program or on the No button to abandon the operation and return to the Main Menu 1 From the Main Menu Click on the Exit button to quit the program Figure 3 167 Exit Quitting the Program ...

Страница 161: ...171 will open the main menu DigiGate on the Taskbar Notification Area Figure 3 169 Figure 3 170 On the right side of the Windows 95 Taskbar is an area called the Notification Area or Tray This area is used to display the clock and is available to programs for their own icon When a program is started it can place an icon in the notification area When this icon is Clicked it will perform a task or o...

Страница 162: ...ccess tab 5 Open the LCD Message list box to the right of the Access Number list box 6 Select one of the messages 7 When you have completed your changes Click on the OK button The message will display when the tenant uses the selected keypads for the number of times set in Count in the Create new message window Figure 2 99 Page 2 50 Figure 3 172 Figure 3 173 The LCD Option setup amount of time eac...

Страница 163: ...he DigiGate directory The four Figures above show the screens where you can assign a picture to a tenant or Other Authorized tenant in the Move In window or in the Find Edit Unit Information window 1 Click the Move In button on the Main Menu screen 2 Select a unit and Click on the OK button 3 This will open the Move In Tenant window Figure 3 174 4 Select either the Tenant tab Figure 3 174 or the A...

Страница 164: ...e of the text box Figure 3 178 3 This will open the Browse window Figure 3 179 4 Use the window controls at the top of the window to find the directory where you stored your images The actual files will be displayed in the window below the controls 5 Select the desired image and Click on the Open button NOTE The image will be displayed to the right when it is selected in the list box so you can sc...

Страница 165: ... Figure 3 181 6 The Picture window will open with the image in place Figure 3 180 7 Click on the OK button to accept the the picture 8 The Move In or Other Authorized window will open 9 Figure 3 181 shows the same window as Figure 3 180 but accessed from the Other Authorized window ...

Страница 166: ...This Page Left Blank Intentionally 3 86 Operating Instructions DigiGate 700 for Windows ...

Страница 167: ...em Setup Information 33 Print a Tenant List Reference page 1 8 in Chapter 1 Reference page 2 2 in Chapter 2 Reference page 3 77 in Chapter 3 Reference page 3 60 in Chapter 3 and page 5 2 in Chapter 5 Reference page 2 37 in Chapter 2 Reference page 2 40 in Chapter 2 Reference page 2 41 in Chapter 2 Reference page 3 2 in Chapter 3 Reference page 3 8 in Chapter 3 Reference page 3 12 in Chapter 3 Refe...

Страница 168: ...t the Disk labeled DigiGate 700 for Windows 95 Installation Disk 1 into the floppy disk drive A or insert the CD ROM into the CD drive 8 Type A SETUP EXE if not there If you are installing from a CD ROM use the letter of the CD ROM drive in place of the A Do NOT type the quotation marks 9 Click on the Finish button 10 On the Welcome window Click on the Next button 11 Enter your Name and your Compa...

Страница 169: ...TE See Page 3 77 in Chapter 3 Quit the DigiGate 700 for Windows program Backup my data 1 From the Utility Menu with the Data Utilities tab active Click on the Backup button 2 This will open the Microsoft Backup window with a prompt of Back up SiteOne SiteOne being the backup set shipped with the DigiGate 700 for Windows program and a second line prompt of A backup is about to begin would you like ...

Страница 170: ...ary Click on the proper Inside or Outside selection Unit Features Door Alarm Options 1 If you selected Feature 1 Feature 2 or Feature 3 as Required Fields Click on the Features tab and Select the proper features from the appropriate list boxes 1 If all of the units in the group you are adding have individual Door Alarms Click on the Door Alarm tab 2 Select the Mux list box and from the list of boa...

Страница 171: ... then Click on the Modify Units button 2 This will open the Modify Unit Information window NOTE The Modify Unit Information window is a grid Each row in the grid is a unit 3 Select a unit row in the grid and Click the Edit button to modify unit information Size Misc 1 From the Modify Unit number window with the Size tab active Select the proper size description from the list box 1 For Unit Type Do...

Страница 172: ...vates a window where you can add other users of the unit who will have different Access Codes 2 Enter the First Name and Last Name in the appropriate fields 3 Select a Keypad Zone and a Time Zone from the list boxes 4 Click the Add button to add the new tenant to the list at the bottom of the screen You can add as many tenants as you choose to the unit Notes 1 To add any Notes in the text area Cli...

Страница 173: ...inquent 1 From the Main Menu Click on the Delinquent button 2 Enter a valid unit number in the Unit Number field in the Select unit to make delinquent or paid up screen and Click on OK to open the Make Tenant Delinquent window OR 3 Click on the Last Name field and enter the tenant s last name and Click on the OK button 4 Select one of the choices and Click on the OK button 5 Click on the OK button...

Страница 174: ... is set to Yes 9 Click Yes to transfer the tenant and return to the Main Menu NOTE See Page 3 14 in Chapter 3 Transfer Tenants 1 From the Main Menu Click on the Transfer button 2 This will open the Transfer Unit window 3 Enter a valid unit number in the Transfer Unit screen and Click on the OK button to open the Select units to transfer copy to window OR 4 Click on the Last Name field and enter th...

Страница 175: ...above 2 Change the information desired on the Tenant tab and Click on the Misc tab 3 Change any information desired for Tenant Information Credit Card Information and Marketing Information and Click on the Access tab 4 Change the Access Information if needed and Click on the Unit tab 5 This will activate a screen for reviewing the unit information for the tenant Click on the Authorized tab when fi...

Страница 176: ... with the System Controller tab active Click on the Date Time button 2 This will open the Set System Controller Time window 3 To change the time Select the hours minutes seconds or AM PM and use the spinner arrows at the right of the field to increase or decrease the numbers 4 To change the date Select the month day or year and type your choice or Click on the down arrow to the right of the Date f...

Страница 177: ...p tab of the Setup Menu Click on the User Ids button to open the User IDs window 2 Click on the Add Button 3 From the Add a new User ID window Select the User ID field and type in a new 4 character user name 4 Select the Password field and type in a 4 character password 5 Click on one of the selections Yes No in the Verify Prompts radio button set 6 Select the Security Level list box then Select t...

Страница 178: ...esired action Clicking OK on the Alarm Zones screen has NO effect on the Arm Disarm Unit screen and vice versa 5 When all selections have been made Click on the OK NOTE See Page 3 72 in Chapter 3 Acknowledge or Arm Disarm Selected Alarm Zones 1 From the Main Menu Click on the Arm Disarm button to open the Arm Disarm Alarm Zones window with the Alarm Zones tab active 2 Click on the Arm Disarm Unit ...

Страница 179: ...ad All button 9 From the Download All Units window Click on the OK button to download the units NOTE See Page 3 51 in Chapter 3 Reset the System Controller 1 From the Main Menu Click on the Utility button to open the Utility menu with the System Controller tab active 2 Click on the Activity Log button 3 This will open the Activity Log window with the number of activities and for the amount of time...

Страница 180: ... 67 in Chapter 3 Create a Custom Document Print Mail Merge Letters and Notifications 1 From the DigiGate Word Processor menu Click on the Merge button 2 This will open the Merge window with the File to Print tab active 3 Click on the Print Setup button 4 This opens the Print Setup window Select the printer you want to use 5 Click on the OK button 6 On the Merge window Click on the button to the ri...

Страница 181: ...cting or Deselecting any of the check boxes on this screen 5 The All and None buttons will Select or Clear all the check boxes respectively 6 When all selections are made Click on the Criteria tab 7 From the Criteria window you can select a specific Unit Number or a date range for the activities 8 To limit the report to a specific unit type a valid unit number into the Unit Number field 9 To enter...

Страница 182: ...rt button to open the Report Menu window Click on the Misc Reports tab 2 Click on the Setup Info button NOTE The Setup Info is a series of reports that show your system configuration and print as a batch 3 This will open the Confirm window with the prompt Print setup information 4 Click on the Yes button to print the reports NOTE See Page 3 45 in Chapter 3 Print a Tenant List 1 From the Main Menu ...

Страница 183: ...is Chapter DigiGate 700 for Windows 1 Introduction 2 Backup Strategies 3 Data Backup 4 Data Restore Why protect your data Effective methods for data protection Instructions Instructions Chapter 5 Backing Up Your Data ...

Страница 184: ...ck up strategy is a plan for the regular backup of data usually at several different levels and for a period of time sufficient to minimize the effect of any loss There are times when data corruption can remain unnoticed for a period of time When this happens you can make corrupted backups that may be used at a later date to restore data that has been lost To prevent this type of occurrence backup...

Страница 185: ...Windows User s Guide DigiGate 700 for Windows 1 From the System Toolbar click on the Utilities button Figure 5 1 2 This opens the Utility window Figure 5 2 3 Click on the Data Utilities tab Figure 5 1 Figure 5 2 Data Backup ...

Страница 186: ...the Utility Menu window Figure 5 3 5 Click on the Backup button 6 This will open the Backup window Figure 5 4 7 Select the data to backup in the Selection box 8 Next click on the folder icon on the right side of the Backup to data field Figure 5 4 Figure 5 3 Figure 5 4 ...

Страница 187: ...ton 12 This returns to the Backup window Figure 5 6 13 Click on the Backup button NOTE The program writes the backup Zip file to the selected directory with the name Digitech International Inc yyyymmdd zip where yyyymmdd is the date the file is saved 14 When the operation completes the Utility Menu window is activated 15 Click on the Close button to return to the System Toolbar Figure 5 5 Figure 5...

Страница 188: ...erly restored to the system s hard disk until they are closed If you receive any error messages during a restore process close the restore operation make certain the DigiGate 700 for Windows program is closed re boot the computer if necessary and then restart the restore procedure If you back up your files using another software package supplied with your backup device or a third party software pa...

Страница 189: ...pen the Utility Menu window Figure 5 9 5 Click on the Restore button 6 This will open the Restore window Figure 5 10 7 Select the data to backup in the Selection box 8 Next click on the folder icon on the right side of the Restore from data field Figure 5 10 Figure 5 9 Figure 5 10 ...

Страница 190: ...red from 11 Click on the Open button NOTE You may select any drive or device connected to you computer as long as it has been designated as a drive on your system 12 This returns to the Restore window Figure 5 6 13 Click on the Restore button 14 When the operation completes the Utility Menu window is activated 15 Click on the Close button to return to the System Toolbar ...

Страница 191: ... Activity Log Display Number of Activities Number of Seconds Required Fields Misc Setup Tenant Profile Codes Marketing Codes Insurance Codes Credit Card Codes System Controller Setup Time Zones Door Alarms Holidays Serial Ports Unit Setup Unit Types Unit Features Door Types Floor Types Unit Sizes Unit Numbers Door Alarm Options Required Fields Tenant Information Unit Information Appendix A Default...

Страница 192: ...There are other Settings and Values that deal with the operation of the equipment and are specific to your site These are predefined and configured by your Reseller or Installer or the Digitech International Inc Project Manager that was involved in designing the system for your location These settings are not user accessible and are not included in this Guide Modification of these values could cau...

Страница 193: ...10PM Yes No System Controller Setup Door Alarms Y Disarm when vacated No System Controller Setup Holidays No Holidays defined No System Controller Setup Serial Ports Com1 Com2 Com3 Com4 None Auto detected by software Yes Unit Setup Unit Types RV SS RV Parking Self Storage No Unit Setup Unit Features CC DA IE Climate Controlled Door Alarm Interior Electric No Unit Setup Door Types RU SD Rollup Door...

Страница 194: ...Number Social Security Number Credit Card Number Insurance Marketing License Profile Miles From Site Y Y N N N N N N N N N N N N N N N Yes No No No No No No No No No No No No No No No No Required Fields Unit Information Unit Size Square Feet Height Unit Price Unit Type Door Type Floor Inside Outside Feature One Feature Two Feature Three Mux Number Slot Number N N N N N N N N N N N N N No No No No ...

Страница 195: ...tenants 4 WhatinformationshouldIgatheraboutmyunits 5 WhatotherinformationshouldIgatheraboutthesite Defaults YourSite UserID SecurityLevel TenantProfileInformation MarketingInformation InsuranceInformation CreditCardInformation UnitTypes UnitFeatures DoorTypes FloorTypes UnitSizes SettingupTimeZones HolidayInformation RequiredFields DefaultValues DooralarmMux SlotInformation ...

Страница 196: ...havereliefpeoplewhoareonly thereforonedayaweekandneedtorestricttheiraccesstocertainfunctionsinthesystem Also youmaywanttocustomizethewaytheDigiGate 700forWindowssystemrespondstouseractionsordisplayscertain information IfyoudonotchangeanyofthedefaultsetupforUserIDsorSecurityLevels 1 AlluserswillusethedefaultLogonandPassword See AppendixA DefaultSettings Values 2 Alluserswillhaveaccesstoallareasofth...

Страница 197: ...gotoPage2 19andfollowtheinstructionstoaddorchangetheInsurancecodes DoIneedtogetCreditCardinformation IfNO skipthenextquestion AretheValueslistedsufficient Ifyouanswered NO gotopage2 21andfollowtheinstructionstoaddorchangetheCreditCardcodes This section deals with information that you choose to collect and store on the type of tenants you have why they rent from you how they pay and how much repeat...

Страница 198: ...IfNO skipthenextquestion AretheValueslistedsufficient IfyouansweredNO gotoPage2 33andfollowtheinstructionstoaddorchangetheFloorTypecodes DoIneedtogetUnitSizes IfNO skipthenextquestion AretheValueslistedsufficient IfyouansweredNO gotoPage2 35andfollowtheinstructionstoaddorchangetheUnitSizecodes This section deals with information that you choose to collect and store on the type of units you have Un...

Страница 199: ...rsTimeZonecorrectformylocation IfyouansweredNO gotoPage2 24andfollowtheinstructionstoedittheTimeZonehours AretheValueslistedsufficient IfyouansweredNO gotoPage2 23andfollowtheinstructionstoaddnewTimeZones Holiday Information This section deals with the actual hours that the gate will operate for tenants during Holidays If you maintain different times that tenants may enter your location on one or ...

Страница 200: ...faultvaluesfortenantoruserrecords IfyouansweredNO skipthissectionentirely IfyouansweredYES gotoPage2 12andfollowtheinstructionsforSettingupDefaultFieldValues This section deals with the information you feel is reasonably consistent among tenants or users of the system The information selected here will automatically be entered into each NEW record added to the tenant database through Move In or to...

Страница 201: ...anager who helped design your location layout NOTE Changing any information in this section without specific diagrams and charts of the wiring of your location can render your DigiGate 700 Access System totally inoperable We strongly recommend that you call your Dealer Installer or the DigiTech International Inc service department before you change any information regarding Door Alarms Yes No ___ ...

Страница 202: ...This Page Left Blank Intentionally B 8 Appendix Title DigiGate 700 for Windows ...

Страница 203: ...Included in this Appendix DigiGate 700 for Windows 1 Introduction 2 Strategies What do I need to do Methods based on required Fields and Door Alarms Appendix C Preparation for Adding Units ...

Страница 204: ...re 1 How much information you set as required on Page 2 11 2 How your units are numbered in relation to the physical set up of your site You should attempt to find the largest consecutively numbered group of units with similar properties or required fields Introduction 1 You have no required fields or door alarms If your units are all numbered consecutively enter the first and last unit numbers an...

Страница 205: ...ADDRESS CARDTYPE CITY COMPANYNAME CREDITCARD DOORTYPE FAXPHONE FEATURE1 FEATURE2 FEATURE3 FLOOR HEIGHT HOMEPHONE INSIDE OUTSIDE INSURANCE KEYPADZONE LASTNAME LICENSE MARKETING MEMO MILESFROMSITE MOVEINDATE PRICE PROFILE SIZE SQUAREFEET SSN STATE UNIT UNITTYPE TIMEZONE VALIDDATE WORKPHONE ZIP Appendix D Merge Data Fields Descriptions ...

Страница 206: ...HONE Tenant s home phone number INSIDE OUTSIDE Location of the unit INSURANCE Type of insurance the tenant has In order to produce useful documents letters notices bills etc for groups of tenants the DigiEdit Word Processor has been given the ability to merge database data fields into these documents Anyone who has used Mail Merge features in the past is well aware of the time savings realized The...

Страница 207: ... MOVEINDATE The date that the tenant was moved in the DigiGate system PRICE The periodic cost of the unit usually monthly PROFILE The reason the tenant rented the unit SIZE The size code of the unit SQUAREFEET The unit s floor space SSN The tenant s Social Security number STATE The tenant s residence state UNIT The unit number UNITTYPE The unit category you have set up TIMEZONE The tenant s access...

Страница 208: ...D 4 Merge Data Fields Descriptions DigiGate 700 for Windows This Page Left Blank Intentionally ...

Страница 209: ... 2 What s New in the Windows Version 3 Running DigiConvert 4 Completing Your Setup The DigiConvert Program Security User Operations Access Control Data Entry Marketing Starting the Program What is Converted What is needed after the conversion Upgrading DOS Software to Windows ...

Страница 210: ... Unrentable Data Entry 1 Ability to set Default values for fields Speeds entry of unit and tenant information 2 Unit information entry in Tenant entry screens 3 Ability to transfer tenants to other units 4 Ability to Link units using the same tenant information 5 Easier Time Zone entry with the Duplicate button 6 New Auto Slot loading options for Door Alarms Marketing 1 Expanded Unit Features and ...

Страница 211: ...lose any DigiGate programs running before starting this procedure 1 From the Windows desktop Click on the Start button 2 Select Programs then DigiGate for Windows then DigiConvert Figure E 1 3 This will open the DigiConvert window with a warning that all data files in the DigiGate 700 for Windows directory will be overwritten Figure E 2 4 Click on the Next button Figure E 1 Figure E 2 Starting the...

Страница 212: ...which shows the progress of the conversion Figure E 4 8 When the conversion is completed the Finished button will appear Figure E 4 9 Click on the Finished button to return to your Desktop NOTE Any errors encountered will open a window displaying a prompt explaining why the conversion could not be completed If you encounter this record the prompt in the error window and call Digitech International...

Страница 213: ... below Access Code Unit Number First Name Last Name Company Name Address City State Zip Code Home Phone Number Work Phone Number SSN License Time Zone Keypad Zone Following the tenant information the unit information is transferred in the order listed below Unit Number Price Size Code and Unit Status i e Vacant Rented Delinquent The program scans the database and checks for any size codes that wer...

Страница 214: ...This Page Left Blank Intentionally E 6 Upgrading DOS Software to Windows DigiGate 700 for Windows ...

Страница 215: ... for Windows 1 Introduction 2 Running LinkView 3 Vendor Specific Requirements Integration with Accounting Programs How LinkView operates MSTC Unit Numbering for Systems with Linking Units Appendix F Troubleshooting Accounting Link Problems ...

Страница 216: ...tem the first step is to find out where the problem origi nated To do this we have included a program called LinkView in the DigiGate 700 for Windowse system This program allows you to look at the file that holds the information sent from the accounting program to the DigiGate 700 for Windows program LinkView is only for viewing the data file It does not allow editing of the information By checkin...

Страница 217: ...re Unit Number Access Code Last Name Time Zone Status and Keypad Zone 6 To print a report of these records click on the Print button Figure F 2 7 The Printing Progress window will open showing the status of the printout Figure F 3 8 Click on the Cancel button to stop the printing 9 The balance of the fields are shown in Figure F 4 10 Click on the Exit button when you are finished This will close t...

Страница 218: ...ogram corrects this situation by stripping the last digit off the access code transmitted from the MSTC software This allows MSTC to have unique access codes and DigiGate 700 for Windows to process alarm and Graphics situations For this interface to work properly the access code given a tenant for an individual unit should have a 0 added to the end i e 1001234 is the access code given a tenant 100...

Страница 219: ...s 4 Other Error Messages Error Message Display Description Parity and Overrun Errors NAK Received Port Not Opened Port in Use Invalid COM Number No more Trigger Slots Time Out Error Parity Error Overrun Error Framing Error Description of Display Invalid User ID Invalid Password Not Integer Error during Backup Program Error Codes ...

Страница 220: ...s a w e s u o t d e i r t m a r g o r p e h t t a h t t r o p e h T n i a g a y r t d n a m a r g o r p e h t e s o l C y l t c e r r o c e s u n i t r o P 8 0 0 2 r e h t o n a y b e s u n i s a w n e p o o t d e i r t m a r g o r p e h t t r o p e h T n i a g a y r t d n a s m a r g o r p l l a e s o l C m a r g o r p r e b m u n m o C d i l a v n I 1 1 0 2 e h t n o t s i x e t o n s e o d t a ...

Страница 221: ... format of the Error Box is different from the other categories The Error window will contain eight lines as follows a The title EDBEngine Error b Total Errors The total number of errors c Module Name The program module where the error occurred d Message Text description of error e Category General area of error i e Index Data Field etc These are in numeric code f Error Code The numeric error code...

Страница 222: ...s corrupted 1 Click on the OK button 2 Try again Enter a valid Password 3 If the error persists call your Reseller or the Digitech International Inc service depart ment Other Error Messages The final category of errors is Other This is all inclusive of anything not yet discussed This category holds user errors other equipment errors system errors other program errors etc The Error window for this ...

Страница 223: ...sists call your Reseller or the Digitech International Inc service depart ment NOTE This error is reported from the Microsoft Backup program The backup set shipped with the DigiGate 700 for Windows program will operate correctly only when the computer is named My Computer If named something else the message above appears 1 Click on the OK button 2 Check the computer name and if different either re...

Страница 224: ...This Page Left Blank Intentionally G 6 DigiGate 700 for Windows Program Error Codes ...

Страница 225: ...duction 2 Activity Log Messages 3 Transaction Messages Site Management Activity Messages Descriptions Access Activities Misc SysCon Activities Board Activities Time Activities Alarm Activities Manager UserActivities Appendix H Activity Log Transaction Messages ...

Страница 226: ...e that specific entry device 6 Soft Antipassback A tenant entered a password at an exit device and was allowed to exit but the Manager was notified because the tenant had not used an entry device Tailgating 7 Hard Antipassback A tenant entered a password at an exit device and was not allowed to exit and the Manager was notified because the tenant had not used an entry device Tailgating 8 Not Found...

Страница 227: ...nput Point has been lost This could be due to power failure or RS485 line problems This message applies to the Keypad boards Mux boards or Graphics boards 3 Board AC Power Fail The Keypad board Mux board Graphics board or other RS485 device listed under Input Point has lost its main power source and is running under backup power This message occurs only if the board has a battery backup 4 Board AC...

Страница 228: ...ithout entering a valid code 2 Secure After a unit has alarmed the unit was closed before the alarm zone rearmed 3 Opened A unit was opened after a valid code was entered 4 Closed A unit was closed after an Opened status Zone Messages 1 Alarm Zone Armed A zone an area or group of devices has been set to activate when a defined condition exists Zones can be armed by the user in the DigiGate 700 for...

Страница 229: ...r Windows 1 Introduction 2 Controlling the Display 3 Programming the Display Introduction Scanning Zoom Site Status Activity Log The Menu Scanning Speeds The Flash Setting The Delay Setting The Status Colors Appendix I The DigiGraphics System ...

Страница 230: ... Figure I 1 contains the DigiGraphics system with its display in the upper right corner also shown enlarged in Figure I 2 The bottom line on the display shows the last activity that occurred on the site Figure I 2 A multifunction remote control Figure I 3 Page I 3 allows you to control the display of the site the activity log and the unit s status In its normal state the display scans an enlarged ...

Страница 231: ...t or full view of the site Figure I 4 In this view only building outlines are dis played The End key or the Scan key will return you to the default scanning mode or the system will automatically return to scanning after 2 minutes Figure I 4 There are eight directional arrow keys located around the Scan key on the remote two vertical up and Down two horizontal right and left and four diagonal upper...

Страница 232: ...he activity log in the DigiGate 700 for Windows program The End key or the Scan key will return you to the default scrolling mode or the system will automatically return to scanning after 2 minutes Pressing the Status key Figure I 3 Page I 3 displays the Site Status screen Figure I 5 This screen shows the current number of Vacant Units Rented Units Delinquent Units and the number of Tenants Onsite...

Страница 233: ...then use the arrow keys to go to the next value you want to change Repeat the procedure in steps 5 and 6 for each item you decide to change 7 When all changes have been made press the End key to return to the normal display of the Site The Menu 1 To access the DigiGraphics menu press the Stop key on the remote to suspend scanning 2 Press the Menu key to activate the on screen Menu Figure I 7 3 The...

Страница 234: ...blinking color that alternates with black In a standard display one of the three basic status colors will display for each unit These are the Rented Vacant and Delinquent colors When a tenant enters the gate the display will jump to their unit and blink in the Onsite color If a unit is alarmed the display will jump to the alarmed unit and blink in the Alarm color Each selection is changed by the p...

Страница 235: ...uded in this Appendix DigiGate 700 for Windows 1 The Electronic User s Guide 2 Adobe Acrobat Reader Where and How Installing or Updating the Reader Appendix J Electronic User s Guide and the Acrobat Reader ...

Страница 236: ...n 3 Click on the Browse button 4 Navigate to your CD ROM drive d then to the Acrobat directory 5 Double Click on Acrd4enu exe 6 This will start the Acrobat Reader installation program Follow the instructions on the screen When completed you will have an Acrobat Reader 4 0 icon on your desktop Running Acrobat Reader 1 The DigiGate 700 for Windows installation will create a shortcut on your desktop ...

Страница 237: ... Registration 1 Introduction 2 Starting the Program the First Time 3 The Temporary Regisration Period 3 Program Registration Registration Codes Temporary Registration Period The RegistrationWindow Notification Expiration Registration ID Registration Code Error Messages ...

Страница 238: ...registration code If this software has been provided with a temporary activation code use the following instructions 1 The first time you start the program the Information window will open with notifica tion that you need to register your DigiGate 700 for Windows software Figure K 1 2 From the Main Menu Figure 3 46 Page 3 24 Click on the Utility button and Select the Data Utilities tab 3 Click on ...

Страница 239: ...tify you if the 60 day temporary registration expires 3 When the temporary registration expires the DigiGate 700 for Windows program is disabled for data entry and linking with any management or accounting program and will not transfer information to or from the System Controller NOTE The System Controller will continue to operate the gate with the existing tenant codes even though updating of the...

Страница 240: ...es Main Menu are the Exit function to quit the program the Help system and one section of the Utilities menu Figure K 6 5 The Registration section of the Data Utilities tab is all that is available from the Utilities menu Figure K 7 Figure K 6 Figure K 7 ...

Страница 241: ...listed in this window 2 The technician will provide you with a Registration Code 3 Click on the Registration button on the Utility menu Figure K 7 Page K 4 4 This will open the Registration Information window Figure K 8 5 Enter the new code provided by Digitech into the Registration Code field and Click on the OK button Figure K 9 Figure K 8 Figure K 9 Program Registration ...

Страница 242: ...ered was the permanent registration code the Information window Figure K 10 will be displayed 7 If the code you entered was an extension code the Information window Figure K 11 will be displayed with the number of days added to your temporary registration Figure K 10 Figure K 11 ...

Страница 243: ...cor rectly 9 Check your entry and if necessary contact Digitech International Inc at the number listed in the window 10 If you have reset your system clock to a previous time in order to reactivate your registration the window shown in Figure K 12 will be displayed and your Digigate 700 for Windows software will be disabled 11 Contact Digitech at the number listed in the window ...

Страница 244: ...This Page Left Blank Intentionally K 8 DigiGate 700 for Windows Program Registration Codes ...

Страница 245: ...tion 2 Copying the Desktop Icon 3 Renaming the Copy of Desktop Icon 4 Changing the Properties of the New Desktop Icon 5 Changes in the LE Version When to use the Lite and Regular Versions Creating a new icon for the LE version Identifying the new icon Setting the icon to start the program What is different ...

Страница 246: ...dows LE with software version 5 8 in July of 2000 Use DigiGate 700 for Windows LE Version in day to day operations When you need to print special reports from the DigiGate 700 program or access the full Setup and Utility menu simply open the full version of the program Once complete re open the LE Version If you have software version 5 8 use the following step by step instructions to install LE If...

Страница 247: ... Windows L 3 DigiGate 700 for Windows User s Guide 3 Right Click on the icon again and Select Paste from the menu Figure L 3 4 A second icon will be placed on the desktop named Copy of Figure L 4 Figure L 3 Figure L 4 ...

Страница 248: ... Setting Up the LE Software Version Figure L 5 Figure L 6 Renaming the Copy of Desktop Icon 1 Right Click on the Copy Of icon and Select Rename from the menu Figure L 5 2 Type DigiGate 700 for Windows LE as the new name Figure L 6 ...

Страница 249: ...s window Figure L 8 3 In the Target field C Program Files DigiGate DigiWin exe will be displayed 4 Place your cursor after DigiWin and add the text LE before exe 5 Click on the Apply button Changing the Properties of the New Desktop Icon 1 Right Click on the WindowsLE icon and Select Properties from the menu Figure L 7 ...

Страница 250: ...0 for Windows L 6 Setting Up the LE Software Version 6 Click on the Close button Figure L 9 Figure L 9 Figure L 10 7 The DigiGate 700 LE icon will now start the Limited version of the DigiGate program Figure L 10 ...

Страница 251: ...nated from the Main Menu in the LE version Figure L 11 2 The Site button bottom row is also blank The Remote software does not have a LE version 1 The All Units Rented Units Vacant Units Onsite and Activity Log reports remain on the Report Menu 2 They remain the same as they were in the standard version Figure L 11 Figure L 12 Changes in the LE Version The Report Menu ...

Страница 252: ...eption of the Registration button 2 The Access Code button on the System Controller tab was replaced with the Data Utilities button 1 The esential features left on the Setup menu are the Add Units and Delete Units buttons from the Unit Setup tab and Time Zone and the Serial Port buttons from the Syscon Setup tab Figure L 13 Figure L 14 The Setup Menu ...

Страница 253: ... 2 21 Other Authorized Tenants 3 22 4 6 Profile Codes 2 19 Required Fields 2 10 Security Levels 2 7 4 10 Site 2 15 Tenants Move In 3 2 Index Other Authorized 3 22 4 6 Select Unit by Size or Number 3 2 Time Zones 2 25 Unit 2 39 4 4 C 2 Door Alarm Options 2 40 Door Type 2 35 Features 2 33 Floor Type 2 35 Size Codes 2 37 Type 2 30 User ID s 2 9 4 10 ADOBE ACROBAT READER J 2 ALARM See also DOOR ALARM ...

Страница 254: ... 3 Values 2 13 A 3 DEFINE See ADD DELETE Activity Log 3 62 Credit Card Types 2 24 Door Types 2 34 Floor Types 2 36 Holidays 2 28 Insurance Codes 2 22 Marketing Codes 2 20 Other Authorized Tenants 3 22 Profile Codes 2 18 Time Zones 2 26 Transaction Log 3 62 Unit 2 42 4 4 Door Type 2 34 Features 2 32 Floor Type 2 36 Size Codes 2 38 Type 2 31 User ID 2 10 DELINQUENT 3 10 Making Tenants Delinquent 3 1...

Страница 255: ...See Conventions used in this Guide G GATE 3 24 4 10 GRAPHICS 3 59 See also DIGIGRAPHICS Site Edit 1 14 H HARDWARE Repair Policy x Warranty viii HELP 3 77 Bubble 2 4 Context Sensitive 3 77 Find 3 78 Help System Window 3 77 Find 3 78 Index 3 78 Hypertext 3 79 Index 3 78 Show Me 3 79 HOLD GATE OPEN 3 24 4 10 HOLIDAY 2 29 HOW DO I 4 1 I INDEX X 1 INSTALLATION 1 8 4 2 Adobe Acrobat Reader J 2 INSURANCE...

Страница 256: ...2 Deleting 2 52 Editing 2 46 Transaction 3 48 MICROSOFT BACKUP 2 14 4 2 G 5 MINIMUM REQUIREMENTS 1 2 MISCELLANEOUS 3 4 MODEM 2 16 2 29 MODIFY Access Code 3 20 3 21 Activity Log 2 8 Credit Card Types 2 25 Door Alarm Options 2 40 2 45 Alarm Zone 2 45 4 4 Arm Disarm 4 4 Mux Slot 2 45 4 4 Door Types 2 34 2 44 Floor Types 2 36 2 44 4 4 Holidays 2 29 Inside Outside 2 44 4 4 Insurance Codes 2 23 Keypad Z...

Страница 257: ...6 PICTURE Option 3 19 3 83 Assigning 3 83 3 84 PRINTER SELECTION 3 26 PRINTING Reports 3 26 PROFILE TYPE 2 19 PROMPTS Verify 2 8 Q QUIT THE PROGRAM 4 2 R RECORD Locked by Other User 3 18 REGISTRATION Code Extension K 6 Permanent K 5 Program K 2 Errors K 7 Extension K 6 Procedure K 5 Temporary K 3 REMOTE Site 2 15 2 16 Communications 2 29 Data Path 2 16 REMOTE SITE 3 75 REPAIR POLICY Hardware x REP...

Страница 258: ...surance Codes 2 20 Modifying Units 2 42 Changing Unit Information 2 45 4 4 Mux Slot 2 40 See also MUX SLOT Options 2 46 LCD Keypad 2 46 Site Setup 2 2 2 15 B 2 System Configuration Form B 2 System Controller Setup 2 5 2 24 2 46 Door Alarms 2 26 Holidays 2 29 Time Zones 2 24 System Setup 2 4 2 5 2 29 4 16 Default Values 2 12 2 13 Required Fields 2 10 2 11 2 13 Security Levels 2 4 2 8 System Configu...

Страница 259: ...e viii SYSTEM CONFIGURATION 2 12 SYSTEM CONTROLLER 3 50 4 10 Clear 3 51 Reset 4 12 Restore 3 51 Setup 2 24 2 46 3 51 3 53 SYSTEM REQUIREMENTS 1 2 T TAG A UNIT 3 4 TASKBAR 3 81 TECHNICAL SUPPORT See SERVICE TENANT 4 16 Access Code 3 4 3 6 3 20 3 21 3 58 3 59 Address 3 5 City 3 5 Credit Card 3 4 Expiration Date 3 4 Number 3 4 Type 3 4 Find Edit 3 19 4 8 Information 3 5 See also DEFAULT DELETE MODIFY...

Страница 260: ...LOT Number 2 39 4 4 Price 2 39 4 4 Setup 2 30 Size 2 36 2 38 2 45 4 4 Slot 2 41 2 45 4 4 4 16 See also MUX SLOT Square Feet 2 39 4 4 Status 2 47 I 2 Tag 3 4 Transfer 3 15 3 16 Type 2 31 4 4 UPGRADE 2 2 E 2 USER ID 2 3 2 9 2 13 4 10 Login 2 2 2 13 Password 2 3 Security Level 2 11 Setup Activity Log Display 2 9 USER S GUIDE Electronic J 2 UTILITY 3 51 Data Utilities 3 60 Backup 3 61 Remove 3 63 Rest...

Страница 261: ...ntrols 1 6 1 7 Interface 1 5 1 6 New Features E 2 Objects 1 6 Screen 1 6 Terms 1 5 WORD PROCESSING 3 65 See also SOFTWARE DigiEdit Creating a Merge Document 4 14 DigiEdit 3 65 4 14 D 2 Mail Merge 4 14 Mege Data Fields 4 14 D 2 Z ZONE Alarm 2 45 3 72 4 12 Keypad 3 4 Time 2 26 3 4 ...

Страница 262: ...X 10 Index DigiGate 700 for Windows This Page Left Blank Intentionally 2 3 ...

Страница 263: ......

Страница 264: ......

Страница 265: ......

Страница 266: ...DigiGate User s Guide Digitech International Inc 800 523 9504 toll free www digitech intl com ...

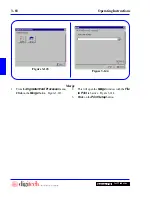
Отзывы: