Removing and Replacing Field Replaceable Units
3.9 Removing an RRD42 CD–ROM Drive
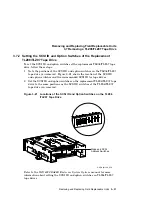
Figure 3–25 Removing the RRD42 CD–ROM Drive
RE_EN06241A_91
RRD42 CDROM Drive
Captive Screw
4. Lift the right side of the RRD42 CD–ROM drive. Slide the RRD42
CD–ROM drive to the right until the tabs on the left side of the mounting
bracket are clear of the cutouts in the lower drive-mounting shelf.
5. Disconnect the power cable from the back of the RRD42 CD–ROM drive.
Figure 1–5 shows the power cables in the BA42B Enclosure.
6. Disconnect the SCSI cable from the back of the RRD42 CD–ROM drive
by pulling the pull-tab. Figure 1–6 shows the signal cables in the BA42B
Enclosure.
7. Lift the RRD42 CD–ROM drive, which has its bracket attached, out of the
system unit.
Caution
The RRD42 CD–ROM drive has a plastic cover that protects the
drive from dust. Do not remove this cover when replacing the RRD42
CD–ROM drive or setting the SCSI ID.
3–38 Removing and Replacing Field Replaceable Units


