Removing and Replacing Field Replaceable Units
3.5 Removing a TZ30 Tape Drive
3.5.1 Separating the TZ30 Tape Drive from the Mounting Bracket
When you are installing a replacement TZ30 tape drive, you must use the
mounting bracket (74-42115-01) that is attached to the faulty TZ30 tape drive
(TZ30-AA). To separate the mounting bracket from the faulty TZ30 tape drive,
follow these steps:
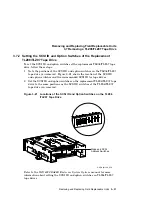
1. Remove the two screws (90-09984-07) from the right side of the mounting
bracket with a Phillps screwdriver (refer to Figure 3–14).
2. Remove one screw (90-09984-07) from the left side of the mounting bracket
(refer to Figure 3–14).
3. Remove one screw (90-10961-03) from the bottom of the drive mounting
bracket (refer to Figure 3–14).
4. Separate the mounting bracket from the TZ30 tape drive.
Figure 3–14 Separating the Mounting Bracket from the TZ30 Tape Drive
Philips Screw
TZ30 Mounting Bracket
TZ30 Tape Drive
Philips Screws (3)
RE_EN06453A_91
5. Keep the mounting bracket and the four screws in a safe place because you
must use them to install the replacement TZ30 tape drive.
Removing and Replacing Field Replaceable Units 3–21


