background image


Delphi Display Systems, Inc.  RDS-INSFTTCU   

Page 11 of 82 


Confidential Document: 

Do not copy or distribute without written permission from Delphi Display Systems, Inc. 

Copyright 

2012. [Unpublished Work]. All rights reserved 

2.5.1  Set Remote Addressing 

Depending on what model of the Remote Display the data will be shown either in minute: seconds, 
seconds only, or percentage. Time data will be displayed only during the hours the store is open. When 
the store is closed, only a colon (:) is shown on the minutes: seconds Remote Display; seconds Remote 
Display is blank; and percentage Remote Display shows the percent sign (%) and the number 0. 


I

F IT IS NECESSARY TO CHANGE A REMOTE DISPLAY

S ADDRESS

,

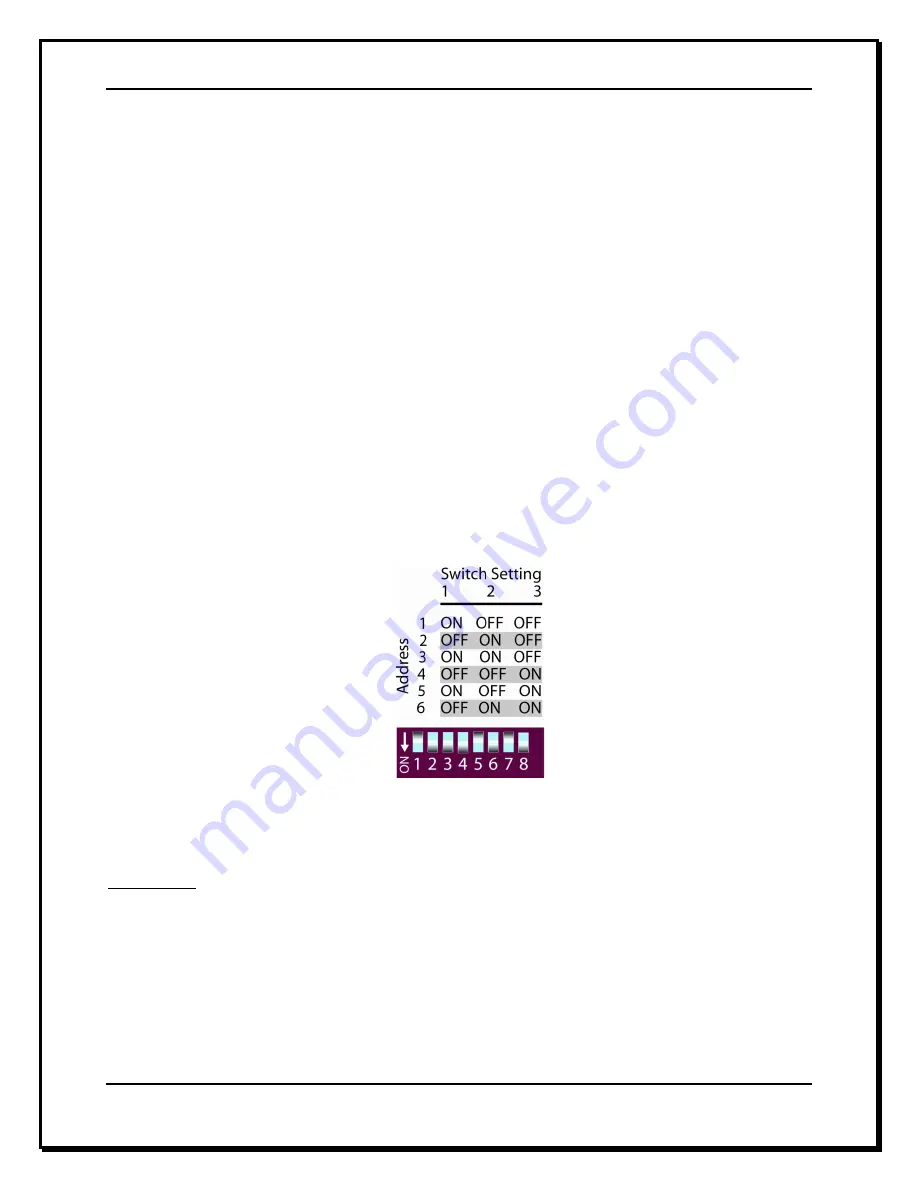
 USE THE FOLLOWING STEPS


Unplug the five-pin DIN connector from the top of the Remote Display and remove the display from 
its mounting. 


On the top of the Remote Display is a DIP switch access cover, push the cover to gain access to 
the DIP switch. Set the switches according to the address you desire. 


Plug the 5-pin DIN connector back into the Remote Display and verify that it has the correct 
address. 


If it is correct, disconnect the DIN connector, push the DIP switch cover back to its original 
position, remount the Remote Display back onto the mounting brackets and then reconnect the 
DIN connector. 


Figure 4 - Dip Switch Positions


IMPORTANT!

  While Remote Displays that show the time of the same event can have either the same 

or different addresses, if you want two or more Remote Displays to show the time of different 

events, each display must be set to a different address. 


The address of the Remote is the third digit 

only 

of the first number that comes up after you power on the 

Remotes, e.g., for example, the address for 275 would be 5; the address for 005 would also be 5. 

(

If the 

Display

’s address is 001, it will show the time that Remote #1 is programmed to show as indicated on the 

Remote Display screen. If a Remote

’s address is 002, it will show the time that Remote #2 is programmed to 

show, etc.) 


Содержание RDS-INSFTTCU

Страница 1: ...Unpublished Work All rights reserved Title Fast Track Timer User Configuration Manual Doc Number RDS INSFTTCU Revision A Department Sales Area Training Approved and released Standard operating proced...

Страница 2: ...Inc RDS INSFTTCU Page 2 of 82 Confidential Document Do not copy or distribute without written permission from Delphi Display Systems Inc Copyright 2012 Unpublished Work All rights reserved This page i...

Страница 3: ...7 REMOTE CONTROL KEYPAD 13 3 SOFTWARE INSTALLATION USING SUPPLIED THUMB DRIVE 14 3 1 SCOPE 15 3 2 STARTUP 15 4 CONFIGURATION 16 4 1 1 Direct Port Configuration 16 4 1 2 Network E3 Configuration 16 4...

Страница 4: ...Hourly and Custom Reports 44 4 11 5 Dayparts Report 45 4 11 6 Shifts Report 47 4 11 7 Year to Date Reports 49 4 11 8 Car by Car Reports 49 4 12 PARAMETERS PROGRAMMING 50 4 12 1 Assign Access Codes 51...

Страница 5: ...nterface card NIC using a local area network LAN or wide area network WAN The Timer is a measurement instrument that is only as good as the sensors connected to it for vehicle detection Listed below a...

Страница 6: ...e operations such as resetting sensors producing reports on demand customizing automatic operation and adjusting to changes in requirements You will find the following symbols and characters used thro...

Страница 7: ...indow Loop Additionally in order to function properly the Fast Track Timer System relies on input from Customer Furnished Audio Communication System Menu Board Loop Detector Figure 1 Single Lane Examp...

Страница 8: ...e as the GREET time Event 3 When the vehicle departs from the Menu Board deactivating the Menu Board Loop the VEHICLE PRESENCE SIGNAL discontinues The Main Console interprets the time as the MENU time...

Страница 9: ...be required to show the necessary data to store personnel The data shown is configured on the 3000 series Timer by the installer following the completion of the hardware installation 2 5 Remote Displ...

Страница 10: ...fy the A grade target time on any selected event The optional Remote Display setting serves as a special percentage Remote Display that can be used to monitor speed service as well as to provide perfo...

Страница 11: ...er to gain access to the DIP switch Set the switches according to the address you desire Plug the 5 pin DIN connector back into the Remote Display and verify that it has the correct address If it is c...

Страница 12: ...drive thru system Labeled L1 through L8 these lights are activated when their corresponding stations are active or occupied The pattern of the L1 L8 indicator lights on the Console lets you see at a g...

Страница 13: ...anumeric characters including the number in the pink triangle For example the 2 key can be used to cycle through the characters ABC2 see below After cycling to the desired character click KEYBOARD MOD...

Страница 14: ...ith the terms and continue with the installation Click I do not accept the terms of the license agreement to cancel installation and exit or Back to return to the previous screen Click on the print bu...

Страница 15: ...e Fast Track Timer and downloaded to your computer using this software Software helps you manage your Fast Track 3000 Series Timer from your PC by emulating the front panel of the Fast Track 2000 Seri...

Страница 16: ...he E3 Locate and Configure Utility to configure all E3 devices All units to be configured must be on the local network When there are multiple units on the network identify the unit you need to change...

Страница 17: ...me list a new file folder is created using that site name Example The site Fast Track Burger will create a file folder C Fast Track Software Suite Fast Track Burger All data that has been downloaded f...

Страница 18: ...g Select the check box to include the Fast Track Timer for multi site downloads and Automatic Command Line See Section 4 15 Download and Section 4 18 ACL Add Event Number Select this box to add event...

Страница 19: ...software that supports ASCII Software file names include alpha characters identifying the time period of report followed by numeric characters identifying the date the report was created for The file...

Страница 20: ...orts The Open dialog box shown in figure shows sixteen 16 different types of report files the Software can create 4 3 2 Save Save As When you select Save or Save As from the Menu Bar a standard window...

Страница 21: ...many copies to print and what print range to use Under Page range specify the portion of the document you want to print If you click Pages you must also enter the page numbers or page ranges you want...

Страница 22: ...oses WARNING Any manual report that was created and not saved will be lost The data is not lost so the manual report can be recreated without downloading from the Fast Track Timer 4 4 Status Bar The S...

Страница 23: ...the hours that the drive thru is closed OK Closes Unit Parameters window Cancel Cancels the unit parameters function Parameters Used to view edit parameters settings from a timer or saved spd file Con...

Страница 24: ...in the open time for the day you wish to close on 4 6 2 Dayparts This allows you to break each day into smaller parts Dayparts and is used to group data for viewing and reporting Select the day of th...

Страница 25: ...last programmed shift always ends at the closing time for the day 4 6 4 Targets This will allow you to create a system of target times audible indicators and letter grades for any or all programmed ev...

Страница 26: ...6 5 Headings This lets you enter a header The header information is displayed on the Header of the reports generated by the Download See Section 4 15 Download and Section 4 11 Reports Each line is ca...

Страница 27: ...e for the audible tone beep When the power is first applied to the Remote Display the first numbers you will see is how the Remote Display is addressed Example If the Remote Display has 123 displayed...

Страница 28: ...any access code A D with the new change Otherwise you will receive an invalid access code when you try to connect to the Fast Track Timer 4 7 3 Night Mgr Night Manager allows you to set up a time peri...

Страница 29: ...phi Display Systems 4 7 4 Drive thru Cfg The Drive Thru Configuration screen allows you set your drive off minimum and maximum times select the display period for your activity screen and toggles your...

Страница 30: ...u desire The List column allows you to list which order you want your L1 L8 single station and or the M1 M4 multi station events to appear on your Fast Track Timer s display The order can be arranged...

Страница 31: ...n with an A for arrival or a D for departure Then stop the multi station time by placing an A for arrival D for departure in the End column of another single station event This will display the averag...

Страница 32: ...tly connected to The display to the right of the site you re connected to shows the Activity screen of the Fast Track Timer in real time L1 through L8 are detection points When Active Red State show t...

Страница 33: ...ome Base for the Timer s operation VIEW PERIODS Shows current Dayparts and Shifts setting VIEW TARGET TIMES Use to view goals and employee performance MENU Gateway to the Timer s powerful features REM...

Страница 34: ...SHFT The drive thru lane being viewed A SIDE or B SIDE An event list with current car times and average car times The time period for averages and totals Number of cars now in the selected drive thru...

Страница 35: ...service specialist to use it Click or to scroll through the Configuration screens NOTE The Alternate Configuration feature is used only when your drive thru operation changes during the day For examp...

Страница 36: ...screen 2 Click or to scroll through the available target events as displayed on the field beginning TARGET to see how your drive thru lanes and their stations are performing Reminder Click to return...

Страница 37: ...Remove Car screen 1 Click or or or to move to the station you want to adjust 2 Click The car count is now decreased by one to the right of the sign 4 10 8 Reset Loop THIS FEATURE REQUIRES AN ACCESS C...

Страница 38: ...want to adjust 5 Click to reset the selected loop and turn off its loop light on the Main Console Only Loop Detectors internal to the Timer can be reset 4 10 9 Print Store Header The PRINT HEADER func...

Страница 39: ...pare shifts or time periods and for many other useful purposes Defining and producing a Manual Report is easy and becomes very natural with some practice The information the Timer needs to produce rep...

Страница 40: ...ILY instead of a specific day or days any individual days you may have also selected will be deselected automatically a Click when selection is complete You are now in the Report Format selection scre...

Страница 41: ...he criteria for each letter grade 10 If you then need a printed copy of the grading report click Print LCD 11 Click to scroll through reports that has too many lines to fit on the screen 12 Click or t...

Страница 42: ...averages all the selected data For example selecting REPORT BY AVERAGE for a Daily Report for which you have selected three particular days will produce a single report combining and averaging the da...

Страница 43: ...screen The Report Format Selection screen lets you pick the starting and ending dates of a time range for which Monthly Reports will be produced 6 Click or or or to move to the FROM or TO fields to t...

Страница 44: ...ts and percentages of cars that meet the criteria for each letter grade 11 If you then need a printed copy of the grading report click Print LCD 12 Click to scroll through reports that has too many li...

Страница 45: ...REPORT BY AVERAGE for a Daily Report for which you have selected three particular days will produce a single report combining and averaging the data for the three daily time periods The REPORT BY PER...

Страница 46: ...row 4 Click to select or to deselect a specific Dayparts you may select one or more Dayparts An X appears to the right of each row selected for reporting 5 Click when selection is complete You are no...

Страница 47: ...the data for the three daily time periods The REPORT BY PERIOD VIEW selection will produce individual report sections for each period The Header for each report section indicates which dates are inclu...

Страница 48: ...lay Selecting the VIEW option below the REPORT BY AVERAGE field will produce a single report that averages all the selected data For example selecting REPORT BY AVERAGE for a Daily Report for which yo...

Страница 49: ...port that averages all the selected data For example selecting REPORT BY AVERAGE for a Daily Report for which you have selected three particular days will produce a single report combining and averagi...

Страница 50: ...he Set Parameters screen lets you customize your Timer to match changing store requirements Operating hours shift times or automatic reporting requirements See SET PARAMETERS WORKSHEET at the front of...

Страница 51: ...d as UNUSED A used Access Code is displayed as SET When no access code has been set the default access code is 000000 Once any of the access codes has been set however the default access code 000000 n...

Страница 52: ...rs Programming 1 Click to select TIME STORE HOURS 2 Click You are now in the Time Store Hours screen 3 Click to move to the desired field 4 Click or to change the time day and or dates The OPEN and CL...

Страница 53: ...ODE to KEYBOARD MODE see bottom row of screen The Keypad then functions like a telephone keypad with letters or characters associated with keys see diagram on following page NOTE If the Keypad is alre...

Страница 54: ...the following two steps 3 Click to move the field immediately to the right of Day 4 Click or to change day 5 Click to move to the desired Dayparts 6 Click to move to the or fields to change the START...

Страница 55: ...the COPY TO feature to copy the same settings to all other days as explained in the following steps 13 Click to move the field immediately to the right of DAY 14 Click or to select the desired day fr...

Страница 56: ...d a new shift by moving the field immediately to the right of the first unused shift number for which START and STOP times have not yet been entered 9 Click or to add the shift The START and STOP time...

Страница 57: ...TORE PARAMETERS Screen See Section 4 12 Parameters Programming 1 Click to select TARGETS 2 Click You are now in the Set Targets screen 3 Click to move field to the field 4 Click or to select the desir...

Страница 58: ...of time in order to pass 14 Click to move the field immediately to the left of the B beep column field 15 Click or to set the beep count for the grade you have chosen The Remote will beep the number o...

Страница 59: ...een to the TARGET DAY and DAYPART fields 29 Click or to scroll through the TARGET DAY and DAYPART values to confirm your settings 4 12 7 Set Printer Options This option is not used in the Fast Track 3...

Страница 60: ...etc 4 Click to move the field immediately to the right of the individual Remote address number s i e 1 5 Click or to select the event that the Remote s will be monitoring Adjust all other Remotes as...

Страница 61: ...ing 1 Press to select NIGHT MANAGER 2 Press You are now in the Night Manager screen NIGHT MANAGER PROVIDES A SET OF SCREENS TO DISPLAY OPERATING EXCEPTIONS EVENTS AND PULLOUTS THAT OCCUR IN YOUR DRIVE...

Страница 62: ...Delphi Display Systems Inc Copyright 2012 Unpublished Work All rights reserved 8 If you selected to view the events press to select either FT Events or Pull Outs and then press FT EVENTS PULLOUTS NOT...

Страница 63: ...ix digit Access Code You are now in the Diagnostic screen and the field is on the month in the date field 4 Click or to select the desired date 5 Click to move field to VIEW NOTE Selecting VIEW will a...

Страница 64: ...memory CAUTION THIS SCREEN WARNS THAT IF YOU CLICK THE KEY YOU WILL ERASE ALL HISTORICAL EVENT DATA PERMANENTLY 1 Click to move field to RESET MEMORY 2 Click You are now prompted to enter your Tech Co...

Страница 65: ...the session to your Fast Track Timer after data has been transferred When you check the box for Create Reports the software automatically creates your reports in a preformatted format Click on Exit Ab...

Страница 66: ...g the Report Options See section Section 4 2 Site with Raw Data DL New Create a new ACL batch file Open Opens a saved ACL batch file Save Saves a new or edited ACL batch file Close Closes this functio...

Страница 67: ...ate Date Displays the date that will be used to base your report on Use the calendar below to change the date No Report Headers Check this box to create the report without the header being used in you...

Страница 68: ...e Update Days This sets the number of days worth of data that will be included in the file Each number represents the amount of days to be in the report Example 1 is all of today s data up to the most...

Страница 69: ...built automatically in 2 different ways either onboard scheduler or ACL In the site configuration Auto Update must be checked SITE This is the site name the data that follow a site name belongs to th...

Страница 70: ...Fast Track Timer Dealer or directly from Delphi Display Systems If you call for help the technician will ask you for the version of Software you re using From the Menu Bar click Help and then About Fa...

Страница 71: ...into spreadsheets database and or word processing programs for further presentation and analysis Two examples of how you might use the Software report files Presentation Import a Software file into M...

Страница 72: ...8 11 08 06 Daypart 2 Shift 1 01 40 15PM A 2 GREET 00 02 A 9 11 08 06 Daypart 2 Shift 1 01 40 24PM A 4 PICK UP 00 21 A 10 11 08 06 Daypart 2 Shift 1 01 40 24PM A 11 TOTAL 00 40 A 11 11 08 06 01 40 24PM...

Страница 73: ...STORE Fast Track Burger NUMBER 111878 MANAGER John PHONE 714 850 1320 MODEM 714 850 1502 CITY Santa Ana Daypart 1 Total Cars AVG Time MENU 158 0 22 GREET 159 0 01 PICKUP 156 0 36 TOTAL 156 2 06 Daypa...

Страница 74: ...ort for Fast Track Burger 04 22 05 STORE Fast Track Burger NUMBER 111878 MANAGER John PHONE 714 850 1320 MODEM 714 850 1502 CITY Santa Ana MENU Tot A Tot B Tot C Tot D Tot F Apr 22 48 22 10 16 4 Apr 2...

Страница 75: ...NUMBER 111878 MANAGER John PHONE 714 850 1320 IP 192 168 1 56 CITY Santa Ana STATION NUMBER 2 1 3 4 11 ARRIVAL DEPARTURE CAR SIDE GREET MENU CASHIER PICK UP TOTAL 06 00 08AM 06 00 53AM 1 A 32 45 06 0...

Страница 76: ...ork All rights reserved 06 11 51AM 06 12 42AM 19 A 1 12 12 20 51 06 12 07AM 06 12 59AM 20 A 3 9 8 14 52 06 12 23AM 06 13 11AM 21 A 2 7 10 10 48 06 13 14AM 06 14 40AM 22 A 2 15 21 31 86 06 13 43AM 06 1...

Страница 77: ...T ODR_DAYPART5 BAT REMOTE BAT ODR_DAYPART6 BAT REMOTE CONTROL BAT These batch programs may be run from the Fast Track Software Suite folder or from the shortcuts on your desktop To use an ODR for Dayp...

Страница 78: ...e body of the Excel screen 2 Located at the bottom in the Open window select from the Files of Type drop down box All Files 3 Locate the E_R report that you created usually the report when created is...

Страница 79: ...stribute without written permission from Delphi Display Systems Inc Copyright 2012 Unpublished Work All rights reserved To save the file click on File from the Menu bar and select Save A new window wi...

Страница 80: ...ame second of each other not simultaneously CARS IN LANE The number of cars that have arrived at the first active detection point but not yet left the last detection point DAYPARTS Up to eight time pe...

Страница 81: ...ext detection point REMOVE CAR A manual method by which cars are subtracted from the drive thru RESET LOOP The resetting of a Loop and or Loop Detector due to the false detection of a car phantom car...

Страница 82: ...2 of 82 Confidential Document Do not copy or distribute without written permission from Delphi Display Systems Inc Copyright 2012 Unpublished Work All rights reserved 8 Change History Change Version D...

Отзывы: