background image

142

Removing and Installing Parts

9

Replace the bezel (see "Replacing the Bezel" on page 125).

10

Replace the computer cover (see "Replacing the Computer Cover" on 
page 166).

11

Connect your computer and devices to electrical outlets, and then turn 
them on.

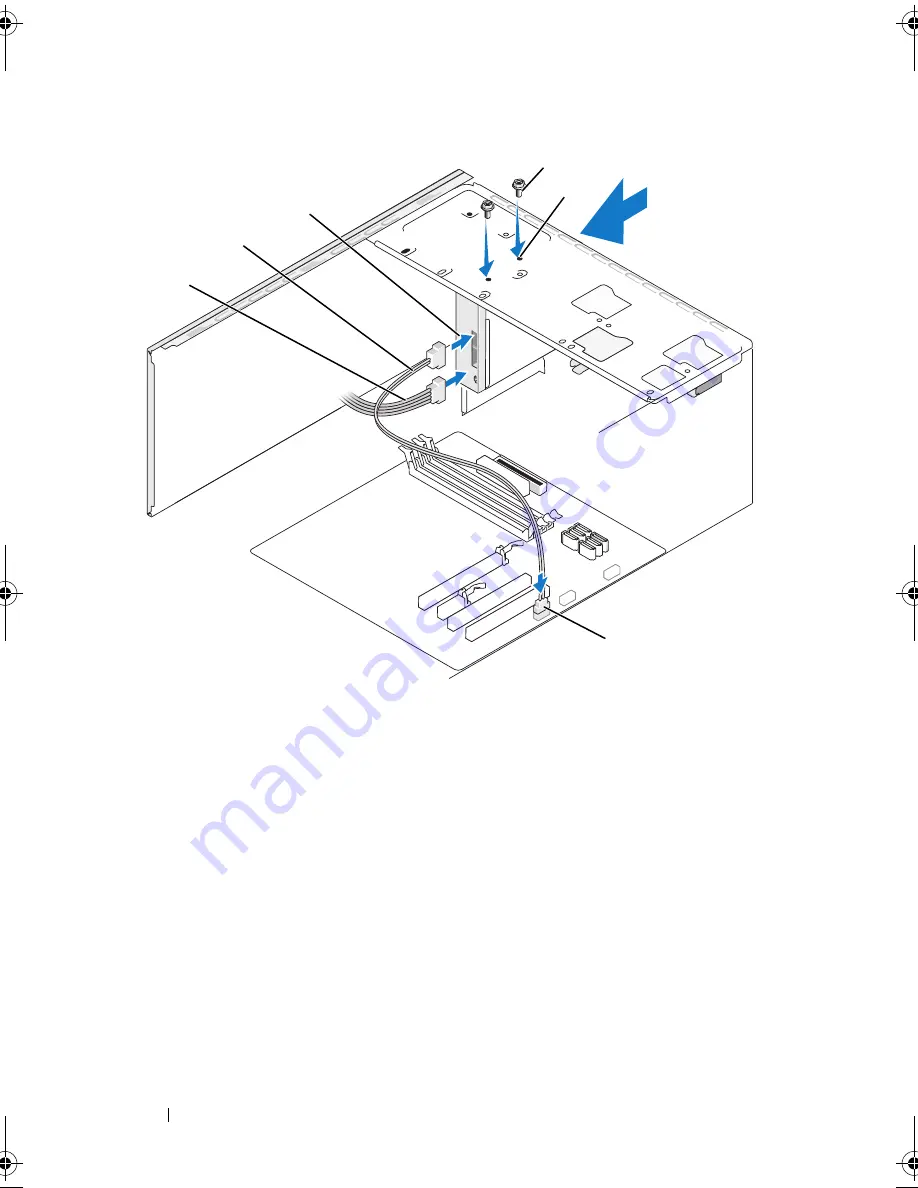
1

Media Card Reader

2

data cable

3

power cable

4

system board 
connector

5

screws (2)

6

screw holes in the 
FlexBay slot (2)

*1

*

Not present on all computers.

2

4

3

5

6

book.book  Page 142  Thursday, June 14, 2007  6:23 PM

Содержание Vostro 200

Страница 1: ...w w w d e l l c o m s u p p o r t d e l l c o m Dell Vostro 200 Owner s Manual Mini Tower Model DCMF ...

Страница 2: ... is strictly forbidden Trademarks used in this text Dell the DELL logo Vostro TravelLite and Strike Zone are trademarks of Dell Inc Bluetooth is a registered trademark owned by Bluetooth SIG Inc and is used by Dell under license Microsoft Windows Outlook and Windows Vista are either trademarks or registered trademarks of Microsoft Corporation in the United States and or other countries Intel Penti...

Страница 3: ... Setting Up a Printer 24 Printer Cable 24 Connecting a USB Printer 24 Playing CDs and DVDs 26 Adjusting the Volume 27 Adjusting the Picture 27 Copying CDs and DVDs 28 Using a Media Card Reader Optional 31 Connecting Two Monitors 33 Connecting Two Monitors With VGA Connectors 33 Connecting One Monitor With a VGA Connector and One Monitor With a DVI Connector 34 Connecting a TV 34 Changing the Displ...

Страница 4: ...s 42 RAID Level 1 Configuration 42 Configuring Your Hard Drives for RAID 43 Configuring for RAID Using the Intel Option ROM Utility 44 Configuring for RAID Using the Intel Matrix Storage Manager 45 Transferring Information to a New Computer 49 Setting Up a Home and Office Network 53 Connecting to a Network Adapter 53 Network Setup Wizard 54 Connecting to the Internet 55 Setting Up Your Internet Co...

Страница 5: ...ps responding 67 A program stops responding 67 A program crashes repeatedly 67 A program is designed for an earlier Microsoft Windows operating system 68 A solid blue screen appears 68 Other software problems 69 Media Card Reader Problems 70 Memory Problems 71 Mouse Problems 72 Network Problems 73 Power Problems 74 Printer Problems 75 Scanner Problems 76 Sound and Speaker Problems 77 No sound from...

Страница 6: ...Dell Diagnostics From Your Hard Drive 86 Starting the Dell Diagnostics From the Drivers and Utilities Media 87 Dell Diagnostics Main Menu 87 Drivers 89 What Is a Driver 89 Identifying Drivers 90 Reinstalling Drivers and Utilities 90 Restoring Your Operating System 93 Using Microsoft Windows System Restore 94 Using Dell PC Restore and Dell Factory Image Restore 95 Using the Operating System Media 9...

Страница 7: ...wer Supply DC Connector Pin Assignments 108 Memory 111 Memory Installation Guidelines 112 Installing Memory 113 Removing Memory 115 Cards 115 PCI and PCI Express Cards 116 Bezel 123 Removing the Bezel 123 Replacing the Bezel 125 Drives 126 Recommended Drive Cable Connections 127 Connecting Drive Cables 127 Drive Interface Connectors 127 Connecting and Disconnecting Drive Cables 128 Hard Drives 128...

Страница 8: ... Sink Assembly 156 Installing the Processor Fan Heat Sink Assembly 157 Processor 158 Removing the Processor 158 Installing the Processor 159 Chassis Fan 162 Removing the Chassis Fan 162 Replacing the Chassis Fan 163 System Board 164 Removing the System Board 164 Installing the System Board 165 Replacing the Computer Cover 166 6 Appendix 169 Specifications 169 System Setup 174 Overview 174 Entering...

Страница 9: ...aning Your Computer 182 Computer Keyboard and Monitor 183 Mouse 183 Floppy Drive 183 CDs and DVDs 184 Dell Technical Support Policy U S Only 184 Definition of Dell Installed Software and Peripherals 185 Definition of Third Party Software and Peripherals 185 FCC Notice U S Only 185 FCC Class B 185 Contacting Dell 187 Glossary 189 Index 207 ...

Страница 10: ...10 Contents ...

Страница 11: ...rtain countries NOTE Additional information may ship with your computer What Are You Looking For Find it Here Warranty information Terms and Conditions U S only Safety instructions Regulatory information Ergonomics information End User License Agreement Dell Product Information Guide How to set up my computer Setup Diagram See the setup diagram that came with your system ...

Страница 12: ...ter Use the Service Tag to identify your computer when you use support dell com or contact support Enter the Express Service Code to direct your call when contacting support NOTE As an increased security measure the newly designed Microsoft Windows license label incorporates a missing portion or hole to discourage removal of the label What Are You Looking For Find it Here ...

Страница 13: ...government and education customers can also use the customized Dell Premier Support website at premier support dell com Desktop System Software DSS If you reinstall the operating system for your computer you should also reinstall the DSS utility DSS provides critical updates for your operating system and support for Dell 3 5 inch USB floppy drives optical drives and USB devices DSS is necessary fo...

Страница 14: ...ndows Help and Support In Windows XP click Start and click Help and Support In Windows Vista click the Windows Vista Start button and click Help and Support 2 Type a word or phrase that describes your problem and then click the arrow icon 3 Click the topic that describes your problem 4 Follow the instructions on the screen What Are You Looking For Find it Here ...

Страница 15: ...Computer Front View of the Computer 1 location of Service Tag Use the Service Tag to identify your computer when you access the Dell Support website or call technical support 2 optical drive Use the optical drive for playing a CD DVD 1 2 4 5 7 3 6 8 9 10 11 12 14 13 ...

Страница 16: ...n page 176 for more information on booting to a USB device It is recommended that you use the back USB connectors for devices that typically remain connected such as printers and keyboards 9 IEEE 1394 connector optional Attach high speed serial multimedia devices such as digital video cameras 10 headphone connector Use the headphone connector to attach headphones and most kinds of speakers 11 micr...

Страница 17: ...ee Controls and Lights on page 172 for more information NOTICE To avoid losing data do not use the power button to turn off the computer Instead perform an operating system shutdown 14 drive activity light The drive activity light is on when the computer reads data from or writes data to the hard drive The light might also be on when a device such as a CD player is operating ...

Страница 18: ... power cable 2 voltage selector switch Used to select voltage rating 3 power supply LED Indicates power availability for power supply 4 back panel connectors Plug USB audio and other devices into the appropriate connector See Back Panel Connectors on page 20 for more information 1 2 3 4 6 5 7 ...

Страница 19: ...mmercially available theft deterrent device The padlock rings allow you to secure the computer cover to the chassis with a padlock to prevent unauthorized access to the inside of the computer To use the padlock rings insert a commercially available padlock through the rings and then lock the padlock 7 security cable slot Security cable slot lets you attach a commercially available antitheft device...

Страница 20: ...the network cable to the network adapter connector on the back panel of your computer A click indicates that the network cable has been securely attached NOTE Do not plug a telephone cable into the network connector On computers with a network connector card use the connector on the card It is recommended that you use Category 5 wiring and connectors for your network If you must use Category 3 wir...

Страница 21: ...akers with integrated amplifiers On computers with a sound card use the connector on the card 7 microphone Use the pink connector to attach a personal computer microphone for voice or musical input into a sound or telephony program On computers with a sound card the microphone connector is on the card 8 side L R surround connector Use the gray connector to provide enhanced surround audio for compu...

Страница 22: ... ambient room temperature is at 25 C 77 F depending on your computer s specifications you only have 5 to 10 C 9 to 18 F temperature margin before you reach your computer s maximum operating temperature For details about your computer s specifications see Specifications on page 169 Leave a 10 2 cm 4 in minimum clearance on all vented sides of the computer to permit the airflow required for proper v...

Страница 23: ...Setting Up and Using Your Computer 23 Do not install your computer in an enclosure that does not allow airflow Restricting the airflow impacts your computer s performance possibly causing it to overheat ...

Страница 24: ... Printer Cable Your printer connects to your computer with either a USB cable or a parallel cable Your printer may not come with a printer cable so if you purchase a cable separately ensure that it is compatible with your printer and computer If you purchased a printer cable at the same time you purchased your computer the cable may arrive in the computer s shipping box Connecting a USB Printer NO...

Страница 25: ...river In Windows XP click Start Printers and Faxes Add a printer to start the Add Printer Wizard In Windows Vista click the Start Network Add a printer to start the Add Printer Wizard 5 Install the printer driver if necessary See Reinstalling Drivers and Utilities on page 90 and the documentation that came with your printer 1 USB connector on computer 2 USB connector on printer 3 USB printer cable...

Страница 26: ... the drive 2 Place the disc label side up in the center of the tray 3 Press the eject button or gently push in the tray To format CDs for storing data to create music CDs or to copy CDs see the CD software that came with your computer NOTE Ensure that you follow all copyright laws when you copy CDs A CD player includes the following basic buttons Play Move backward within the current track Pause M...

Страница 27: ...For more information on volume control options click Help in the Volume Control window Adjusting the Picture If an error message notifies you that the current resolution and color depth are using too much memory and preventing DVD playback adjust the display properties Windows XP 1 Click Start Control Panel Appearance and Themes 2 Under Pick a task click Change the screen resolution Stop Restart t...

Страница 28: ...r CD RW DVD combo drive NOTE The types of CD or DVD drives offered by Dell may vary by country The following instructions explain how to make an exact copy of a CD or DVD using Roxio Creator Plus Dell Edition You can also use Roxio Creator Plus for other purposes such as creating music CDs from audio files stored on your computer or backing up important data For help open Roxio Creator Plus and th...

Страница 29: ...nce you have finished copying the source CD or DVD the CD or DVD that you have created automatically ejects Using Blank CDs and DVDs CD RW drives can write to CD recording media only including high speed CD RW media while DVD writable drives can write to both CD and DVD recording media Use blank CD Rs to record music or permanently store data files After the maximum storage capacity of a CD R is r...

Страница 30: ... Music MP3 files can be played only on MP3 players or on computers that have MP3 software installed Commercially available DVD players used in home theater systems may not support all available DVD formats For a list of formats supported by your DVD player see the documentation provided with your DVD player or contact the manufacturer Media Type Read Write Rewritable CD R Yes Yes No CD RW Yes Yes ...

Страница 31: ...again You can also use blank CD RWs to test music file projects before you record the project permanently to a blank CD R See the Sonic website at sonic com for additional information Using a Media Card Reader Optional Use the Media Card Reader to transfer data directly to your computer The Media Card Reader supports the following memory types xD Picture Card SmartMedia SMC CompactFlash Type I and...

Страница 32: ...Setting Up and Using Your Computer 1 xD Picture Card and SmartMedia SMC 2 CompactFlash Type I and II CF I II and MicroDrive Card 3 Memory Stick MS MS Pro 4 SecureDigital Card SD MultiMediaCard MMC 1 3 4 2 ...

Страница 33: ...onnector and one monitor with a DVI connector or a TV NOTICE If you are connecting two monitors that have VGA connectors you must have the optional DVI adapter to connect the cable If you are connecting two flat panel monitors at least one of them must have a VGA connector If you are connecting a TV you may connect only one monitor VGA or DVI in addition to the TV Connecting Two Monitors With VGA ...

Страница 34: ...itor to the DVI white connector on the back of the computer Connecting a TV NOTE You must purchase an S video cable available at most consumer electronics stores to connect a TV to your computer It is not included with your computer 1 Follow the procedures in Before You Begin on page 101 2 Connect one end of the S video cable to the optional TV OUT connector on the back of the computer 1 optional ...

Страница 35: ...en it is on and you are not using it You can reduce power to just the monitor or the hard drive or you can use standby mode or hibernate mode to reduce power to the entire computer When the computer exits from a power conservation mode it returns to the operating state it was in prior to entering the mode NOTE Windows XP Professional includes security and networking features not available in Windo...

Страница 36: ... prior to entering hibernate mode To activate hibernate mode 1 Click Start Control Panel Pick a category Performance and Maintenance 2 Under or pick a Control Panel icon click Power Options 3 Define your hibernate settings on the Power Schemes tab Advanced tab and Hibernate tab To exit hibernate mode press the power button The computer may take a short time to exit hibernate mode Because the keybo...

Страница 37: ...rting standby mode hibernate mode turning off the monitor and turning off the hard drive NOTICE If you set the hard drive to time out before the monitor does your computer may appear to be locked up To recover press any key on the keyboard or click the mouse To avoid this problem always set the monitor to time out before the hard drive The Power schemes drop down menu displays the following scheme...

Страница 38: ...nate mode or turn off the computer To program these functions click an option from the corresponding drop down menu and click OK Hibernate Tab The Hibernate tab allows you to enable hibernate mode If you want to use the hibernate settings as defined on the Power Schemes tab click the Enable hibernation check box on the Hibernate tab Additional Information For more information on power management o...

Страница 39: ...1 Click Start Control Panel System and Maintenance 2 Under System and Maintenance click Power Options The next dialog box shows three power plans The top option Dell Recommended is the currently active plan To display additional power plans click the arrow at the bottom of the list To immediately activate standby mode without a period of inactivity click Start and click the off button icon Windows...

Страница 40: ...a key on the keyboard or moving the mouse does not bring the computer out of hibernation because the keyboard and the mouse do not function when the computer is in hibernate mode Because hibernate mode requires a special file on your hard drive with enough disk space to store the contents of the computer memory Dell creates an appropriately sized hibernate mode file before shipping the computer to...

Страница 41: ...s 1 Choose the Power Plan you want to change 2 Click Change Plan Settings from just below the plan name 3 Click Change Advanced Power Settings CAUTION There are many different settings in the Power Options Advanced Settings dialog box Use care when making setting changes Enabling SpeedStep Technology SpeedStep technology controls your computer s processor performance automatically dynamically adju...

Страница 42: ... used as a spare drive in a RAID 1 configuration However if four drives are present in your computer then each pair of drives can be made into a RAID level 1 volume The drives should be the same size in order to ensure that the larger drive does not contain unallocated and therefore unusable space RAID Level 1 Configuration RAID level 1 uses a data redundancy storage technique known as mirroring W...

Страница 43: ...D hard drive volumes One method uses the Intel Option ROM utility and is performed before you install the operating system onto the hard drive The second method uses the Intel Matrix Storage Manager or Intel Storage Utility This method is performed after you have installed the operating system and the Intel Storage Utility Both methods require that you set your computer to RAID enabled mode before...

Страница 44: ...ct RAID1 Mirror and press Enter 6 If there are more than two hard disks available use the up and down arrow keys and space bar to select the two disks you want to use to make up your array and then press Enter 7 Select the desired capacity for the volume and press Enter The default value is the maximum available size 8 Press Enter to create the volume 9 Press y to confirm that you want to create t...

Страница 45: ... to an existing single drive computer and the operating system is on the single drive and you want to configure the two new drives into a RAID volume You already have a two hard drive computer configured into an array but you still have some space left on the array that you want to designate as a second RAID volume Creating a RAID 1 Volume NOTE When you perform this operation all data on the RAID ...

Страница 46: ...s for creating a partition on the new RAID volume Deleting a RAID Volume NOTE While this procedure deletes the RAID 1 volume it also splits the RAID 1 volume into two non RAID hard drives with a partition and leaves any existing data files intact 1 In Windows XP click Start All Programs Intel Matrix Storage Manager Intel Matrix Storage Console to launch the Intel Storage Utility In Windows Vista c...

Страница 47: ...drop down box select RAID 1 as the RAID level NOTE Select the hard drive that already has the data or operating system files that you want to maintain on the RAID volume as your source hard drive 7 On the Select Source Hard Drive screen double click the hard drive from which you want to migrate and click Next 8 On the Select Member Hard Drive screen double click the hard drive to select the member...

Страница 48: ...rom a Spare Hard Drive 1 Right click the spare hard drive icon 2 Click Reset Hard Drive to Non RAID Rebuilding a Degraded RAID 1 Volume If your computer does not have a spare hard drive and the computer has reported a degraded RAID 1 volume you can manually rebuild the computer s redundancy mirror to a new hard drive by performing the following steps 1 In Windows XP click Start All Programs Intel ...

Страница 49: ... writable CD for transfer to the new computer NOTE You can transfer information from an old computer to a new computer by directly connecting a serial cable to the input output I O ports of the two computers To transfer data over a serial connection you must access the Network Connections utility from the Control Panel and perform additional configuration steps such as setting up an advanced conne...

Страница 50: ...Windows XP CD screen click I will use the wizard from the Windows XP CD Next 5 When the Now go to your old computer screen appears go to your old or source computer Do not click Next at this time To copy data from the old computer 1 On the old computer insert the Windows XP Operating System media 2 On the Welcome to Microsoft Windows XP screen click Perform additional tasks 3 Under What do you wan...

Страница 51: ...u must create a wizard disk that will allow you to create a backup image file to removable media To create a wizard disk use your new computer with Windows XP and perform the following steps 1 Open the Files and Settings Transfer Wizard click Start All Programs Accessories System Tools Files and Settings Transfer Wizard 2 When the Files and Settings Transfer Wizard welcome screen appears click Nex...

Страница 52: ...ew computer 1 On the Now go to your old computer screen on the new computer click Next 2 On the Where are the files and settings screen select the method you chose for transferring your settings and files and click Next Follow the instructions on the screen The wizard reads the collected files and settings and applies them to your new computer When all of the settings and files have been applied t...

Страница 53: ... will see the Windows Vista Welcome Center One icon in the Welcome Center is Transfer Files and Settings Click this icon to start Windows easy Transfer If the Welcome Center dialog box has been closed you can access Easy Transfer by clicking Start All Programs Accessories System Tools Easy Transfer Setting Up a Home and Office Network Connecting to a Network Adapter NOTICE Plug the network cable i...

Страница 54: ... Wizard 2 On the welcome screen click Next 3 Click Checklist for creating a network NOTE Selecting the connection method This computer connects directly to the Internet enables the integrated firewall provided with Windows XP SP1 4 Complete the checklist and required preparations 5 Return to the Network Setup Wizard and follow the instructions on the screen Windows Vista 1 Click Start and then cli...

Страница 55: ...cess through your existing telephone line or cellular telephone service With a DSL connection you can access the Internet and use your telephone on the same line simultaneously Cable modem connections that provide high speed Internet access through your local cable TV line Satellite modem connections that provide high speed Internet access through a satellite television system Dial up connections ...

Страница 56: ...ice outage Contact your ISP to check the service status or try connecting again later NOTE Have your ISP information ready If you do not have an ISP the Connect to the Internet wizard can help you get one Windows XP 1 Save and close any open files and exit any open programs 2 Click Start Internet Explorer The New Connection Wizard appears 3 Click Connect to the Internet 4 In the next window click ...

Страница 57: ...rnet The Connect to the Internet window appears 3 Click either Broadband PPPoE or Dial up depending on how you want to connect Choose Broadband if you will use a DSL satellite modem cable TV modem or Bluetooth wireless technology connection Chose Dial up if you will use a dial up modem or ISDN NOTE If you do not know which type of connection to select click Help me choose or contact your ISP 4 Fol...

Страница 58: ...58 Setting Up and Using Your Computer ...

Страница 59: ... diagnose and fix the problem If an error message occurs in a program see the program s documentation Battery Problems CAUTION There is a danger of a new battery exploding if it is incorrectly installed Replace the battery only with the same or equivalent type recommended by the manufacturer Discard used batteries according to the manufacturer s instructions CAUTION Before you begin any of the pro...

Страница 60: ... check for and remove viruses Viruses can sometimes prevent Windows from recognizing the drive ENSURE THAT THE DRIVE IS ENABLED IN THE SYSTEM SETUP PROGRAM See System Setup on page 174 TEST THE DRIVE Insert another floppy disk CD or DVD to eliminate the possibility that the original one is defective Insert bootable media and restart the computer CLEAN THE DRIVE OR DISK See Cleaning Your Computer o...

Страница 61: ... the volume is turned up by clicking the slidebar and dragging it up Ensure that the sound is not muted by clicking any boxes that are checked CHECK THE SPEAKERS AND SUBWOOFER See Sound and Speaker Problems on page 77 CLOSE OTHER PROGRAMS The CD DVD RW drive must receive a steady stream of data when writing If the stream is interrupted an error occurs Try closing all programs before you write to t...

Страница 62: ...ck Scan for and attempt recovery of bad sectors and click Start Windows Vista 1 Click Start and click Computer 2 Right click Local Disk C 3 Click Properties Tools Check Now The User Account Control window may appear If you are an administrator on the computer click Continue otherwise contact your administrator to continue the desired action 4 Follow the instructions on the screen NOTE You must be ...

Страница 63: ... have other telephone devices sharing the line such as an answering machine fax machine surge protector or line splitter then bypass them and use the telephone to connect the modem directly to the telephone wall jack If you are using a line that is 3 m 10 ft or more in length try a shorter one RUN THE MODEM DIAGNOSTICS TOOL Windows XP 1 Click Start All Programs Modem Helper 2 Follow the instructio...

Страница 64: ... Click Start Control Panel Hardware and Sound Phone and Modem Options Modems 2 Click the COM port for your modem Properties Diagnostics Query Modem to verify that the modem is communicating with Windows If all commands receive responses the modem is operating properly ENSURE THAT YOU ARE CONNECTED TO THE INTERNET Ensure that you have subscribed to an Internet provider With the Outlook Express e ma...

Страница 65: ...am documentation for installation instructions Windows Vista 1 Click Start Control Panel Programs Programs and Features 2 Select the program you want to remove 3 Click Uninstall 4 See the program documentation for installation instructions drive letter IS NOT ACCESSIBLE THE DEVICE IS NOT READY The drive cannot read the disk Insert a disk into the drive and try again INSERT BOOTABLE MEDIA Insert a ...

Страница 66: ...ter on page 102 reconnect the keyboard cable as shown on the setup diagram for your computer and then restart the computer Check the cable connector for bent or broken pins and for damaged or frayed cables Straighten bent pins Remove keyboard extension cables and connect the keyboard directly to the computer TEST THE KEYBOARD Connect a properly working keyboard to the computer and try using the ke...

Страница 67: ...lation instructions in its documentation or on a floppy disk or CD Ensure that the power cable is firmly connected to the computer and to the electrical outlet TURN THE COMPUTER OFF If you are unable to get a response by pressing a key on your keyboard or moving your mouse press and hold the power button for at least 8 to 10 seconds until the computer turns off Then restart your computer END THE P...

Страница 68: ...w the instructions on the screen Windows Vista The Program Compatibility Wizard configures a program so that it runs in an environment similar to non Windows Vista operating system environments 1 Click Start Control Panel Programs Use an older program with this version of Windows 2 In the welcome screen click Next 3 Follow the instructions on the screen TURN THE COMPUTER OFF If you are unable to g...

Страница 69: ...nimum hardware requirements needed to run the software See the software documentation for information Ensure that the program is installed and configured properly Verify that the device drivers do not conflict with the program If necessary uninstall and then reinstall the program BACK UP YOUR FILES IMMEDIATELY USE A VIRUS SCANNING PROGRAM TO CHECK THE HARD DRIVE FLOPPY DISKS OR CDS SAVE AND CLOSE ...

Страница 70: ...wn list select the new drive letter assignment for the Media Card Reader 6 Click OK to confirm your selection Windows Vista 1 Click Start right click Computer and select Manage 2 Click Continue if prompted 3 Click Expand the Storage object and select Disk Management 4 Right click the corresponding drive letter in the right pane that needs to be changed 5 Select Change Drive Letter and Paths 6 Clic...

Страница 71: ...entation for minimum memory requirements If necessary install additional memory see Memory Installation Guidelines on page 112 Reseat the memory modules see Installing Memory on page 113 to ensure that your computer is successfully communicating with the memory Run the Dell Diagnostics see Dell Diagnostics on page 86 IF YOU EXPERIENCE OTHER MEMORY PROBLEMS Reseat the memory modules see Memory Inst...

Страница 72: ...ously press Ctrl Esc to display the Start menu 2 Type u press the keyboard arrow keys to highlight Shut down or Turn Off and then press Enter 3 After the computer turns off reconnect the mouse cable as shown on the on the setup diagram for your computer 4 Start the computer ENSURE THAT THE USB PORTS ARE ENABLED IN THE SYSTEM SETUP PROGRAM See System Setup on page 174 TEST THE MOUSE Connect a prope...

Страница 73: ...ork connector on the back of the computer and the network port or device CHECK THE NETWORK LIGHTS ON THE BACK OF THE COMPUTER If the link integrity light is off that indicates no network communication exists Replace the network cable For a description of network lights see Controls and Lights on page 172 RESTART THE COMPUTER AND LOG ON TO THE NETWORK AGAIN CHECK YOUR NETWORK SETTINGS Contact your ...

Страница 74: ...DY BLUE AND THE COMPUTER IS NOT RESPONDING See Power Lights on page 81 IF THE POWER LIGHT IS BLINKING BLUE The computer is in standby mode Press a key on the keyboard move the mouse or press the power button to resume normal operation IF THE POWER LIGHT IS STEADY AMBER Power problem or internal device malfunction Ensure that the 12 volt power connector 12V is securely connected to the system board...

Страница 75: ... devices on a power strip Multiple power strips connected to the same electrical outlet CHECK THE PRINTER DOCUMENTATION See the printer documentation for setup and troubleshooting information ENSURE THAT THE PRINTER IS TURNED ON CHECK THE PRINTER CABLE CONNECTIONS See the printer documentation for cable connection information Ensure that the printer cables are securely connected to the printer and...

Страница 76: ...rts For a parallel printer ensure that the Print to the following port s setting is LPT1 Printer Port For a USB printer ensure that the Print to the following port s setting is USB Windows Vista 1 Click Start Control Panel Hardware and Sound Printer 2 If the printer is listed right click the printer icon 3 Click Properties and click Ports 4 Adjust the settings as needed REINSTALL THE PRINTER DRIVE...

Страница 77: ...omputer VERIFY THAT THE SCANNER IS RECOGNIZED BY MICROSOFT WINDOWS Windows XP 1 Click Start Control Panel Printers and Other Hardware Scanners and Cameras 2 If your scanner is listed Windows recognizes the scanner Windows Vista 1 Click Start Control Panel Hardware and Sound Scanners and Cameras 2 If the scanner is listed Windows recognizes the scanner REINSTALL THE SCANNER DRIVER See the scanner d...

Страница 78: ...mputer s front panel headphone connector TEST THE ELECTRICAL OUTLET Ensure that the electrical outlet is working by testing it with another device such as a lamp ELIMINATE POSSIBLE INTERFERENCE Turn off nearby fans fluorescent lights or halogen lamps to check for interference REINSTALL THE SOUND DRIVER See Manually Reinstalling Drivers on page 92 RUN THE HARDWARE TROUBLESHOOTER See Restoring Your ...

Страница 79: ...ther than the video connector on the system board If you are using a graphics extension cable and removing the cable solves the problem the cable is defective Swap the computer and monitor power cables to determine whether the power cable is defective Check the connector for bent or broken pins It is normal for monitor cable connectors to have missing pins CHECK THE MONITOR POWER LIGHT If the powe...

Страница 80: ... EXTERNAL POWER SOURCES Fans fluorescent lights halogen lamps and other electrical devices can cause the screen image to appear shaky Turn off nearby devices to check for interference ROTATE THE MONITOR TO ELIMINATE SUNLIGHT GLARE AND POSSIBLE INTERFERENCE ADJUST THE WINDOWS DISPLAY SETTINGS Windows XP 1 Click Start Control Panel Appearance and Themes 2 Click the area you want to change or click t...

Страница 81: ... electrical outlet and that the power strip is turned on Also bypass power protection devices power strips and power extension cables to verify that the computer turns on properly Ensure that the electrical outlet is working by testing it with another device such as a lamp If the power light is steady blue and the computer is not responding Ensure that the display is connected and powered on If th...

Страница 82: ...ecurely connected to the system board see System Board Components on page 106 Ensure that the main power cable and front panel cable are securely connected to the system board see System Board Components on page 106 Beep Codes Your computer might emit a series of beeps during start up if the monitor cannot display errors or problems This series of beeps called a beep code identifies a problem One ...

Страница 83: ...of the same type into your computer see Installing Memory on page 113 If the problem persists contact Dell 3 Possible motherboard failure Contact Dell 4 RAM Read Write failure Ensure that no special memory module memory connector placement requirements exist see Memory Installation Guidelines on page 112 Verify that the memory modules that you are installing are compatible with your computer see M...

Страница 84: ...tacting Dell on page 187 for assistance CPU FAN FAILURE CPU fan failure Replace CPU fan See Removing the Processor Fan Heat Sink Assembly on page 156 DISKETTE DRIVE 0 SEEK FAILURE A cable may be loose or the computer configuration information may not match the hardware configuration Check cable connections See Contacting Dell on page 187 for assistance DISKETTE READ FAILURE The floppy disk may be ...

Страница 85: ...stem board might be malfunctioning or motherboard failure See Contacting Dell on page 187 for assistance NON SYSTEM DISK OR DISK ERROR Replace the floppy disk with one that has a bootable operating system or remove the floppy disk from drive A and restart the computer NOT A BOOT DISKETTE Insert a bootable floppy disk and restart your computer USB OVER CURRENT ERROR Disconnect the USB device Use ex...

Страница 86: ...ogram and is active Start the Dell Diagnostics from your hard drive or from the Drivers and Utilities media Starting the Dell Diagnostics From Your Hard Drive The Dell Diagnostics is located on a hidden diagnostic utility partition on your hard drive NOTE If your computer cannot display a screen image see Contacting Dell on page 187 1 Ensure that the computer is connected to an electrical outlet t...

Страница 87: ...device list appears highlight CD DVD CD RW and press Enter 4 Select the Boot from CD ROM option from the menu that appears and press Enter 5 Type 1 to start the CD menu and press Enter to proceed 6 Select Run the 32 Bit Dell Diagnostics from the numbered list If multiple versions are listed select the version appropriate for your computer 7 When the Dell Diagnostics Main Menu appears select the te...

Страница 88: ... run a test from the Custom Test or Symptom Tree option click the applicable tab described in the following table for more information Option Function Express Test Performs a quick test of devices in the system This typically can take 10 to 20 minutes Extended Test Performs a thorough check of devices in the system This typically can take an hour or more Custom Test Tests a specific device or cust...

Страница 89: ...e Drivers and Utilities media may contain drivers for operating systems that are not on your computer Ensure that you are installing software appropriate for your operating system Many drivers such as the keyboard driver come with your Microsoft Windows operating system You may need to install drivers if you Upgrade your operating system Reinstall your operating system Connect or install a new dev...

Страница 90: ...r Account Control window may appear If you are an administrator on the computer click Continue otherwise contact your administrator to continue 2 Scroll down the list to see if any device has an exclamation point a yellow circle with a on the device icon If an exclamation point is next to the device name you may need to reinstall the driver or install a new driver see Reinstalling Drivers and Util...

Страница 91: ...does not resolve the problem then use System Restore Restoring Your Operating System on page 93 to return your computer to the operating state that existed before you installed the new driver Using the Drivers and Utilities media If using Device Driver Rollback or System Restore Restoring Your Operating System on page 93 does not resolve the problem then reinstall the driver from the Drivers and U...

Страница 92: ...you want to reinstall and follow the instructions on the screen If a particular driver is not listed that driver is not required by your operating system Manually Reinstalling Drivers After extracting the driver files from the Drivers and Utilities media to your hard drive you may be required to update the driver manually Windows XP 1 Click Start and click Control Panel 2 Under Pick a Category cli...

Страница 93: ...You can restore your operating system in the following ways System Restore returns your computer to an earlier operating state without affecting data files Use System Restore as the first solution for restoring your operating system and preserving data files Dell PC Restore by Symantec available in Windows XP and Dell Factory Image Restore available in Windows Vista returns your hard drive to the ...

Страница 94: ...assic view Starting System Restore NOTICE Before you restore the computer to an earlier operating state save and close any open files and exit any open programs Do not alter open or delete any files or programs until the system restoration is complete Windows XP 1 Click Start All Programs Accessories System Tools System Restore 2 Click either Restore my computer to an earlier time or Create a rest...

Страница 95: ...e is automatically disabled To see if System Restore is enabled 1 Click Start Control Panel Performance and Maintenance System 2 Click the System Restore tab and ensure that Turn off System Restore is unchecked Using Dell PC Restore and Dell Factory Image Restore NOTICE Using Dell PC Restore or Dell Factory Image Restore permanently deletes all data on the hard drive and removes any programs or dr...

Страница 96: ... with PC Restore click Reboot 3 Click Restore and click Confirm The restore process takes approximately 6 to 10 minutes to complete 4 When prompted click Finish to reboot the computer NOTE Do not manually shut down the computer Click Finish and let the computer completely reboot 5 When prompted click Yes The computer restarts Because the computer is restored to its original operating state the scr...

Страница 97: ... If the partition for PC Restore does not exist on your computer hard drive a message appears stating that the partition was not found Click Quit there is no partition to delete 4 Click OK to remove the PC Restore partition on the hard drive 5 Click Yes when a confirmation message appears The PC Restore partition is deleted and the newly available disk space is added to the free space allocation o...

Страница 98: ...ake five or more minutes to complete A message appears when the operating system and factory installed applications have been restored to factory condition 8 Click Finish to reboot the system Using the Operating System Media Before you Begin If you are considering reinstalling the Windows operating system to correct a problem with a newly installed driver first try using Windows Device Driver Roll...

Страница 99: ...des options for reinstalling Windows XP The options can overwrite files and possibly affect programs that are installed on your hard drive Therefore do not reinstall Windows XP unless a Dell technical support representative instructs you to do so 1 Save and close any open files and exit any open programs 2 Insert the Operating System disc 3 Click Exit if the Install Windows message appears 4 Resta...

Страница 100: ...ardware troubleshooter in the Search field and click the arrow to start the search 3 Click Hardware Troubleshooter in the Search Results list 4 In the Hardware Troubleshooter list click I need to resolve a hardware conflict on my computer and click Next Windows Vista 1 Click Start and click Help and Support 2 Type hardware troubleshooter in the search field and press Enter to start the search 3 In...

Страница 101: ...ing conditions exist You have performed the steps in Turning Off Your Computer on page 102 and Before Working Inside Your Computer on page 102 You have read the safety information in the Dell Product Information Guide A component can be replaced or if purchased separately installed by performing the removal procedure in reverse order Recommended Tools The procedures in this document may require th...

Страница 102: ... computer from potential damage and to help ensure your own personal safety CAUTION Before you begin any of the procedures in this section follow the safety instructions in the Product Information Guide NOTICE Handle components and cards with care Do not touch the components or contacts on a card Hold a card by its edges or by its metal mounting bracket Hold a component such as a processor by its ...

Страница 103: ... the metal at the back of the computer While you work periodically touch an unpainted metal surface to dissipate static electricity which could harm internal components Removing the Computer Cover CAUTION Before you begin any of the procedures in this section follow the safety instructions in the Product Information Guide CAUTION To guard against electrical shock always unplug your computer from t...

Страница 104: ...moving and Installing Parts 4 Release the computer cover by pulling it away from the front of the computer and lifting it up 5 Set the cover aside in a secure location 1 computer cover 2 front of computer 1 2 ...

Страница 105: ...r CAUTION Before you begin any of the procedures in this section follow the safety instructions in the Product Information Guide 1 optical drive 2 power supply 3 optional optical drive 4 floppy drive or Media Reader 5 hard drive 6 optional hard drive 1 2 3 6 5 4 ...

Страница 106: ...r CPU_FAN 3 memory module connector DIMM_1 4 memory module connector DIMM_2 5 memory module connector DIMM_3 6 memory module connector DIMM_4 7 main power connector ATX_POWER 8 floppy drive connector FLOPPY 9 battery socket 1 3 20 21 11 13 2 15 22 19 16 24 26 30 4 7 8 18 25 27 28 29 5 6 14 31 9 10 17 23 12 ...

Страница 107: ...connector F_USB1 17 serial ATA drive connector SATA5 18 front USB connector F_USB2 19 front FlexBay connector F_USB3 20 system fan connector SYS_FAN1 21 front audio F_AUDIO 22 PCI connector PCI2 23 PCI connector PCI1 24 PCI Express x1 connector PCIE_X1 25 PCI Express x16 connector PCIE_X16 26 audio connectors 27 2 USB and 1 LAN connector 28 2 USB connectors 29 chassis fan connector CHASSIS_FAN 30 ...

Страница 108: ...108 Removing and Installing Parts Power Supply DC Connector Pin Assignments DC Power Connector P1 13 14 15 16 17 18 19 20 21 22 23 24 1 2 3 4 5 6 7 8 9 10 11 12 ...

Страница 109: ...AWG 6 5 V Red 20 AWG 7 RTN Black 20 AWG 8 POK Gray 22 AWG 9 5 V AUX Purple 20 AWG 10 12 V Yellow 20 AWG 11 12 V Yellow 20 AWG 12 3 3 V Orange 20 AWG 13 3 3 V Orange 20 AWG 14 12 V Blue 22 AWG 15 RTN Black 20 AWG 16 PS_ON Green 22 AWG 17 RTN Black 20 AWG 18 RTN Black 20 AWG 19 RTN Black 20 AWG 20 OPEN 21 5 V Red 20 AWG 22 5 V Red 20 AWG 23 5 V Red 20 AWG 24 RTN Black 20 AWG ...

Страница 110: ...ector P2 DC Power Connectors P3 P4 P5 and P6 Pin Number Signal Name 18 AWG Wire 1 GND Black 2 GND Black 3 12 VADC Yellow 4 12 VADC Yellow Pin Number Signal name 18 AWG Wire 1 3 3 VDC Orange 2 GND Black 3 5 VDC Red 4 GND Black 5 12 VBDC White 3 1 4 2 ...

Страница 111: ...the system board Your computer supports DDR2 memory For additional information on the type of memory supported by your computer see Memory on page 169 NOTICE Do not install ECC or buffered memory modules Only unbuffered non ECC memory is supported Pin Number Signal Name 22 AWG Wire 1 5 VDC Red 2 GND Black 3 GND Black 4 12 VADC Yellow ...

Страница 112: ...irs of matched memory size speed and technology If the memory modules are not installed in matched pairs the computer will operate but with a slight reduction in performance See the label on the module to determine the module s capacity For example if you install a mixed pair of DDR2 533 MHz and DDR2 667 MHz and 800 MHz memory the modules function at the slowest speed installed 1 Pair A matched pa...

Страница 113: ...ered under your computer warranty Installing Memory CAUTION Before you begin any of the procedures in this section follow the safety instructions in the Product Information Guide CAUTION Before installing memory you must remove the PCI Express X16 card See Cards on page 115 NOTICE To prevent static damage to components inside your computer discharge static electricity from your body before you tou...

Страница 114: ...nto the connector until the module snaps into position If you insert the module correctly the securing clips snap into the cutouts at each end of the module 5 Replace the PCI Express x16 card See Cards on page 115 6 Replace the computer cover NOTICE To connect a network cable first plug the cable into the network device and then plug it into the computer 7 Connect your computer and devices to elec...

Страница 115: ...uter chassis 1 Follow the procedures in Before You Begin on page 101 2 Press out the securing clip at each end of the memory module connector 3 Grasp the module at the end of the board and lift up 4 Replace the PCI Express x16 card See Cards on page 115 Cards CAUTION Before you begin any of the procedures in this section follow the safety instructions in the Product Information Guide NOTICE To pre...

Страница 116: ...d follow the procedures in the next section If you are removing but not replacing a card see Removing a PCI PCI Express Card on page 121 If you are replacing a card remove the current driver for the card from the operating system Installing a PCI PCI Express Card 1 Follow the procedures in Before You Begin on page 101 2 Remove the computer cover See Removing the Computer Cover on page 103 ...

Страница 117: ...wdriver outwards to break the metal plate 6 If you are replacing a card that is already installed in the computer remove the card If necessary disconnect any cables connected to the card For PCI card grasp the card by its top corners and ease it out of its connector For PCI Express card pull the securing tab grasp the card by its top corners and then ease it out of its connector NOTE The position ...

Страница 118: ...network To guard against electrical shock be sure to unplug your computer from its electrical outlet before installing any cards 8 Place the card in the connector and press down firmly Ensure that the card is fully seated in the slot 9 If you are installing the PCI Express card into the x16 card connector position the card so the securing slot is aligned with the securing tab 1 alignment bar 2 ful...

Страница 119: ...retention bracket ensuring that The guide clamp is aligned with the guide notch The tops of all cards and filler brackets are flush with the alignment bar The notch in the top of the card or filler bracket fits around the alignment guide 1 PCI Express x16 card 2 securing tab 3 PCI Express x1 card 4 PCI Express x1 card slot 5 PCI Express x16 card slot 1 5 2 3 4 ...

Страница 120: ...tening the screw 13 Connect any cables that should be attached to the card See the documentation for the card for information about the card s cable connections 1 alignment guide 2 filler bracket 3 alignment bar 4 card retention bracket 5 screw 6 guide clamp 2 7 guide notch 2 1 2 3 4 6 7 5 ...

Страница 121: ...s to the microphone speaker headphone or line in connectors on the back panel See Back Panel Connectors on page 20 16 If you installed an add in network adapter and want to disable the integrated network adapter a Enter system setup see System Setup on page 174 go to Onboard Devices and select Integrated NIC and then change the setting to Off b Connect the network cable to the add in network adapt...

Страница 122: ...tention bracket ensuring that The guide clamp is aligned with the guide notch The tops of all cards and filler brackets are flush with the alignment bar The notch in the top of the card or filler bracket fits around the alignment guide 8 Fix the card retention bracket by replacing and tightening the screw NOTICE To connect a network cable first plug the cable into the network device and then plug ...

Страница 123: ... the back panel of the computer See Back Panel Connectors on page 20 Bezel CAUTION Before you begin any of the procedures in this section follow the safety instructions in the Product Information Guide CAUTION To guard against electrical shock always unplug your computer from the electrical outlet before removing the cover Removing the Bezel 1 Follow the procedures in Before You Begin on page 101 ...

Страница 124: ...ime to release them from the front panel 4 Rotate and pull the bezel away from the front of the computer to release the three bezel clamps from bezel insert 5 Set aside the bezel in a secure location 1 bezel grip 3 2 bezel 3 bezel clamp 3 4 clamp insert 3 5 back of computer 3 4 5 1 2 ...

Страница 125: ...ng the Bezel 1 Align and insert the bezel clamps in the bezel insert 2 Rotate the bezel toward the computer until it snaps into place on the front panel 1 bezel grip 3 2 bezel 3 bezel clamp 3 4 clamp insert 3 5 back side of computer 3 2 1 5 4 ...

Страница 126: ... a combination of these devices Up to two serial ATA hard drives One optional floppy drive or an optional Media Card Reader Up to two optical drives 1 optical drive 2 optional optical drive 3 floppy drive or Media Reader 4 optional hard drive 5 hard drive 1 2 3 5 4 ...

Страница 127: ... connectors labeled SATA4 or SATA5 on the system board Connecting Drive Cables When you install a drive you connect two cables a DC power cable and a data cable to the back of the drive Drive Interface Connectors The drive cable connectors are keyed for correct insertion Properly align the cable connector key on the cable and the drive before connecting 1 power cable 2 power input connector 1 2 ...

Страница 128: ...his section follow the safety instructions in the Product Information Guide CAUTION To guard against electrical shock always unplug your computer from the electrical outlet before removing the cover NOTICE To avoid damage to the drive do not set it on a hard surface Instead set the drive on a surface such as a foam pad that will sufficiently cushion it NOTICE If you are replacing a hard drive that...

Страница 129: ... data cables from the drive 4 Disconnect the data cable from the system board 5 Remove the four screws securing the hard drive NOTICE Ensure that you do not scratch the screw holes with the screw driver as the hard disk circuit board assembly is exposed 6 Slide the drive out and away from the front of the computer 1 hard drive 2 power cable 3 serial ATA data cable 4 system board connector 5 screws...

Страница 130: ...ct configuration 8 Replace the computer cover see Replacing the Computer Cover on page 166 9 Connect computer and other devices to an electrical outlet Installing a Hard Drive 1 Follow the procedures in Before You Begin on page 101 2 Remove the computer cover see Removing the Computer Cover on page 103 3 Check the documentation for the drive to verify that it is configured for your computer 4 Slid...

Страница 131: ...cables to be certain that they are properly connected and firmly seated 10 Replace the computer cover see Replacing the Computer Cover on page 166 NOTICE To connect a network cable first plug the cable into the network port or device and then plug it into the computer 1 hard drive 2 power cable 3 serial ATA data cable 4 system board connector 5 screws 4 6 screw holes in the hard drive bay 4 2 4 3 ...

Страница 132: ...plug your computer from the electrical outlet before removing the cover NOTICE To avoid damage to the drive do not set it on a hard surface Instead set the drive on a surface such as a foam pad that will sufficiently cushion it NOTE For additional drives extra screws are not shipped during initial purchase of the computer but are shipped with the additional drives 1 Follow the procedures in Before...

Страница 133: ...nnect the data cable to the system board 9 Check all cables to be certain that they are properly connected and firmly seated 10 Replace the computer cover see Replacing the Computer Cover on page 166 1 second hard drive optional 2 power cable 3 serial ATA data cable 4 system board connector 5 screws 4 6 screw holes in the hard drive bay 4 2 4 3 1 5 6 ...

Страница 134: ...guration changes see Entering System Setup on page 174 Floppy Drive CAUTION Before you begin any of the procedures in this section follow the safety instructions in the Product Information Guide CAUTION To guard against electrical shock always unplug your computer from the electrical outlet before removing the cover NOTE If you are adding a floppy drive see Installing a Floppy Drive on page 136 Re...

Страница 135: ...loppy drive connectors Remove this card before disconnecting the floppy drive cables see Removing a PCI PCI Express Card on page 121 5 Disconnect the data cable from the system board 6 Remove the two screws securing the floppy drive 7 Slide the floppy drive out through the front of the computer 1 floppy drive 2 data cable 3 power cable 4 system board connector 5 screws 2 2 4 3 1 5 ...

Страница 136: ...ering System Setup on page 174 Installing a Floppy Drive 1 Follow the procedures in Before You Begin on page 101 2 Remove the computer cover see Removing the Computer Cover on page 103 3 Remove the bezel see Removing the Bezel on page 123 4 If you are installing a new floppy drive rather than replacing a drive align the tip of a Phillips screwdriver with the slot on the break away metal plate and ...

Страница 137: ...Y on the system board see System Board Components on page 106 and route the cable through the clip on the shroud 10 Check all cable connections and fold cables out of the way to avoid blocking airflow between the fan and cooling vents 11 Replace the bezel see Replacing the Bezel on page 125 1 floppy drive 2 data cable 3 power cable 4 system board connector 5 screws 2 6 screw holes in the floppy dr...

Страница 138: ... computer and devices to their electrical outlets and turn them on See the documentation that came with the drive for instructions on installing any software required for drive operation 14 Enter system setup see System Setup on page 174 and select the appropriate Diskette Drive option 15 Verify that your computer works correctly by running the Dell Diagnostics see Dell Diagnostics on page 86 Remo...

Страница 139: ...lacing the Floppy Drive Panel Insert Align the drive panel insert along the edges of the empty slot for the floppy drive and push the panel insert The drive panel insert is locked in place NOTE To comply with FCC regulations it is recommended that you replace the drive panel insert whenever the floppy drive is removed from the computer 1 drive panel insert optional 2 back of the computer 2 1 ...

Страница 140: ...hock always unplug your computer from the electrical outlet before removing the cover Removing a Media Card Reader 1 Follow the procedures in Before You Begin on page 101 2 Remove the computer cover see Removing the Computer Cover on page 103 3 Remove the bezel see Removing the Bezel on page 123 1 Media Card Reader 2 data cable 3 power cable 4 system board connector 5 screws 2 1 2 4 3 5 Not presen...

Страница 141: ...stalling a Media Card Reader 1 Follow the procedures in Before You Begin on page 101 2 Remove the computer cover see Removing the Computer Cover on page 103 3 Remove the bezel see Removing the Bezel on page 123 4 If this is a new card reader installation Remove the drive panel insert see Removing the FlexBay Break Away Metal Plate on page 138 Remove the Media Card Reader from its packaging 5 Gentl...

Страница 142: ...he computer cover see Replacing the Computer Cover on page 166 11 Connect your computer and devices to electrical outlets and then turn them on 1 Media Card Reader 2 data cable 3 power cable 4 system board connector 5 screws 2 6 screw holes in the FlexBay slot 2 1 Not present on all computers 2 4 3 5 6 ...

Страница 143: ...g your computer from the electrical outlet before removing the cover Removing an Optical Drive 1 Follow the procedures in Before You Begin on page 101 2 Remove the computer cover see Removing the Computer Cover on page 103 3 Remove the bezel see Removing the Bezel on page 123 4 Disconnect the optical drive data cable from the system board connector 5 Disconnect the power cable and the optical driv...

Страница 144: ...144 Removing and Installing Parts 1 optical drive 2 data cable 3 power cable 4 system board connector 5 screws 2 1 2 4 3 5 ...

Страница 145: ...ectrical outlets and then turn them on 12 Configure the drives in system setup see Entering System Setup on page 174 Installing an Optical Drive 1 Follow the procedures in Before You Begin on page 101 2 Remove the computer cover see Removing the Computer Cover on page 103 3 Remove the bezel see Removing the Bezel on page 123 4 Gently slide the drive into place 5 Align the screw holes in the optica...

Страница 146: ...plug the cable into the network device and then plug it into the computer 11 Connect your computer and devices to their electrical outlets and turn them on See the documentation that came with the drive for instructions on installing any software required for drive operation 1 optical drive 2 data cable 3 power cable 4 system board connector 5 screw holes in the optical drive bay 2 6 screws 2 1 2 ...

Страница 147: ... Removing the Computer Cover on page 103 3 Remove the bezel see Removing the Bezel on page 123 4 Align the tip of a Phillips screwdriver with the slot on the break away metal plate and rotate the screwdriver outwards to break the metal plate 5 Gently slide the drive into place 6 Align the screw holes in the optical drive with the screw holes in the optical drive bay 7 Replace and tighten the two s...

Страница 148: ...he optical drive 12 Replace the bezel see Replacing the Bezel on page 125 13 Replace the computer cover see Replacing the Computer Cover on page 166 NOTICE To connect a network cable first plug the cable into the network device and then plug it into the computer 1 optical drive 2 second optical drive 3 data cable 4 power cable 5 system board connector 6 screw holes in the optical drive bay 2 1 2 3...

Страница 149: ... instructions on installing any software required for drive operation 15 Enter system setup see System Setup on page 174 and select the appropriate Drive option 16 Verify that your computer works correctly by running the Dell Diagnostics see Dell Diagnostics on page 86 Replacing the Optical Drive Panel Insert 1 drive panel insert optional 2 back of the computer 2 1 ...

Страница 150: ...omputer configuration date and time information The battery can last several years If you have to repeatedly reset time and date information after turning on the computer replace the battery CAUTION A new battery can explode if it is incorrectly installed Replace the battery only with the same or equivalent type recommended by the manufacturer Discard used batteries according to the manufacturer s...

Страница 151: ... the low battery and other errors associated with the battery replacement in the Event Log 10 Properly dispose of the old battery See the Product Information Guide for battery disposal information Power Supply CAUTION Before you begin any of the procedures in this section follow the safety instructions located in the Product Information Guide NOTICE To prevent static damage to components inside yo...

Страница 152: ...ower cables underneath the tabs in the computer chassis as you remove them from the system board and drives You must route these cables properly when you replace them to prevent them from being pinched or crimped 4 Remove the hard drive cable optical drive data cable front panel ribbon cable and any other cables from the securing clip on the side of the power supply 5 Remove the four screws that a...

Страница 153: ...ure they are secure 11 Replace the computer cover see Replacing the Computer Cover on page 166 12 Connect your computer and devices to an electrical outlet and turn them on 13 Verify that the computer works correctly by running the Dell Diagnostics see Dell Diagnostics on page 86 I O Panel CAUTION Before you begin any of the procedures in this section follow the safety instructions in the Product ...

Страница 154: ... Cover on page 103 3 Remove the bezel see Removing the Bezel on page 123 NOTICE When sliding the I O panel out of the computer be extremely careful Carelessness may result in damage to the cable connectors and the cable routing clips 4 Disconnect all the cables that are connected to the I O panel from the system board 5 Remove the screw that secures the I O panel 6 Carefully remove the I O panel f...

Страница 155: ...ning the Dell Diagnostics see Dell Diagnostics on page 86 Processor Fan CAUTION Before you begin any of the procedures in this section follow the safety instructions in the Product Information Guide CAUTION To guard against electrical shock always unplug your computer from the electrical outlet before opening the cover CAUTION The heat sink assembly power supply and other components may be very ho...

Страница 156: ...3 3 Disconnect the processor fan cable from the system board see System Board Components on page 106 4 Carefully move away any cables that are routed over the processor fan heat sink assembly 5 Loosen the four captive screws securing the processor fan heat sink assembly and lift it straight up CAUTION Despite having a plastic shield the heat sink fan assembly may be very hot during normal operatio...

Страница 157: ...e captive screws on the processor fan heat sink assembly to the four metal screwhole projections on the system board NOTE The processor fan heat sink assembly in your computer may vary from the one shown in the illustration above 2 Tighten the four captive screws NOTE Ensure that the processor fan heat sink assembly is correctly seated and secure 3 Connect the processor fan heat sink assembly cabl...

Страница 158: ...puter cover see Removing the Computer Cover on page 103 CAUTION Despite having a plastic shield the heat sink assembly may be very hot during normal operation Be sure that it has had sufficient time to cool before you touch it 3 Remove the processor fan heat sink assembly from the computer see Removing the Processor Fan Heat Sink Assembly on page 156 NOTICE Unless a new heat sink is required for t...

Страница 159: ...he pins in the socket 5 Gently remove the processor from the socket Leave the release lever extended in the release position so that the socket is ready for the new processor Installing the Processor NOTICE Ground yourself by touching an unpainted metal surface on the back of the computer 1 processor cover 2 processor 3 socket 4 release lever 1 2 3 4 ...

Страница 160: ...ed move it to that position 4 Orient the front and rear alignment notches on the processor with the front and rear alignment notches on the socket 5 Align the pin 1 corners of the processor and socket NOTICE To avoid damage ensure that the processor aligns properly with the socket and do not use excessive force when you install the processor 6 Set the processor lightly in the socket and ensure tha...

Страница 161: ...grease to the top of the processor 11 Install the processor fan heat sink assembly see Installing the Processor Fan Heat Sink Assembly on page 157 NOTICE Ensure that the processor fan heat sink assembly is correctly seated and secure 12 Replace the computer cover see Replacing the Computer Cover on page 166 1 processor cover 2 tab 3 processor 4 processor socket 5 center cover latch 6 release lever...

Страница 162: ...e very hot during normal operation Be sure that they have had sufficient time to cool before you touch them NOTICE To prevent static damage to components inside your computer discharge static electricity from your body before you touch any of your computer s electronic components You can do so by touching an unpainted metal surface on the computer chassis Removing the Chassis Fan NOTICE Do not tou...

Страница 163: ...the chassis fan towards the front of the computer and lift it up Replacing the Chassis Fan 1 Follow the procedures in Before You Begin on page 101 2 Remove the computer cover see Removing the Computer Cover on page 103 3 Slide the chassis fan in place towards the back of the computer 4 Tighten the four screws to secure the chassis fan 1 screws 4 2 chassis fan 2 1 ...

Страница 164: ...ity that could harm internal components 1 Follow the procedures in Before You Begin on page 101 2 Remove the computer cover see Removing the Computer Cover on page 103 3 Remove any add in cards on the system board see Cards on page 115 4 Remove the processor and heat sink assembly see Removing the Processor Fan Heat Sink Assembly on page 156 5 Remove the memory modules see Removing Memory on page ...

Страница 165: ...ust removed next to the replacement system board to compare and ensure they are identical Installing the System Board 1 Gently align the board into the chassis and slide it toward the back of the computer 2 Using the eight screws secure the system board to the chassis 1 screws 8 2 system board 1 2 ...

Страница 166: ...m on 9 Verify that the computer works correctly by running the Dell Diagnostics see Dell Diagnostics on page 86 Replacing the Computer Cover CAUTION Before you begin any of the procedures in this section follow the safety instructions located in the Product Information Guide 1 Ensure that all cables are connected and fold cables out of the way 2 Ensure that no tools or extra parts are left inside ...

Страница 167: ...connect a network cable first plug the cable into the network device and then plug it into the computer NOTICE Ensure that none of the system air vents are blocked Blocking them can cause serious thermal problems 1 computer cover tab 2 slot 3 computer cover 4 front of the computer 4 3 1 2 ...

Страница 168: ...168 Removing and Installing Parts ...

Страница 169: ...et associative writeback SRAM Memory Type 667 MHz 800 MHz DDR2 SDRAM Memory connectors four Memory capacities 512 MB 1 GB or 2 GB Minimum memory 512 MB Maximum memory 4 GB Computer Information Chipset ICH9 and Intel G33 RAID Support RAID 1 Mirroring DMA channels seven Interrupt levels 24 BIOS chip NVRAM 16 Mb NIC Integrated network interface capable of 10 100 communication Video Type Intel integra...

Страница 170: ...6 slot bidirectional speed 8GB s SATA 1 5 Gbps and 3 0 Gbps USB 480 Mbps high speed 12 Mbps full speed 1 2 Mbps low speed PCI connectors two connector size 124 pins connector data width maximum 32 bits PCI Express connector one x1 connector size 36 pins connector data width maximum 1 PCI Express lane PCI Express connector one x16 connector size 164 pins connector data width maximum 16 PCI Express ...

Страница 171: ...or Network adapter RJ 45 connector USB four front panel and four back panel USB 2 0 compliant connectors Audio six connectors for 7 1 support System board connectors Serial ATA four 7 pin connectors Internal USB device two 10 pin connector supports four USB ports Floppy drive one 34 pin connector Processor fan one 4 pin connector Chassis fan one 3 pin connector PCI 2 3 two 124 pin connectors PCI E...

Страница 172: ... be a system board or a power supply problem see Power Problems on page 74 Drive activity light blue light A blinking blue light indicates the computer is reading data from or writing data to the SATA hard drive or CD DVD Rear of computer Link integrity light on integrated network adapter green light A good connection exists between the network and the computer off no light The computer is not det...

Страница 173: ...nvironmental Temperature Operating 10 to 35 C 50 to 95 F Storage 40 to 65 C 40 to 149 F Relative humidity 20 to 80 noncondensing Maximum vibration Operating 5 to 350 Hz at 0 0002 G2 Hz Storage 5 to 500 Hz at 0 001 to 0 01 G2 Hz Maximum shock Operating 40 G 5 with pulse duration of 2 msec 10 equivalent to 20 in sec 51 cm sec Storage 105 G 5 with pulse duration of 2 msec 10 equivalent to 50 in sec 1...

Страница 174: ...n or restart your computer 2 When the blue DELL logo is displayed you must watch for the F2 prompt to appear 3 Once this F2 prompt appears press F2 immediately NOTE The F2 prompt indicates that the keyboard has initialized This prompt can appear very quickly so you must watch for it to display and then press F2 If you press F2 before you are prompted this keystroke will be lost 4 If you wait too l...

Страница 175: ...keys As an option is highlighted the Option Field displays more information about that option and the option s current and available settings Option Field This field contains information about each option In this field you can view your current settings and make changes to your settings Use the right and left arrow keys to highlight an option Press Enter to make that selection active Key Functions...

Страница 176: ...e dual or single and type of memory installed Standard CMOS Features Date Time Displays current date and time settings Date mm dd yy SATA Info Displays the SATA drives integrated in the system SATA 0 SATA 1 SATA 2 SATA 3 SATA 4 SATA 5 SATA HDD Auto Detection Auto detects the SATA connector to which the hard drive is attached Capacity The combined installed capacity of all the SATA devices Drive A ...

Страница 177: ... CDROM Legacy LAN Disabled Hard disk by default Third Boot Device Removable Hard Disk CDROM USB CDROM Legacy LAN Disabled CD ROM by default Boot Other Device Enabled Disabled Disabled by default Advanced Chipset Features Init Display First PCI Slot Onboard PCIEx PCI Slot by default Video Memory Size 1 MB 8 MB 8 MB by default DVMT Mode FIXED DVMT DVMT by default DVMT FIXED Memory Size 128 MB 256 MB...

Страница 178: ... the computer generates an error message CD Drive The computer attempts to boot from the CD drive If no CD is in the drive or if the CD has no operating system the computer generates an error message Onboard LAN Boot ROM Enabled or Disabled Disabled by default SATA Mode IDE RAID AHCI IDE by default Power Management Setup ACPI Suspend Type S1 POS S3 STR S3 STR by default Quick Resume Disabled Enabl...

Страница 179: ...uch as a floppy drive memory key or CD RW drive NOTE If you are booting to a USB floppy drive you must first set the floppy drive to OFF in system setup see page 174 1 If you are booting to a USB device connect the USB device to a USB connector 2 Turn on or restart your computer 3 When F2 Setup F12 Boot Menu appears in the upper right corner of the screen press F12 If you wait too long and the ope...

Страница 180: ...spacebar to enable or disable a device enabled devices have a checkmark 5 Press plus or minus to move a selected device up or down the list Clearing Forgotten Passwords CAUTION Before you begin any of the procedures in this section follow the safety instructions located in the Product Information Guide 1 Follow the procedures in Before You Begin on page 101 2 Remove the computer cover see Removing...

Страница 181: ...Begin on page 101 NOTE The computer must be disconnected from the electrical outlet to clear the CMOS setting 2 Remove the computer cover see Removing the Computer Cover on page 103 3 Reset the current CMOS settings a Locate the 3 pin CMOS jumper CLEAR CMOS on the system board see System Board Components on page 106 b Remove the jumper plug from the CMOS jumper CLEAR CMOS pins 2 and 3 c Place the ...

Страница 182: ...w appears 5 Click Save this program to disk and then click OK The Save In window appears 6 Click the down arrow to view the Save In menu select Desktop and then click Save The file downloads to your desktop 7 Click Close when the Download Complete window appears The file icon appears on your desktop and is titled the same as the download BIOS update file 8 Double click the file icon on the desktop...

Страница 183: ...ft cleaning cloth moistened with a solution of three parts water and one part dishwashing detergent NOTICE Do not soak the cloth or let water drip inside your computer or keyboard Mouse If your screen cursor skips or moves abnormally clean the mouse To clean a non optical mouse 1 Turn the retainer ring on the underside of your mouse counterclockwise and then remove the ball 2 Wipe the ball with a ...

Страница 184: ...ed side in a straight line from the center to the outer edge of the disc For stubborn dirt try using water or a diluted solution of water and mild soap You can also purchase commercial products that clean discs and provide some protection from dust fingerprints and scratches Cleaning products for CDs are safe to use on DVDs Dell Technical Support Policy U S Only Technician assisted technical suppo...

Страница 185: ... of the software programs that are installed on the computer during the manufacturing process Microsoft Office Norton Antivirus and so on Dell installed peripherals include any internal expansion cards or Dell branded module bay or PC Card accessories In addition any Dell branded monitors keyboards mice speakers microphones for telephonic modems docking stations port replicators networking product...

Страница 186: ... television reception which can be determined by turning the equipment off and on you are encouraged to try to correct the interference by one or more of the following measures Reorient the receiving antenna Relocate the system with respect to the receiver Move the system away from the receiver Plug the system into a different outlet so that the system and the receiver are on different branch circ...

Страница 187: ...pport and service options Availability varies by country and product and some services may not be available in your area To contact Dell for sales technical support or customer service issues 1 Visit support dell com 2 Verify your country or region in the Choose A Country Region drop down menu at the bottom of the page 3 Click Contact Us on the left side of the page 4 Select the appropriate servic...

Страница 188: ...188 Appendix ...

Страница 189: ...e video circuitry and the computer memory AHCI Advanced Host Controller Interface An interface for a SATA hard drive Host Controller which allows the storage driver to enable technologies such as Native Command Queuing NCQ and hot plug ALS ambient light sensor A feature that helps to control display brightness antivirus software A program designed to identify quarantine and or delete viruses from ...

Страница 190: ...its per second The standard unit for measuring data transmission speed BTU British thermal unit A measurement of heat output bus A communication pathway between the components in your computer bus speed The speed given in MHz that indicates how fast a bus can transfer information byte The basic data unit used by your computer A byte is usually equal to 8 bits C C Celsius A temperature measurement ...

Страница 191: ...ndows alpha numeric code located on a sticker on your computer Also referred to as the Product Key or Product ID Control Panel A Windows utility that allows you to modify operating system and hardware settings such as display settings controller A chip that controls the transfer of data between the processor and memory or between the processor and devices CRIMM continuity rambus in line memory mod...

Страница 192: ...mon rules and procedures for use by a specific group of users A user logs on to the domain to gain access to the resources DRAM dynamic random access memory Memory that stores information in integrated circuits containing capacitors driver Software that allows the operating system to control a device such as a printer Many devices do not work properly if the correct driver is not installed in the ...

Страница 193: ...ricity ESD can damage integrated circuits found in computer and communications equipment expansion card A circuit board that installs in an expansion slot on the system board in some computers expanding the capabilities of the computer Examples include video modem and sound cards expansion slot A connector on the system board in some computers where you insert an expansion card connecting it to th...

Страница 194: ...or disk for file storage When a drive or disk is formatted the existing information on it is lost FSB front side bus The data path and physical interface between the processor and RAM FTP file transfer protocol A standard Internet protocol used to exchange files between computers connected to the Internet G G gravity A measurement of weight and force GB gigabyte A measurement of data storage that ...

Страница 195: ...hertz MHz gigahertz GHz or terahertz THz I IC integrated circuit A semiconductor wafer or chip on which thousands or millions of tiny electronic components are fabricated for use in computer audio and video equipment IDE integrated device electronics An interface for mass storage devices in which the controller is integrated into the hard drive or CD drive IEEE 1394 Institute of Electrical and Ele...

Страница 196: ...ement of the capacity of memory integrated circuits KB kilobyte A unit of data that equals 1024 bytes but is often referred to as 1000 bytes key combination A command requiring you to press multiple keys at the same time kHz kilohertz A measurement of frequency that equals 1000 Hz L LAN local area network A computer network covering a small area A LAN usually is confined to a building or a few nea...

Страница 197: ...s used as a synonym for RAM memory address A specific location where data is temporarily stored in RAM memory mapping The process by which the computer assigns memory addresses to physical locations at start up Devices and software can then identify information that the processor can access memory module A small circuit board containing memory chips which connects to the system board MHz megahertz...

Страница 198: ...that stores data when the computer is turned off or loses its external power source NVRAM is used for maintaining computer configuration information such as date time and other system setup options that you can set O optical drive A drive that uses optical technology to read or write data from CDs DVDs or DVD RWs Example of optical drives include CD drives DVD drives CD RW drives and CD RW DVD com...

Страница 199: ...mpliant POST power on self test Diagnostics programs loaded automatically by the BIOS that perform basic tests on the major computer components such as memory hard drives and video If no problems are detected during POST the computer continues the start up processor A computer chip that interprets and executes program instructions Sometimes the processor is referred to as the CPU central processin...

Страница 200: ...d programs that cannot be deleted or written to by the computer ROM unlike RAM retains its contents after you shut down your computer Some programs essential to the operation of your computer reside in ROM RPM revolutions per minute The number of rotations that occur per minute Hard drive speed is often measured in rpm RTC real time clock Battery powered clock on the system board that keeps the da...

Страница 201: ...smissions SIM cards can be used in phones or portable computers smart card A card that is embedded with a processor and a memory chip Smart cards can be used to authenticate a user on computers equipped for smart cards S PDIF Sony Philips Digital Interface An audio transfer file format that allows the transfer of audio from one file to another without converting it to and from an analog format whi...

Страница 202: ... what effect the settings have on the computer do not change the settings for this program T TAPI telephony application programming interface Enables Windows programs to operate with a wide variety of telephony devices including voice data fax and video text editor A program used to create and edit files that contain only text for example Windows Notepad uses a text editor Text editors do not usua...

Страница 203: ...raphics array A video standard for video cards and controllers that supports resolutions up to 1600 x 1200 V video controller The circuitry on a video card or on the system board in computers with an integrated video controller that provides the video capabilities in combination with the monitor for your computer video memory Memory that consists of memory chips dedicated to video functions Video ...

Страница 204: ...l Panel You can also scan in your favorite picture and make it wallpaper WLAN wireless local area network A series of interconnected computers that communicate with each other over the air waves using access points or wireless routers to provide Internet access write protected Files or media that cannot be changed Use write protection when you want to protect data from being changed or destroyed T...

Страница 205: ...ial kind of zipped file is a self extracting file which has a filename extension of exe You can unzip a self extracting file by double clicking it Zip drive A high capacity floppy drive developed by Iomega Corporation that uses 3 5 inch removable disks called Zip disks Zip disks are slightly larger than regular floppy disks about twice as thick and hold up to 100 MB of data ...

Страница 206: ...206 Glossary ...

Страница 207: ...s 115 types supported 115 CD RW drive problems 61 CDs 28 playing 26 Check Disk 62 CMOS settings clearing 181 computer beep codes 82 components inside 105 crashes 67 68 inside view 105 stops responding 67 conflicts software and hardware incompatibilities 100 contacting Dell 187 copying CDs general information 28 helpful tips 30 how to 28 copying DVDs general information 28 helpful tips 30 how to 28...

Страница 208: ...talling 90 Drivers and Utilities media 91 Dell Diagnostics 86 drives 126 hard drive 128 installing floppy 136 installing hard drive 130 drives continued installing optical 145 147 problems 60 removing floppy 134 removing hard drive 129 removing optical 143 second hard drive 132 serial ATA 128 DVD drive problems 61 DVDs 28 playing 26 E e mail problems 62 End User License Agreement 11 ergonomics inf...

Страница 209: ...e mode 36 38 40 I I O panel replacing 155 installing parts before you begin 101 recommended tools 101 turning off your computer 102 Internet problems 62 Internet connection about 55 options 55 setting up 56 IRQ conflicts 100 K keyboard problems 66 L labels Microsoft Windows 12 Service Tag 12 15 M Media Card Reader installing 140 141 problems 70 removing 140 using 31 memory installing 113 problems ...

Страница 210: ...ystem media 98 reinstalling Windows Vista 94 optical drive installing 145 147 problems 61 removing 143 P password clearing 180 jumper 180 PC Restore 95 PCI cards installing 116 removing 121 phone numbers 187 playing CDs and DVDs 26 power button 17 hibernate mode 36 38 40 options 37 options advanced 41 options schemes 37 plan 40 problems 74 standby mode 35 39 power light conditions 74 power options...

Страница 211: ...m crashes 67 program stops responding 67 programs and Windows compatibility 68 restore to previous state 94 scanner 76 screen is blank 79 screen is hard to read 80 software 67 69 problems continued sound and speakers 77 technical support policy 184 troubleshooting tips 59 volume adjusting 78 Product Information Guide 11 Program Compatibility Wizard 68 R regulatory information 11 reinstalling Windo...

Страница 212: ...rs and Utilities CD 87 Starting the Dell Diagnostics From Your Hard Drive 86 support contacting Dell 187 policy 184 support website 13 system board 106 System Restore 94 system setup about 174 entering 174 options 176 screens 174 T technical support policy 184 telephone numbers 187 transferring information to a new computer 49 troubleshooting conflicts 100 Dell Diagnostics 86 Hardware Troubleshoot...

Страница 213: ...indows Vista Device Driver Rollback 90 91 Factory Image Restore 95 Program Compatibility Wizard 68 reinstalling 94 scanner 77 System Restore 94 Windows XP Device Driver Rollback 91 hibernate mode 36 PC Restore 95 standby mode 35 wizards Files and Settings Transfer Wizard 49 Network Setup Wizard 54 Program Compatibility Wizard 68 ...

Страница 214: ...214 Index ...

Отзывы: