3.
Remove all SCSI hard drives. See "
Removing a SCSI Hard Drive
" in "Installing Drives."
4.
Remove the optical drive/diskette drive carrier.
To remove the drive carrier, pull the release latch forward, then slide the carrier out of the chassis. See
Figure 7
-3
.
5.
Remove the cooling shroud. See "
Removing the Cooling Shroud
" in "Installing System Components."
6.
Remove the processor filler blanks or heat sinks from processors 2 and 4. See "
Removing a Processor
" in "Installing System Components."
7.
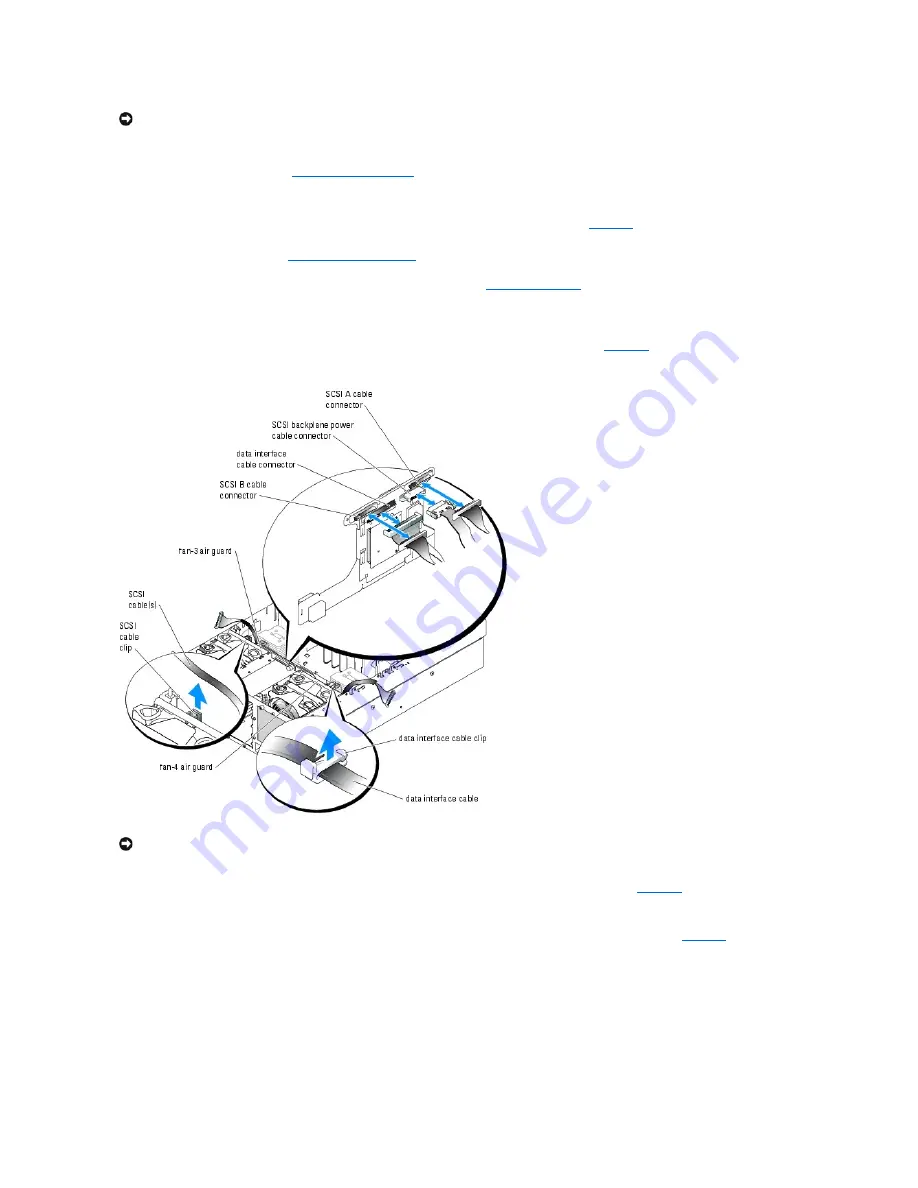
Disconnect the SCSI, data interface, and power cables from the back of the SCSI backplane.
For improved access, remove the SCSI cable(s) from the clip that is attached to the fan-3 air guard and move the cable(s) away from the backplane; lift
up the data interface cable clip from the fan-4 air guard and move the cable away from the backplane. See
Figure C
-3
.
Figure C-3. Removing and Installing SCSI Backplane Cables
8.
Disconnect the control-panel cable from the control-panel cable connector on the front of the SCSI backplane. See
Figure C
-4
.
9.
Remove the SCSI backplane:
a.
Pull the spring-loaded blue retention pin away from the front of the backplane, then slide the backplane upward. See
Figure C
-4
.
b.
When the backplane cannot slide upward any farther, pull the backplane toward the back of the system to remove it from the retention hooks.
c.
Lift the board out of the system, being careful to avoid damaging components on the face of the board.
d.
Place the SCSI backplane face down on a work surface.
Figure C-4. Removing and Installing the SCSI Backplane
NOTICE:
To prevent damage to the drives and backplane, you must remove the SCSI drives and diskette/optical drive carrier from the system before
removing the backplane. You must note the number of each hard drive and temporarily label them before removal so that you can replace them in the
same locations.
NOTICE:
When disconnecting the control-panel cable, hold the white pull-tab next to the control-panel cable connector to prevent damage to the SCSI
backplane or the cable itself.
Содержание PowerEdge 6850
Страница 37: ...Back to Contents Page ...


