49
8. How to Assign the Pre-saved Virtual Scene/Logo to the Input Channel by
the VGB-2000
It is necessary for users to assign the pre-saved virtual scene and Logo to the specific input channel
before using the SE-1200MU’s User2, User3, User5 and User8 presets which are integrated in the
VGB-2000.
1. Please select an input channel from the Preset button row for showing the pre-saved still images.
The screen of the selected input channel will be shown on the MULTIVIEW preview window. Please do
not worry if there is no image which is shown on the window at this time.
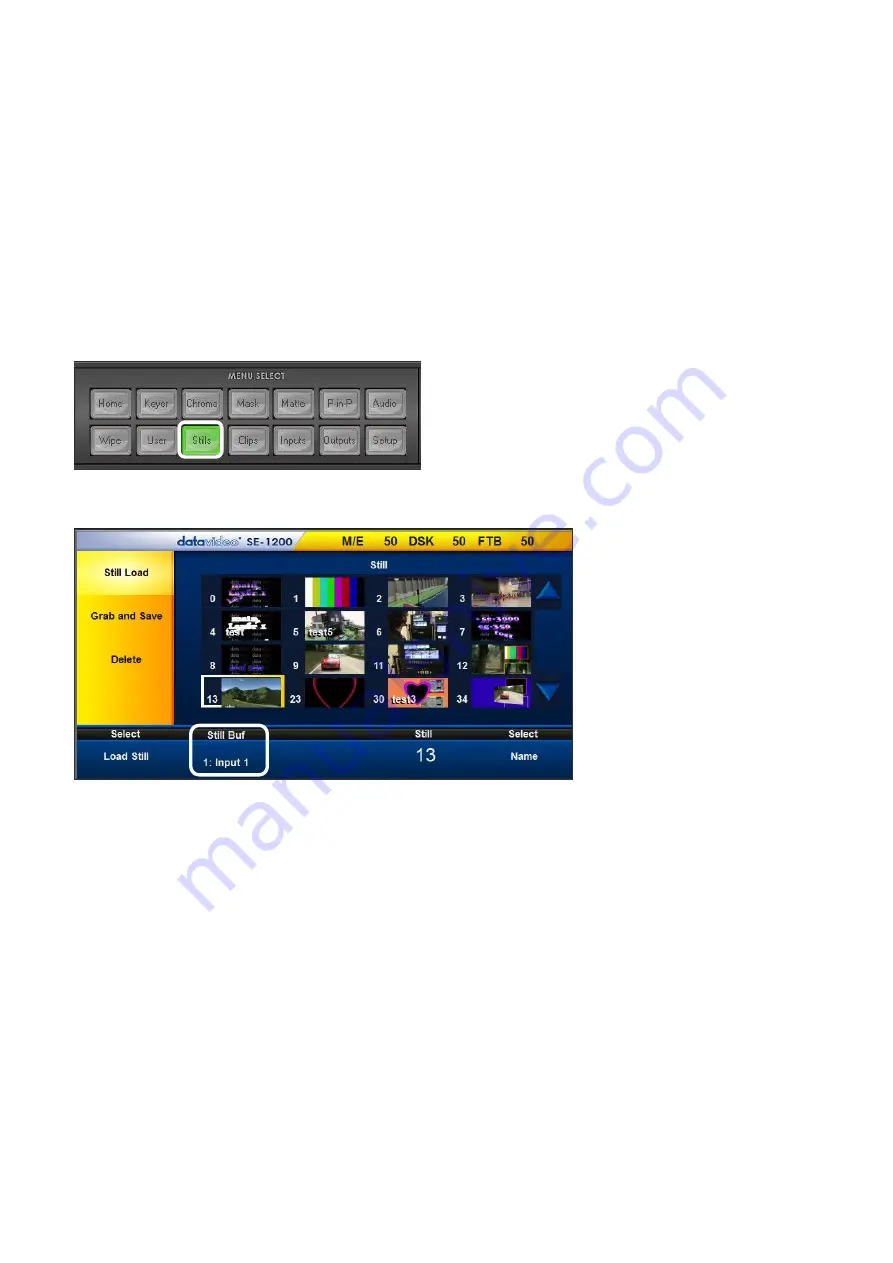
2. Please select the Stills button from the MENU SELECT panel.
3. Please select the Still Load from the vertical yellow column which is located on the left side.
4. Please modify the Still Buf option to the input channel that is desired for showing the still image. In
the VGB-2000 operation, the Logo image must be assigned to the input 5 channel of the SE-1200MU
(SWITCHER HDMI IN(CAM1)
)
. The virtual scene image must be assigned to the SDI 3 and the SDI 4
interfaces (CAMERA 3 & CAMERA 4 interfaces which are located on the rear panel of the VGB-2000).
5. Now select the required saved still within the stills matrix. Use the up and down triangle buttons
on the right to scroll through the matrix if necessary. Empty memory points will appear as blue
thumbnail boxes without a number. Alternatively enter the Still value and then click Load Still.
The input channel will now display only the selected still image. To change the still to another repeat
step 5.
Содержание VGB-2000
Страница 1: ...VGB 2000 Instruction Manual...
Страница 7: ...7 1 2 System Diagram 2 Channel Pro Presentation System VGB 2000...
Страница 26: ...26 LBK 1 Look Back Kit Exploded View...
Страница 27: ...27 LBK1 1 1 Main Support Exploded View...
Страница 28: ...28 LBK1 1 2 22 Monitor and LCD Display Mount...
Страница 29: ...29 LBK1 1 3 22 Glass Frame Module and Hood Support Wire...
Страница 30: ...30 LBK1 2 Exploded View of Main Support Glass Frame LCD Display and Tripod...
Страница 31: ...31 LBK1 3 Look Back Kit Assembly...
Страница 71: ...71 Close Up with Chromakey Slides Close Up Interactive Pen Mark...
Страница 72: ...72 Wide Shot Interactive Pen Mark Logo Interactive Pen Mark Logo...
Страница 73: ...73 Dual Camera Effects Interactive Pen Mark Close Up Interactive Pen Mark...
Страница 74: ...74 Wide Angle with Chromakey Interactive Pen Mark Wide Shot Interactive Pen Mark Logo...
Страница 75: ...75 Interactive Pen Mark Logo Close Up with Chromakey...
Страница 76: ...76 Wide Angle with Chromakey...
Страница 79: ...79 14 Dimensions...
Страница 80: ...80 Unit mm...
Страница 83: ...83 Note...


